Back to School Baggies

My daughter just started preschool at the end of last school cycle and she loves it. She loves having a backpack and a packed lunch. I have very fond memories of the little notes my mom would leave for me in my lunch box. Since my daughter’s only 4 and can’t read, for awhile I was having a ton of fun decorating her lunch bags with Sharpie doodles…

But being a bit of a pseudo-hippie, it bothered me a little, throwing so many bags away every day. I mean, I’m not super hardcore, but when I notice ways I’m being wasteful, I try my best to find ways that might be a little better and aren’t TERRIBLY inconvenient. We used cloth diapers when she was little, we use cloth grocery bags (when we don’t forget to take them into the store), so why not whip up a few quick reuseable bags?
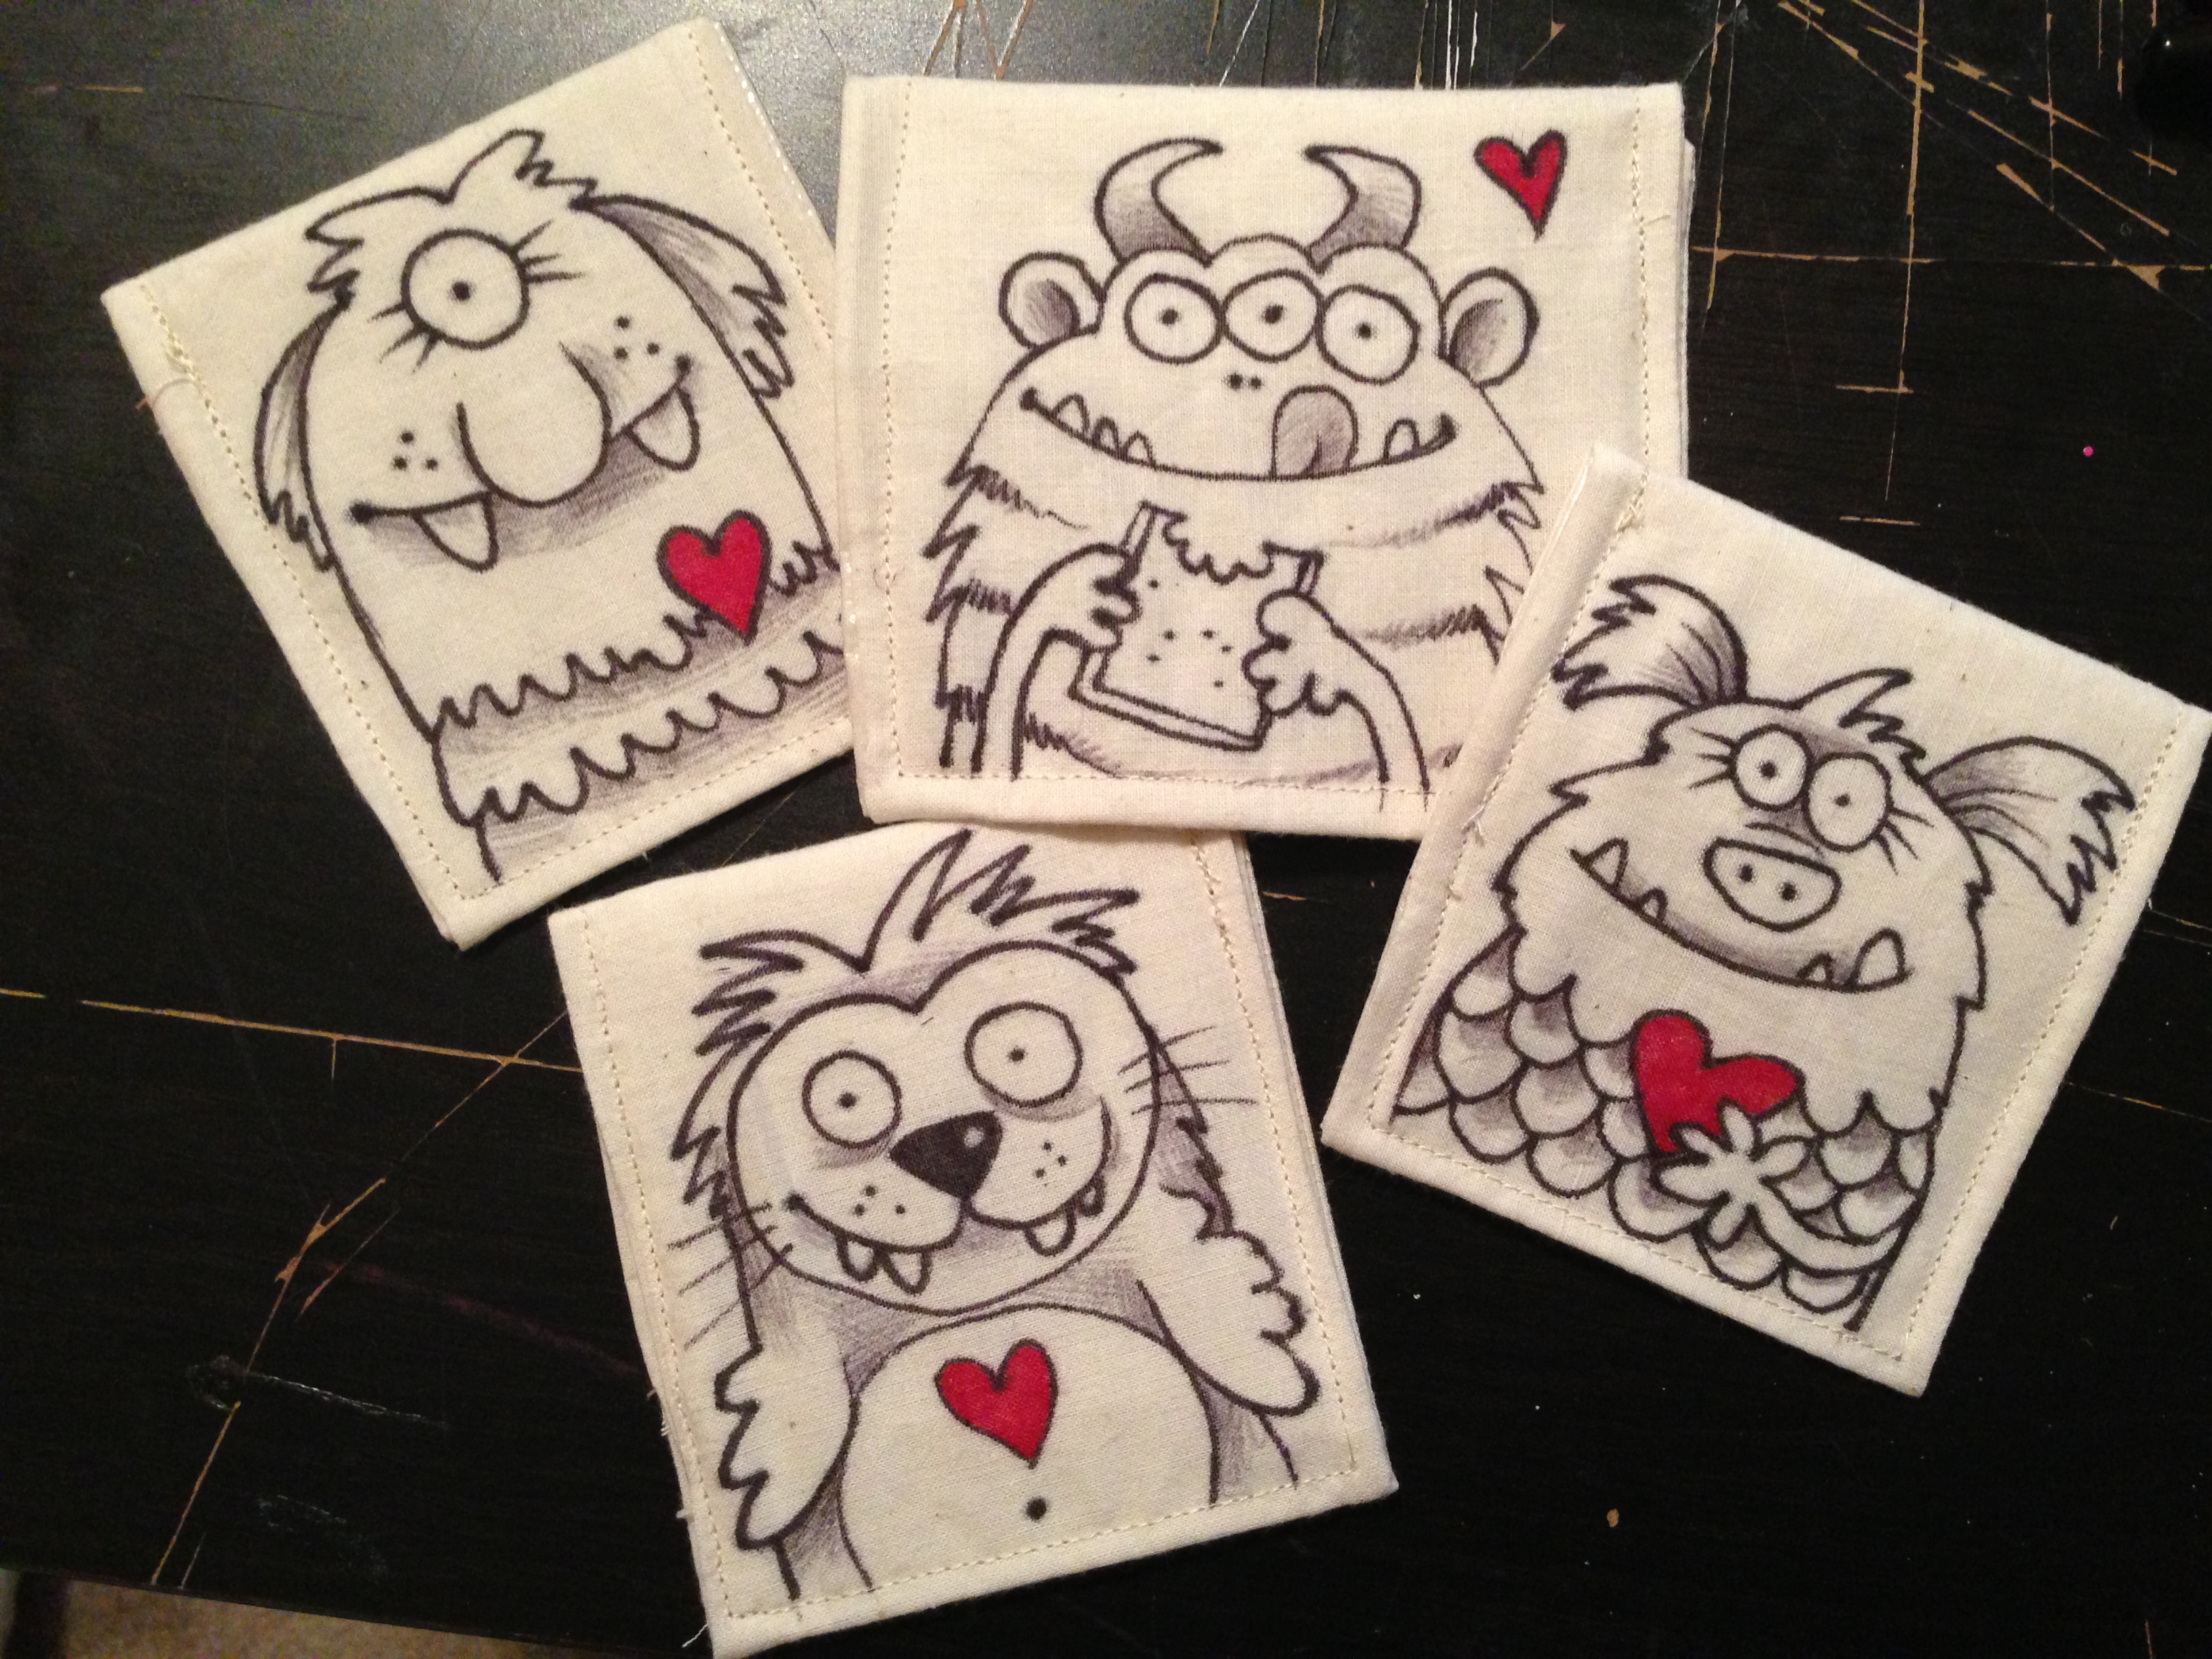
When I looked around online, there were a great many DIY options, several of which seemed quite complicated for an amateur like myself, with zippers and pulltabs and fancy fabric and such….except for one: this tutorial from Rhinestone Beagle. Our local fabric department didn’t have any of the fancy nylons I had seen in some DIYs, but they did have very inexpensive fusible vinyl, which is SUPER easy to use. You iron it on, and boom–whatever you’re making is water resistant. So that was good. Secondly, I’m not good with zippers, but I can sloppily fake some velcro like no one’s business, so score another point for this tutorial. Thirdly, I worried that certain opening fasteners would be difficult for my kid to open at lunchtime, so if I wasn’t fancy enough to put in my own zippers, I wanted one that folded over a bit. And lastly: I felt a little like I was taking the easy way out, not being able to doodle something new with every lunch. (I felt I had to live up to things like this)…I compromised by going with a plain fabric, so I could doodle some monster faces on the bags (with Sharpies, of course. …They should sponsor me).
And there you go! Personalized lunch bags!
Now, in hindsight, they’re a BIT small.
…Okay, they’re tiny. The sizes I had seen online just seemed so HUGE, so I sort of winged it and made them smaller. But I can fit a cookie or two in there, or a couple of small strawberries. But just for giggles, I decided to try a few of the fancy ones. I found a shop on Etsy called Cute Little Bugs, who seemed to have the best quality & the best deal. Zippers, nylon liner, cute fabric, and even a little tag for you to write your kid’s name on it. Super cute. And they’re not tiny at all.

So, as my daughter gets ready for her second year of Pre-K, I think I’m going to have to look into trying again to make some more baggies of my own–this time human-sized. That can fit actual food inside. The point is, I want to make lunch a little special for my kid. And there’s always room for some creativity!
DIY Customized Helmets

When I was in derby, my desire to customize pretty much everything I own found a nice snuggly spot in helmets. Derby girls often decorate their helmets in all kinds of awesome stickers and artwork, so I started making custom helmets for the ladies (and dudes) on my team. My favorite (and the quickest) way to decorate helmets is with paint pens, which you can get at any craft or art store. Get lots of them, because they run out of paint quickly, and sometimes you get duds that don’t work well. Thick point is best–fine-lines pens will take FOREVER. But don’t get those ones with the mega-marker tips, or you won’t be able to get ANY detail in there.
First off, if you’re working with an older helmet, clean off any dirt or residue from the helmet. No sticker goo. Rubbing alcohol works well for this. New helmet, no problem, just wipe it down a little and get started. Glossy helmets work best. You can paint on a matte helmet, just be warned that when you spray it with sealant at the final step, it will most likely turn a little glossy, so if you’ve got your heart set on a matte-looking helmet, you can choose to leave off the final spray…it’ll just not stay on as long and probably need some touch-ups. I usually like to print references to look at while I work, and doodle it on freehand. Sometimes I’ll find a fancy font and print out what I want, and then freehand it using the printout as a reference.

I’ve done lots of helmets this way, using simple color combos, varying shades of paint pens. Sometimes when they get older, pen paint changes color a little, and you can get two shades of the same color (as in the celtic clover above). Often, the person I’m doing it for will give me a rough idea of what they have in mind, but usually they just let me go crazy with ’em. Since skate helmets are around $35, and you have to replace them now & then, it allows players to have options in the helmets they wear. Some will wear certain ones to practice and others to bouts, etc.
If you mess up while you’re painting with the paint pens, you might be able to salvage it with a paper towel soaked in rubbing alcohol. Usually, it’ll wipe away oil-based paint pens pretty easily, and allow you to correct your mistake.

I usually put the players’ name on the right side of the helmet (facing the crowd, in a bout), and the fun design on the left, facing in. Sometimes I’ll put the number on there somewhere (back or side). Some ladies prefer the numbers off….not that it has anything to do with being less visible to the refs or anything. 🙂
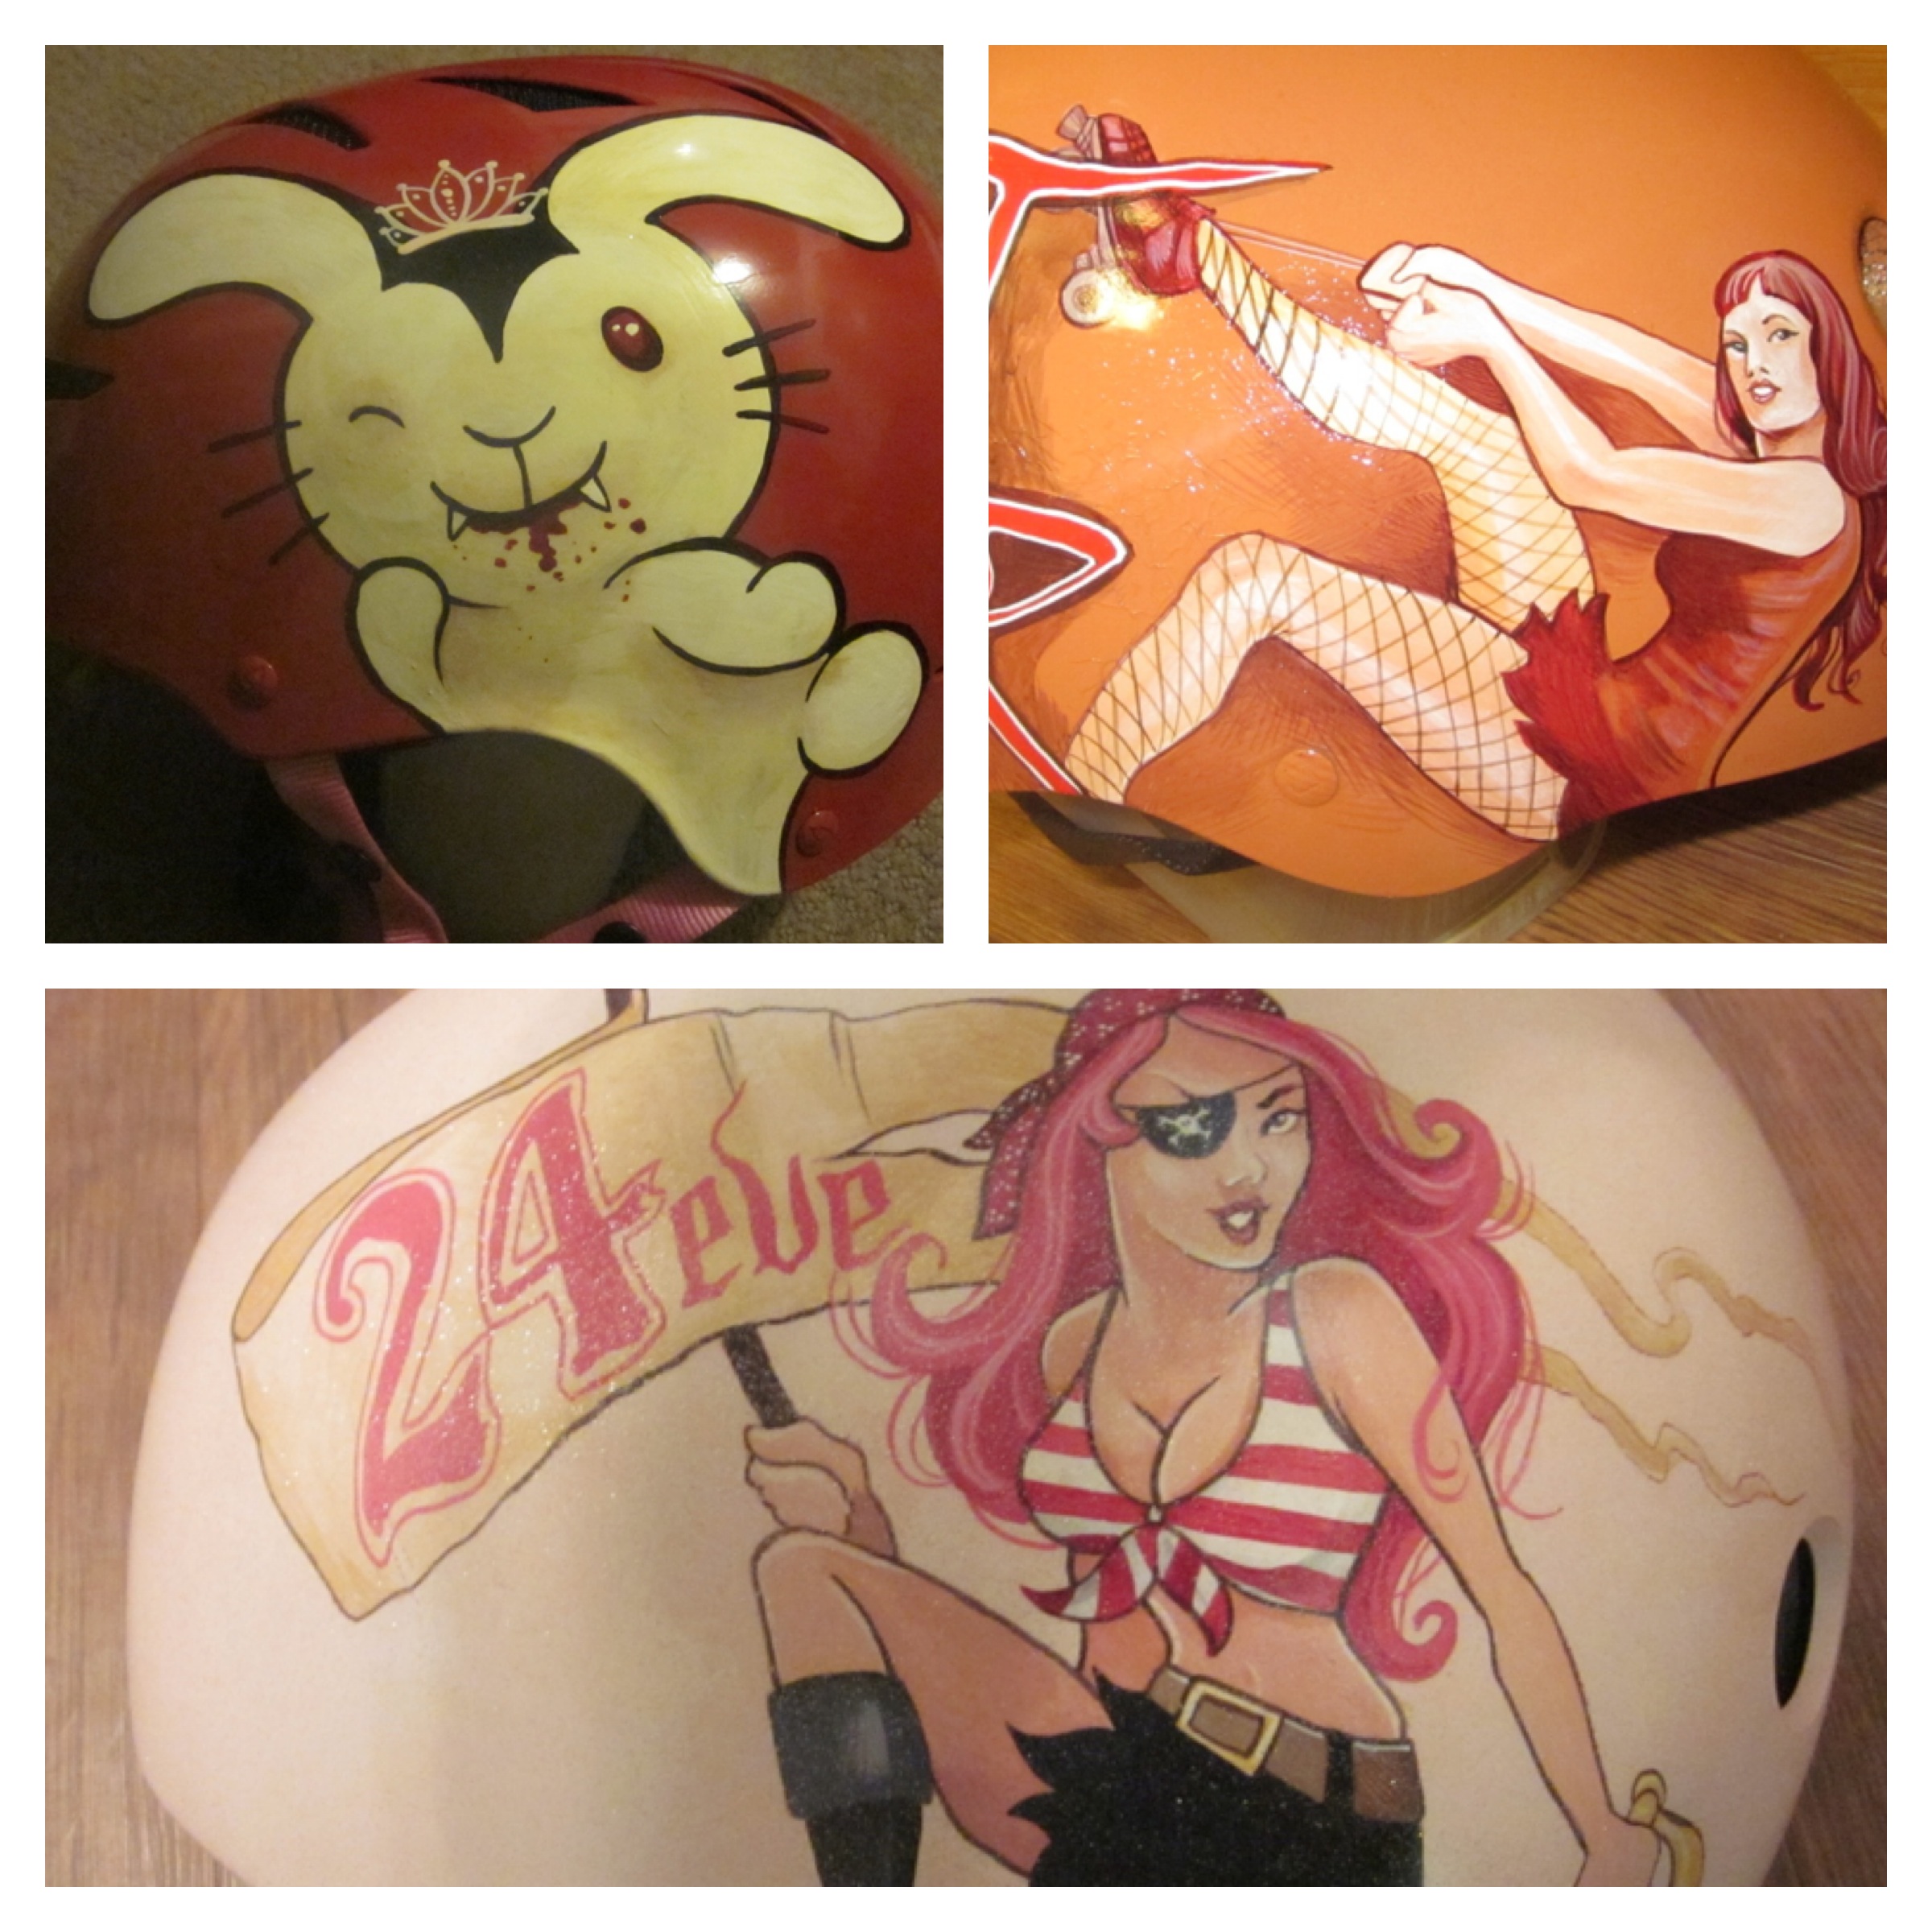
I’ve also handpainted a few helmets, although this requires MUCH more work. I use acrylic paints for them, and go to town. Handpainting allows for much more detail and artistic license, but honestly, is a little too “fine” for derby, which can really bang up a helmet.
Whether you handpaint a helmet or use paint pens, your best bet for durability is to finish it with SEVERAL coats of acrylic gloss varnish, which you can get anywhere that sells spray paint. It’s a clear gloss spray that “seals” the helmet in a coat of varnish to protect it. Be warned: I have had some problems with spray paint underpainting or acrylic handpainting warping and bubbling with some sprays, and I’ve never found a rhyme or reason why (never had a problem spraying over paint pens, though). After you’ve sprayed your helmet evenly and completely, let it dry, then spray it again….and again…and again. Hopefully, that’ll be enough to protect it through at least one bout! But hey–they look good all scratched up, too…. 🙂

