Happy Mom’s Day!
Everything I learned about being a mom I learned from the awesome moms and women around me.
My grandmother LIVED to be a mother, and raised eight children. Her face still glows around kids, and her eyes twinkle when she talks about them.
My own mom followed me along the same creative journeys when I was a kid, watching my little brain work, always doing crafty projects with me, and teaching me the first very basic steps of how to draw. She was there for all the firsts, all the cuts & scrapes, all the tears, all the smiles. Even still, she’s the first one I call when I’ve got a mom issue.
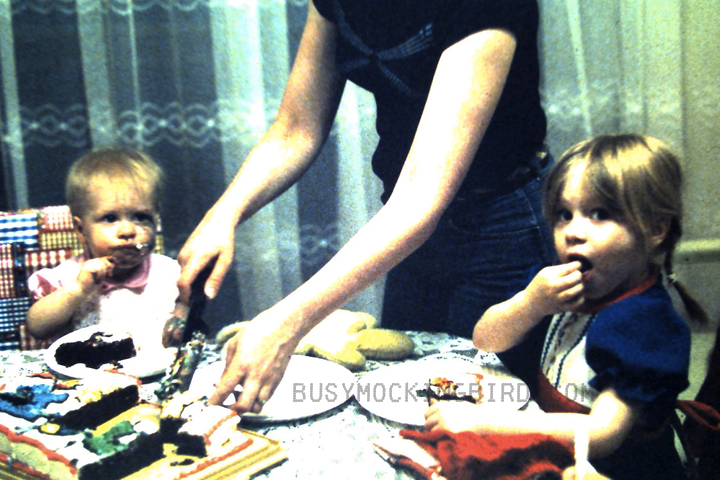
(The photo above is of my mom serving up slices of my little sister’s birthday cake. I still remember VERY clearly standing next to my mom in the kitchen–which probably wasn’t annoying and distracting AT ALL–as she decorated the details in that cake, which we seem to have lovingly demolished in a very short amount of time…)
My younger sister had her kids before I ever even considered one, and has always been an example for me of what an amazing mom is. Working and struggling to make a good life for her girls as best as she can, it hasn’t always been easy. She’s the most amazing at working wonders with what she’s got. And she’s someone I call when I need perspective on what’s normal mom stuff and what I’m blowing out of proportion after spending too much time Googling.
I am lucky enough to have a mother-in-law that is an amazing mom, and is always great at giving advice. She’s like a great friend…who also knows funny stories about my husband from when he was a kid.
I have a sister-in-law who is the mom of a now one-year-old, who has toughed out this first year like a champ, and is well on her way to raising a super smart (and goofy) little girl.
My best friend Christine is an amazing mama with the same sort of “devil-may-care with messes” attitude as me, and I get to tell her all the fun stuff I’ve already gone through…and help her sort through all the stuff she’s Googled.
I have mama friends that I can talk to and share with, bounce ideas off of, gauge if something is “normal” or not, and be inspired by. I have friends that are dog-moms and friends that are not YET moms, and friends that are just amazing, wonderful women. I gauge my mom-abilities against them all to be sure I’m always doing what I think is right.
I have friends who have NO IDEA how awesome and amazing they are.
And the main thing about all of them is their ability to love, despite–and sometimes even BECAUSE of–all of our flaws.
When I was pregnant and worried that I might not be a good mom, my mom said, “If you’re the kind of mother that’s worried if you’ll be a good mother, it means you’re going to be just fine.”
So to all you moms out there, and all you wonderful, inspiring women, I’d just like you to know that whether you know it or not, even if you’re just a passing face in someone’s day, people see you. And you are loved.
Happy mom’s day to all of you!

An Update on Our BOOK!

Oh my goodness.
You know that feeling when you’ve worked on something for SO long and it FINALLY starts coming together?
Well since September of last year when our collaborations post went viral, all I really wanted to do was make a book of our doodles.
When I first ran the Kickstarter, I worried about everything. Because I’m a worrier, and that’s what I do. I worried we wouldn’t make our goal, I worried about what rewards to offer, I worried if I could handle the extra workload with my husband deployed if we DID meet our goal, and I worried that I might make mistakes in the books…and there are a few of you that can attest to my world of worry firsthand.
I am thankful to say that it was not only a great success, but we EXCEEDED our goal enough to print a smaller book of children’s stories from the collaborative animal doodles Myla and I did! And once we met THAT stretch goal, we made enough to give every one of the mailed backers an exclusive lemur print. Because….LEMURS.
So once it was over, I kicked into gear, having my good buddy at Cartozia Tales painstakingly proof both books (’cause he’s good at that sort of thing). I worked closely with the printer on page formats, layouts, saving files, uploads, downloads, around loads, changes and revisions, and all kinds of good and exhausting stuff. (I’m sure that stuff is a piece of cake when you go through a publisher–They probably have scores of people that scour each document for errors, and layout, and all that good stuff, but doing it yourself means it’s ALL up to you.)
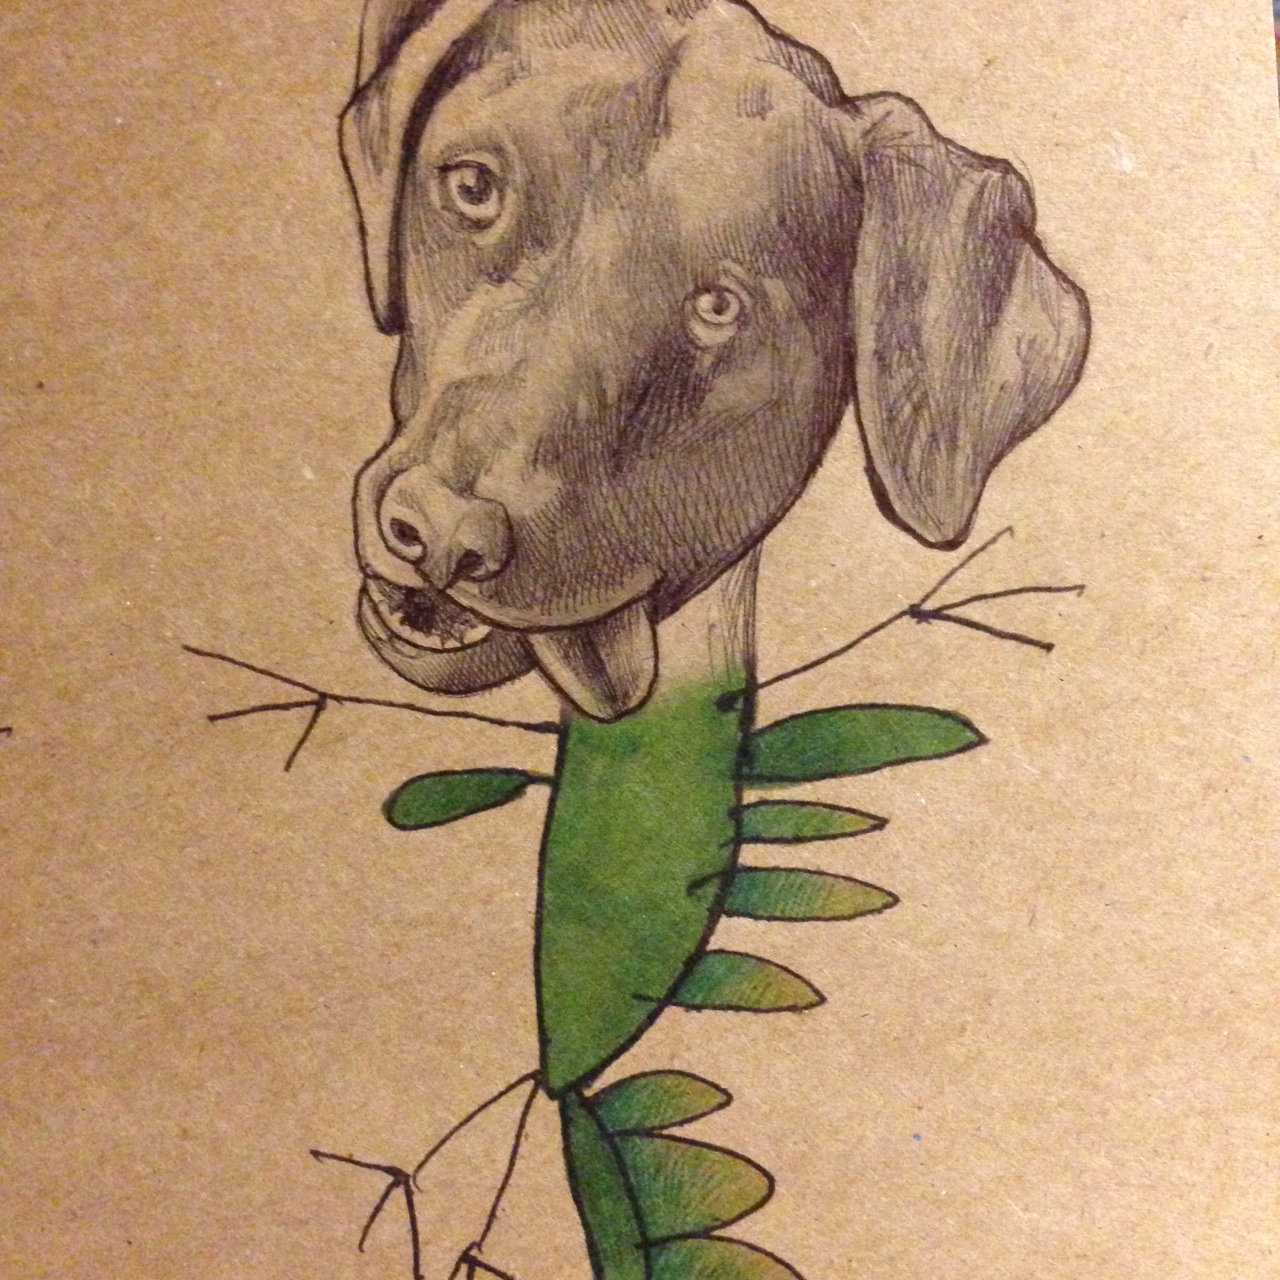
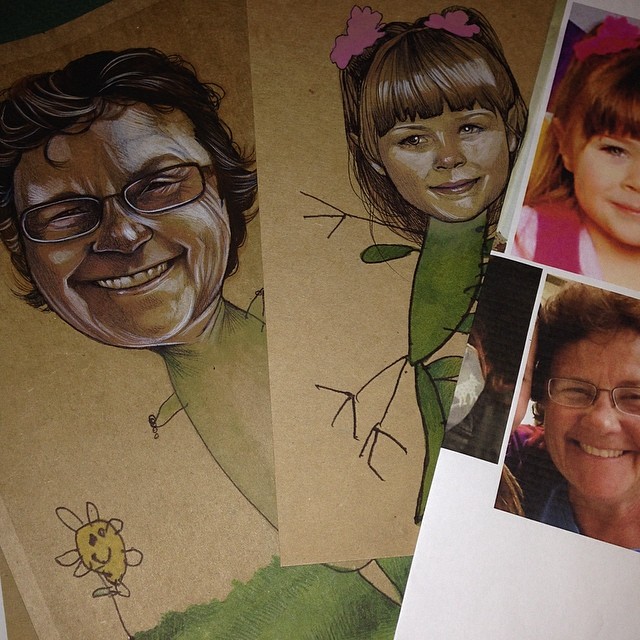
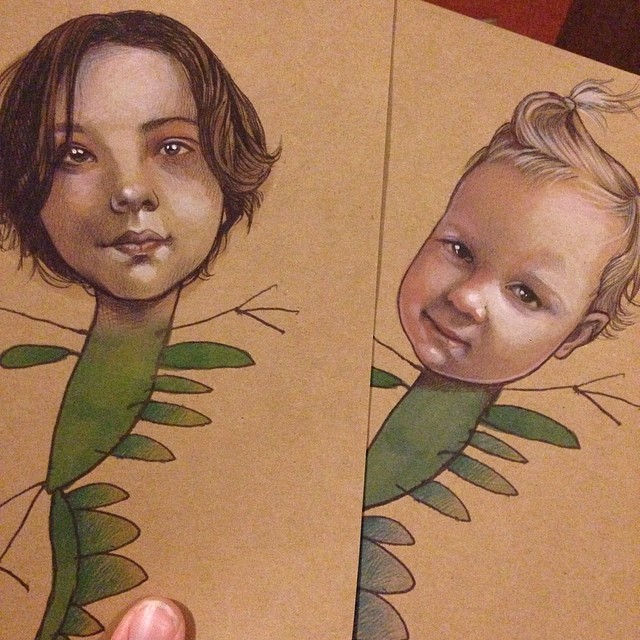
While all of that was going on, I worked on backer rewards. In some of the higher tiers, rewards involved portraits on dinosaur bodies…and you all came up with some beautiful faces for me to draw!

I also sent postcards to be printed, and prints and doodle pages to the printer.

I registered ISBN and barcodes for both the “Share With Me” book and the animal story book, and ordered shipping supplies to send all this wonderful stuff OUT.
Next step was getting rough proofs in the mail, just for pagination; to make sure all the pages were laid out the way I wanted them.

And then YESTERDAY, my friends, I got a package in the mail from the printer that contained a few copies of the COMPLETED animal book and a printer’s proof of the ACTUAL BOOK on the ACTUAL PAPER!!!
And you guys–I am not at all someone to toot my own horn but OMGOSH these look so GOOD!!!
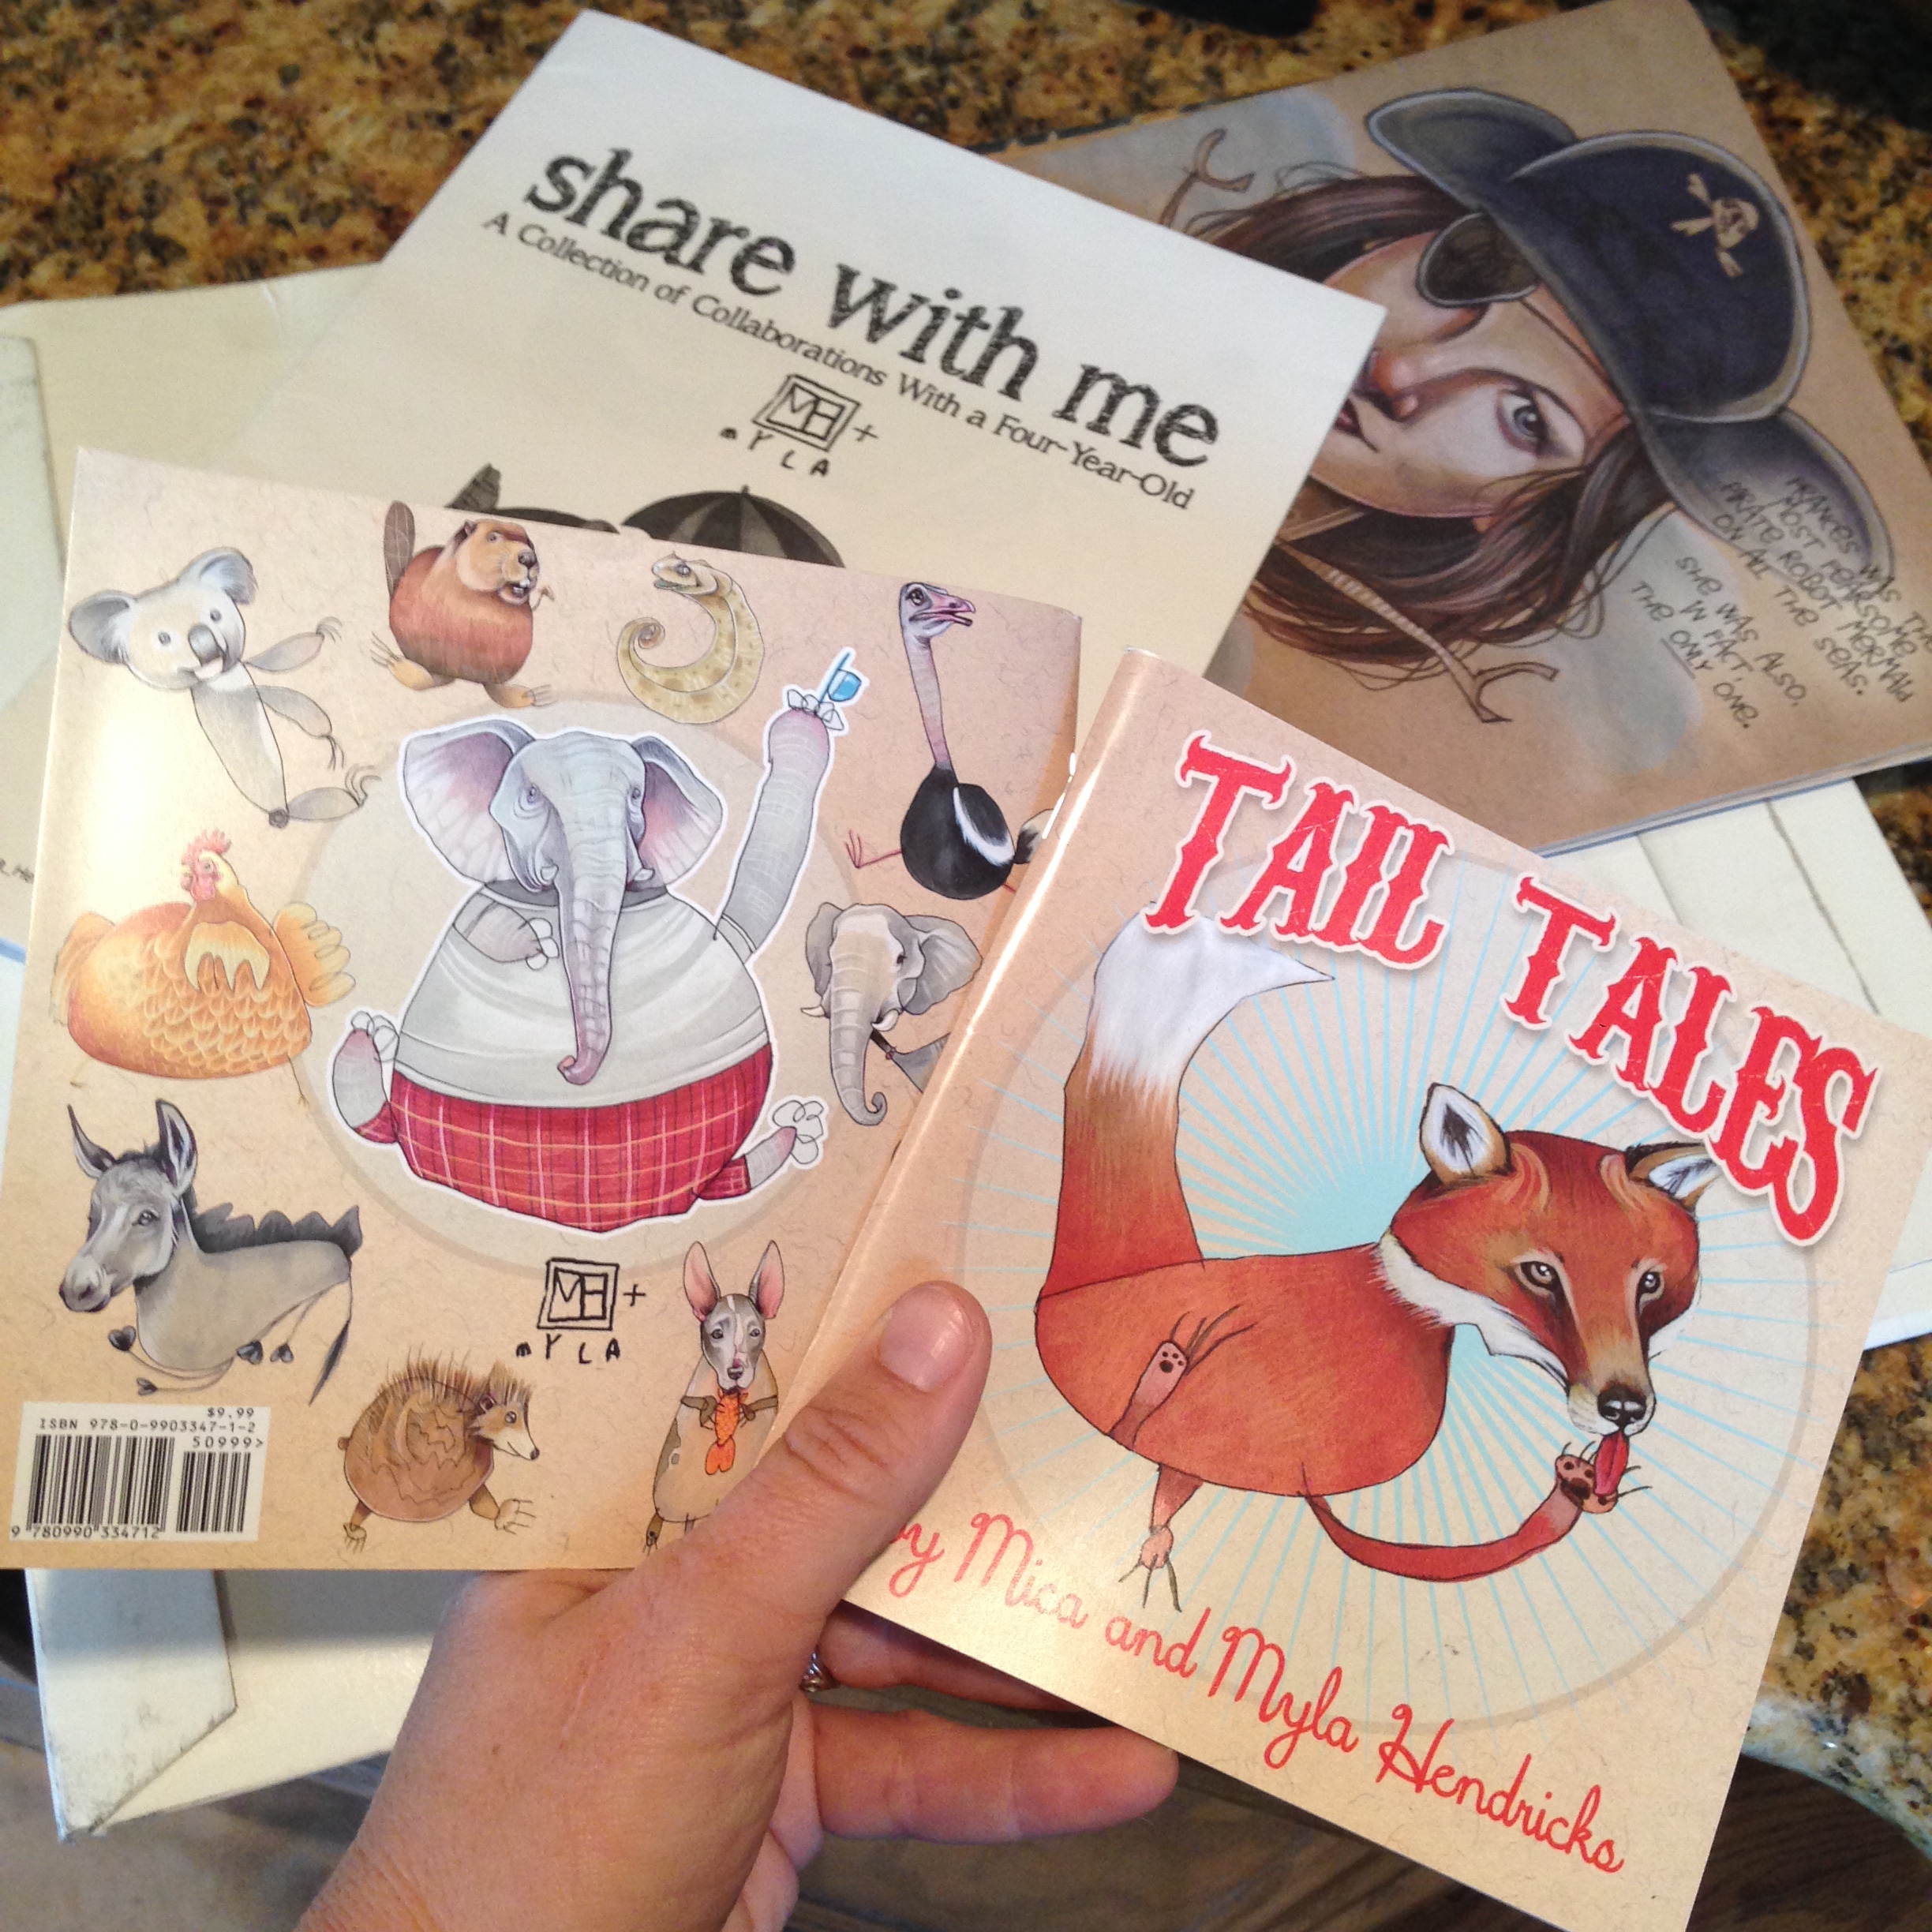
The little animal story booklet is completely finished, and waiting to be shipped. I think it’s quite cute! I read it to Myla (who had never seen the stories all put together), and she loved it! Although she was a bit critical of the fact that I apparently swapped the gender of some of the characters in the stories I wrote, which displeased her. I tried to explain that I changed it up a bit for the fun of the stories, I did the best I could, and that it’s too late and the books were already printed, but she was still a little miffed. So if you all could just mentally change the genders of the giraffe, bear, the zebra, the pig, and the cow when you read it, that’d be great. (Insert exhausted parental eyeball roll here, accompanied by a huge SIGH.)
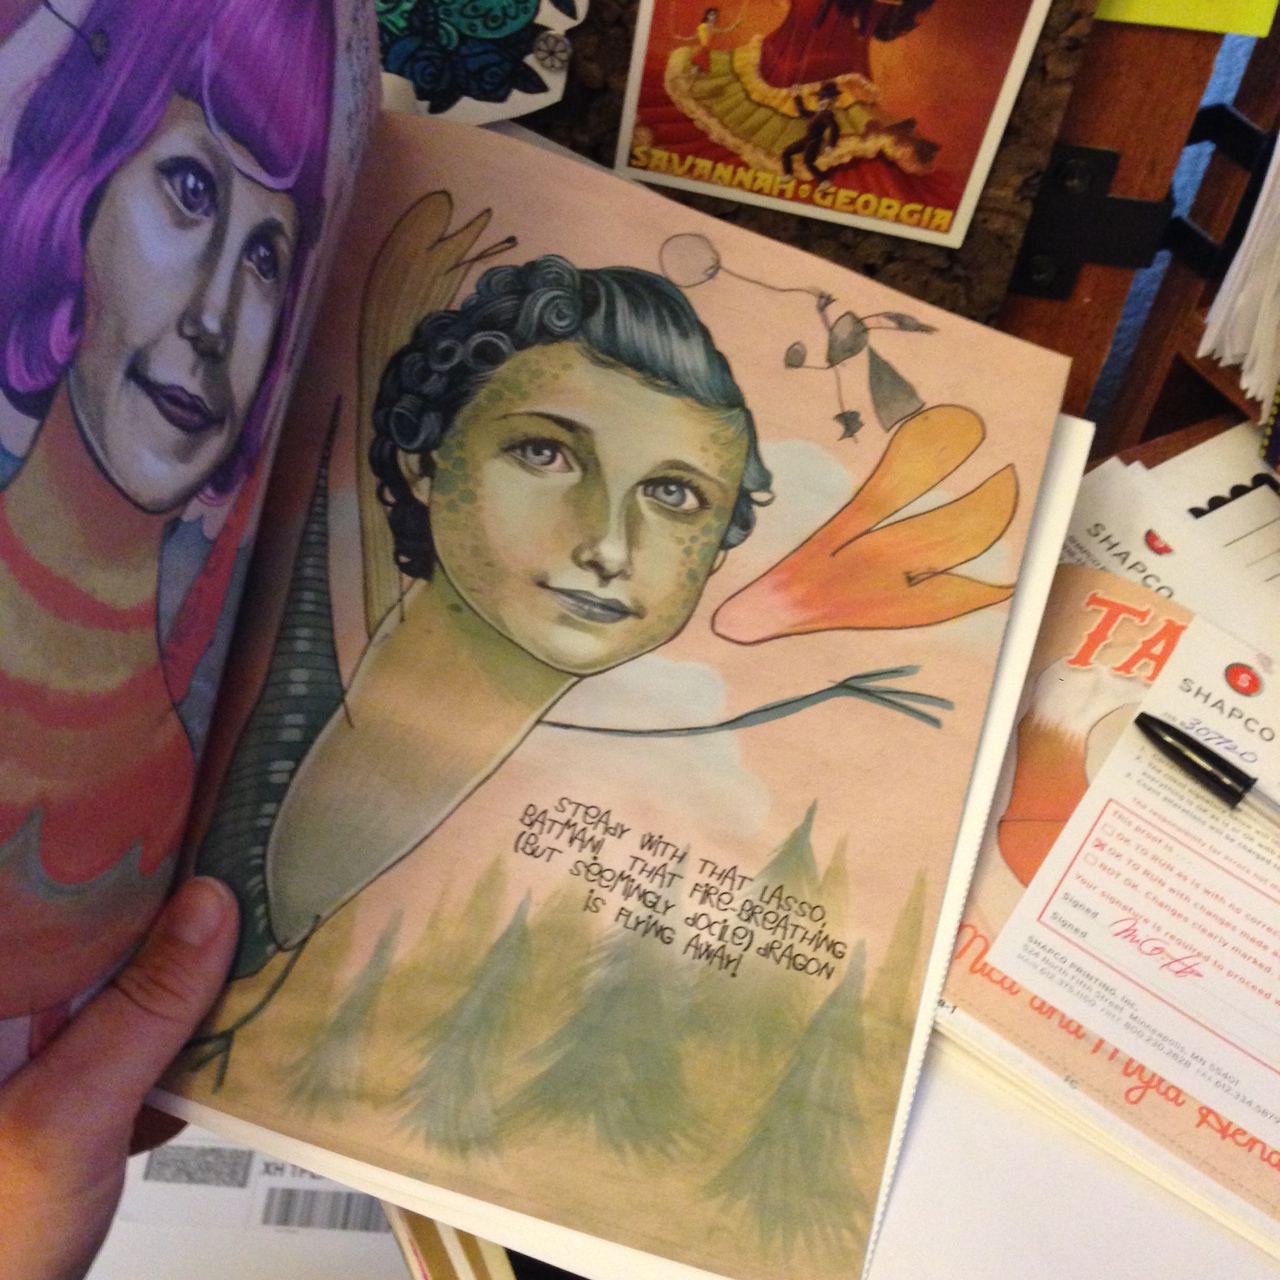
The actual book, “Share With Me,” is nearly completely printed, folded, stitched, and is awaiting the cover print, and then it will continue on to binding. When I first started working with the printer on “Share With Me,” I wanted to be sure it wouldn’t be on glossy, schoolbook paper, but instead, a thick paper that was porous enough to…oh, I dunno….DRAW AND PAINT ON. When I opened the package, I thought to myself not to get too excited, because it doesn’t have a cover, and it’s just the inside guts, but I’m not too proud to say I got a little teary-eyed flipping through it. I’m just so….PROUD of it!!
And sure, there may be mistakes (I already found ONE, after ALL that proofing, and it’s too late to change it. URRRG!) and there may be some wonky bits, but it’s exactly what I imagined, and I can’t WAIT to see the whole thing finished and all put together!!!
If you didn’t get a chance to hop on the Kickstarter, never fear! Once I send all the Kickstarter copies out, I’ll have a storefront open to order them online.
So to everyone who helped make this book possible, thank you SO much! It feels really GOOD, and I can’t wait to share it all with you!
Get Messy!
Summer’s coming! And for a stay at home, work-at-home mom, the prospect of keeping the munchkin busy all day every day for several months while simultaneously working from my computer is a daunting one indeed. But while I work on the prospect of signing up for a little bit of summer day camps and a few hours of daycare each day, I have to remember to make some really good memories. And sometimes, the quickest way to make a good memory…is to make a good MESS.
A long long time ago on the blog, I wrote about making beautiful messes. When I was a kid, I loved to make a mess, and I wasn’t afraid of things like dirt, muddy clothes, or bug guts. But somehow, in the process of growing up, instead of being carefree and fun, a roll in the grass now makes me fret about grass stains, spiders, and where the dogs may have peed. But how is our daughter supposed to know what it’s like to squish mud between her toes and all that stuff…if I never let her do it?

And honestly, can’t all that stuff be washed away, for the most part? I mean, what’s the worst that can happen, really? When I was in the army, we would get disgustingly gross, sweaty and muddy and horrible-smelling and sore, and I think the fact that you are so disgustingly messy beforehand made you feel SOOOO GOOD when you got all cleaned up.
As a mom, when I find myself being resistant to something the kid wants to do, I try to ask myself if I’m saying no for a good reason, or just because it makes me uncomfortable. If it’s just that it makes me uncomfortable, it might be something I actually SHOULD do.
So a recent trip to our local library has unearthed my sister’s favorite book series and our newest book obsession: The Magic Schoolbus. Along with being EXTREMELY educational and fun for me to read to Myla in a way that can grow with her (there is the main story about going on crazy adventures and exploring things like the human body, insects, sea life, etc, and then additional more detailed information along the sides in cute “side notes”), the crazy teacher’s motto has reiterated an idea that has been a key thing I’ve learned from becoming a parent: to “Take chances, make mistakes, GET MESSY!!!”
If you’re someone who gets the oogies about messes, there are easy stress-free ways to get messy, and the key is to GET PREPARED! Use washable paints, wear sloppy clothes or an apron. Put down a table cloth and have towels on hand for when you’re done. Have the washer on standby and have a set of clean clothes waiting by a readied bathtub.
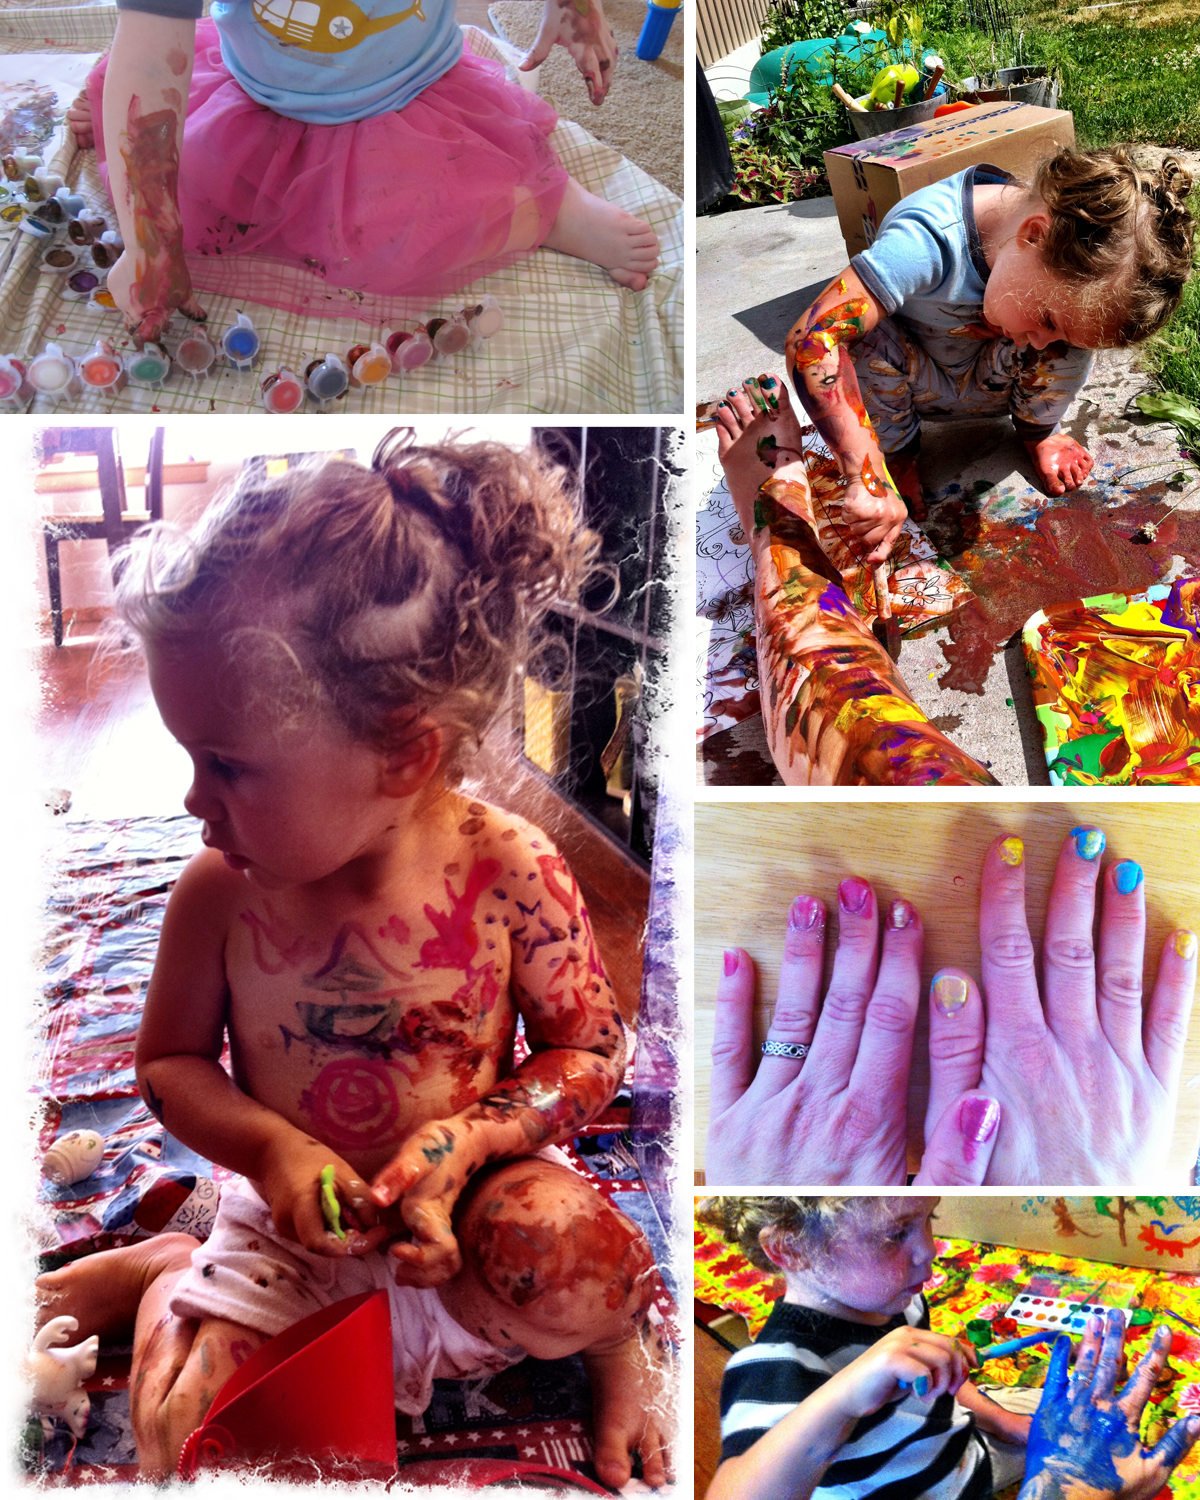
And don’t forget to JOIN IN! Don’t just be a spectator. It’ll be good for you to get out of your comfort zone–believe me!

Most important of all, though: don’t take anything too seriously! Get out there and challenge yourself to make all kinds of messes with your kids, with your family, with your friends. You can do it! And when you DO, don’t forget to take some pictures, and share them with me on Facebook. I’d love to see ’em!
Totoro and Brandalion’s Shoes
Okay, I don’t usually do features on other artists, but my friend Brandy from Brandalion’s Boutique is one crafty mama that I think you’ll enjoy…
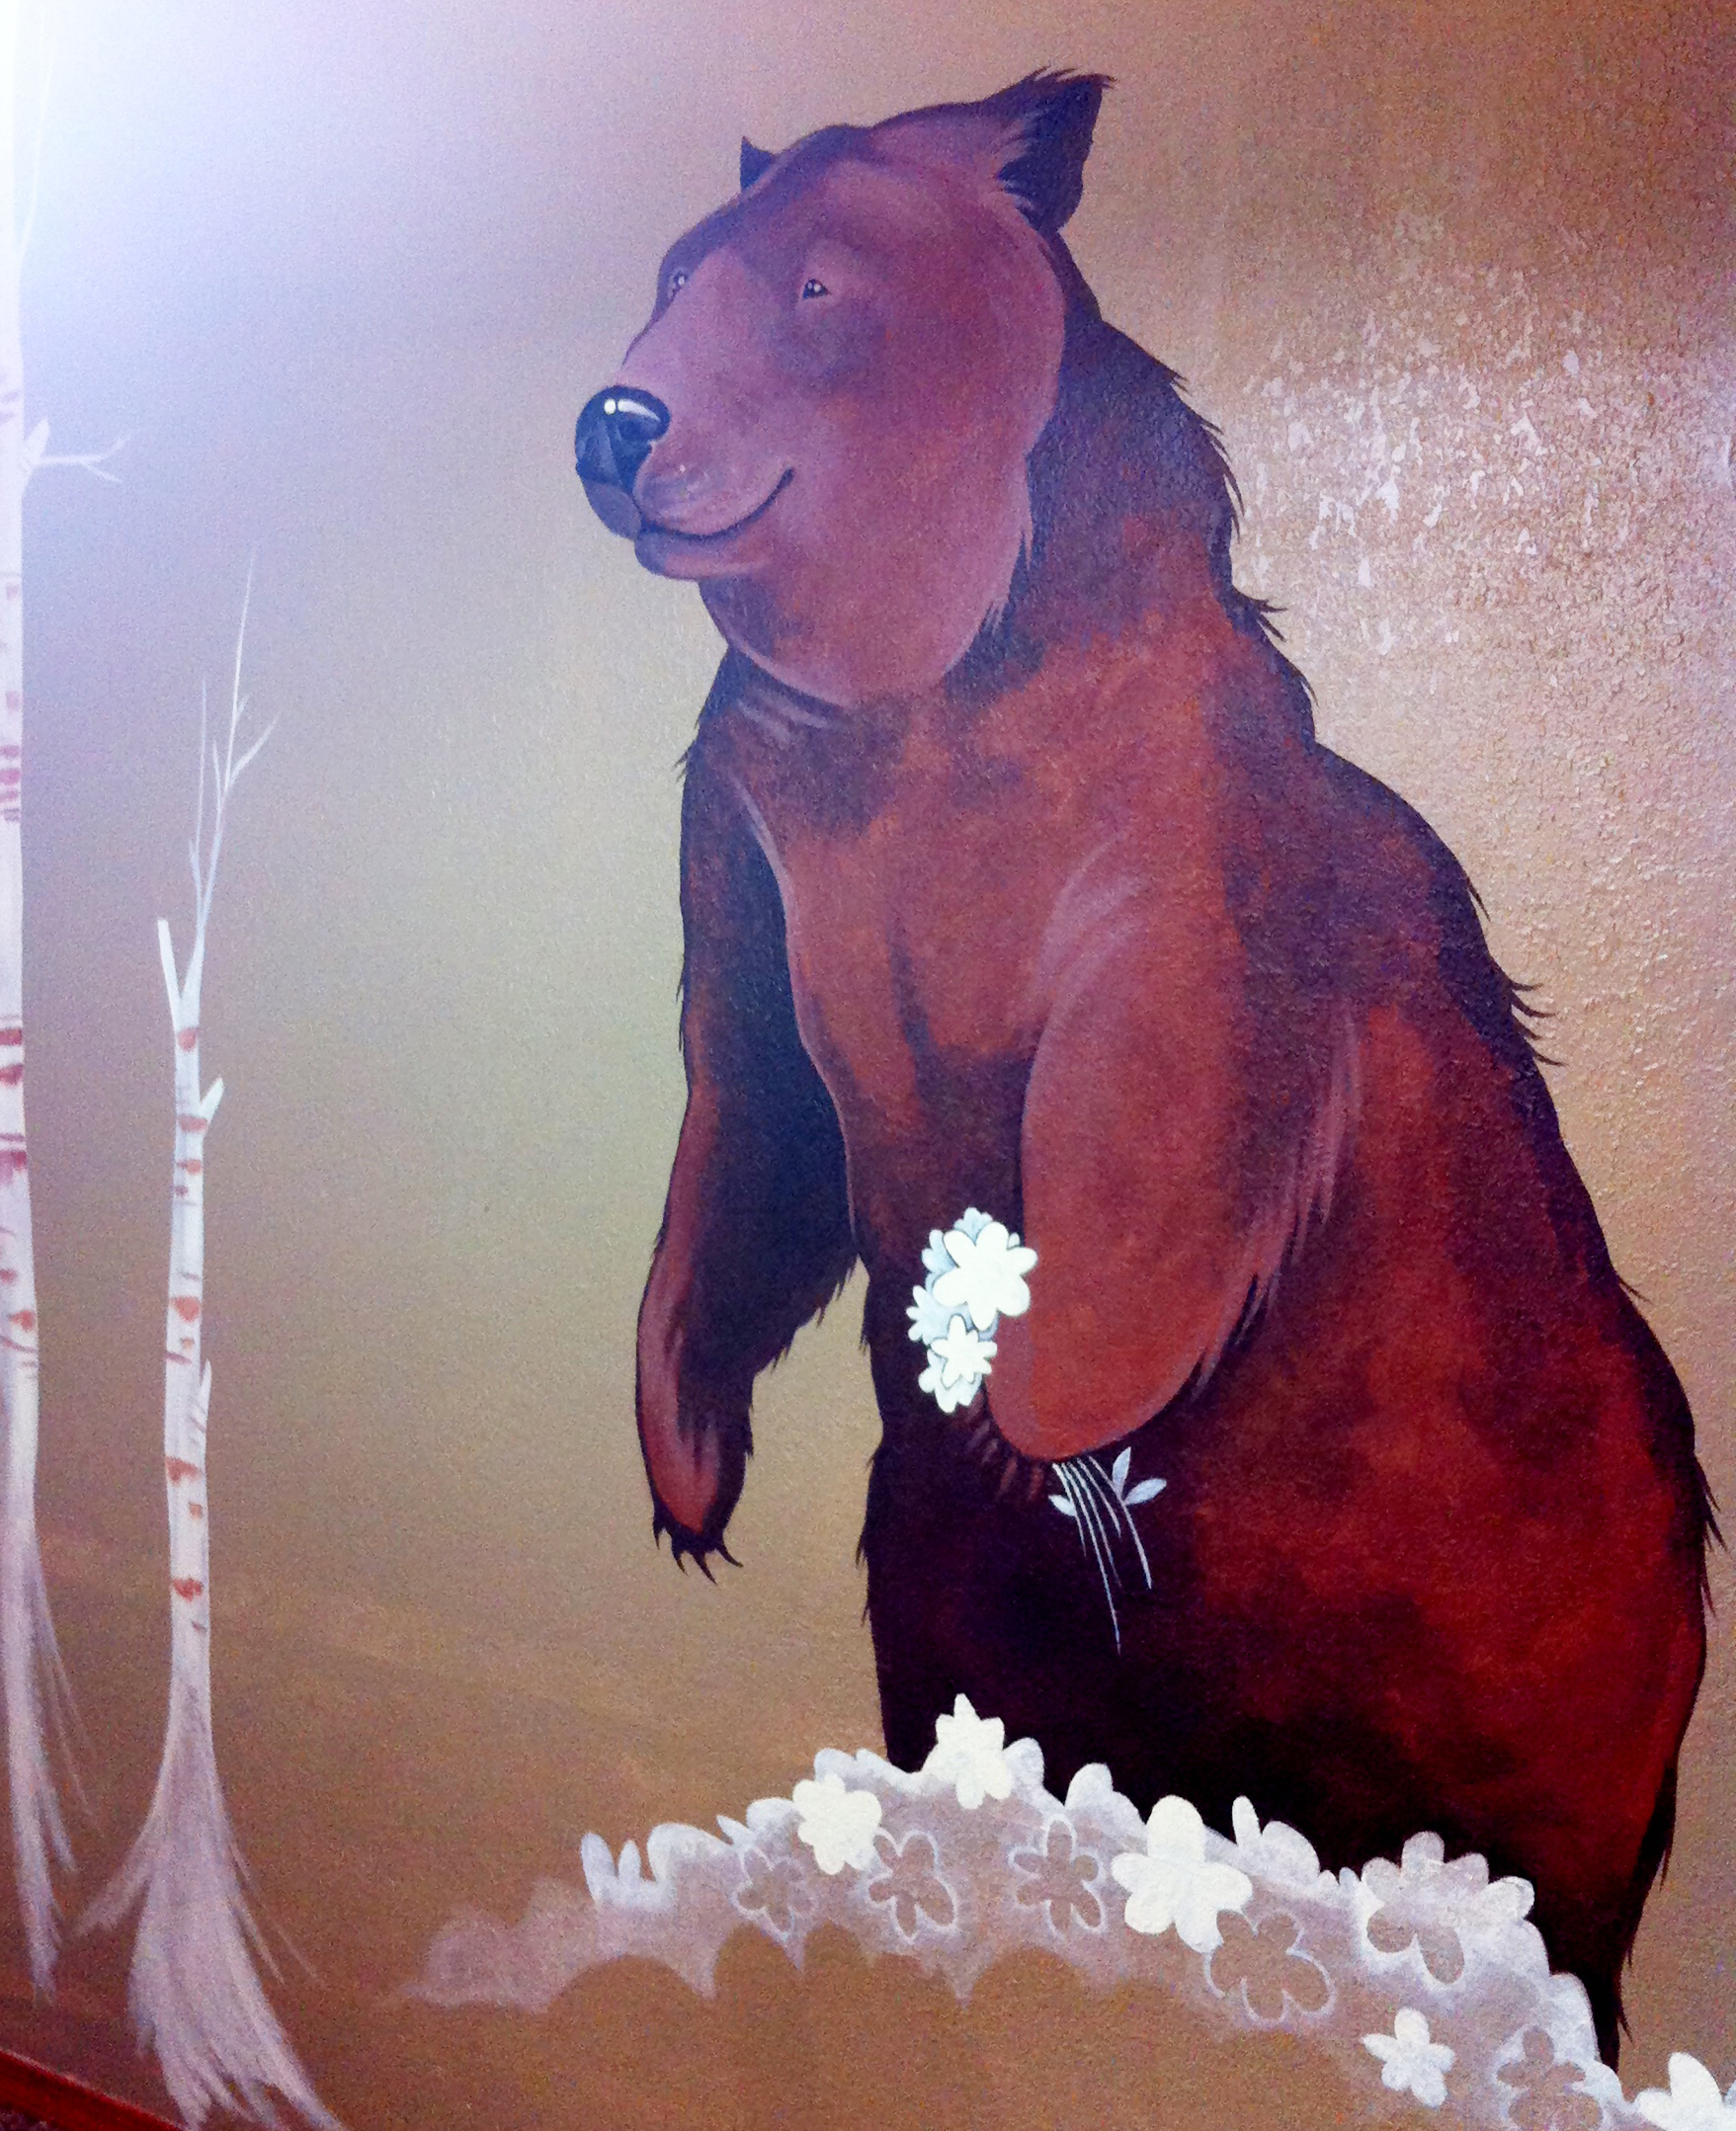
Her husband worked with mine in an Army medevac unit when we were stationed in Alaska, and I once painted a bear and birch tree mural on her niece’s nursery walls…
 I always thought Brandy was a way cool girl, but back in Alaska, I really thought we only had in common a love of geeky things and Star Wars. I have learned, over the past year or two, exactly HOW crafty she is…
She makes beautiful jewelry:

She has a pottery works called Brandalion Mudworks:

And since she had her son, she’s done some baby items.
But more recently, she’s tried her hand at soft-soled shoes….and they are AWESOME.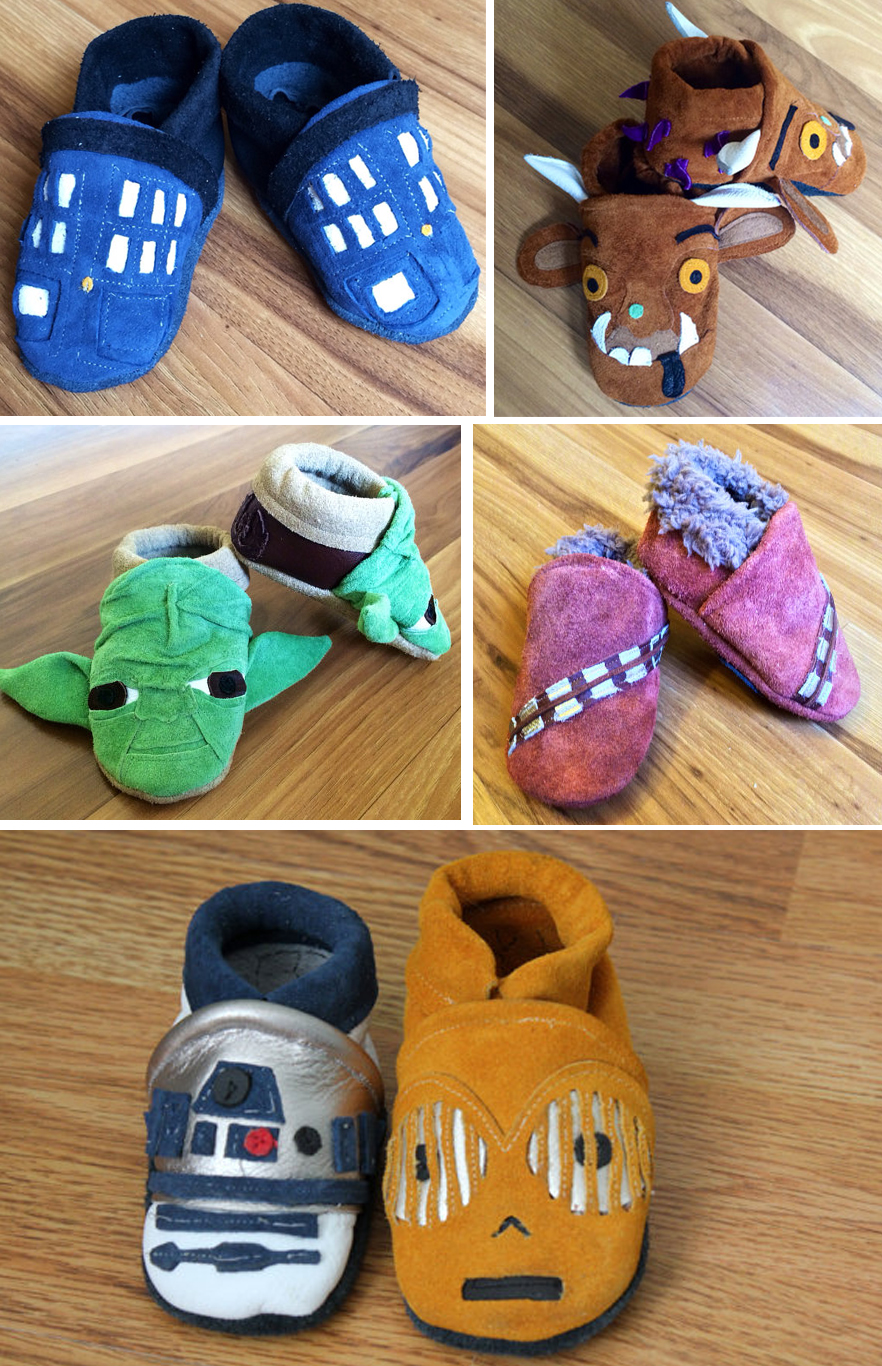
They’re amazingly hand-sewn leather, and she can do pretty much anything you can imagine. And in nearly any size. Knowing Myla’s love of C-3PO, she sent us a pair of big-kid shoes, and Myla LOVED them…
…And then she saw TOTORO. (Ahh, kids can be fickle..)
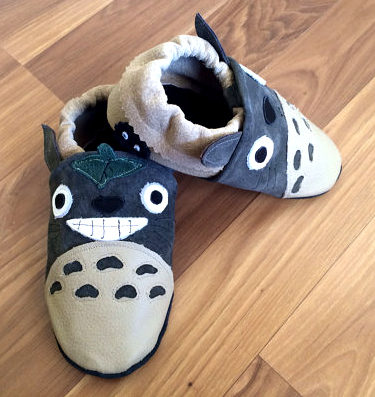
She squealed and was instantly enthralled. This was her first introduction to Totoro. So while Brandy made us an order of Totoro shoes to go along with the awesome C-3POs, we watched Totoro again…and again….and again. And again.
We made a Totoro doll…
 Myla drew pictures of Totoro as a ballerina… Because…adorable?
 We found a super cute Totoro/bigfoot mashup shirt on TeeFury.
And, since Myla’s birthday is coming up at the end of May, she decided on a Totoro-themed birthday party.
So, she was beyond excited when the package from Brandy came in the mail just before Easter with not only the awesome C-3PO shoes, but her very own adorable Totoros…
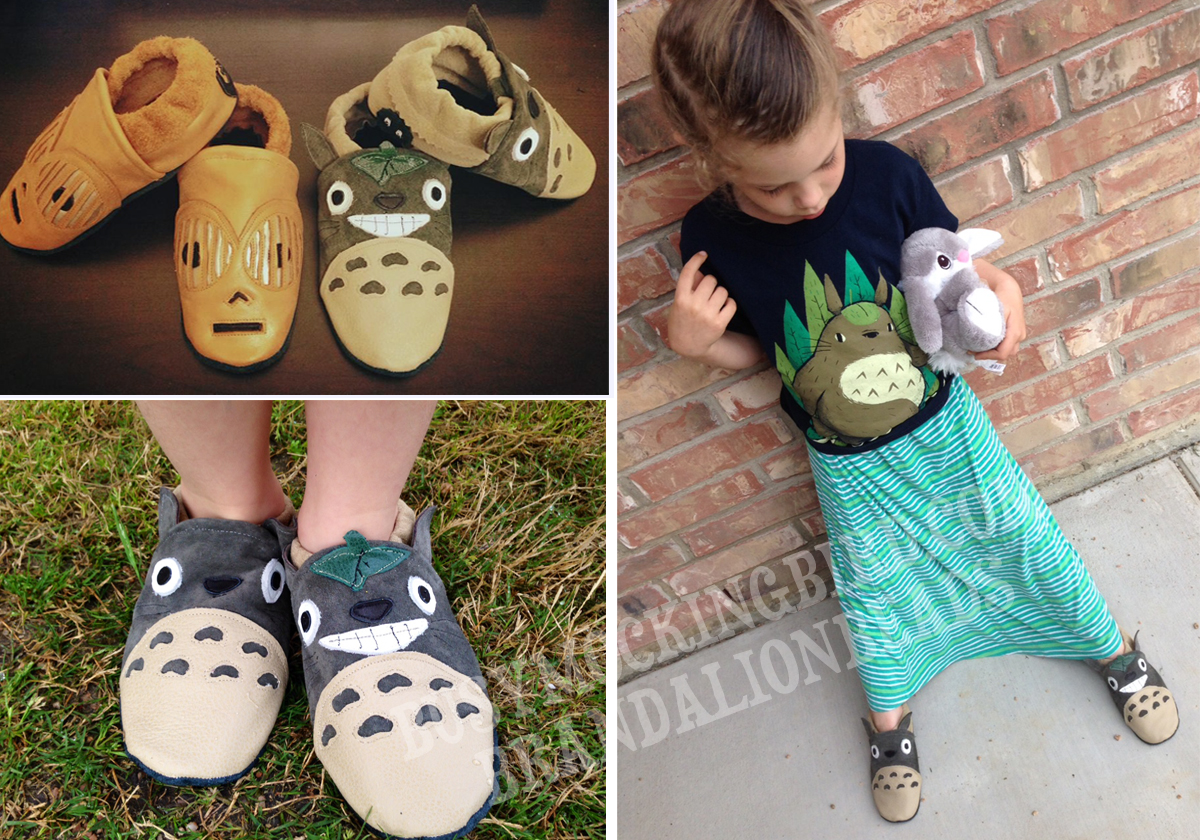 She insisted she wear the whole Totoro outfit to school the very next school day…and even tried to wear them to bed.
There are some baby-things that work for you so well that you just want to share them with all your mama friends. I realize that not everything works for everyone, but for me, it has been cloth diapers, white noise, a baby carrying sling, and soft-soled shoes. I try to share only when people ask, but I just can’t help but share these. Because for me, When Myla was a baby/toddler, she LIVED in these kinds of soft-soled shoes–they’re perfect for babies learning to walk. Having a soft sole means they can feel the ground and better learn balance, but their feet are also protected. And if I could’ve had cute little customs for Myla when she was a baby–WOW! I totally would’ve geeked out.
Brandy can make pretty much anything you want onto these little shoes! She’s done the Tardis, a Gruffalo, Star Wars-inspired shoes, ones with interchangeable bows, biplanes, team logos, and all sorts of other adorable creations. She’ll do pretty much any size you want. And she LOVES a challenge!
I know I have a ton of crafty readers. And I love to see people inspired by their kids, and finding a way to share the stories and the characters you love with them. So, from one crafty mama to another, please check out her stuff!
Here are links to Brandy’s Etsy shop called Brandalion’s Boutique, her Facebook page, and her Mudworks.
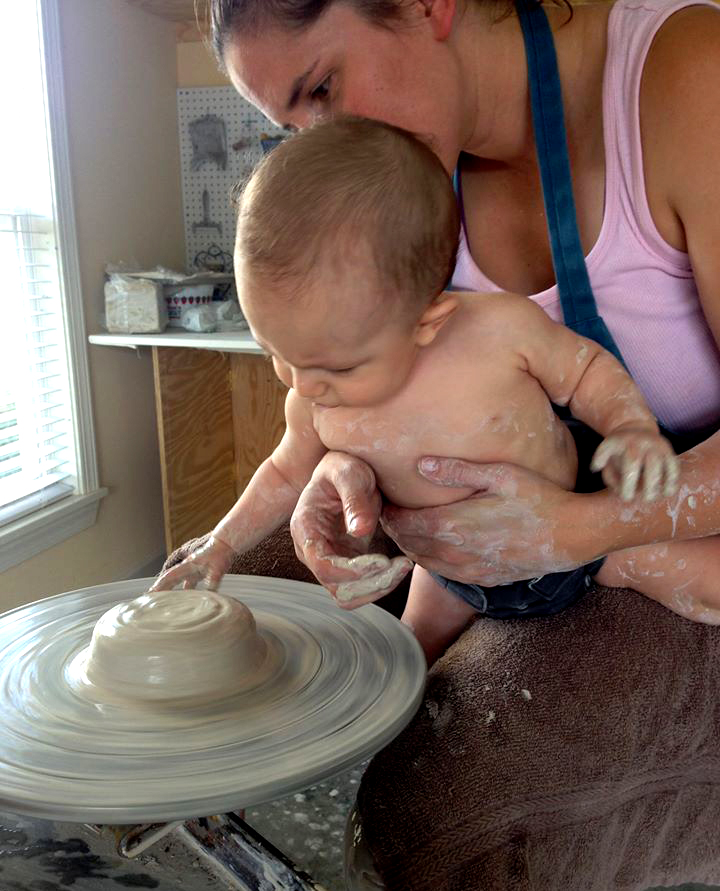
Brandy in her pottery studio with her son, Connor, getting messy with some clay. Love it!
(PS: I’m not at all sponsored by anyone, nor do I want to be–I just love sharing great stories, crafts, and art with you all!)
Paper and Thread
The good thing about having an interest in a variety of different arts and crafts is that when one well is dry (as it often will become), you can pass the time with another until it returns. My favorite thing is drawing in ballpoint pen and painting with inks, watercolors, and acrylics. But when a dry spell recently hit (for me, it happens in sort of all the same ways you might describe how a pen runs out of ink), I decided to revisit some embroidery.
I don’t have a lot of formal knowledge of embroidery, necessarily, but I’ve had a lot of fun working on embroidery projects in the past…
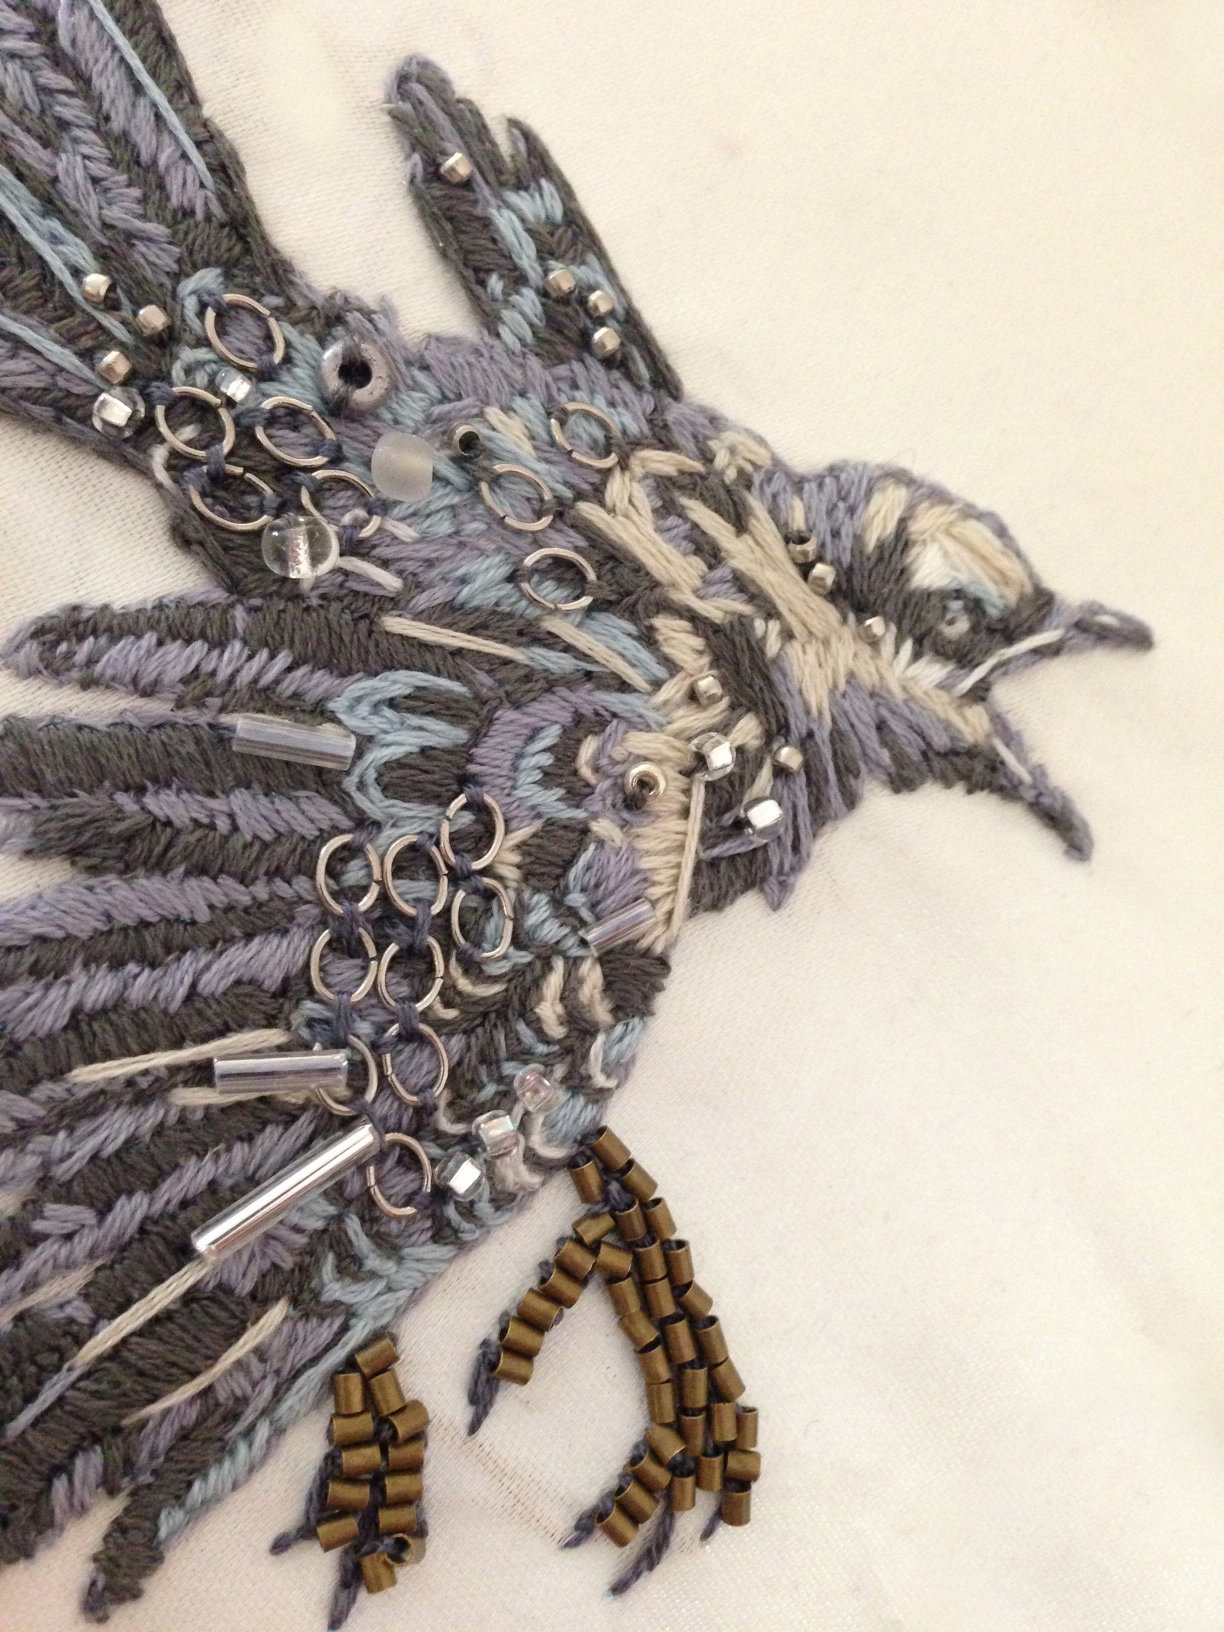
I am constantly inspired by the work of Michele Carragher, the embroidery artist from Game of Thrones. While I don’t have the patience for the amazing expression and detail she puts into her work (hey, we can’t win ’em all, right?), I think there’s something so beautiful about the mixture of mediums.
I’ve tried it a time or two, mixing my illustrations with embroidery–this portrait of Jinkx Monsoon was one of my first. I wasn’t sure how the paper would hold up, so I actually glued a very thin piece of fabric on the back side of the paper to help keep it sturdy, and just played with practicing stitches.

So this time, taking an old illustration I had done of (coincidentally) Catelyn Stark from Game of Thrones, I decided to practice a few of my stitches right onto the illustration.

On paper, it’s good to do simple stitches, but I’m curious how it would hold up to a lot of very tight, very detailed stitchwork. Mine is more wild and simple and wonky. And as much time as I spend on these, imagine if I were to REALLY take my time! Heheheeh.

My favorite thing in all my work is mixing very soft things with very hard, or very sweet things with very bold. I love these little metal jewelry jumpers; they seem to add a sort of “armor” to Catelyn…which also suits her character in the movie & in the books.

As much of a perfectionist as I am, I do not always take my work quite as seriously. I enjoy just playing with the shapes, and mixing them together. I’m pretty lenient with experimentation. Mistakes WILL be made…
So this is a closeup of the final piece….which sort of happens whenever I just decide I’m done.

So when I’m really into something, I sort of obsess over it. If it’s my “project du jour,” then it sort of always hovers around me when I have to do other day-to-day things. With this project, I decided (as I sometimes do) to risk going ahead and working on it while our 4-year old played around doing her own projects.
Of course, it wasn’t long before she asked to “help.”
Well, I DO have boundaries, and this is one I didn’t really want her “help” with! So, to be fair, I told her that this was a project I was working on by myself, but that I could show her how to do one of her own. First, she had to draw something to sew on….so she quickly drew some sort of little creature.
From there, I let her pick out thread, and I sort of pushed the needle up for her (letting her dictate where the stitches should go) and let her pull it through herself, even showing her how to hold onto the thread so it doesn’t come unlooped…

…Not that she was always successful in pulling it correctly. But seeing as she’s sort of afraid of needles and pokey things, I still see it as a win. These kinds of things are good steps for her…

And this is her final piece! I think she calls it a sort of horse, with a long, flowing mane, but to me it looks like a horse harp. 🙂
Eh, art. It’s all about the experience, right?

FINAL DAYS of our Kickstarter!
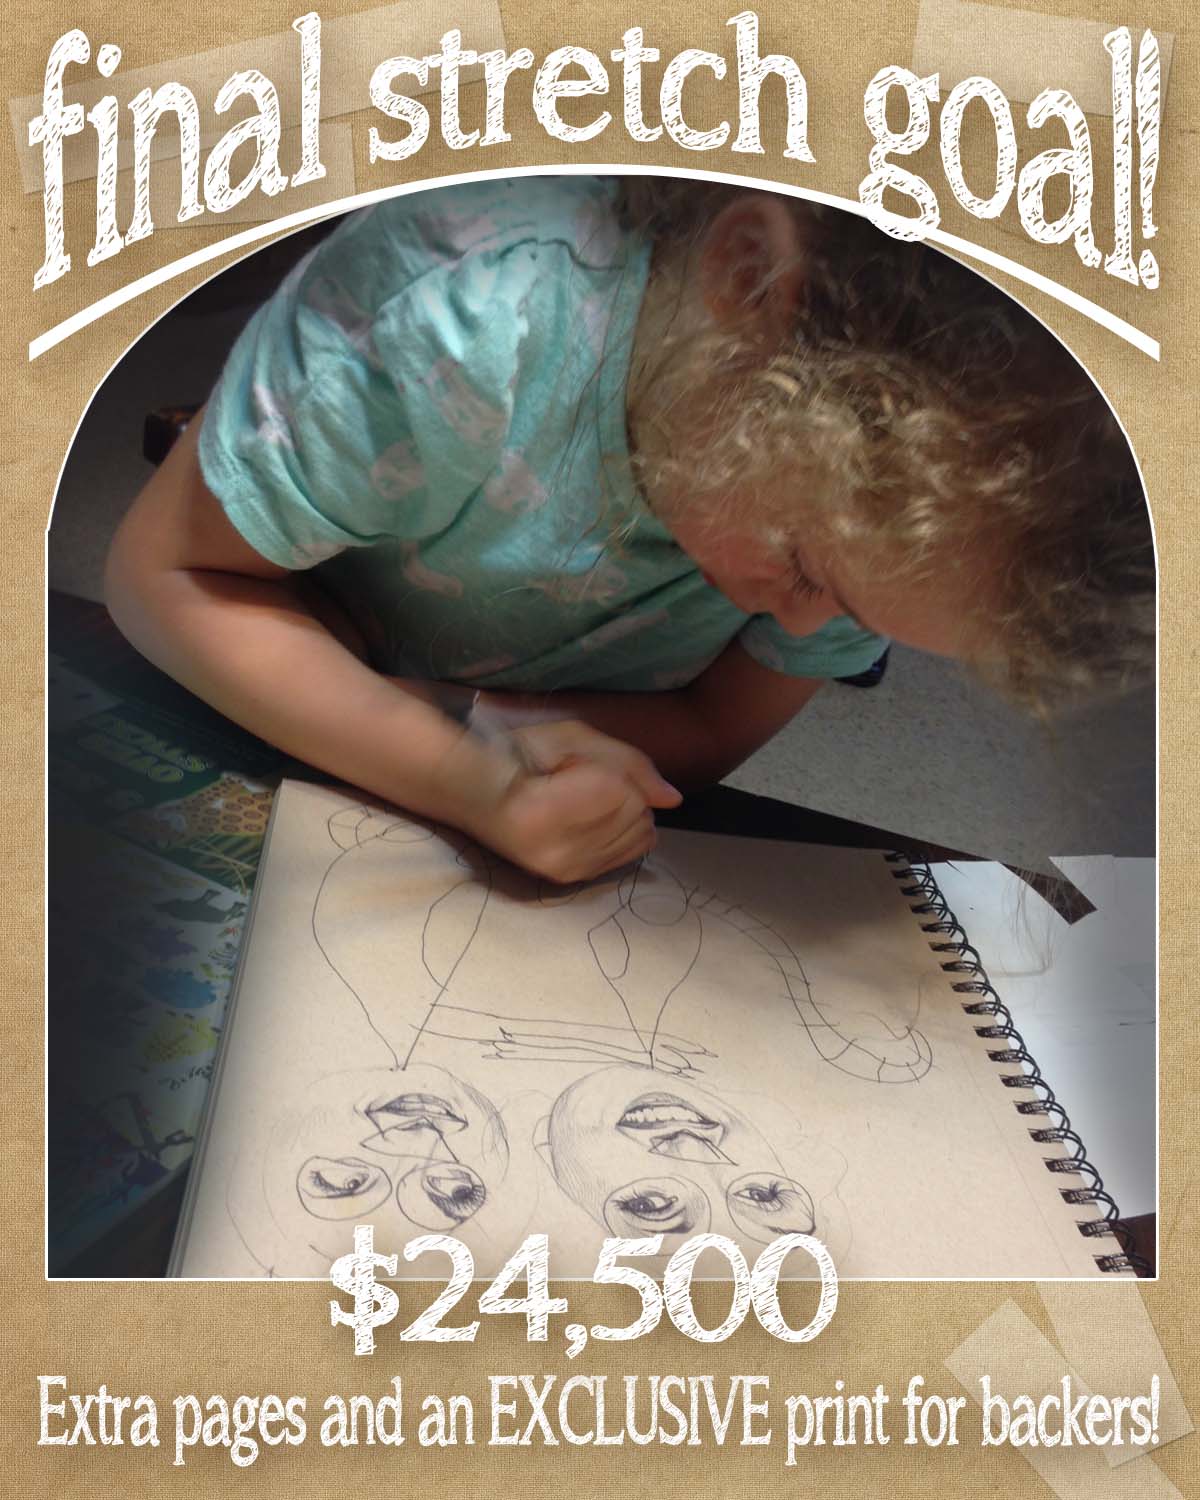
I cannot tell you how very excited I am that our Kickstarter campaign has been a success! We made enough to print our book! I made a stretch goal in the hopes of printing our little animal storybook, and we made THAT goal as well! Woohoo! Everyone seemed to be completely confident we would make it except me, so I cannot TELL you how amazing this whole thing has been. I am jumping up and down in my head with excitement!
So I’m gonna go wild and set ONE FINAL GOAL in the last few remaining days of our Kickstarter campaign. I want to see if we can make it to $24,500 to add more pages to our book! If we can make this goal, I will include an EXCLUSIVE PRINT available ONLY to Kickstarter backers who pledge $25 or more! This means if you already pledged and we make goal, you will get your reward AND the exclusive print!
For those of you that follow us, you know Myla is a big giant part of the creative process, and she decided we should create two smiling lemurs hugging (I suggested teddy bears or dinosaurs, but she was insistent on lemurs–so yeah, lemurs are pretty awesome, too!), as a “thank you” for all of your support. I’ll actually be working on painting it soon, in the hopes that we can make our goal. This print won’t ever be available on the Society6 print shop, but will ONLY be available to Kickstarter backers!
So please spread the word, and let’s see if we can make this last stretch goal happen! Thank you so much!
Old Bones
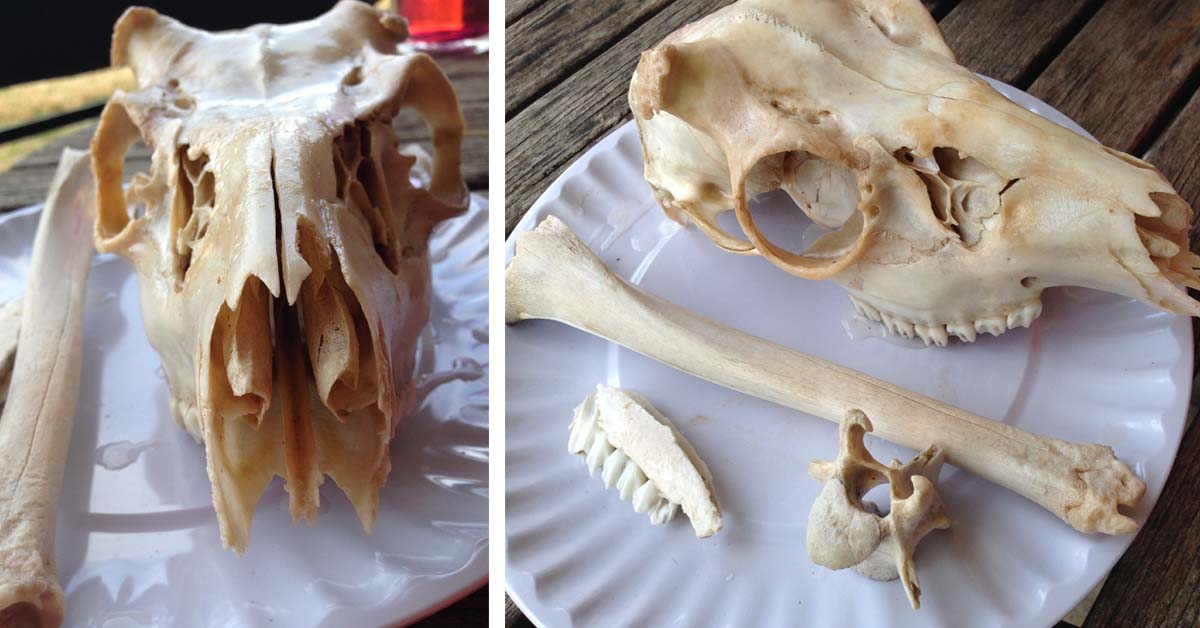
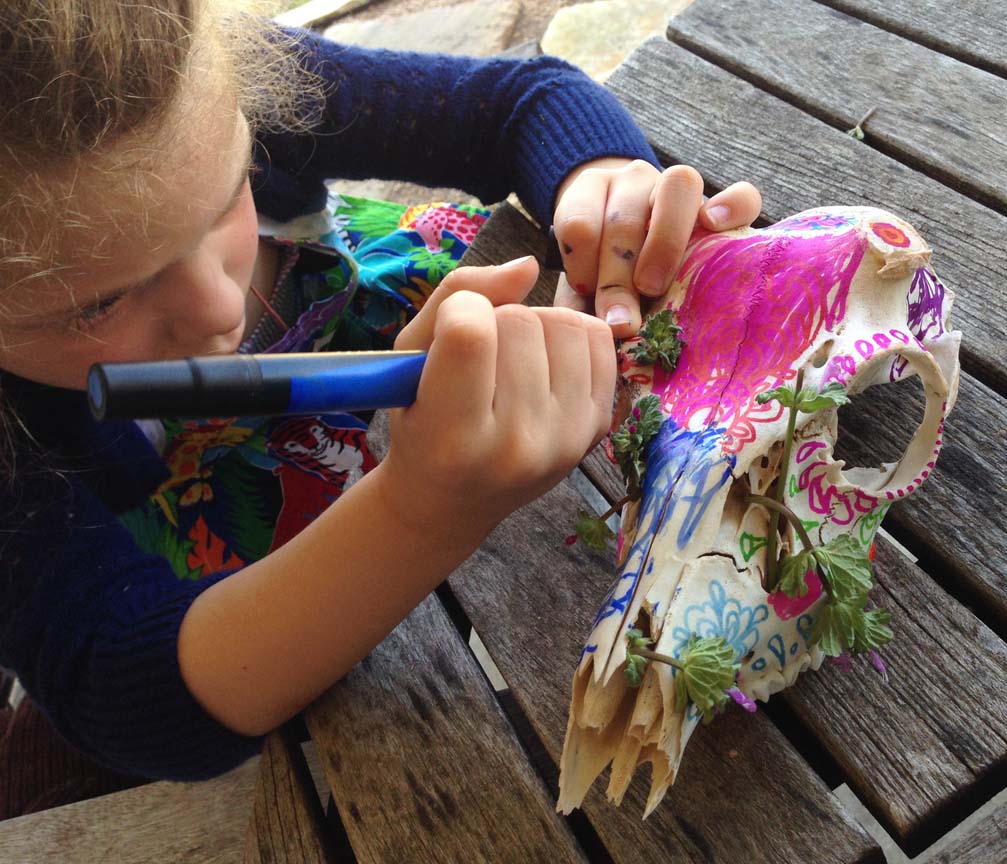
One day, while adventuring through a little wooded area, the kid and I ran across some old bones. Myla is a girl who is instantly fascinated by unusual things (a girl after my own heart), but thankfully, these bones were old and dried up and had been there quite a long, long time. She asked me what it used to be, and I asked her what she though it looked like. “A dinosaur,” she said. “Or a goat.” So we looked a little more closely, and noticed hooves and places where horns once were. Having seen a lot of dinosaur shows, she remembered that flat teeth usually meant plant eater.
“We could take these home and make a project with them!” she said.
Whoah there. Ew. While quaint little odd things fascinate me, I am not one who is interested at ALL in the performing the process of taxidermy on bodypart-things. The idea of taking these bones home was not something that appealed to me in the slightest. “But wouldn’t it be quite gross?” I asked, to which she replied that the bones were almost like rocks now, and they weren’t disgusting at all. Knowing our daughter can be quite sensitive (and to avoid potential heartbreak later), I asked, “Would you feel like it’s maybe sad at all? To have the bones around of something that died?”
And our 4-year old daughter, being quite sweet and thoughtful, said, “Well, yes. It IS a little sad, mama. But we can take them and make them into something beautiful. And then it won’t be so sad anymore.”
And boom–I was sold.
Now don’t ask me about the intricacies of dealing with mushy, fresh fleshy bones–ours weren’t that, or I would’ve left them in that wooded area without a second thought. Scouring the internet, I found way more disgusting things on how to handle that subject matter than I care to recall. Thankfully, these bones (as I say) were EXTREMELY dry, and therefore the easiest to sterilize. I soaked them in hydrogen peroxide for about three days, flipping them each day, and let them dry for another day, just so we didn’t have any random goo-cooties crawling all over us.
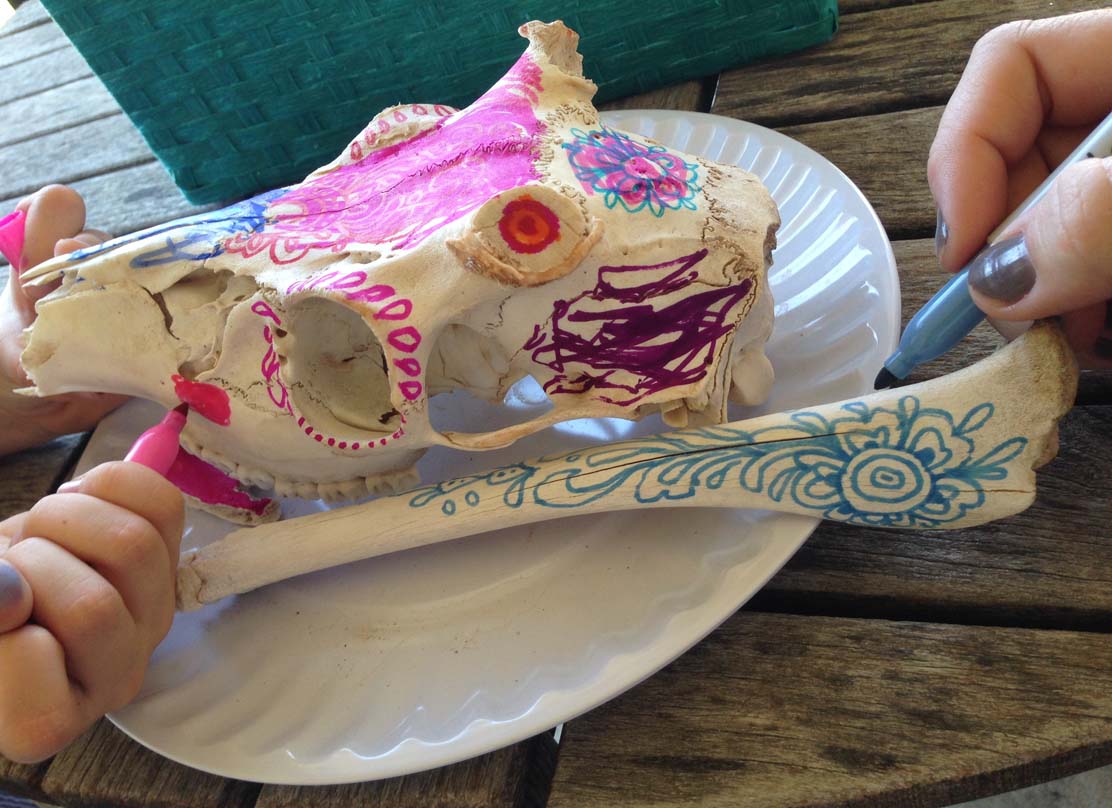
Markers were the medium that Myla chose. I suggested paint, but she said “they take too long to dry.” So markers it was. I got out the permanent markers, and we started doodling.
We traded back and forth. She was so excited that each time I picked up a piece to doodle on, she was instantly interested in it as well. So in the spirit of sharing, we took turns, swapping pieces, and decorating the bones.

She turned this vertebrae into a “little creature” who can conviently hold a marker.
 And she gave this jawbone the most adorable face (with “hair made out of teeth,” she said).
 We doodled on the skull with shapes, colors and patterns…
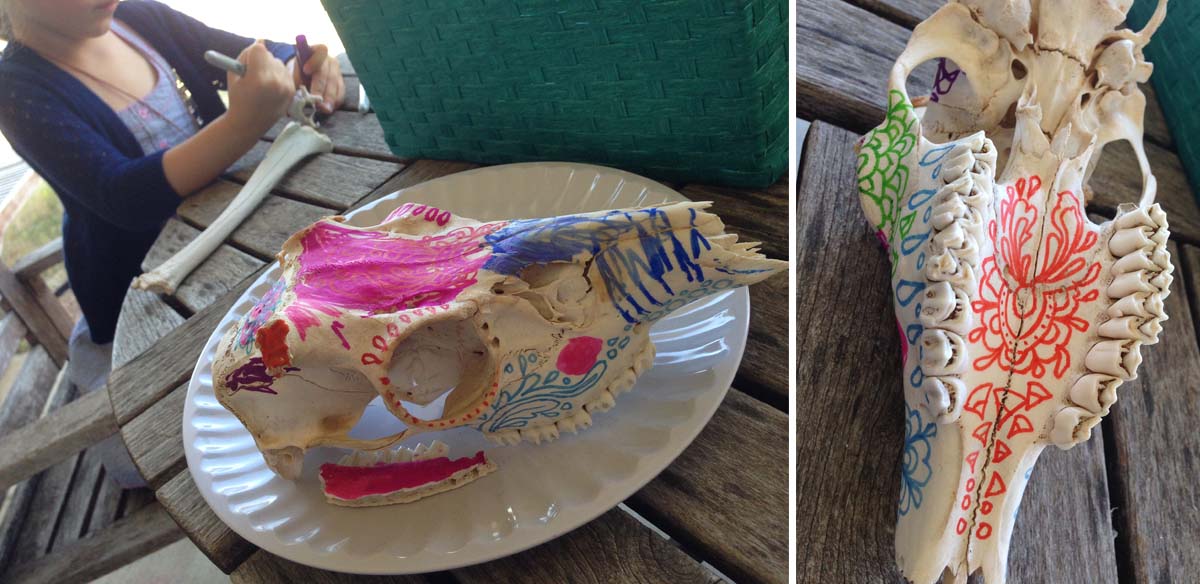 Until they were all nice and strange and lovely old bones.

After awhile, she said she wanted to “make it prettier” by putting flowers in all the places she could fit them. (For all you folks that know art supplies, don’t worry–that’s a way older, nearly dried-out primary chisel tip blue marker, not one of my fancy new brush ones…)
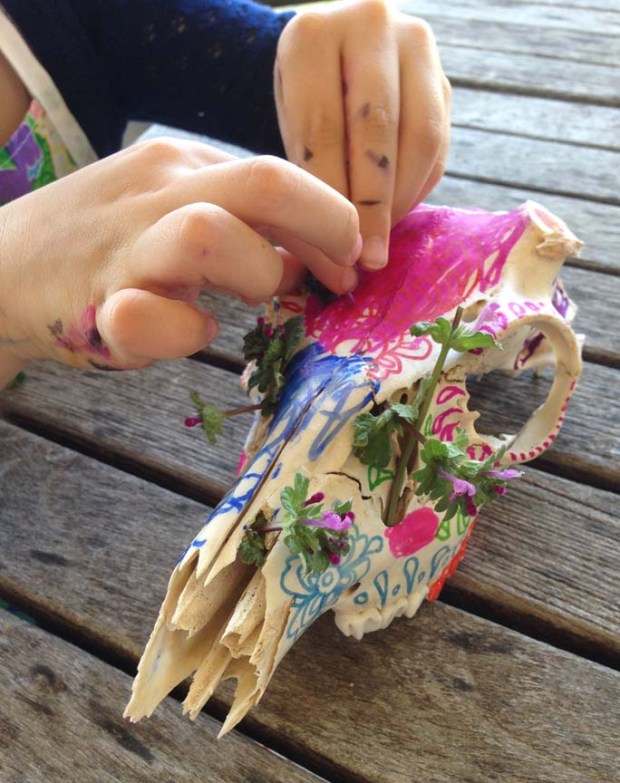
So there you go. Something sad and dead into something lovely. And the best part was watching her work. And not that I particularly love old bones lying around, but I may have to varnish these and keep them around somewhere inside. Maybe mounted. But up high, maybe….so the dogs will stop sniffing at them.
What’s the Point?
As a kid, I LOVED trying out new artsy things. As I might have mentioned before, our daughter has sort of developed the same sense of realistic sensibilities as I have. While she’s definitely got the creativity and imagination going full tilt, we’re both VERY literal in our interpretations of things. Filling a loose, free-flowing pattern on something is an uncomfortable concept to her. Why not just make it into something figural, something REAL?
Which is why I try to introduce her to new artistic techniques from time to time. We did some Pollock splatters. We did some Picasso shapes. We looked closely like O’Keefe. Now I thought we’d give some Seurat a try…
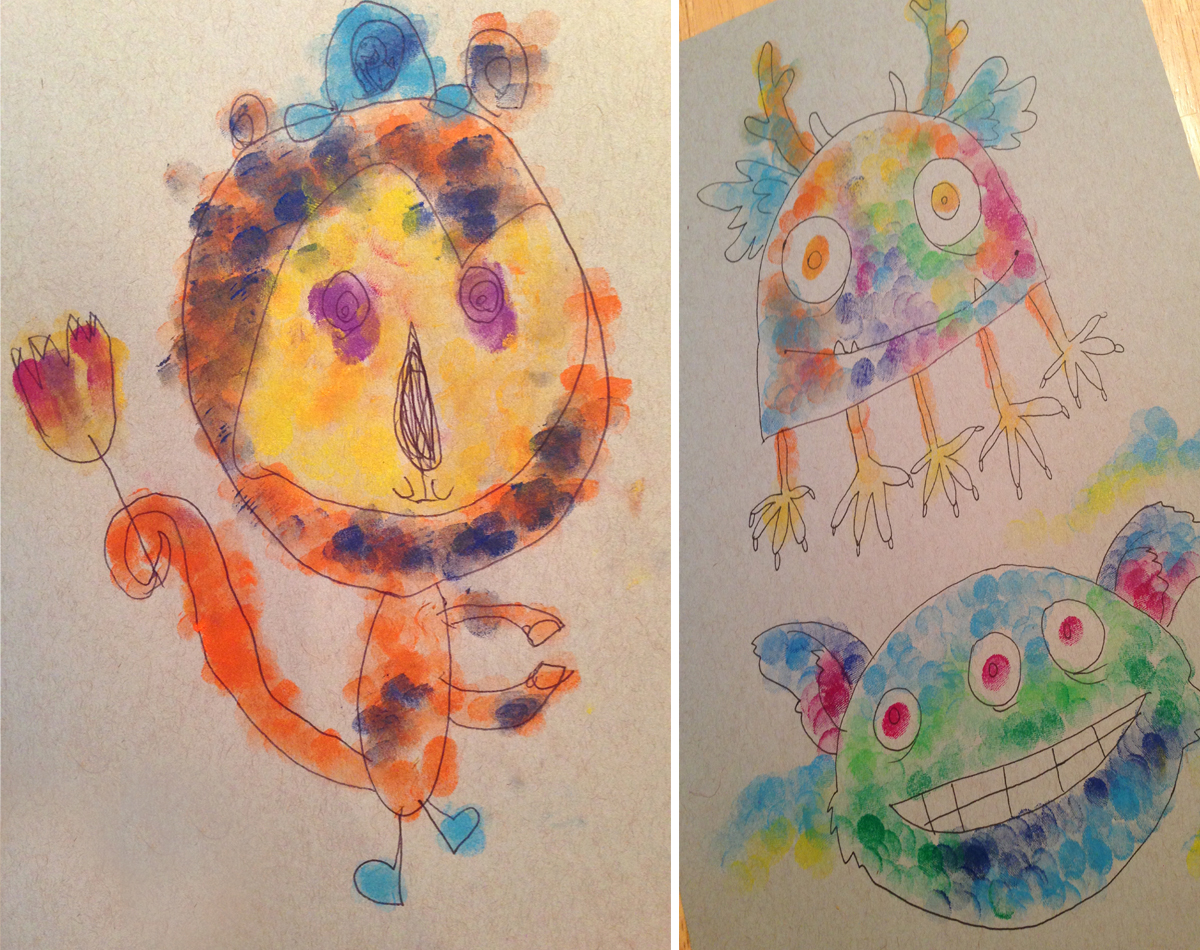
Seurat was one of the key players in developing “pointillism.” Similar to expressionism (which was more about capturing EMOTIONS), pointillism was more about capturing an image through LIGHT. About how color is not always just ONE color, but sometimes many different colors all the many different ways light hits it. “You know how your skin looks light in the sun? At nighttime, doesn’t it look more dark and blue?” I asked her. And she agreed.
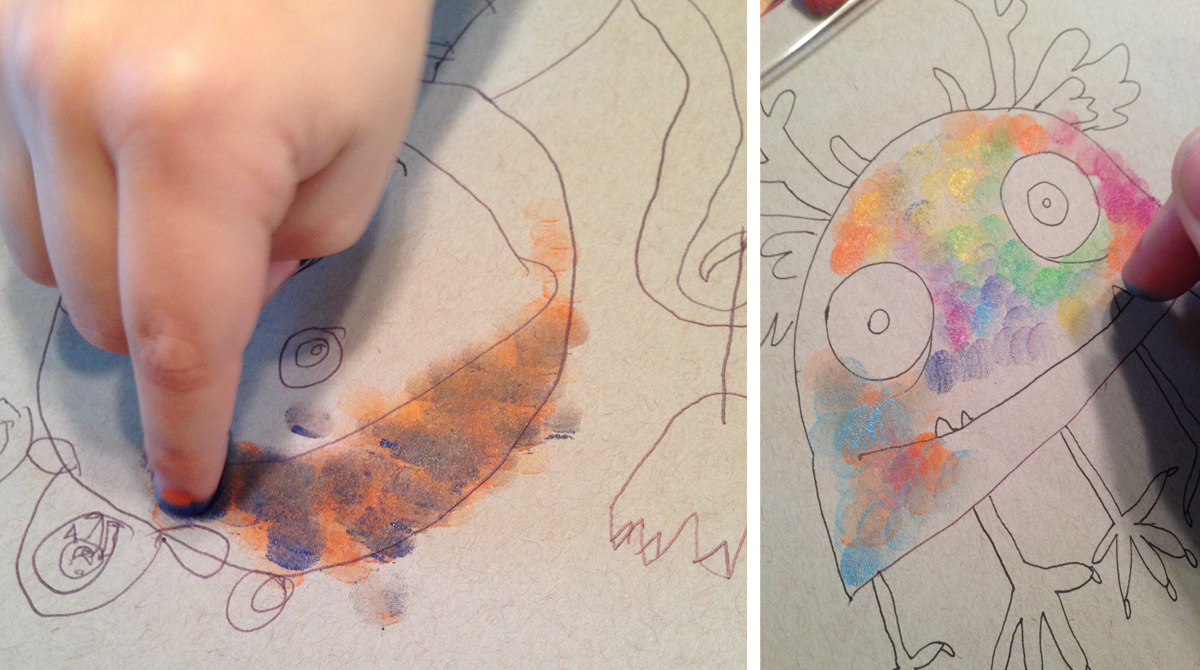
I set up a few simple things ahead of time…Instead of messy finger paints, I got a rainbow stamp pad, which had a variety of colors we could use. I also found a sample of Seurat’s work (like “La Parade de Cirque ” or “A Sunday Afternoon on the Island of La Grande Jatte”), which were easy ones to show her the basic idea, and tell her the concept of how we were going to try to paint the light…

I thought the concept of freestyle figure painting might be a little complex for a kid, and since she’s four, I decided it might be easier to draw a quick outline of what we’d like to “paint” on, so we didn’t lose focus.
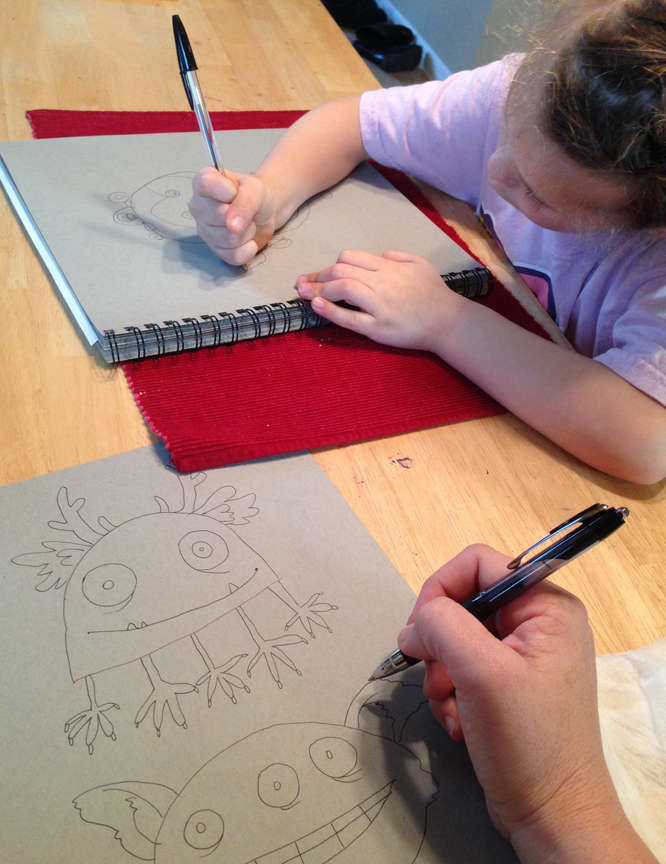
I don’t know about most kids, but to our daughter, anything that SOUNDS like a “lesson” is instantly rejected. I get better response from her if I create a sense of adventure and exploration, as opposed to sitting her down and saying (in a stuffy school marm accent), “Here’s what we’re going to learn today.” Just doesn’t work. So I say things like, “I thought it would be cool if we could try to do what this guy did in his picture.” Works MUCH better!
So she was ready to go…but then stopped short when she looked at the stamp pad and realized there was no brown. She wanted her character to be brown. He HAD to be brown. And there, my friends, is the lesson: color mixing using pointillism! I said, “since there’s no brown, we can make it LOOK like brown by adding lots of colors to it. Then when you look from far away, it will look like brown.” She was a little hesitant, but she dove in….
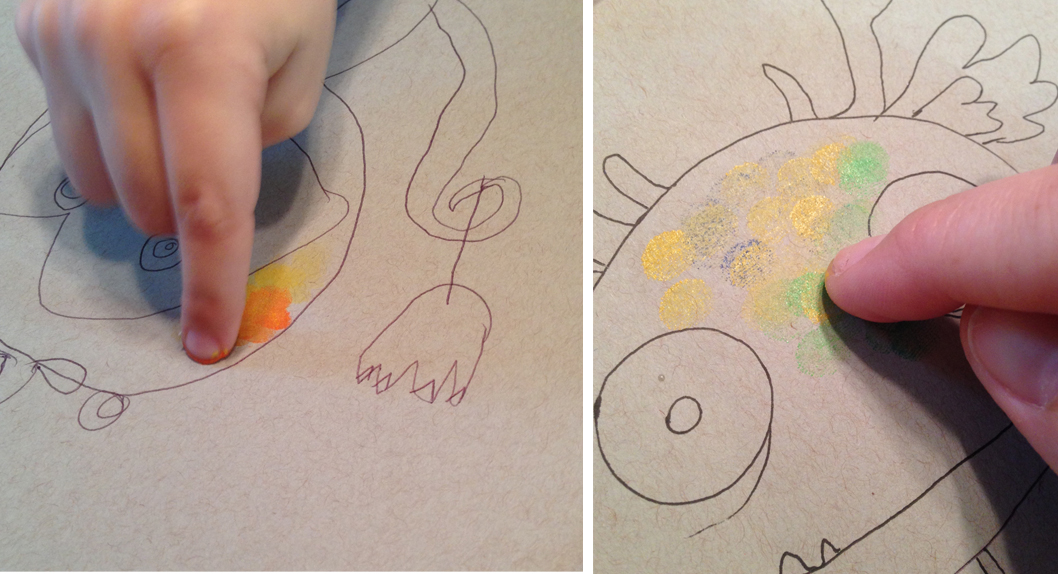
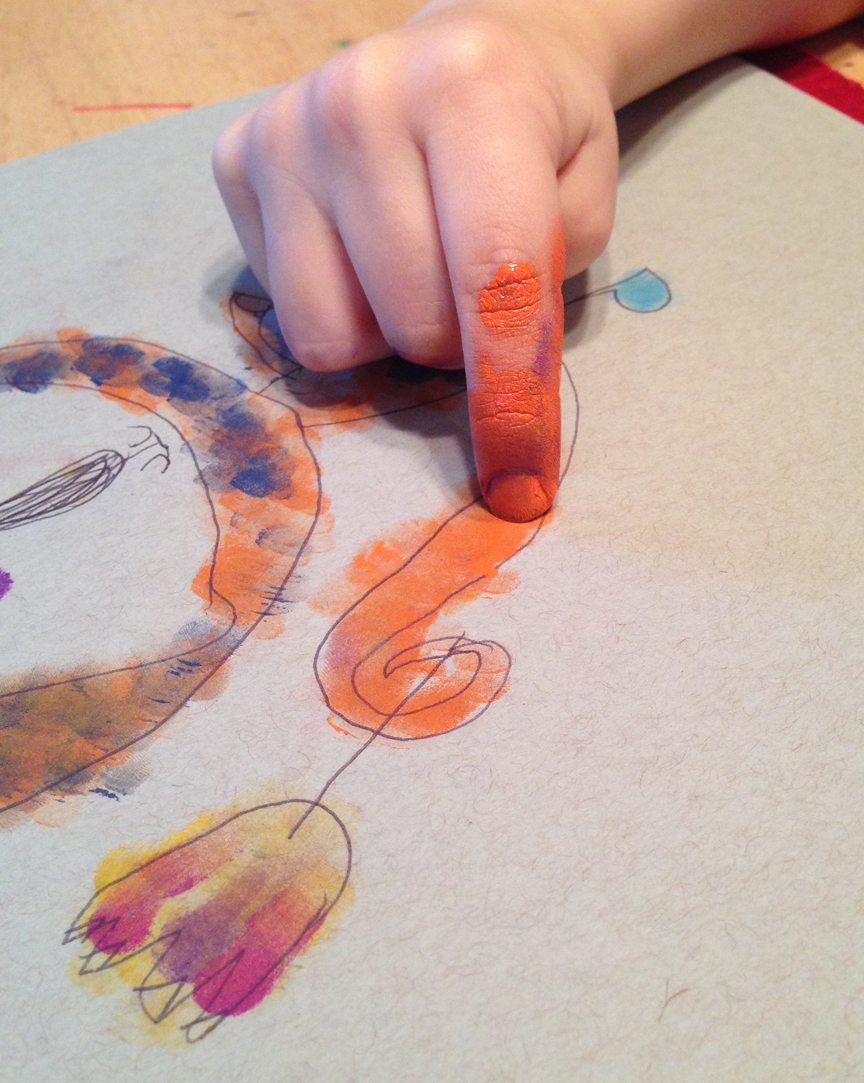
She played with different colors to sort of get a brown color going–oranges, reds, yellows and blues. And it was working! I, on the other hand, made rainbow monsters. But still, I was trying to demonstrate how the different colors blended when you looked at them from far away, without actually blending. An up side of using the ink pad stamper also, is that the colors DON’T run together, so you truly get a “point” of color. She noticed how from faraway, her drawing looked sort of brown, but closeup he was made up of lots of little fingerprints of different colors.
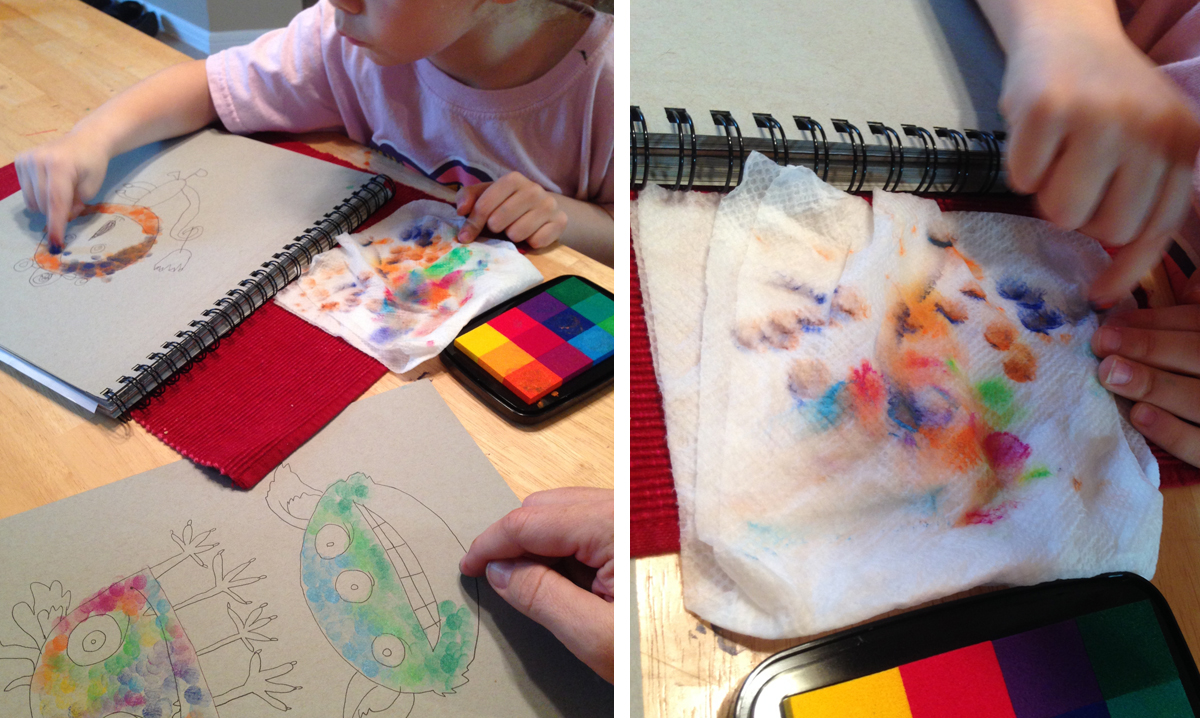
As for setup, it was one of the cleanest “messy projects” we’ve done in awhile! But to keep her from wiping her finger on herself, I wet a paper towel and put it next to her. This way, she could change the colors she wanted to use, without too much mess.
We had fun just blending the colors. It was calming. It was relaxing. The soft little pat-pat-pat sounds of our fingers on the paper was quite comforting.
She’s been learning a lot about elements (mostly from her VERY favorite science game, called Toca Lab–an EXCELLENT learning game, by the way), and she said, “We are making these characters out of tiny little dots…just like people are made up of elements.” YES! Exactly! And again, we talked about how color looks different in different light and different times of the day (a concept that Monet, especially, was really trying to capture).
She still found a way to get messier than you would imagine with a stamp pad…!
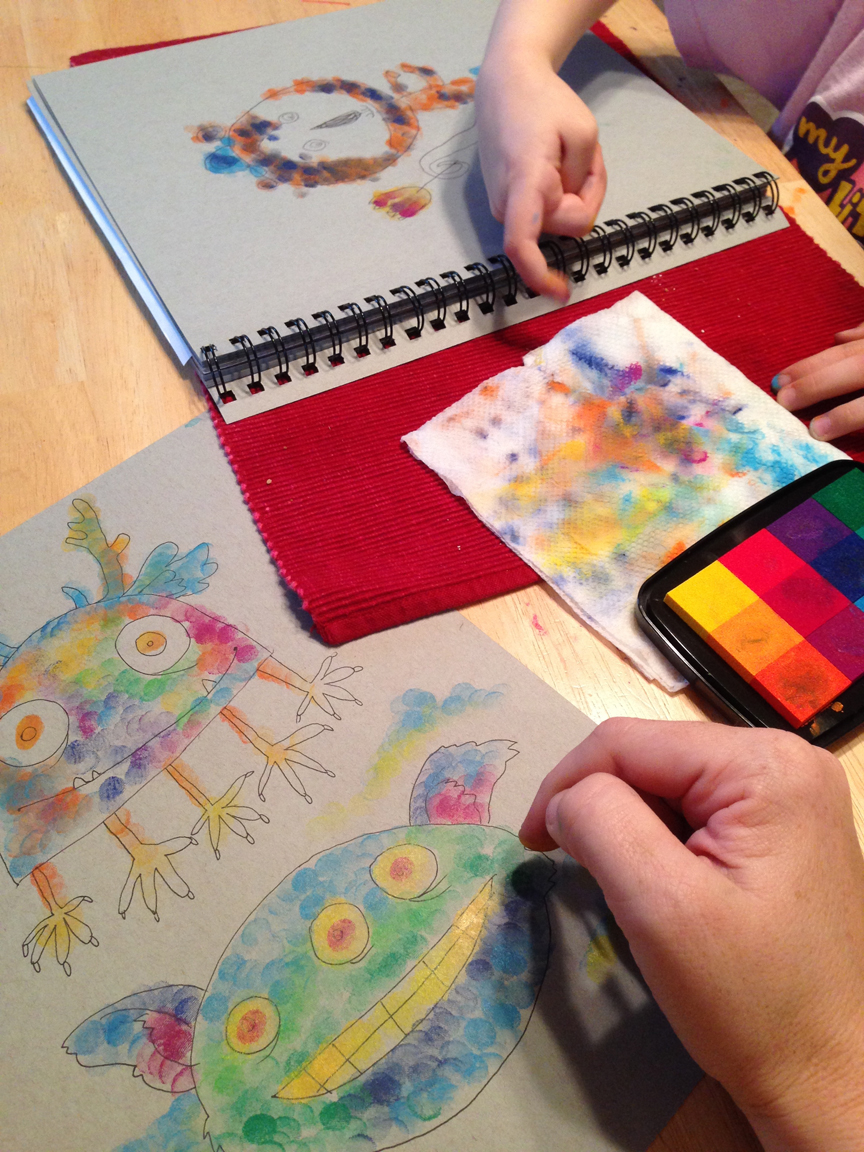
So here are our final doodles! Myla’s on the left, and mine on the right. It was such a relaxing, fun project! She really got into it. But the point is, it doesn’t matter what the end result is: it’s more important to not only make something fun with your special person, but to enjoy the time together. One of the coolest thing about being a parent (for me) is the opportunity to show someone something COMPLETELY new to them, and watch that fascination with it and amazement for the very first time. It’s almost like being able to experience it for the first time yourself, and see it through new eyes. It’s one of my most very favorite things.
On a side note, we are about 13 days away from the end of our Kickstarter campaign, with only a little under $5,000 left to go! If you’re interested in supporting our collaborative book project, would you PLEASE consider pledging (there are some great rewards, as well as copies of the actual BOOK), or at least sharing the link? I want to share our weird story and unusual doodles with the world! Thank you so much!
Kick It!!

If you haven’t heard, I’m running a kickstarter campaign in the hopes of printing a book of the collaborative doodles I do with our 4-year old daughter. (And if you have, I’m sorry…but I’m really trying to do everything I can to make this happen!) We’ve had SO much support, and so many great shares and contributions–and we’re already over HALFWAY there!
It is a lot of money for a goal, but for a 96-page, hardcover, FULL color book full of doodle pages and quirky illustrations, as well as the cost of shipping everything to everyone, I have hope that we can do it.
If you’re new to kickstarter, there are a couple of things you should know: 1: You don’t get charged until (and unless) the kickstarter project makes its goal by the deadline (in our case, April 17th). And thusly, 2: If we don’t make our goal by deadline, the project fails and nothing happens. Boohoo!
For your pledge, you can select different reward tiers, and I’ve got some pretty cool ones: postcards, gift tags, books, and CUSTOM doodles!
I really really want to share this book with everyone! I want to share something weird and wonderful with the world. I want to put something GOOD in it. And I want to encourage other people to do the same thing in their own lives.
So please PLEASE consider putting in a pledge–every bit helps!–and if you can’t, please just share the link with anyone & everyone you think might enjoy it. Thank you all SO MUCH!
Here’s the link again to our kickstarter campaign…Thank you thank you and thank you again!
Cardboard Duct Tape Fairy Wings
Things aren’t always as crisp in real life as they are in the parenting magazines, are they? Mistakes and miscalculations are made. And while most of them are fairly harmless, life doesn’t always look as perfect as it does in the pictures. But you know what? That’s OKAY.
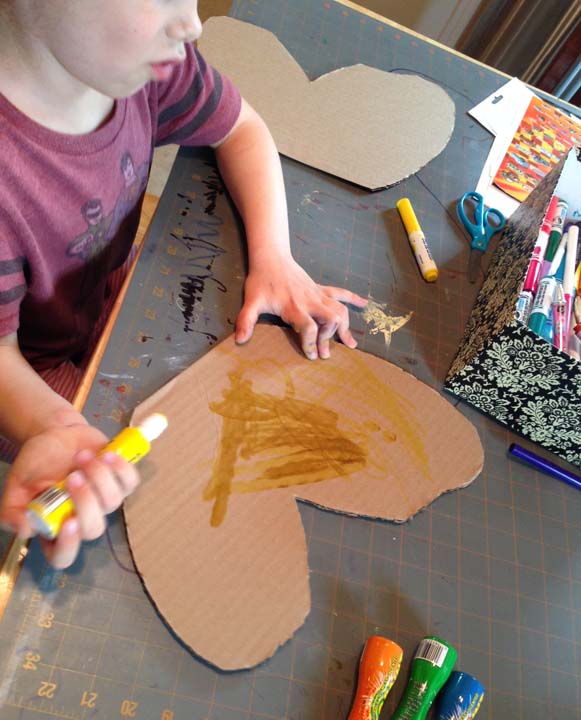
Sometimes I find that the standards I set for myself are WAY higher than what anyone else expects. Take, for example, the idea our daughter had recently to make some butterfly fairy wings. “Can you help me make wings, mama?” she asked me. And who can say no to that? There are times when I say “Baby, I can’t DO that, I don’t know how.” And our daughter, aware of her blatant challenge or not, will say, “you can do it, mama. I KNOW you can.”
If I were to make my dream fairy wings, they would NOT be made from cardboard. But cardboard is what we had on a rainy stay-at-home day when I didn’t feel like leaving the house, and that’s what we used. And you know what? She didn’t mind at all.
Do YOU need a set of on-the-whim fairy wings, like, STAT? Well, I’ve got some some ninja crafting moves right here. Just call me the MacGyver of crafty mamas….
Because of an anxiously, excitedly impatient kid, and without the luxury of being able to consult my trusty Pinterest pins before getting started, I just quickly cut out some butterfly shapes–one side each–from a small piece of cardboard I had. Later, when I had a chance to look it up, all the pins I read said to make one big piece. But like I said–I was ninja crafting.

While she colored the separate wing pieces, I was wondering to myself how the heck I would get these on her back. I looked up a few pins, which–as I said–all had a single wing shape. I only had my two hastily-cut-out shapes…but I was pretty confident I could make this work.
By the way, have you seen these no-mess paint stampers? We found them at the craft store. A super easy way to get the paints out without REALLY getting the paints out…
Oh wait. She was done doodling and I hadn’t quite figured out how to attach these yet. QUICK! I went for my box o’ embellishments and came up with some sequins, which she spent a bit of time gluing on. For a little more interest, we used our trusty rainbow ink stamper for a little more color to the wings.

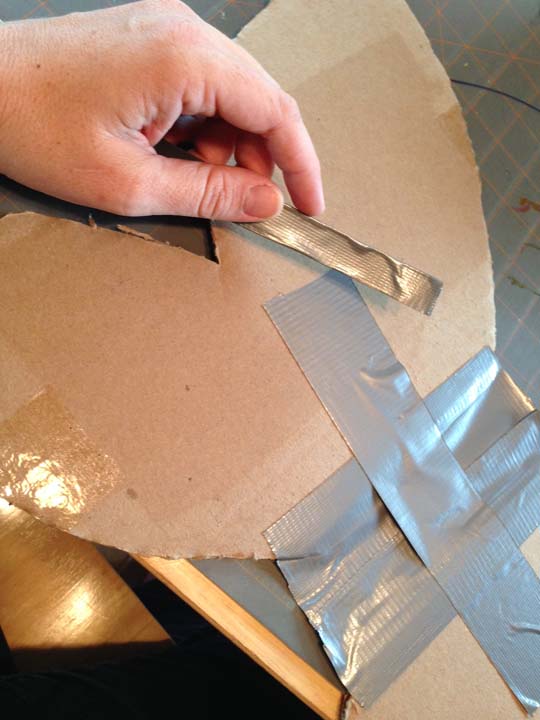
Okay, finally my stalling had paid off, and I had a chance to think it through…Maybe I didn’t plan this out very well (or at all), and maybe I was using last-minute materials. But what works best when you have nowhere else to turn? I’ll tell you, my friends: DUCT TAPE. I made a “bridge” of sorts, connecting the two wings together. Then I constructed a set of “backback straps” by folding a piece in thirds for the strap, and first: taping them on the top of the wing bridge. I did it at a bit of an angle, so they’d fit around her shoulders pretty smoothly.

I held them up to our daughter, wrapped the straps around her arms, and taped them back down at the bottom seam at an angle as well.
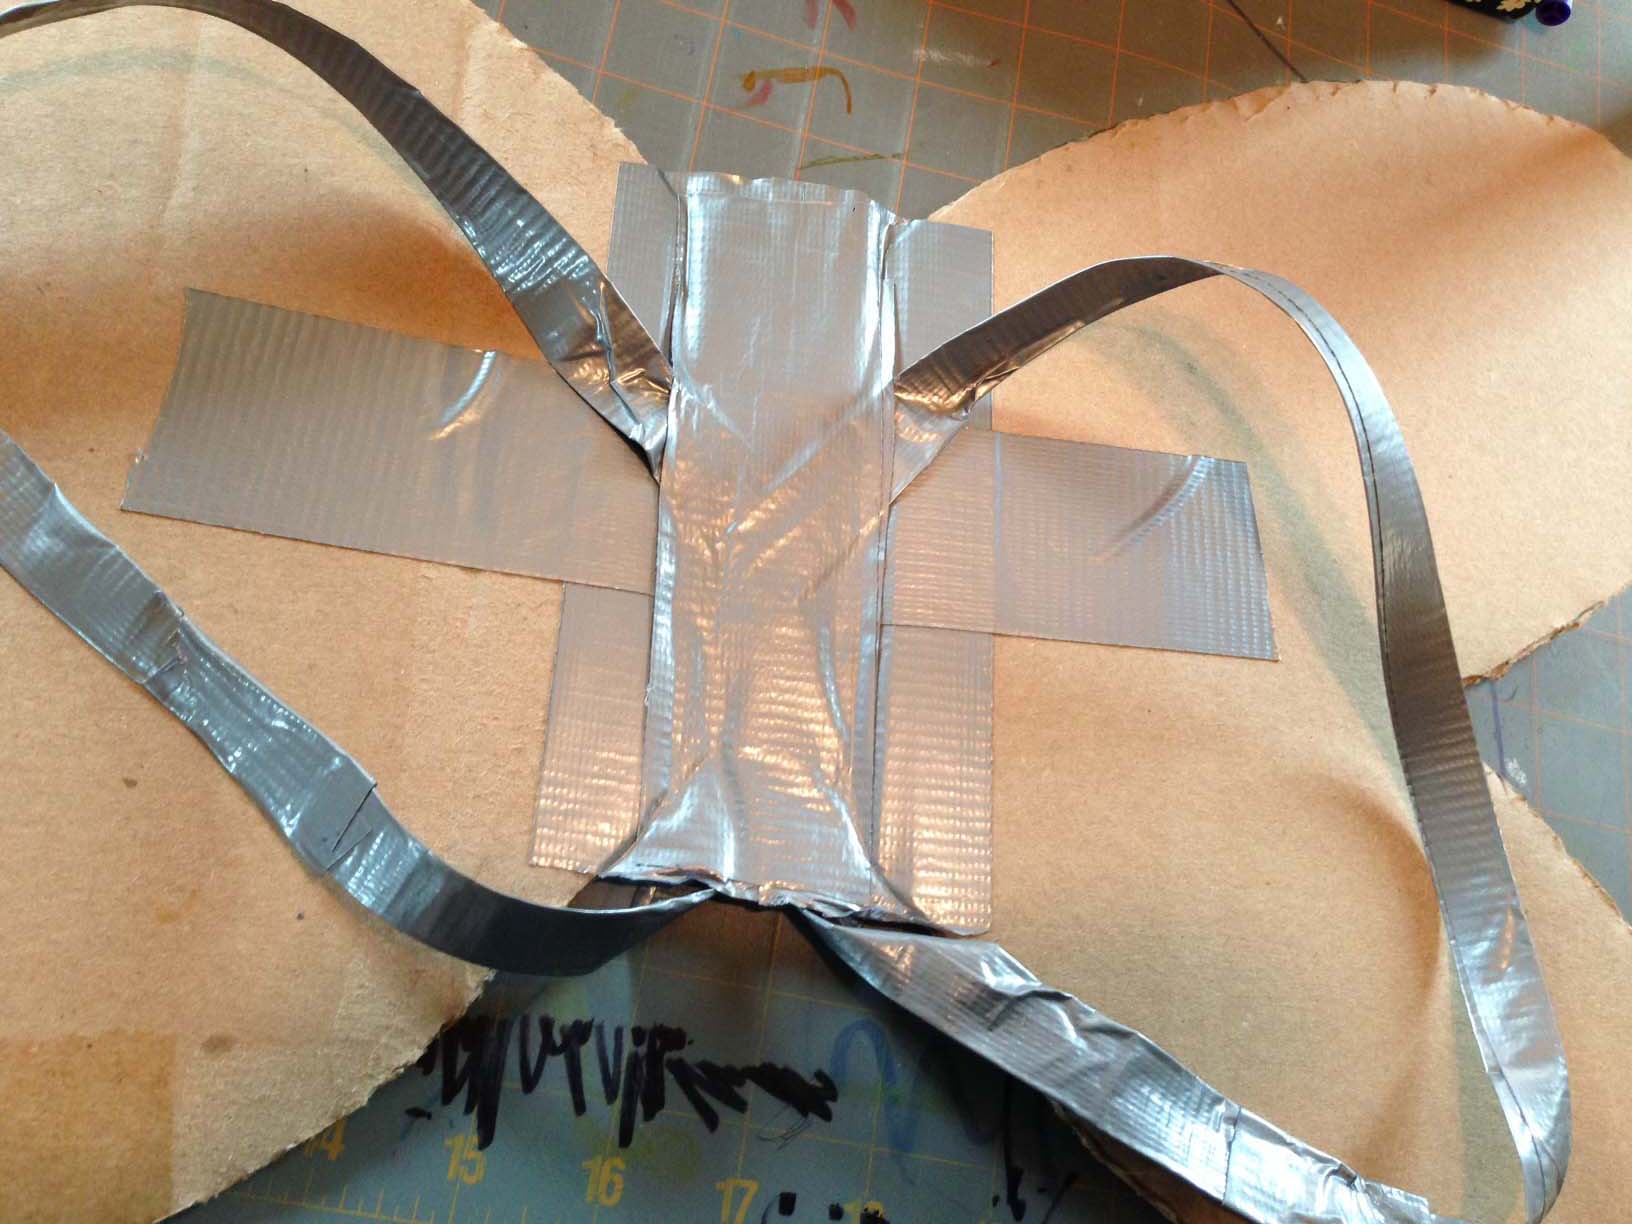
I fastened them onto the “front” side for a little more support, and taped those down, too.

Now we had a sort of “backpack” set of wings!

Since we first made these wings, she’s worn them to the grocery store, on outings, exploring in the woods, visiting neighbors, and just hanging around the house. And while they’re not SUPER sturdy, they’re holding up fairly well, actually!


So there you go. Sometimes I tell myself we can’t do something, for a number of reasons: we don’t have the right supplies, we’d have to go to the store, I’m pretty sure I can’t make it look exactly like what you’re imagining. But, you know, sometimes all they want is something WAY simpler that what you have in mind. Even if it doesn’t REALLY look like fairy wings, it’s close enough for her. And all I did was grab some of the stuff around me and SIMPLIFY. Don’t be afraid to mess up–if you make something out of love, it’s got a higher chance of survival than something that isn’t.
And sure, with some planning and some craft store trips, I could’ve made some cosplay-quality wingness to be adored…but you have to pick and choose your battles. This was one I was willing to simplify on. They have all sorts of decorative duct tape, just ripe for customizing.
But you know, now that I’m thinking of it, wouldn’t it be cool to do a STEAMPUNK set of wings?!?! Myla keeps asking me where MY wings are…and this metallic-looking duct tape would look really cool painted to look like rivets and metal and such. Hm. I have an extra set of wings I cut as a backup…maybe I need to look into that…. 🙂
So give it a try! See if you can make some super easy, spur-of the moment, on-the-fly (har-har) wings, and let me see your kids (or you) exploring in ’em over on the Facebook page!
And on a side note, have you read our proposed Kickstarter project? We REALLY want to make a book of our collaborative doodles! We’re nearly HALFWAY THERE with several fun rewards for various pledges. Every bit helps–a share, a like, or a re-post. We appreciate it!

