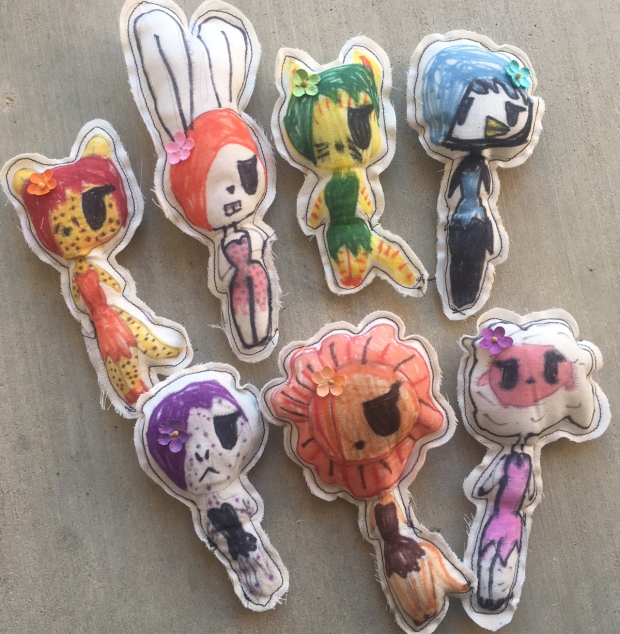
Easy Dolls
I’ve had my daughter come up with doll ideas in the past that have been fairly complicated, and required a great deal of my attention. But a few days ago, in an attempt to keep her occupied in something creative (rather than vegging out on her Ipad), I suggested she DRAW her own simple pillow-dolls.
“I can DO that?!?” She questioned. Of course! And the best part is, it takes minimal mom-effort. 🙂
I started with a bolt of inexpensive off-white muslin fabric I had. I have no recollection of how I obtained this fabric (I think my mom once sent it to me), but it’s been around a long, long, time, and I use it for EVERYTHING.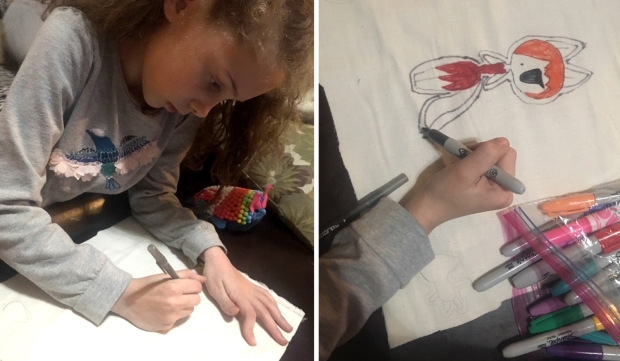
I grabbed our bag of permanent markers, and told her she could draw away, keeping in mind that it had to have a seam around it, preferably simpler than the drawing, to make sewing easier and more sturdy.
Once she did that, I took her to the sewing machine, where I had her help guide the fabric (she’s still learning to use it herself), and with the fabric doubled over, we just stitched all around the outline, leaving a gap on the leg to stuff it.
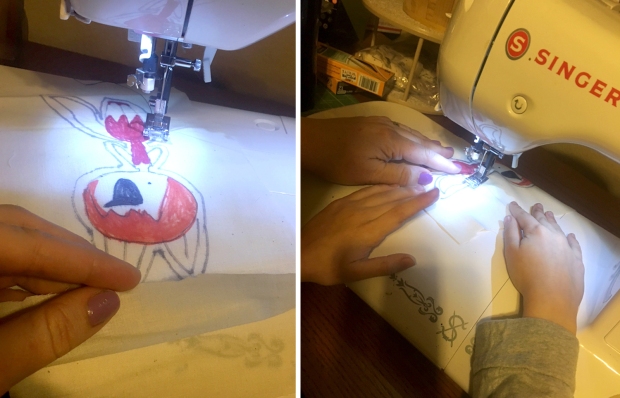
I figured this would be much easier than dealing with flipping a doll inside out, as you do with more detailed works, and this was VERY exciting to her. We cut out the doll around the stitching (see the gap in her leg? That’s where we stuff), stuffed her, and then completed the stitching with the machine.
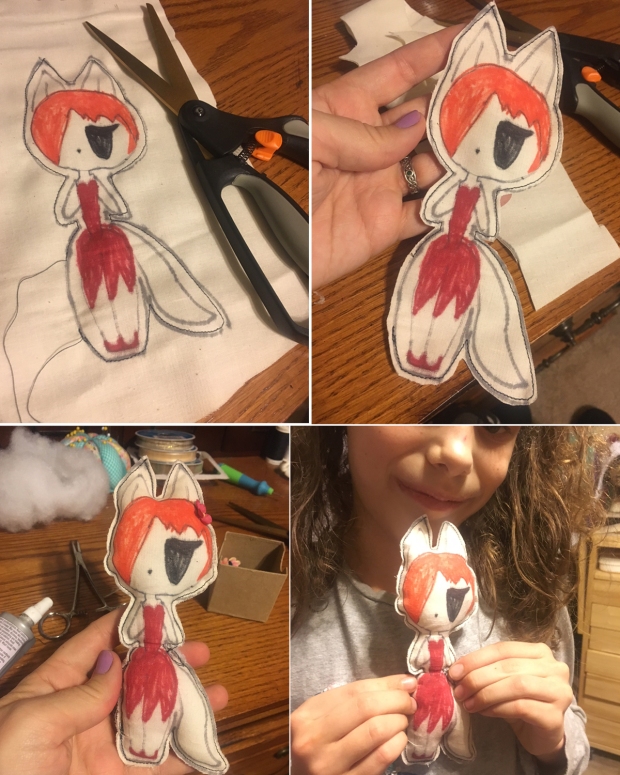
She was SO excited! You’d think we’d never made dolls before. “Why didn’t you ever TELL me we could do this??” she asked excitedly. I reminded her that I had tried to get her to do this MANY TIMES over the years, but she always had WAY more complicated things in mind. Anyway, apparently times had changed, and she was enthralled, immediately sitting down to draw more.
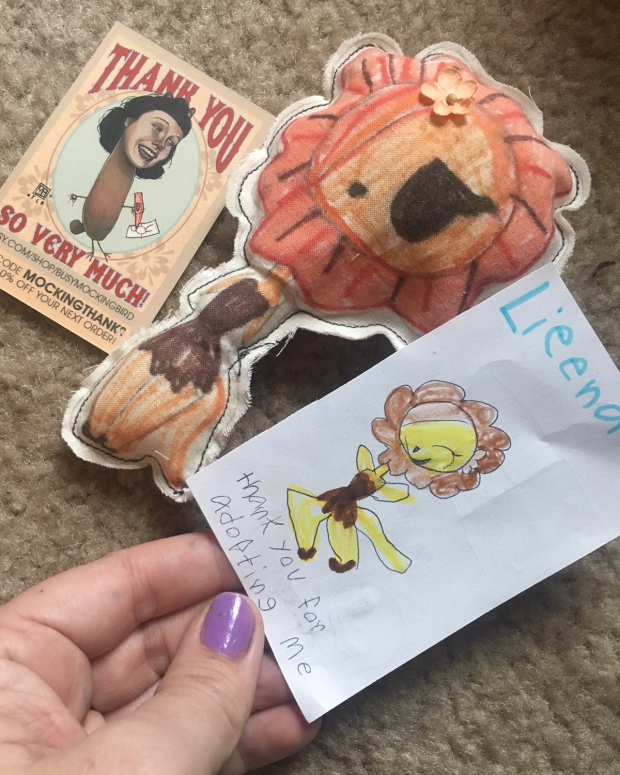
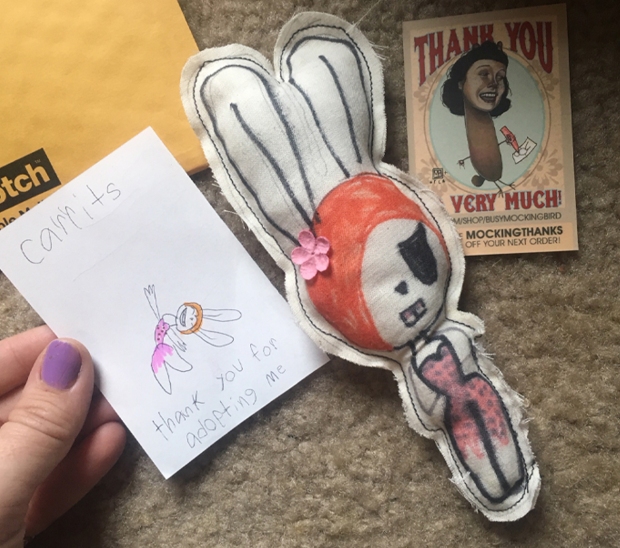
And they were lovely! She said she wanted to call them “SweetKitties,” and asked if she could put them up for sale in my Etsy shop for $5 each. I had intended to offer them here, but surprisingly, they sold out within an hour of posting them!
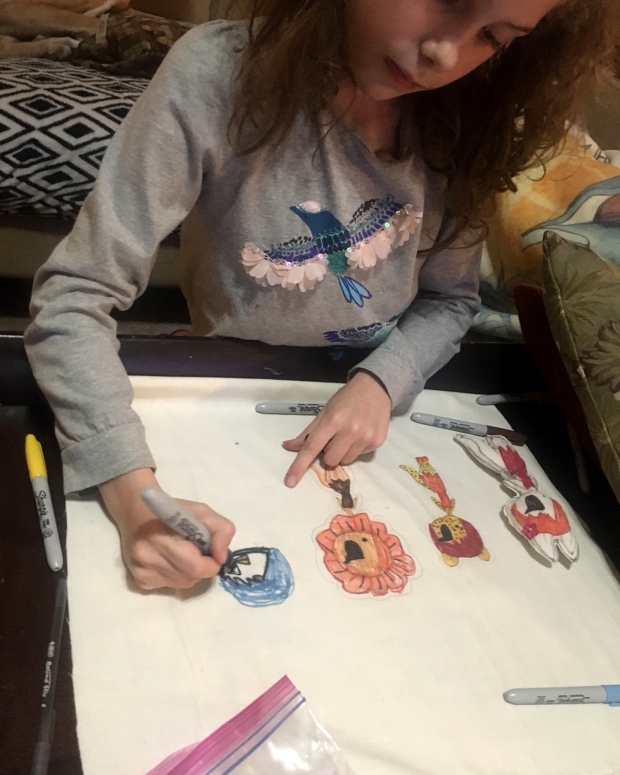
I am so grateful to have so many sweet and generous people that read our blog pages and social media supporting our art, and I’m grateful for each and every one of you reading these words right now. Her excitement that someone actually bought her SweetKitty dolls was thrilling. She helped me package them up, even making little “adoption cards” for each of them (like I do with my Dream Creepers).
Someone suggested she should put catnip in them so their cats could carry them around, but she worried that a cat would tear them up. She says she’ll make more (because people so kindly asked if she would), but as kids don’t always have the attention span for dedicated business, we’ll see how it goes!
In any case, it was heartwarming to see so many people be so encouraging and supportive towards and 8-year old kid. I had initially made this post to share the simplicity of making fun & easy dolls with kids, but it really truly was endearing.
In any case, if you don’t sew, you could always do what our stuffed animal-loving kid did before this most recent project: make the front and backs out of regular ol’ paper, stuff them with wadded up scrap paper (or toilet paper) and tape all around the edges. BOOM–instant doll!
So make something fun, and easy, and get those kids CREATING!
Plastic Pumpkins
A million years ago, when Myla was four years old, we bought a plastic pumpkin (because the husband was deployed, and I didn’t have the energy to scoop the guts out of a real one). I got out the permanent markers like a good mom (ahem), and let my daughter go to town on it.
I drew a face on it to get her started, thinking she could add things to it. Instead of adding features to the face itself, she drew characters (mostly Batman–her favorite at the time). Which was still pretty cool.
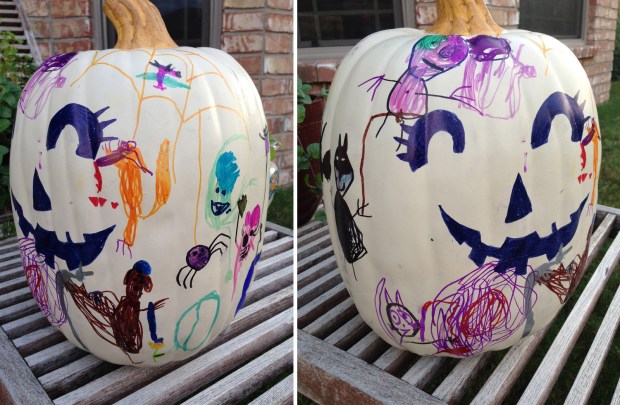
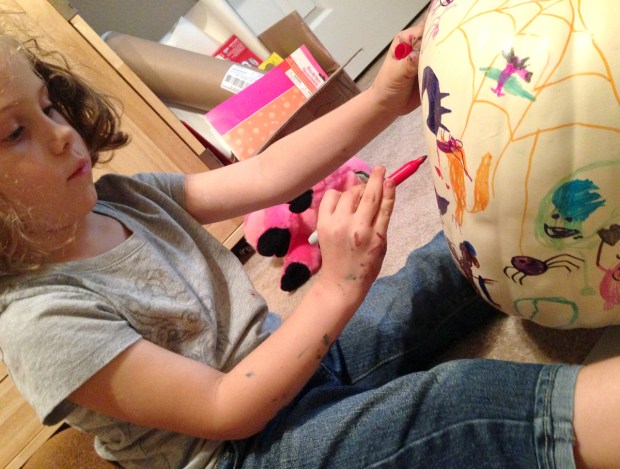
This year (because I just don’t like the mess of a real pumpkin), we were looking at Halloween decorations, and instead of buying a new one, I went back to this old pumpkin, made sure I had a bunch of photos of it, and then painted right over it with acrylic paint.
And once again, we sat down outside with our markers in the warm autumn…sunshine (this is Texas, y’all), and filled it with all sorts of Halloween goodness. I thought this time, we’d draw characters that I could paint with more detail later (which Myla thinks is sort of like magic).
Once it was done, I used my acrylic paints to give it some quick paint detail. It’s a pumpkin, so I didn’t go TOO crazy with detail, but I had fun making the little doodles we drew come to life. (MWHAHAHAH! IT’S ALIIIIVE!!!)

It occurred to me that there was a pretty empty area to fill, and instead of drawing something new, I filled it with a quick lighting bolt, which is SUPER easy, and I’ll tell you how to do it, “step to step” (as Myla used to say).
Step 1: Draw a big ol’ wiggly line that takes up the area you want to fill. Step 2: Add another big ol’ wiggly line if the area is a wonky shape. (It doesn’t matter too much what it looks like–it’ll look fine when it’s done.)
 Step 3: Draw wiggly lines coming OFF of your wiggly lines in random places, to fill out the wonky space. End the line in a sort of “branch” Y or V shape (depending on how you see it). Step 4: Keep adding little wiggly lines off of your wiggly lines. It doesn’t look great close up, but from a distance, people will get the idea. and BOOM! You’ve got lightning!
And it filled out the blank spaces in our pumpkin pretty well. Other space-fillers included spirals, rays coming off of the character, and spiderwebs….
(Myla later asked me why her skeleton was on a target…I was actually going for a sort of Twilight Zone-ish sort of spiral, but I guess a target is sort of spooky too, right? RIGHT?)
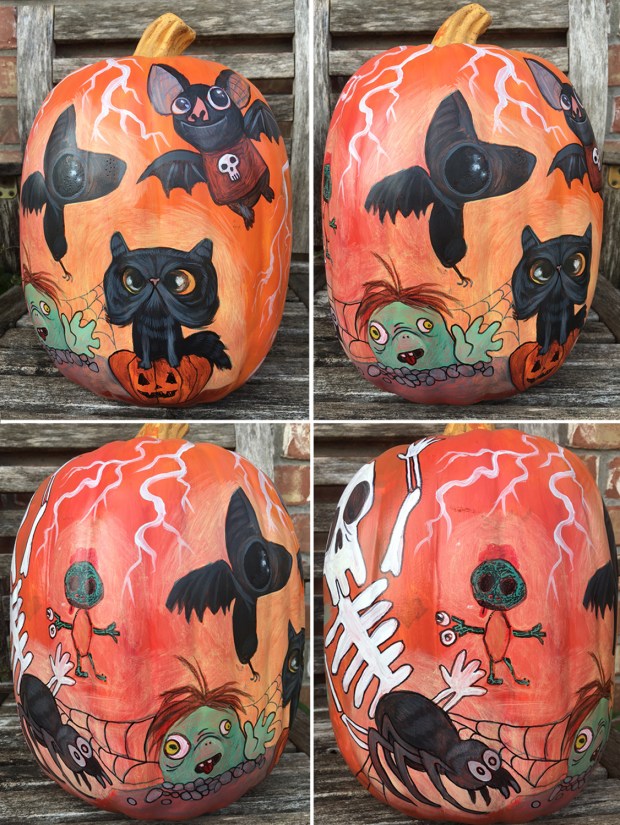
And there it is! You’ll notice my drawings are pretty indistinguishable from my 8-year old’s, despite my being a grownup, not to mention a fairly experienced illustrator. This is because Myla draws fast, and I have to draw fast to keep up with her. Which is why my “zombie” looks sort of like a green potato waving hello. That’s how I roll sometimes.
But the important thing is, we made a memory! We spent time doing something fun together without some grandiose end plan. Sure, we didn’t get pumpkin goo all over our hands, and we didn’t have to watch it decompose and liquify into slime this whole upcoming month, but we had fun drawing on our plastic pumpkin together, and we have a pretty cool keepsake for awhile now. And that’s totally okay, too.

By the way, if you’re into it, the kid and I will be participating in our own version of Inktober: drawing a spooky thing every day for the whole month of October. You can join us, and post your own thing on your own pages, too. No one wins any awards or anything, it’s just for fun to see if we can do it. We tried last year as well, but failed. We only really succeeded a couple years back–and you can see all our 2015 Inktober drawings HERE.
But this year, we’re READY! We can DO it! We’re probably going to do some other activities as well, because we love Halloween. So keep an eye out for our projects on Facebook and Instagram!
Happy upcoming October, everyone!
Easy Fliers
When we first moved into our Texas house, I asked Myla (who was 3 years old at the time) what she wanted her new room to look like. All she said was “green and pink dinosaurs.” So that’s what we did. And although her room has changed a little over the years (mostly, getting filled to capacity with stuffed animals and art projects), the little hanging pteranadon I made from cardboard still hangs in the corner by her bed.
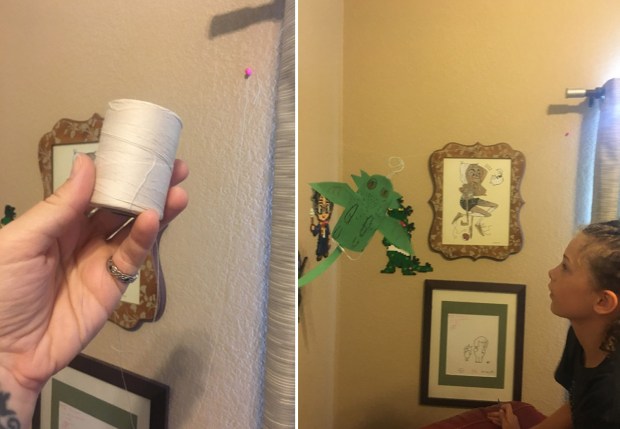
On weekends, we do a lot of art projects, so recently, Myla and I decided to make our own hanging fliers. I had a sheet of foam core (but cardboard works too), tape, markers, and an xacto blade. And aside from a bit of string, that’s pretty much all you need.
We started by drawing our creatures onto the foam core with pen. The wings took a little help, as I was planning on having them slide through a slot in its upper back. If you’re not up for that, you can just do half a wing, flip it over, and trace the other side, and just tape it to the body. But not a lot of precision is required, really.
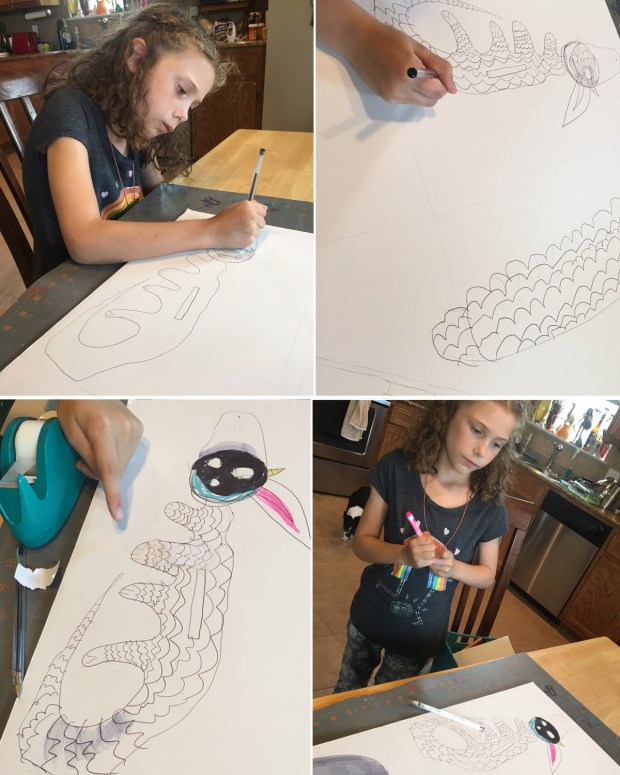 I took on the Xacto cutting myself, as I really didn’t feel like taking Myla to the E.R. for slicing her little kid-fingers off (keeping in mind that I might risk doing the same to my adult-fingers–I am quite clumsy). Once the creature was cut out, I gave it to her to draw on the other side, so her creature would be visible from all angles.

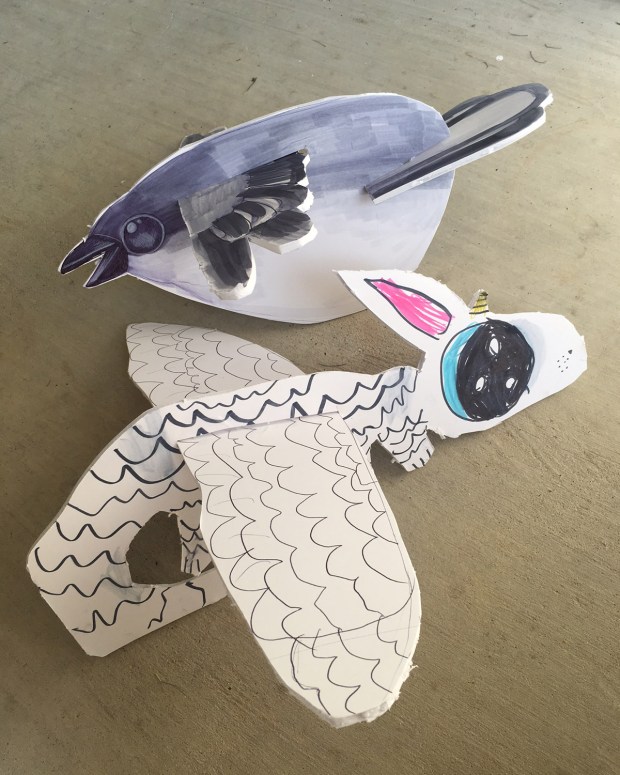
While she decorated the back side of her dragon, I hurriedly cut out the mockingbird I’d drawn, and hastily colored the flip side of mine (because she is a kid and works three times as fast as I do).

Next, we put their wings through the slots, and taped them down. BOOM–our own creature fliers!


Here’s my finished chubby mockingbird, which I can then tape a piece of string to and hang from wherever I like.

And here it is with Myla’s dragon…
You can also make little fliers on a much smaller scale…While digging through old blog photos, I found this little project from ages ago, where we had made tiny palm-sized fliers one weekend, just using cardstock, scissors, and tape.

So there you go! If you’re looking for a quick & easy project to do with the kid (or to do for your own room), they’re fun and don’t require a big supply list. You could even use old box cardboard from the recycling bin (which is what I did with the pteranadon).

So play around and see what you come up with! And if you do, please show me on our Facebook page!
Dracarys…
Recently, I was contacted by Education.com, asking if we’d be interested in trying out one of their many learning projects… They sent us one called “homemade airplane,” which is an airplane made from a hanger, that can “fly” on a zipline….and it looked like a pretty fun project with a fairly small supply list, so I decided to give it a try.

…Of course, we always have to add our little spin. So when I introduced the idea to Myla, she instantly wanted to make it into a dragon instead. WHOOPS okay, that’s fine, we can work with that. So here’s basically how we did the project:
1. Find a wire hanger. This proved to be quite a difficult task, as we apparently threw out all of our wire hangers in a fit of rage one day, but I found ONE hiding in the back of my closet, behind some party dresses I’ve never worn.
2. Bend the wire handle into a loop, and be sure it’s closed, as this will be what it slides down on the zipline.
(This is where I noticed that the bottom of my hanger was only connected by a wonky weak little cardboard tube which broke not long after I touched it, so I bent it into a different shape altogether, and Myla taped it together because scotch tape solves all of her problems.)
3. Trace it onto paper & cut out two. Whatever your shape is, trace it onto a folded sheet of paper so you have a front and a back.
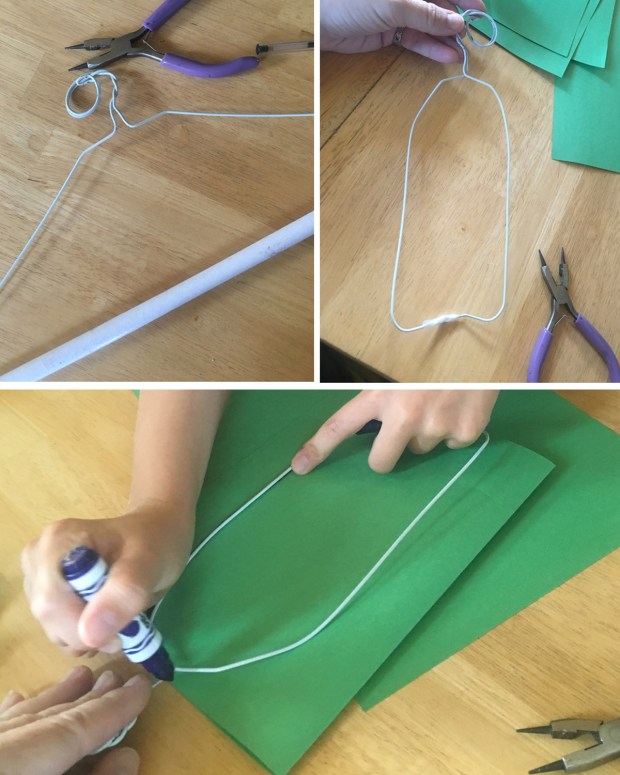
4. Decorate it. While I hot-glued the bent-up hanger onto the back side of the paper, Myla decorated the front.

So now he looked like this:

…which she said looked ridiculously duck-like, and decided she needed to give him some head-fins.
5. Hot glue that junk. Glue it all to the hanger. Myla added the head-fins, wings, and a tail to hers.

And BOOM this is the final dragon. Pretty cool! And aside from the gluing, she pretty much did it herself.

So here’s where it springs to life.
6. Get some fishing line…or other such thin thread. The instructions said “fishing line,” but despite my massive craft resources, I couldn’t seem to find any, and decided to give this very thin thread a try. Pin it between two walls with pushpins, and BOOM you have a flying dragon, ready to decimate battlefields and lay waste to various enemies.
…Or, just fly around a corner of your room looking cool.
So there it is! Education.com has lots of other fun learning activities on their site, and I think a free sign-up gets you lots more access.
So have fun storming the castle!
(Side note: “Dracarys” is the command that the Mother of Dragons–Daenerys Targaryen, from Game of Thrones–gives her dragon Drogon, that compels him respond by shooting flames from his mouth, destroying her enemies. So, that’s nice.)
DIY Pin Art Display
Enamel pins are kind of a big deal these days, aren’t they? They’re so cute and cool. And aaaaall the kids are collecting them. Displaying them is a whole OTHER deal.
I’ve seen banners, hanging fabric, pennants, and other ways to show of a lovely collection. A common theme is corkboard. I took the quick simple way out a while back, and grabbed the adhesive corkboard squares you find in office supply stores….which lasted a few short months before they all came crashing down in shambles… My friend Aletta came up with a suggestion: what if we DREW a background for them? The best part: it was fun and easy to make, and I could do it with the daughter!
I got a couple of embroidery canvases (it’s made to stitch through, so the fabric is a little softer than regular painting canvas, but those would probably work too), and some Sharpie markers. We started by taking a couple of pins that sort of went together, and drawing backgrounds behind them.
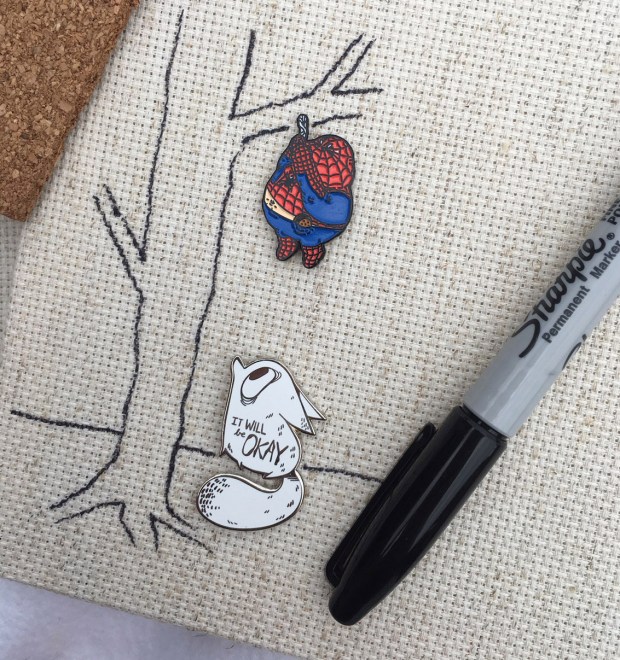 If I started this project having some fun, it was nothing compared to the fun the kid had. Myla is age seven and tells stories as she draws, so this project was PERFECT for her imagination. She’d grab a pin and start doodling, telling stories as she went–adding characters, sceneries, and battles between pins.
 It didn’t take long before we had filled our three canvases up…
 And we ended up with some fun, funky little canvas displays…Mine looking a bit like a Keith Haring comic book …
 And Myla’s turning out pretty cool as well…
 Later, we decided they needed a little color, and Myla gave me permission to add to them all. I didn’t want to take too much away from the pins or the drawings, so very light washes of acrylic paint seemed to really bring everything together.
 And voila–DIY pin displays! Ready to hang right on the wall! And if you feel like wearing a pin for a day, just take it off the canvas and put it back on when you’re done!
 Here’s a better look at them, one by one: Myla’s first one was a tree scene with most everyone hiding in the trees from Casper (who is famous, because there is a camera taking photos of him), and a random arm holding Audrey 2 over everyone…
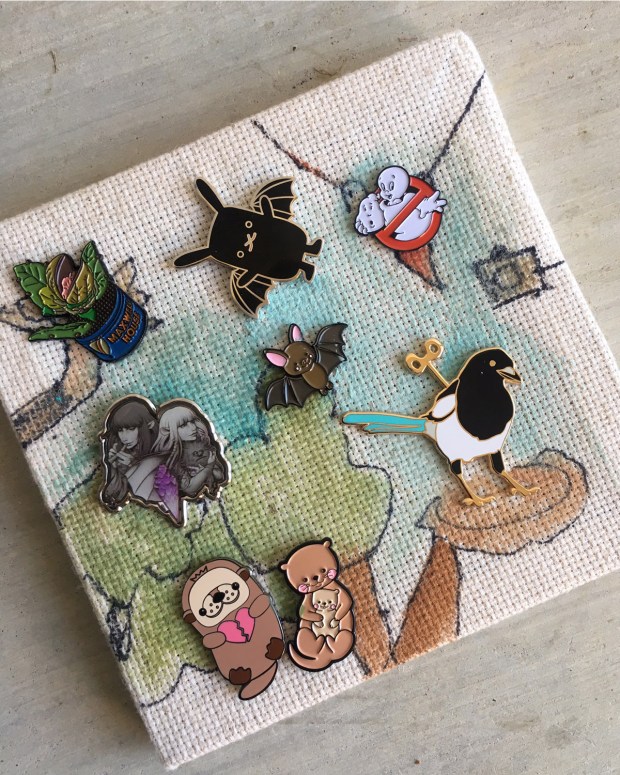 Her next one features Immortan Joe and the “blood bag” Mad Max (see–he’s hanging from the ceiling?) fighting, and two starry-eyed monsters stealing eggos and threatening a very passive, jet-pack flying stormtrooper. At the bottom, a lunch lady chases the running dishes, as the cats all jump on a trampoline, and beetles climb all over a building full of people.
Like ya do.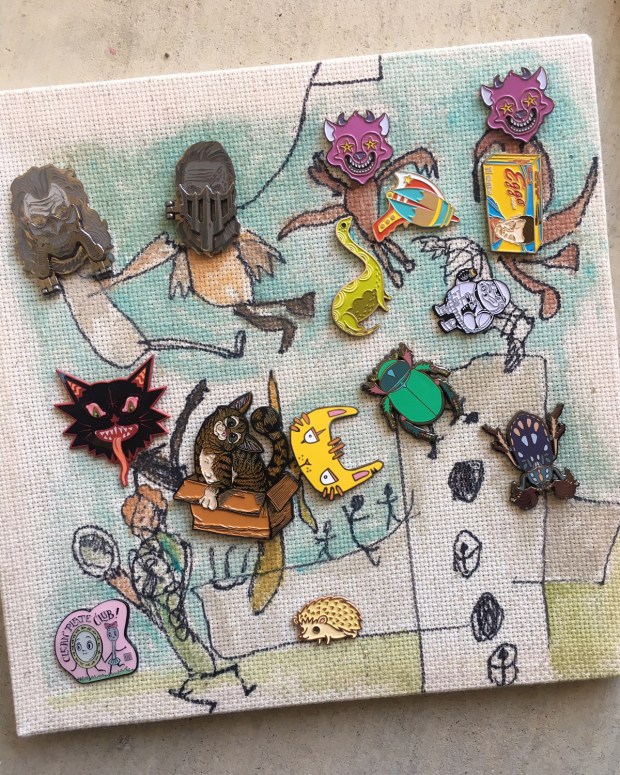 And mine has a skelecorn and magic floating arctic wolf protecting the land from an alien invasion, a strong-arm with tattoos, a very worried arctic fox stressing over tree-climbers, and and Pee-Wee unwittingly driving into a city being attacked by Audrey 2, the Thing, and Godzilla. Yikes!
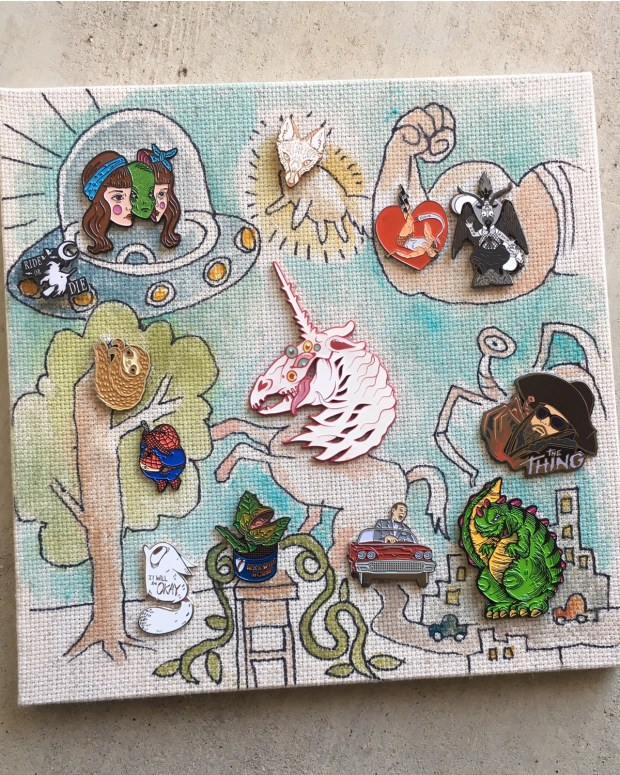 And there you have it! Easy to do…fun for you AND for a kid…looks pretty on the wall, and yet still super functional!
 So go out and give it a try! Or tell me about your DIY pin display ideas–what do you do to enjoy your pin collection?
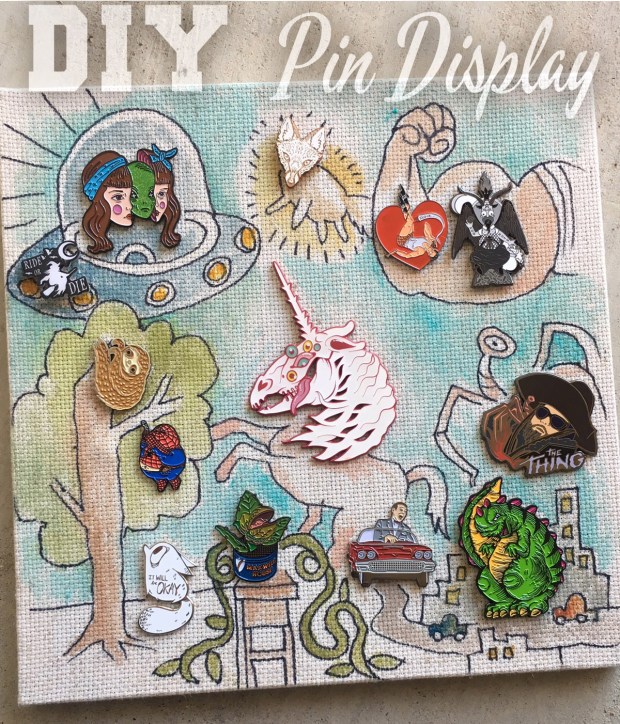
(Our pin collection featured here: anxiety wolf by Namoi Romero , pinup Dale Cooper by Emma Munger, the Thing by Annie Frenzel, chubby Stormtrooper, Spiderman, and Casper unmasked by Alex Solis), windup bird by Bleu Louise, Godzilla and box cat by Noosh Studios, sloth, hedgehog, and Nessie by BoyGirlParty, alien-head girl by Julie Filipenko, clean plate club by Mab Graves, Immortan Joe and Mad Max by Pinhead Company, tiny bat, mama otter with baby, and ray gun by LuxCups Creative, bunny-bat and broken-hearted otter by Flat Bonnie, coleoptera beetles by Dianafloresblazquez, Dark Crystal by Zen Monkey Studios, arctic wolf face by Monica Knighton, starry-eyed monsters by BeATrashCat, skelecorn and wicked black cat by Bbllowwn, and a few others that were either gifts or that I can’t seem to recall…)
Designing Dolls
The other day, I was in a crafty mood, and felt like doing a project with Myla. I pushed all my “to do” things and other commitments I’ve been putting off, and asked her if she wanted to make a doll.
She ALWAYS wants to make a doll. “There’s a creature I’ve been thinking about,” she said excitedly. “I think it would make a great doll!” She grabbed her markers and started drawing it out.
When I do projects like this, I like to let her feel like she’s a big part of making it. We went to the craft room, and picked out some fabric from my stash. Apparently, this creature is a sort of cat-like mossy dragon, so we found some mossy-looking fabric that fit perfectly. I let her decide what fabric would work best. She gave me details on how it should look–long tail, webbed feet, spiky hair…
I sat her on my lap and had her help a little with the beginning. She’s still a little needle-shy, but I showed her how to guide the fabric without pushing it. After awhile, it’s easier to finish it up myself, so she bounced off to another paper project while I finished up the sewing.
Later, when the body was done, I asked her to draw the eyes on with a pen the way she wanted, so I could paint them.

And finally, the little mossy cat-dragon was done! I’m no master sewer by any means, and my dolls are ALWAYS quite wonky, but the best part is that she doesn’t care, because we made it together and she designed it herself.
I always ask her what she thinks when it’s done, and she always says she loves them so much. Once, she said “when we make dolls, it doesn’t always turn out exactly like I thought in my drawing….but it always turns out so much BETTER.”
I noticed she uses dolls as an icebreaker with other kids at the child care room at the gym, and sort of walks up to kids and just starts playing dolls with them. Sure, they ask what the heck it is, but when she tells them, I think they sort of dig it. I brought it to visit her at school lunch the other day, and made it move around like a puppet and play, and had the kids (who had at first looked at me like I was odd…which I am, btw) cracking up and laughing at the silly antics of her little mossy doll.

So wonky or not, it took me about an hour and a half to make something that she could make connections with. In just a short amount of time, we made something she could proudly tell people she designed…and that little feeling of pride glows on her face when she talks to other kids. Which makes ME smile. And that’s what it’s all about, isn’t it?
Fun Little Nature Project
It’s been a busy week, trying to keep up with the world…sometimes it’s nice to just step away and do an easy, fun little thing with the kid.
My mother’s day weekend was spent with a large group of giggling Girl Scouts, on a Mother-Daughter Campout in the woods. (Please please, calm your envy…)
Even with the archery, horseback riding, and nature walks we did, if you asked Myla what her favorite part was, she’d tell you it was the nature project. She’s been asking me to do it again, and since our Texas days have cooled down for a couple of days, we were able to just go into our yard and have some fun. So I thought I’d share what we worked on, in case you’d like to give it a go yourself!

First step is to Pick some plants. You want to find things that have a variety of shapes and sizes and colors, but you want to make sure they’re fairly flat. You don’t need to go far; if you’ve got houseplants nearby, or have access to grass (unlike some Ohioans I’ve heard, who are currently covered in snow) and plants in your own yard, all you have to do is gather them up.
Next, you’ll need contact paper. I’m sure it’s cheaper sold in rolls, but I only happened to have self-laminating sheets on hand, which are admittedly a bit pricier. But they got more action with this project than they’ve seen in a while, so I didn’t mind.
With your gathered plants nearby, unpeel half of the sheet with the sticky side up, so you can start placing your plants where you want them, into whatever design you choose.

Since Myla’s more into building animals and creatures and things with faces, she went straight for making something adorably weird, even adding little bits of paper for the eyes, while I made a simple little mouse. Fun little tip: clover petals look like hearts. 🙂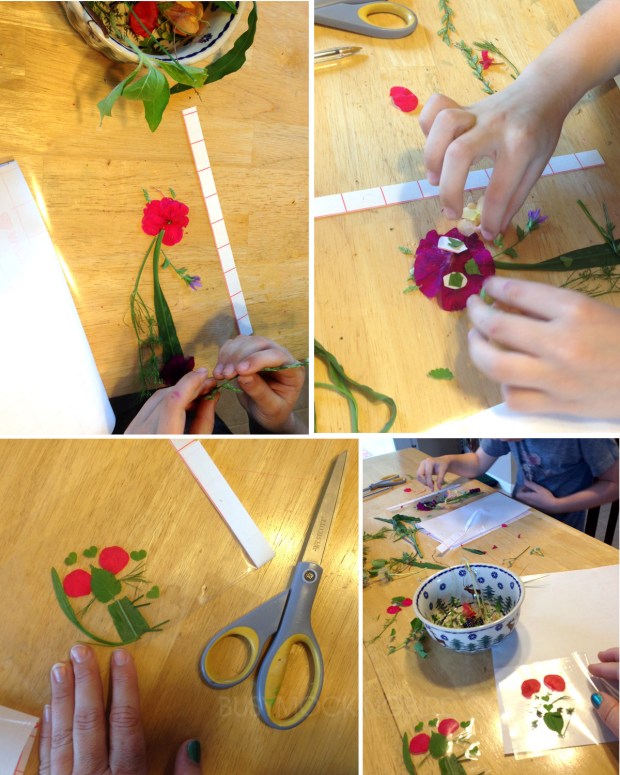
Or you can go decorative, like my wonky little tree-shape below.

Myla moved on to making a rabbit from various plants, being very careful in properly laying them out how she wanted. With have the page exposed, when you feel finished, just unfold the other half and fold it over your piece to seal it up.

Once you’ve folded it over and sealed it up, cut around your piece, being sure to leave quite a lot of space around. Sometimes, it even helps to seal it twice, making sure all the edges or sealed, or air will get in, and your little creations will discolor and “turn rotten,” as Myla says.
And there you have it! Just a fun and easy little idea to make into bookmarks or punch holes to make a mobile to hang in a window. And a calm little happy project that nearly anyone of any age can do. So get out and spend some time in the sunshine (if you have it) and make some lovely little things with someone you love!

Inkin’ it Up Together
Kid time is the BEST time for messes…
 And putting pink in your hair if you want to (like Myla asked to do when she was 3 or 4).
 And drawing on yourself! Sadly, Myla’s school doesn’t allow for crazy hair color and excessive temporary tattoos (weird, huh?). So summertime was a GREAT time to do all that. And even best is when everyone else gets involved, too. At our house, family visits usually mean the markers come out at some point, and Myla offers everyone some “ink.”
I’ve always loved how well our whole family (on Matt’s side and on mine) have always been so cooperative about getting all markered up. This last visit, she got her cousin involved, and they even made a “menu” (unlike the old days, when she used to just draw whatever she wanted on you).
 Hardly anyone escapes the ink sessions…

It always reminds me of how ages ago, Myla & I had tried printing some of our own designs on tattoo paper….
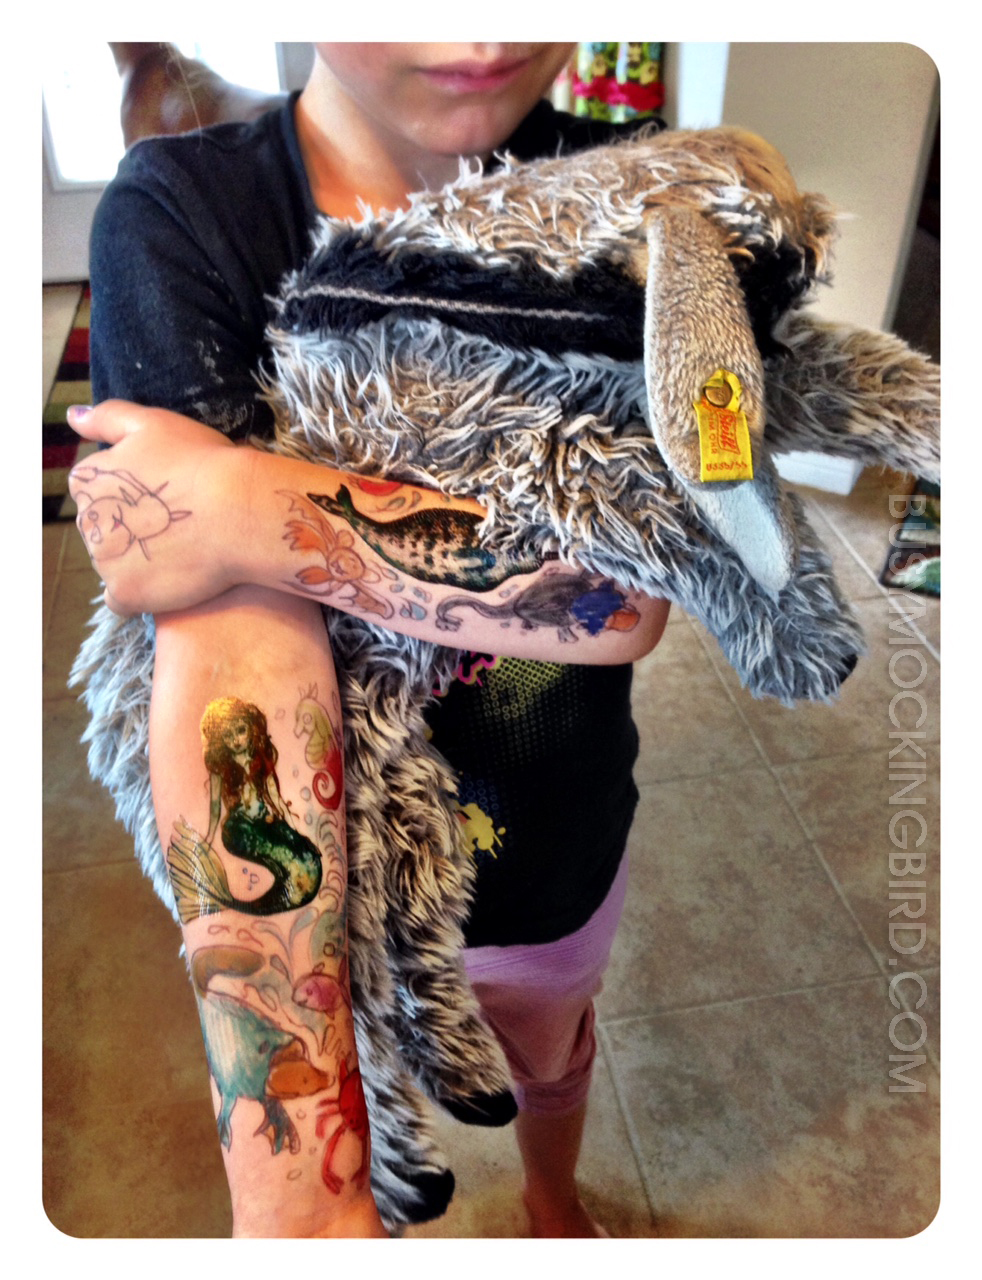
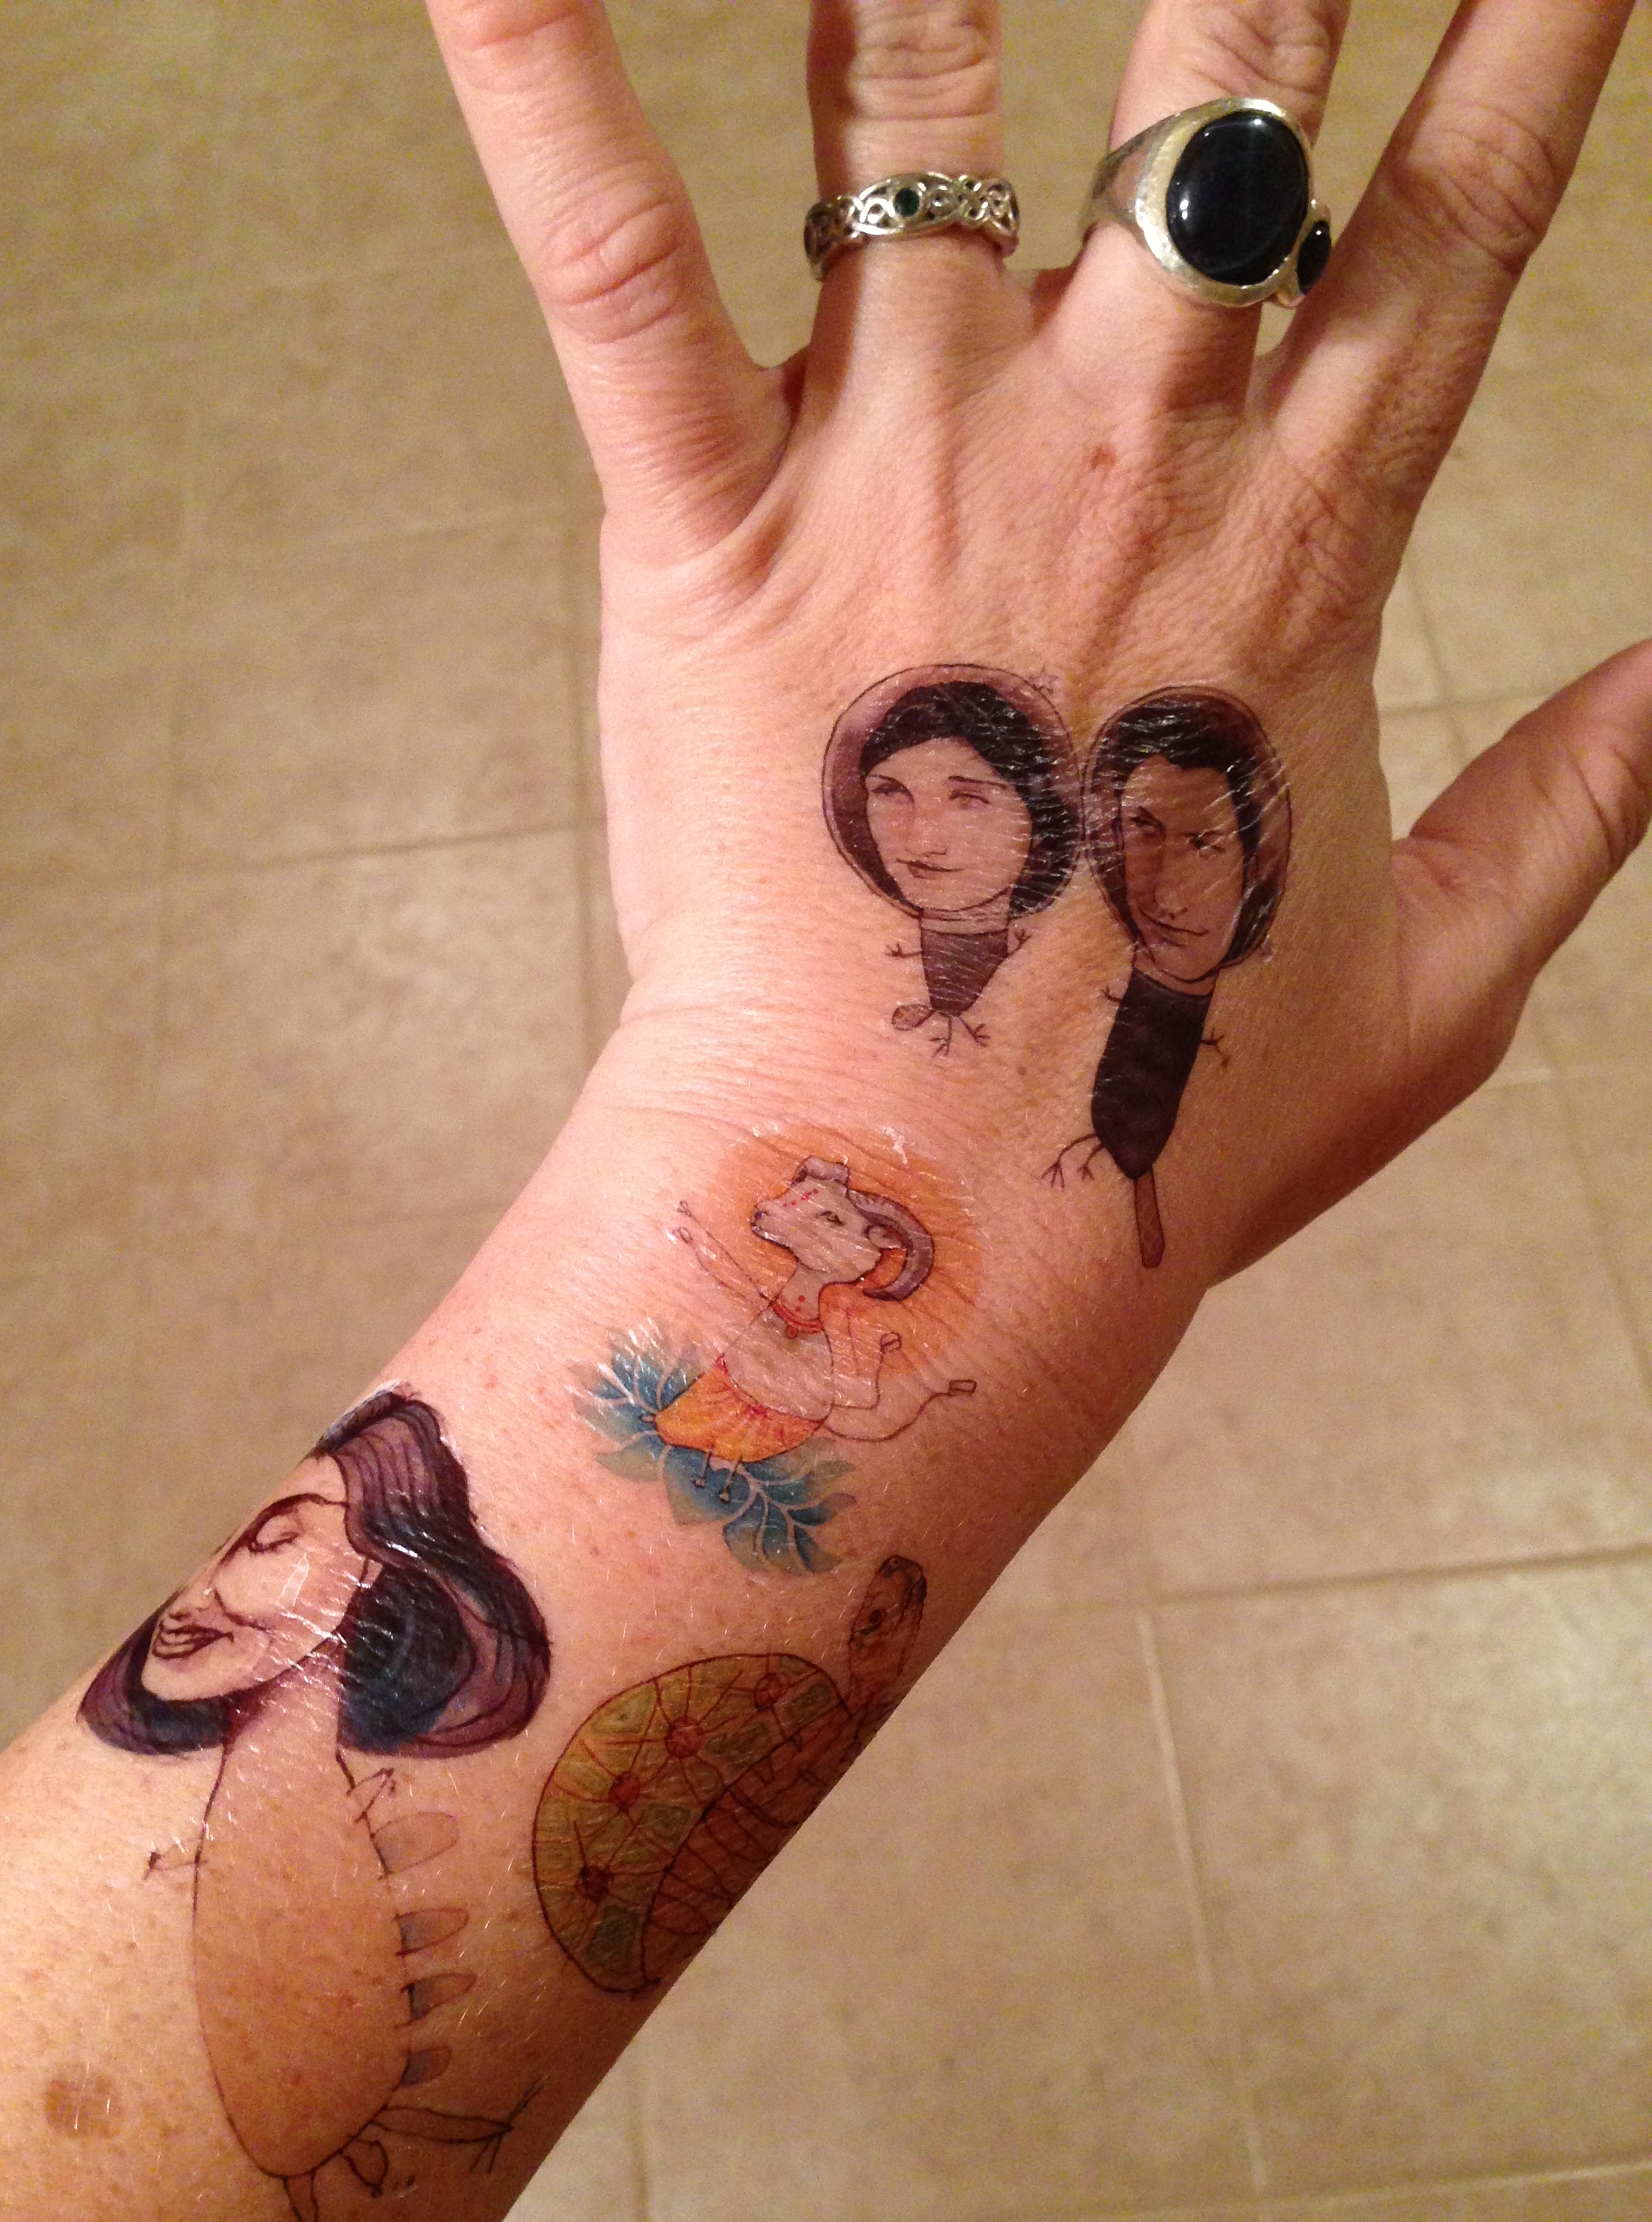 So recently, when a sister-run company called Inky & Bear asked me if I’d like to try out some of their beautifully hand-illustrated temporary tattoos, I said “HECK YEAH!” When our Inky & Bear tattoos came, we had a blast figuring out where to put them on. Myla chose a lovely little mermaid, and a sweet lil’ narwhal for her arms.
 And, like with most things, Myla always has a great way to kick it up a notch. This time, by asking me to draw all sorts of sea creatures on her to go along with the nautical theme. I doodled them out in ballpoint and she even added a little creature on her own hand.
 So after a little ballpoint pen and a bit of pipsqueak Crayola markers, I had a pretty decorative, temporary-tattooed, inked-up kid!
 She added onto my already-existing real tattoos (and an Inky & Bear mermaid), with a little dancing Donkey doodle. (Do you know the story of Donkey?)
 So there it is!
 Messes are temporary. So are marker doodles and temporary tattoos. But they make for great memories when you actually let yourself join in!
If you want to print your own tattoos, try this tattoo printer paper, or go check out all the wonderfully painted temporary tattoos at Inky & Bear!
Angsty Disclaimer: Everytime I do a post about drawing on yourself, I get comments asking if I’m worried about the toxicity and danger of inks soaking into skin. My response to that is that if you’re worried about it, don’t do it. As for me, I’m not going to leave them on me or my daughter’s skin for very long, so it’s fine. Artist Jodi Steel draws amazing drawings on herself and her friends with Sharpie Markers, and washes it off with coconut oil (and then gets a lot of nasty comments by people telling her she’s poisoning her OWN skin). It’s temporary. It washes off. And ultimately, it’s not your skin, right?. In my opinion, there is just as much danger of chemicals eating non-organic fruit or junk food–all fine in moderation. But if it doesn’t sound right for you, don’t do it. Go get some nontoxic facepaints and try doing the same thing, except with paints! So take a deep breath, take it easy, get creative, and have a little messy fun!
Cardboard Monsters

Now that the monkey’s a bit older, she tends to take over and tweak her own ideas for projects. It’s been a while since I set something up with a fairly specific goal in mind, but since first grade (with all its new rules) is about to start and we’ve been working on following instructions (WITHOUT complaining), I decided to set up a project using pretty much things I had around the house.
So I decided we’d make some monster masks.
When she came home from summer daycare, I had it all laid out on the kitchen table, ready to go: glue, sparkles, google eyes, puffballs, foam, washable paints, scissors, tape, construction paper, some scraps of fur from my monster dolls, and a couple of cardboard boxes from the recycle bin. The key here is to set it up so that it’s stress-free, and you’re not worrying about paint splashing onto nice things, so I laid out a tablecloth, and put a messy shirt for her to change into. A little prep work, and making messes isn’t so bad.
 She was excited right away, and started making her own ideas up, which is usually okay, but as I said, we’re working on following directions–so I asked her if she could start by painting the boxes, and THEN we could decorate them. I tried to work a little ahead of her, so she could see what I was going for. (In hindsight, it might’ve helped for her to see a final version to shoot for, but ain’t nobody got time f’that. That would’ve meant either that I’d be doing a kid project twice, or that she’d be doing it on her own while looking at my final piece, and for me, the purpose is to do it TOGETHER.)
 So we painted and decorated… and since she’s pretty fast, BOOM–she was finished with her monster “mask” in no time! I love that she made a little unicorn horn. The funny thing is that I had THOUGHT I’d make a horn, but didn’t get a chance before she beat me to it…
 Mine was pretty fancy shmancy, I must say. Quite sparkly and glam. I may need to wear it grocery shopping, to a family gathering, or to my next monster shaman voodoo dancer tribe meeting.
 So there ya go. …Now what else are we going to do for the other 16 hours of the day?!?

Strong Will and Structure
So the monkey and I have been “off” for a few days. Every issue has been an argument, every request a struggle. This has resulted in fits and frustration, tears and tantrums. I won’t bore you with the details, and I don’t really need any advice or criticism about it–it’s a phase, I know it’ll pass, but in the meantime, it’s torturous. Of course, I’ve checked that something was not horribly horribly wrong, and by all accounts, I’m fairly certain I’ve ruled out anything major…I think it is just a matter of resisting structure, and avoiding conflict with other kids.
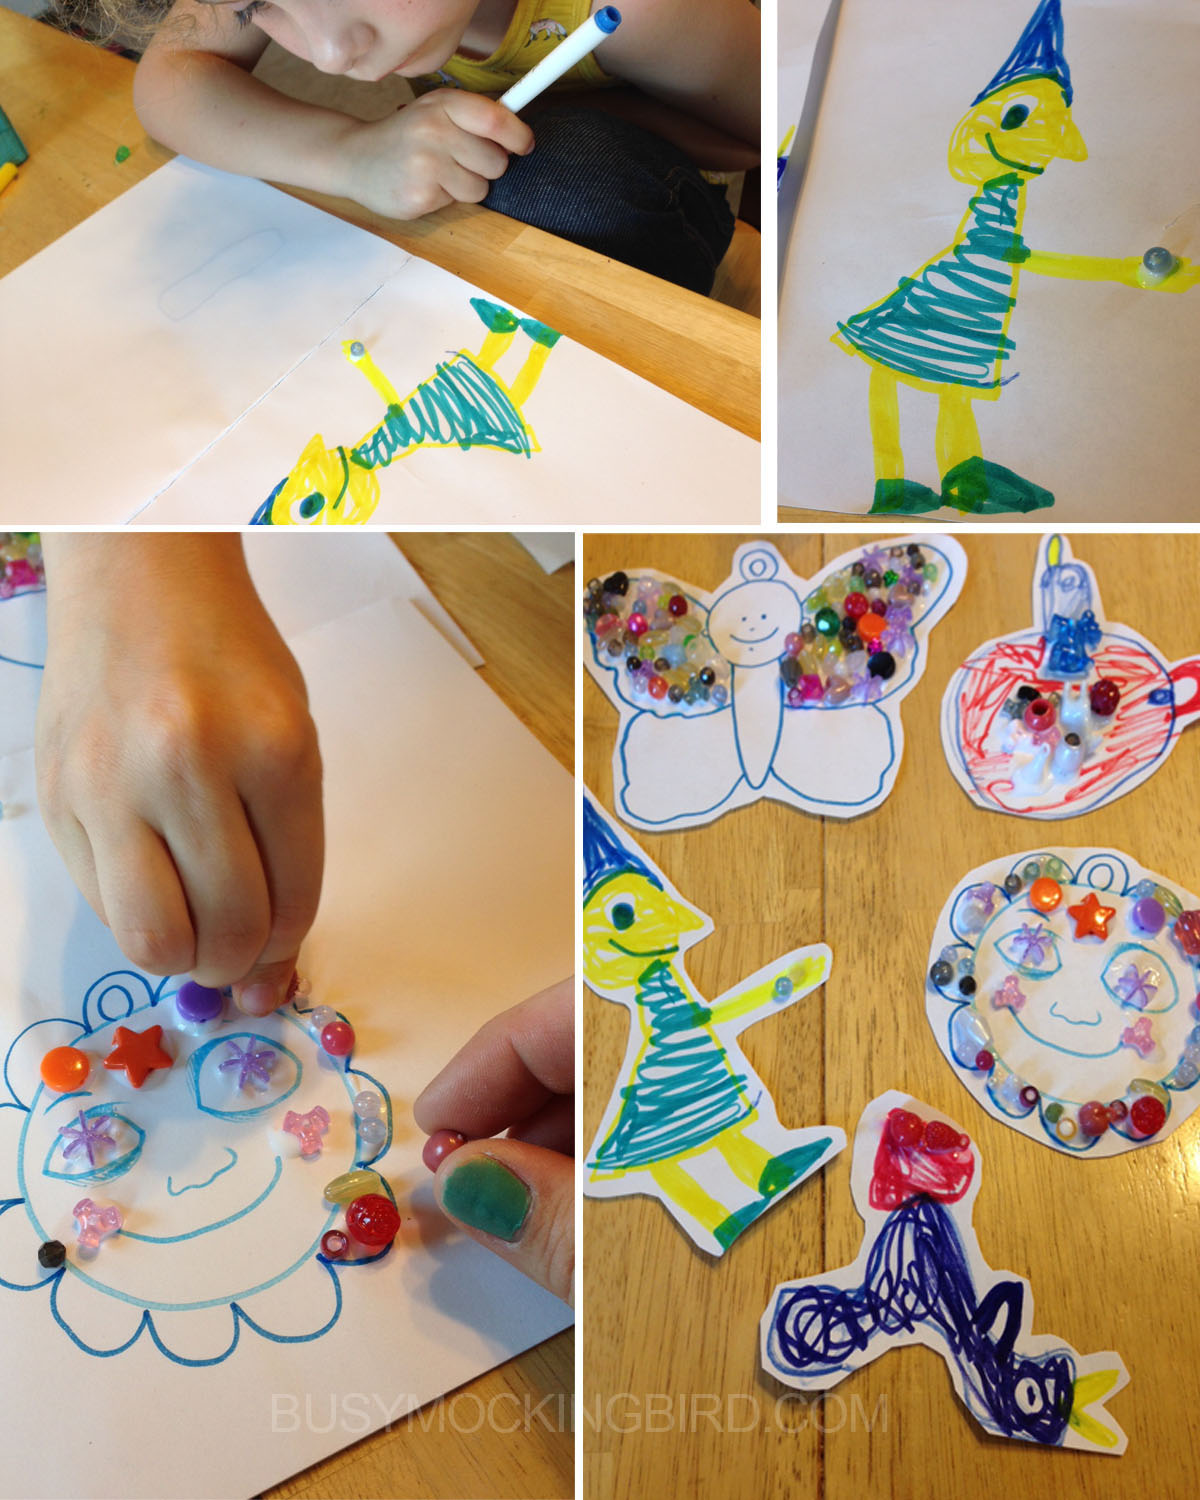
But since life is full of conflict and structure, I have started trying to implement that into our down time. The trick, I think, is to make it fun so it doesn’t SEEM like structure. So when I told her yesterday it was “project time,” she asked if we could glue macaroni noodles to paper.
Dang. I didn’t have any macaroni noodles, because no one in the whole house eats macaroni. But what I DID have was a big ol’ bag of kid-beads that a friend had given us. Sometimes, I give her a project to do and I go do something productive, like clean the kitchen, or sweep the floor. But this time, considering all the struggles we’ve been having, I thought it was important to do this project WITH her.

So it’s super easy: doodle something on some paper, and glue some random beads to it. Or macaroni. Or beans. Or Q-tips. Or leaves. Or cereal. Or grass. Or whatever random things you have around the house. It really doesn’t matter, because that part’s not at ALL important. The important thing is that I spend some time WITH her. Since she often goes into a project with an idea already of what she wants to do, she requested we turn them into ornaments, so each one has a little loop for a string to go through.
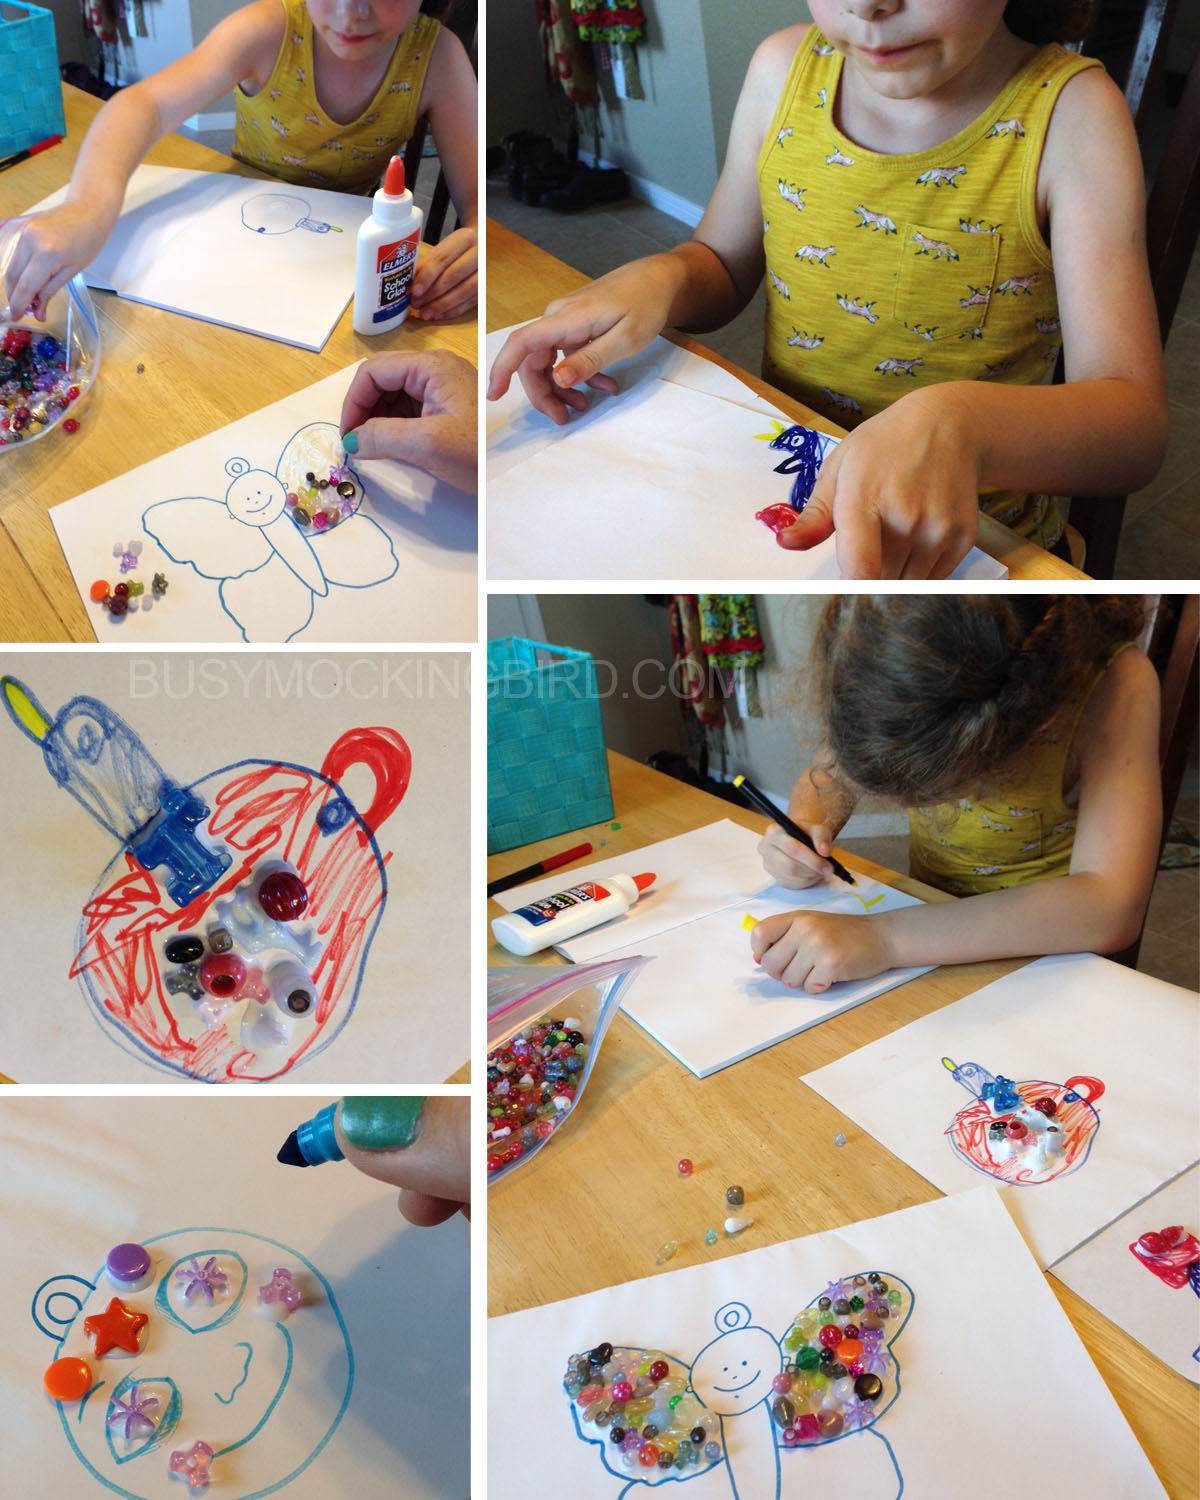
And it’s things like this that don’t take a lot of effort to do that really help me on the rough days. I don’t care what I made. I don’t care what it looks like. The fact that we did it together is what’s important. Spending actual time with her. Stopping to take a few pictures, but mostly listening to her and her ideas, and having fun WITH her instead of just giving her busy work to do. Instead of just tossing an ipad at her. Instead of just turning on the TV…
I am the mother of a strong-willed girl. Because of our collaborations, people sometimes applaud my mom-skills…but I’ll tell you a secret every mom should freely admit without fear: I don’t really know what I’m doing. I just do what feels right, even if it’s not my favorite option. I talk it over with my husband, and we figure out something that works. And you know what I’ve learned? NO ONE KNOWS WHAT THEY’RE DOING. And the very most important thing (especially when you’re a new mom) is to keep in mind that what works for my kid won’t always work for yours.
I’ve had lots of people give me parenting advice, and after it fails me, I get the feeling that they think I’ve “done it wrong.” And then I feel like I’ve done it wrong. But I’ve learned over time, that there is no “wrong.” You just try and try again, and hope that you stumble along something that works before you pull out all your hair. You can’t fault someone for trying, and you can’t give them the squinchy eye if what works for you didn’t work for them. Give them a pat on the back for their struggle, and help them come up with another idea…or at least offer them a spot on your couch, a sympathetic ear, or a playdate.

Sometimes, you look around and it seems like everyone else is doing this whole parenting thing better than you. I promise you, they’re not. I know I’m not. We’re just doing the best we can over here. That smiling, happy family photo? Of course that family is posting it–they’re SO blown away that they actually have a SINGLE documented moment that looks like a magazine photo!! (I like to picture those magazine people first thing in the morning after very little sleep, with tangled hair, and bags under their eyes. And maybe a headcold, too…not to be spiteful, but because you KNOW they have to have those days).
(For a bit of a giggle, by the way, I love looking at “It’s Like They Know Us” on Facebook, where they take stock photos of “perfect” families, comment on them, and hilarity ensues. PS: If you’re going on there, you’ve got to read the comments people write for each photo; they’re just as funny).
Parenting is rough stuff. It’s not always that smiling happy, ethereal moment that gets captured in photos of people happily tossing their well-behaved, angelic toddler in the air as they smile adoringly at them. It’s not always the wonderfully monastic and artistic mom, lovingly and patiently doing art projects with her compliant and easygoing daughter. Maybe you think it’s like that for me. Maybe you think it’s like that for other people. Maybe it makes you feel like you’re not doing the best you can. If it inspires you to be a better parent, great! If it makes you feel like all your efforts are for naught because you’ll never be magazine-perfect Martha Stewart Betty Crocker parents, that’s not good. Because I can bet you it’s not like that all the time for those people. Parenting is some messy stuff, full of snot and tears and crying and frustration (and that’s just ME).

So we’re struggling a bit this week. And in case you feel like you’re the only one struggling, I promise you, you’re not alone. Maybe you worry you’re screwing them all up. Or that you’re making the wrong decisions. Or that your kid will grow up and become a jerk and it’s all your fault. I worry that ALL. THE. TIME. But as my mom told me, “the fact that you’re worrying about it means you’re doing alright.”
So good luck, grownups. Stay strong. You’re doing the best you can. And so are we. (And maybe she’ll realize that when she’s in her 30s….)

