My Painted Vans
This past Mother’s Day, I had heard from another artist that you could customize Vans shoes with your own artwork…so I decided to treat myself to a pair of customized Vans with our art on them, and I was so excited! …Until I got a message saying my order was cancelled, because of artwork issues–apparently, if the art is anywhere else on the internet, they assume you may have stolen the image–and I couldn’t get it to upload again.
The artwork I had chosen was a painting Myla and I did about letting your weirdo flag fly, which is up in my etsy shop… To me, it represented something we always try to teach her: to be yourself, and be proud of all the weird things that make you special.
 It was based on this picture I had taken of her, by the way, when she had built herself a paper astronaut helmet, spaceship, and bat sidekick. Because I’m constantly amazed at her creativity and uniqueness, and I want her to always be proud of it.
 In any case, when the Vans order came back cancelled and I couldn’t get it to upload despite my best efforts, I was SUPER disappointed.
…Until my husband suggested I just get a pair of blank Vans and paint them myself. So that’s just what I did.
As often happens when I am furiously gripped by a project I am obsessively compelled to do, I did absolutely no research ahead of time, and started by doing what I THOUGHT was a good idea: smoothing out my painting surface with clear matte gel medium. Maybe if I had taken a little time to research, I’d have left that step out (as I’ll explain later), and just painted directly onto the blank canvas shoes.

But I didn’t, and painted onto the surface I had treated with the clear gesso. I had to alter the composition of our artwork a bit to get everything to fit on there the way I wanted, but I considered that a good thing–that I could change it up to perfectly fit the shoe space.


One of the upsides to painting the shoes myself (as opposed to using the customizer on the Vans page) is that not only could I alter the composition to make everything fit, but I could also put a different image on each shoe (the Vans page only puts the same image on both shoes).
So here’s what my final pair looked like:

Yay! They really make me smile.

Now, remember when I said I’d probably leave out the clear gesso? Here’s why:

See all those cracks? I’m not sure, but I think if I’d left that step off and painted directly onto the shoe canvas, it might have clung to the fibers more tightly, and not have cracked so easily. Who knows? In any case, it’s not so bad–it’s not TOO terribly noticeable, and I can touch it up if it starts looking too bad.
So that was my mother’s day splurge! That–along with spending the day with my husband and little munchkin doing fun things–made for a pretty darn awesome Mother’s Day!

C’mon, Grab Your Friends…
This year, Myla decided she wanted her birthday party to be Adventure Time-themed…and I was TOTALLY down with that. Because I’m a pretty big fan of Adventure time. And all of the characters. And songs. And everything.
I always look forward to the cake, because even though I stink at cooking a meal, I can bake the heck out of a cake. And when I decorate, I pretend like I’m on Ace of Cakes or something, and do my best to make it special.
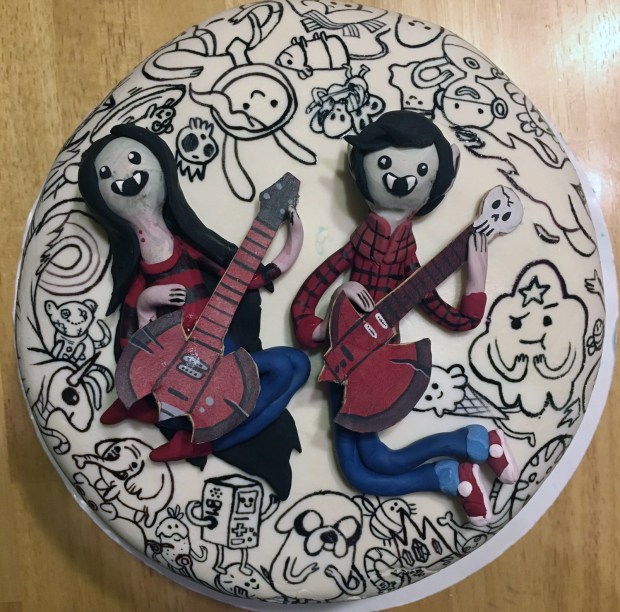
I started by sculpting these Marceline and Marshall Lee figures from Sculpey, and building a little cardboard ax guitar and bass for them, since Myla requested they be the centerpiece.

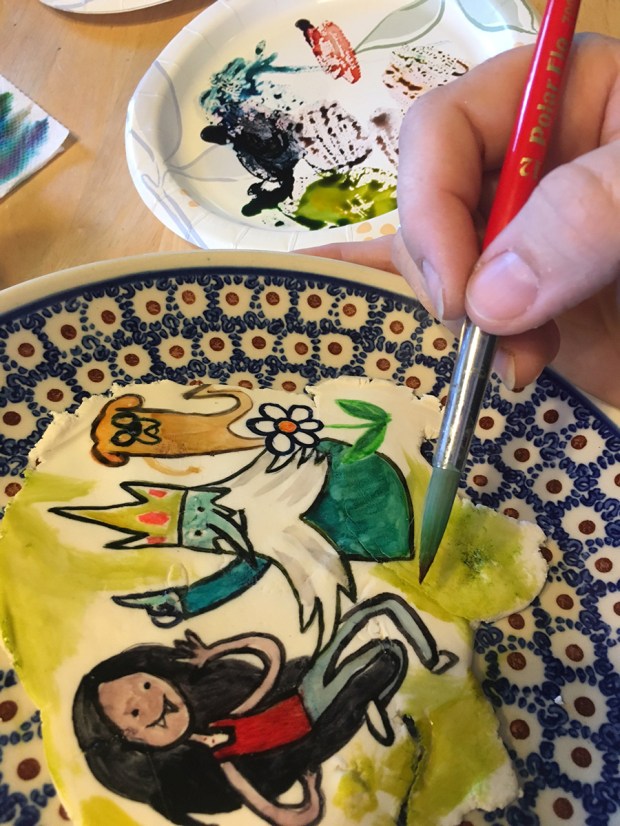
And although I know kids aren’t a huge fan on fondant, I had read that you could paint on it with food coloring, so I gave it a try…
I started by rolling out a little plate full to practice on, and gave Myla a plate full to let her try it, too. I had read that you can put food coloring onto a plate like paint, but instead of water (which makes fondant gummy), you can mix it with vodka (don’t worry–the alcohol evaporates!). So we gave it a try, and it was SO MUCH FUN. It wasn’t even a struggle–it was just like painting with paints!

Once I decided it was going to work out pretty well, I settled on that as the final decorating method for the cake.
The night before her party, I baked, iced and cooled the 2-story cake. I broke a chunk out of it, which thankfully I could piece back together and glue down with icing, since it’d be covered in fondant. And since I’m terrible at fondant, it was full of wonkiness and lumps, which I promptly covered up in more decorative icing. BOOM.

Next, I waited til the kid was in bed so I could reeeeeally focus (plus, I told her that the final cake should be a surprise), and got down with painting TONS of characters all over the cake, around the clay figures. (I realize cake pros would cringe that the centerpiece isn’t edible, but I’m an artist, and I do what I want.)


I had intended to color it all, but as I started working, I realized I really really liked it in just black outlines, so I went with that…

(I swear, I love SO many of the characters on this show, and they’re SO much fun to draw….)
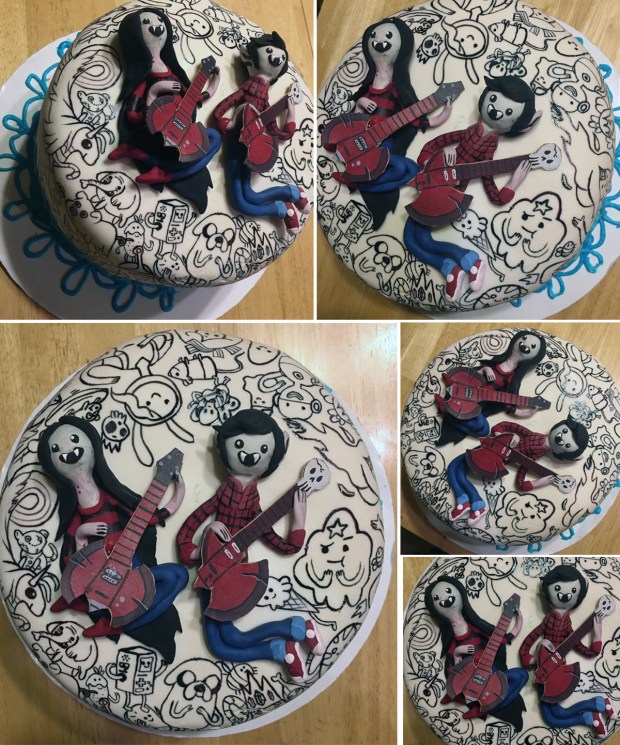
So there it is!
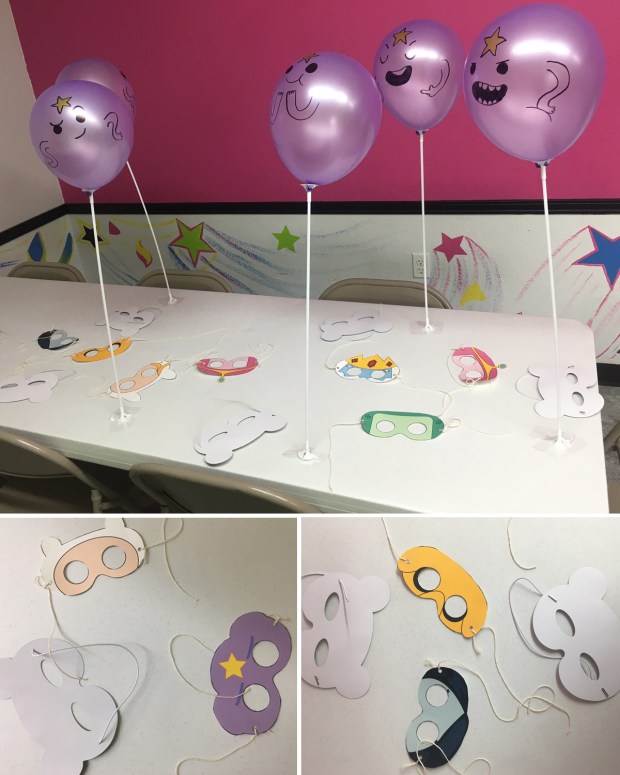
We blew up some purple balloons, which I decorated with Sharpie markers to look like Lumpy Space Princess, and downloaded these fun Adventure Time character masks from HappilyAfter Designs on Etsy.
I got several little goodies for the take-home bags, like Adventure Time slap bracelets and figures from Ebay, little individually-wrapped burger gummies, and random dollar store things. I also got some blank wooden beads and painted very simple character faces on them, and tossed them in little snack bags with random handfuls of beads and necklace string so people could build their own necklaces.
The least expensive goody bags at the craft store were these blank white ones, so I kept up the plain character theme, and drew them again on each bag, in Sharpies.

And that was that! Along with a few helium big balloons we bought online that my husband filled at a flower shop and a plastic table cover, it made for a pretty good Adventure Time-themed party!

Myla chose to have her party at a gymnastics center, where they have trampolines and a huge foam block pit with a rope swing over it. The good thing there was that they gave the kids an hour to play, a half hour to eat cake & ice cream, and then they boot you all out of there! So cool. No big cleanup, no mess at home, no all-day event. And the kids get worn out! WOOHOOOOOO.
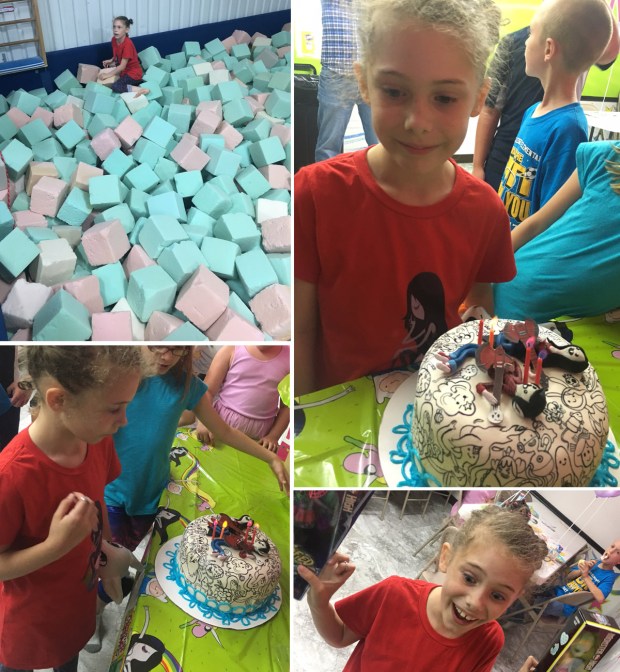
And the cake? Yeah, the cake was a hit. Yay!

And remember my birthday sewing story a few posts back? Well, I took the fox pattern I bought from DolphinWing and made Myla the little arctic fox character who wears an orange shirt that she’s drawn for awhile and created herself.

(I think the dog approved. I’m not sure.)
So aside from all the party planning and prep, the big news is that WE HAVE AN EIGHT-YEAR OLD ON OUR HANDS, PEOPLE. She’s still so sweet and kind, smart and creative. I couldn’t ask for a cooler kid.

She’s a funny little goofball who still loves to draw and create, and had the best birthday week ever! Happy birthday, Myla!

Thank you, Teachers!
As Myla’s 2nd grade school year comes to an end, I wanted to send her teacher out with a proper thank-you gift. Teachers work HARD, and although there are a million ideas online for teacher gifts, I try my best to give something functional that someone can actually use. So here’s a quick and easy project that I hope will be a special gift…
First, I went to our local craft store, and got an inexpensive blank tote bag, They have all kinds of canvas totes–I chose this thicker one with a strong handle and a blank canvas pocket on the outside.
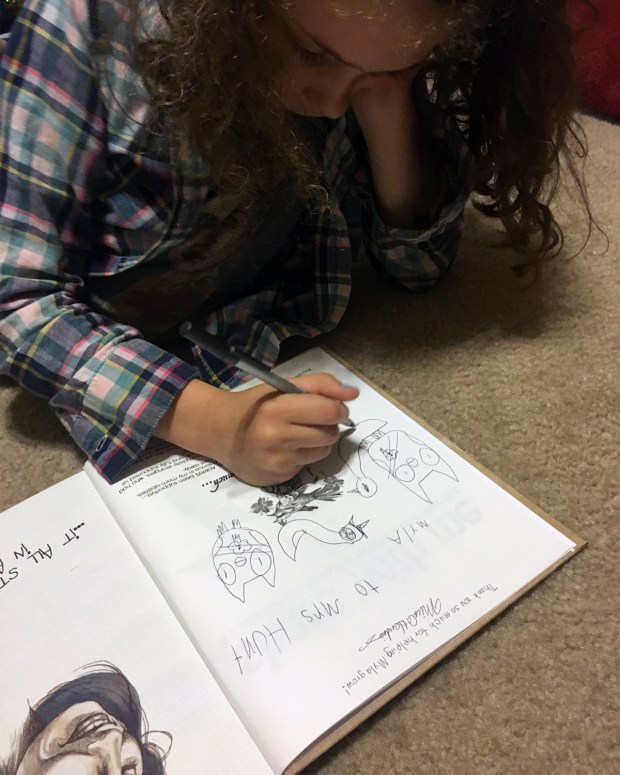
Next up, I grabbed a handful of Sharpie permanent markers, and had Myla draw all over it. Since her teacher had a running Dr. Seuss theme all year, Myla filled the front with some of her favorite characters.
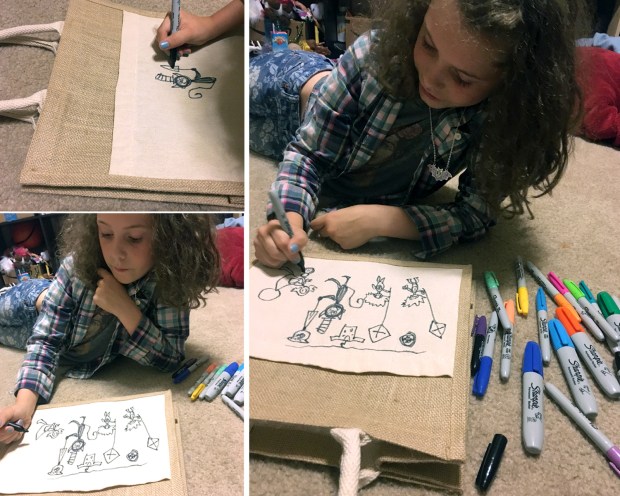
First, she drew the outlines in black, then filled it all in to make it colorful…and don’t forget to sign it!
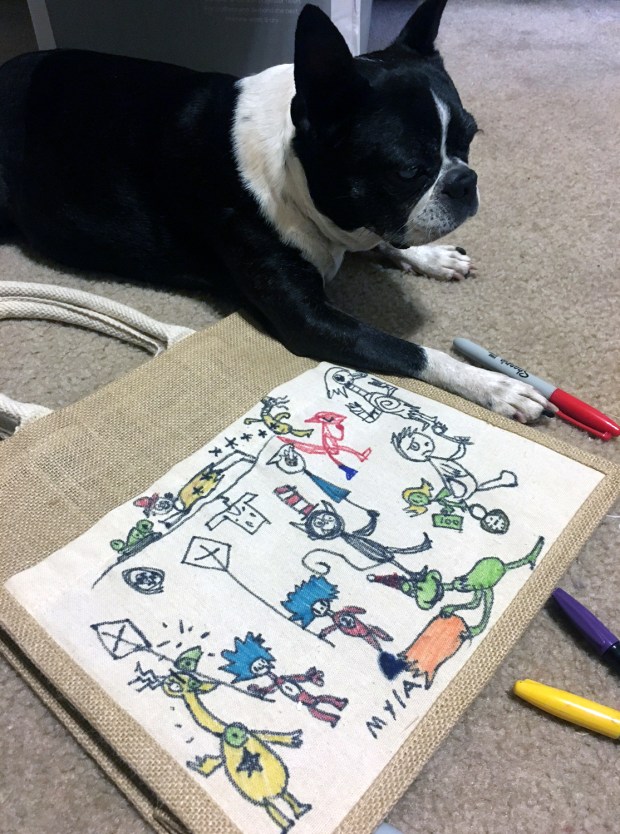 *Artistic dog assistant optional.
Next, you could put in some stationery supplies, pens, and folders, but we chose to put a signed copy of our “Share With Me” book of collaborations. If you don’t have time to order one of ours, you could maybe throw in a few kid’s books to donate to the teacher’s next classroom.

And there you go! Easy peasy, simple to do, and hopefully a good, functional gift that will be a lovely keepsake reminder to show teachers how much their hard work is appreciated.

So show your teacher some love before the school year ends! And here’s to a great start of summer, and the hopes that we can keep our kids busy and active til next school year begins! 🙂
Bull Helmet
Ages ago, when I was buffer, younger, and not falling apart, I used to play roller derby and LOVED it (I still love it). We lived in Alaska, I was on a team from North Pole, and I loved nothing more in my free time than being on my skates.
In derby, your best friend and derby partner is called your “derby wife,” and Jamie was mine (that’s me in the stripes and in the Captain America shirt, and Jamie in the NPBT team logo shirt that I designed)… Wonder Woman was our spirit animal, and we often paired up in our starry-bummed shorts.

(Ahhh, roller derby: where having a booty is actually an asset…and ALL body types have very important roles!)
So when Jamie told me (from miles away, and several years later) that she had signed up for the coming NOLA Running of the Bulls this July 8th, and asked if I’d make her helmet, I said HECK YES.

If you’re not familiar, New Orleans has an event similar to the infamous bull run in Pamplona, Spain–except minus blood, maiming, and actual BULLS. At the NOLA Bull Run, the “bulls” are all roller derby girls with horned helmets and plastic bats who skate around trying to bat-spank the runners, who all wear white shirts. It’s kind of a big deal, and sounds like a heck of a lot of fun.
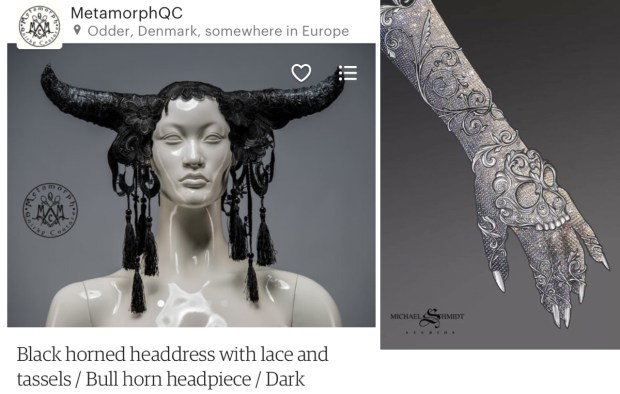
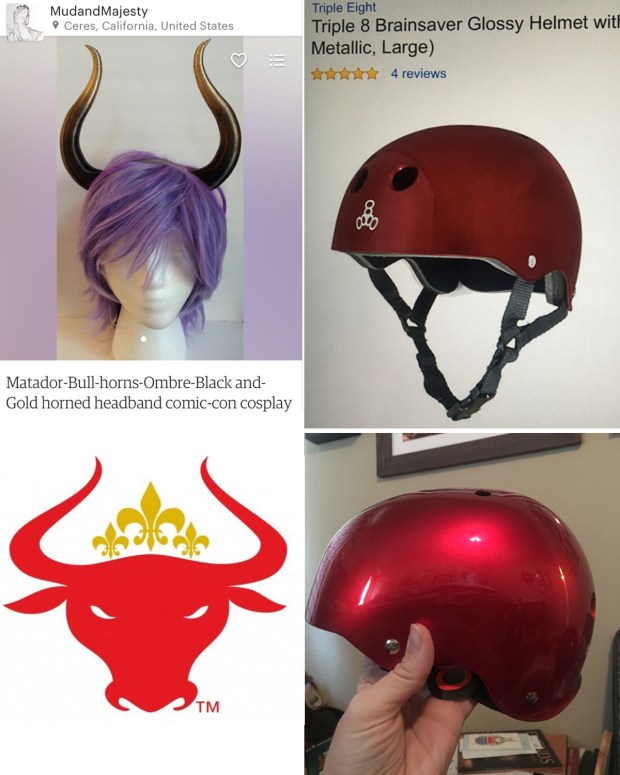
Jamie showed me some photos for inspiration, and the main images I kept in my sights were this headpiece from MetamorphQC on Etsy, and the filigree on Lady Gaga’s Countess’ glove from American Horror Story. (You’ll see later that the end result looks nothing like either of these two, really, but that’s the great thing about inspiration–it inspires you to create your OWN thing…)
Jamie ordered the two main supplies and had them sent to my house. They included a set of 3D-printed bull-horns from MudandMajesty, and a Triple 8 derby helmet from Amazon.
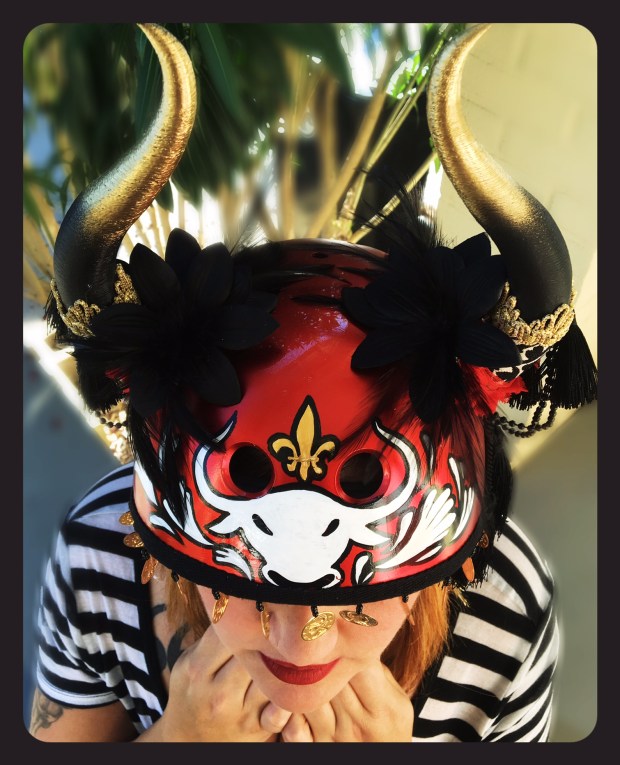
I was super ready to get started when the horns came! I immediately dismantled them (so very sorry!!). They were well-made–screwed into the headband they came with. I unscrewed the horns from the headband, sanded them down a bit to fit the curve of the helmet, drilled holes in the helmet, and re-mounted the horns onto the helmet with screws, gluing them down for extra support.

I made a trip to the craft store, grabbing several things I thought might work: tassles from the upholstery section, strings of beads and flowered ribbon from the ribbon section, flowers from the wedding section…Anything that fit the look and feel I was going for from that first photo.
Granted, I probably should’ve done this part LAST, as I hadn’t painted the actual helmet yet, but I am a very impatient artist, and I do what I want. 
Then, I just had fun painting! I painted a snurfling bull with flourishes (similar to the one in the inspiration photos) and roses on one side, Jamie’s derby name on the other, and the NOLA bull run logo on the front.
 I was a bit worried it would be too much, but I think in this case, too much is GOOOOOOD.
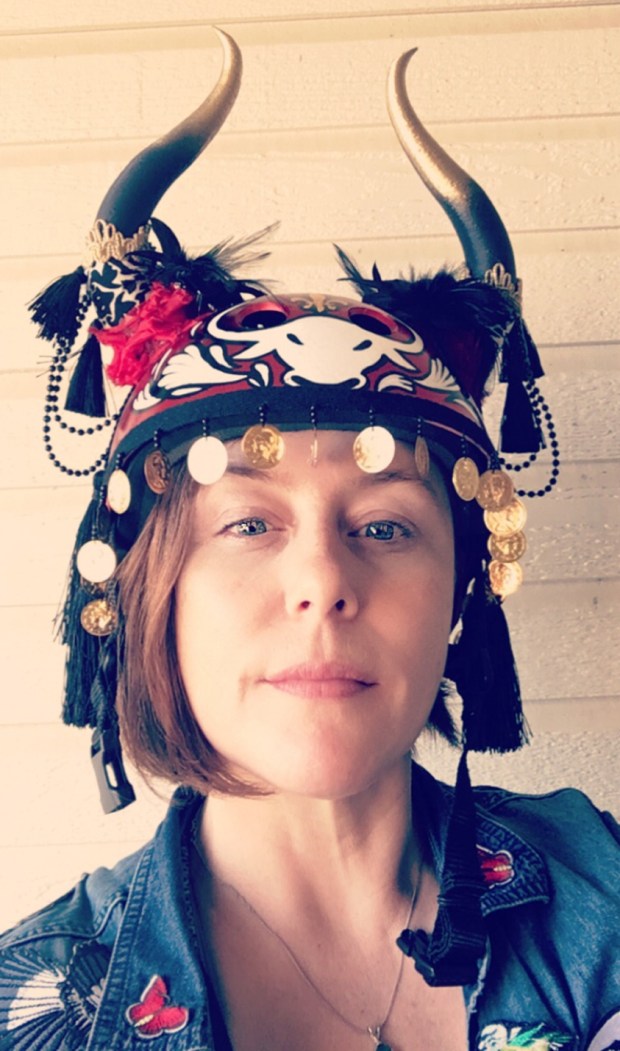
So feeling finally finished, I carefully packaged it all up, crossed my fingers for luck that the postal gods would keep it in one piece–and mailed it to Jamie. When she got it a few days later, I was excited to hear the squee through her text message, and she happily sent me some photos:
 She already looks pretty darn cool in it–I can’t wait til she gets all fully decked out for the event. I’m sure it’ll be awesome fun!
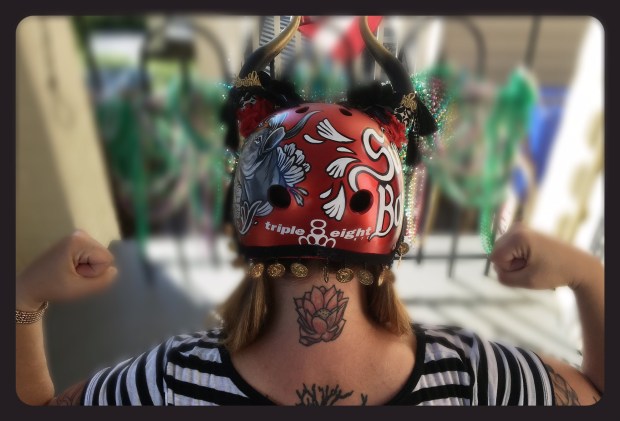
So if you happen to be anywhere near NOLA and aren’t hiding in your house from the bull run, keep an eye out for Jamie, smiling and skatin’ it up with the other bulls…. ❤

Birthday Pony
One of the times being crafty comes in handy is for birthdays…
So when my husband told me of his friend’s little girl’s My Little Pony birthday, I shuffled through patterns for this one I had used ages ago, when Myla wanted an all-black and pink MLP for christmas…

Back then, I had found this wonderful MLP pattern by Dollphinwing on Etsy. She even has patterns for different manes, tails, and extras…

So I pulled out the pattern again, took a trip to the craft store to pick out fabrics, and started building a custom MLP for a very girly 3-year old.
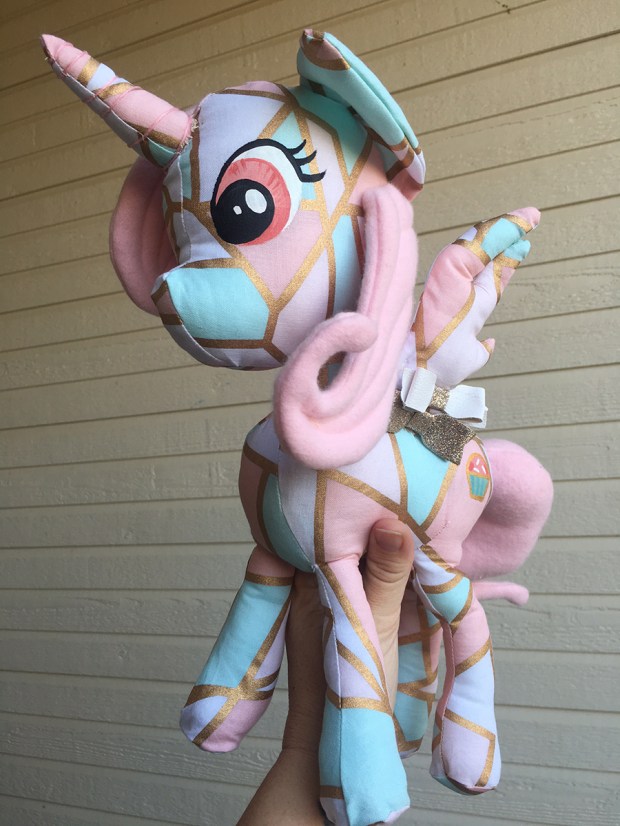
Looking back, I probably should’ve gone with the minky fabric like the pattern suggested, as it tends to hide any stitches and flaws pretty well. Regular cotton fabric is MUCH less forgiving, but I think it turned out okay!

I purchase little hair clips to hold up the wings that they could remove later, and put in the little girl’s hair. I handpainted the eyes in acrylic, and let my daughter name it and choose a cutie mark I could paint on.
She chose “Cupcake,” and I painted a cupcake cutie mark on its bum–which is funny, considering the gift bag I had grabbed, and didn’t realize until later (and Myla had no idea) was purely coincidentally DECORATED IN CUPCAKES:
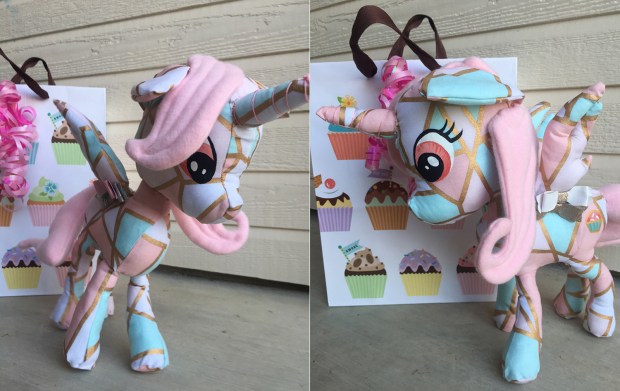
So there you go! It went over very well at the birthday party. Surrounded by tons of store-bought MLP toys and clothing, this custom handmade one brought a kid-hug and a big happy smile.

So head on over to Dollphinwing! She has no idea I’m sending you, but I like to share great things when I have a chance…she’s got a fox pattern there that I just purchased. Myla’s birthday is coming up and since our kid is a stuffed animal junkie, I will most likely use it to make a doll of the arctic fox character that Myla came up with. I’ll keep you posted!
Happy crafting!
Making Things Better
A while back, I posted about my little embroidery setup. But since I am a mama bird and constantly building new nests, I was looking for a setup where I could keep ALL my supplies. I kept everything in a photo box for awhile, but then I found this goofy little treasure chest at the craft store, on sale for 40% off. Yay! Trouble was, I thought it was pretty, um…UGLY.
So I asked Myla to help me with it, because she makes everything awesome. She immediately grabbed a marker, and started filling each panel with a new type of dragon. Because she’s awesome, and that’s a great idea.
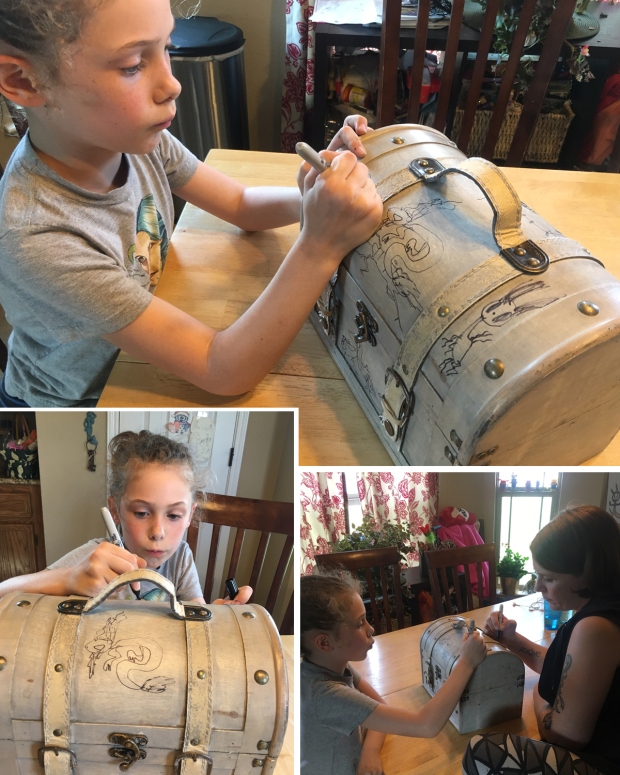
I added some details and backgrounds to it, as she told me about each one…
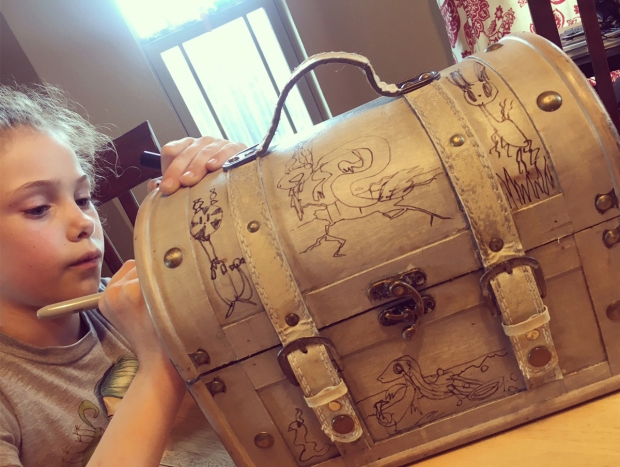
And when I painted it and added the details of what kind of dragon each was, it made me smile super big, because HOW COOL?!?!
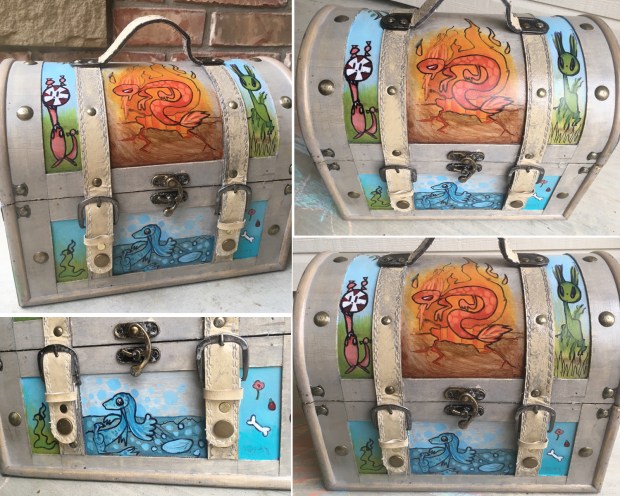
On one side, she filled the center panel with a SEWING DRAGON, with pin legs, button eyes, and yarn hair. There’s a skeleton dragon, nature dragon, and something called “zero knowledge dragon” at the bottom center (see how he doesn’t know his abc’s and thinks a dog is a cat and a cat is a dog? That’s because he has zero knowledge). 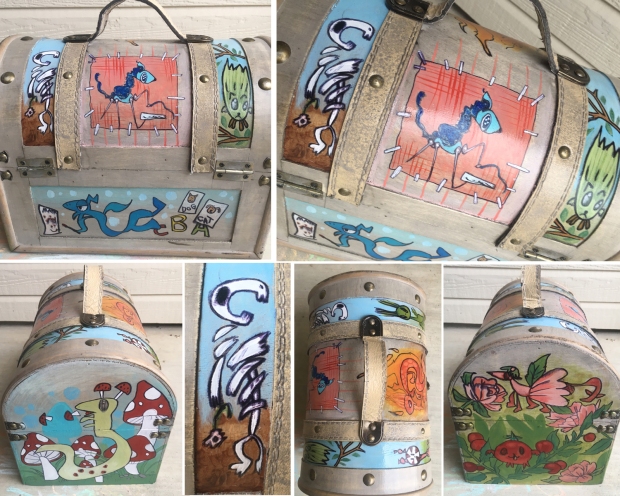
On one side panel (above), she drew a mushroom dragon, the other was a flower dragon and a tomato dragon.
On the flip side, the center panel features a flame dragon, a candy dragon, grass dragon, slime dragon, and a water dragon.
Because OF COURSE IT DOES.
 So now that I have a lovely, magical treasure chest of crafts, let me show you the setup inside…
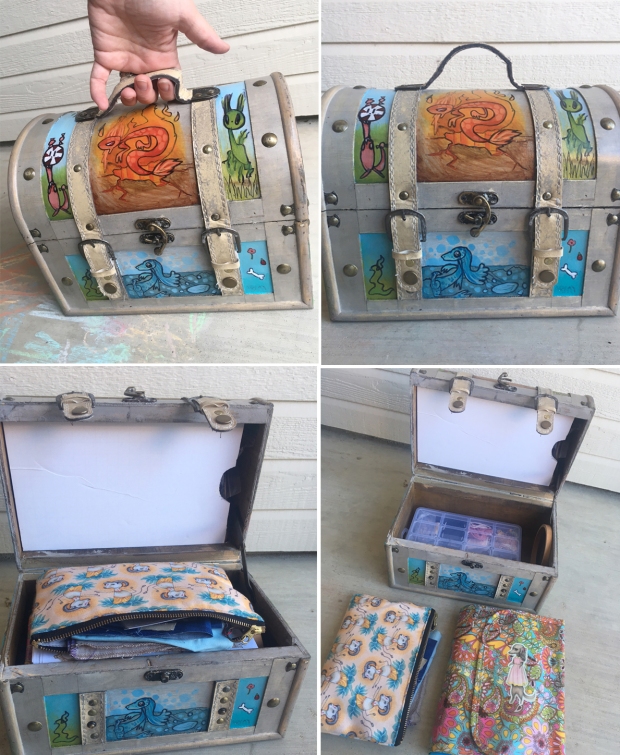 First off, I put a foam core panel in the top lid, to hold things (that was my nephew’s great idea), and then everything else fits inside.
In the little ram zipper bag (which features the spider ram art on Redbubble by me & Myla), I keep fabric, glue, clips, and everything I need to put together the little Dandelyne hoops I use to frame the tiny embroideries. Then I have another little thread folder (with a doxie-girl on the front by Mab Graves) that holds all my cotton threads, separated by colors.
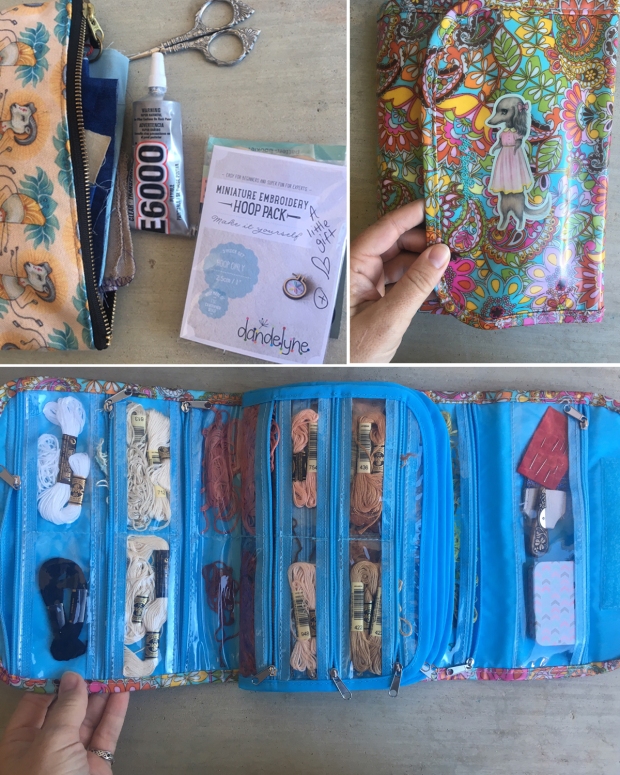 And the little top panel in the box lid comes down to tuck away the frame hoops (which have 3 parts each, so I separated them all up), and a few specialty threads. But it’s tucked away up there so that it’s out of the way.
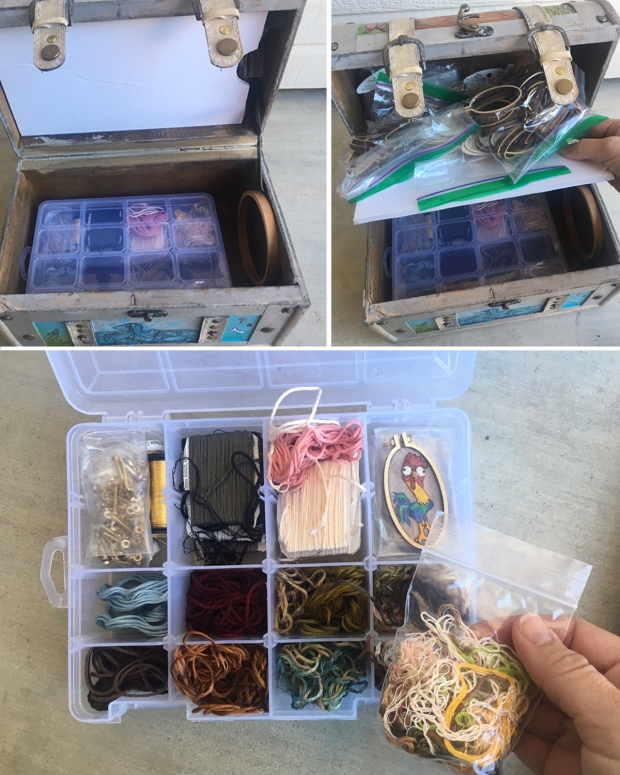 But the new thing (above) is a little box that holds my collection of silk embroidery floss! They’re a new find for me–softer and smoother, just for something a little more fancy. So the silk threads are in this little tackle box, so I don’t get them confused with my cotton threads.
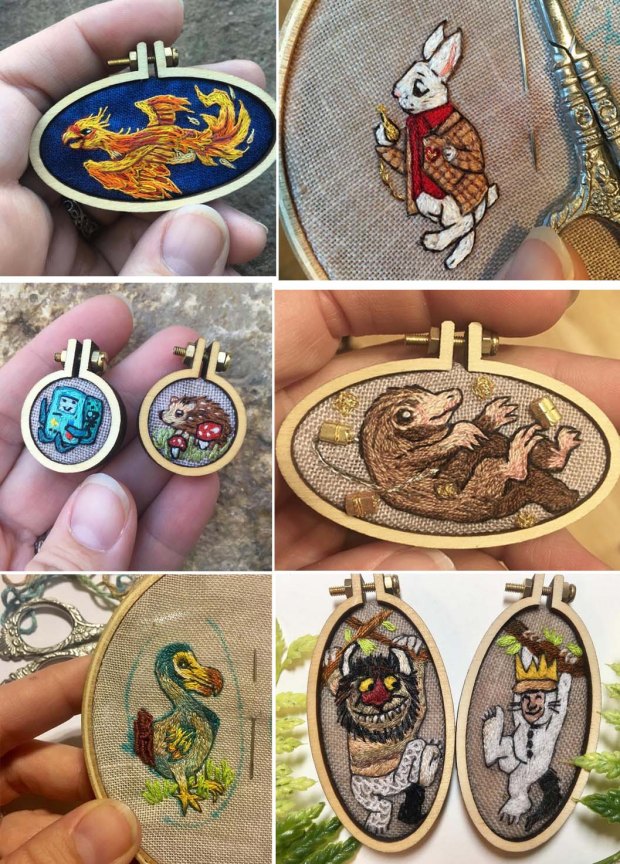 And that’s my setup so far! Do you have special setups for your hobbies?
A Tale of a Tail
Would you like another example of how art saved the day? I will tell you a story.
First off, this is my hairy girl. Her name is Adie, and she’s an old lady. She’s a 10-year old lovable Boston terrier, who unfortunately is beginning to fall apart a bit.

When we first got her, she was weensy. She weighed two pounds and could fit in your hand. She came to us with an ear infection and worms, and had to be medicated, but after some time, she was happy and healthy.

Our other dog, a boxer named Scout, became her adopted big sister, and–despite being three times her size–was VERY gentle with her, and always let her think she was the boss.
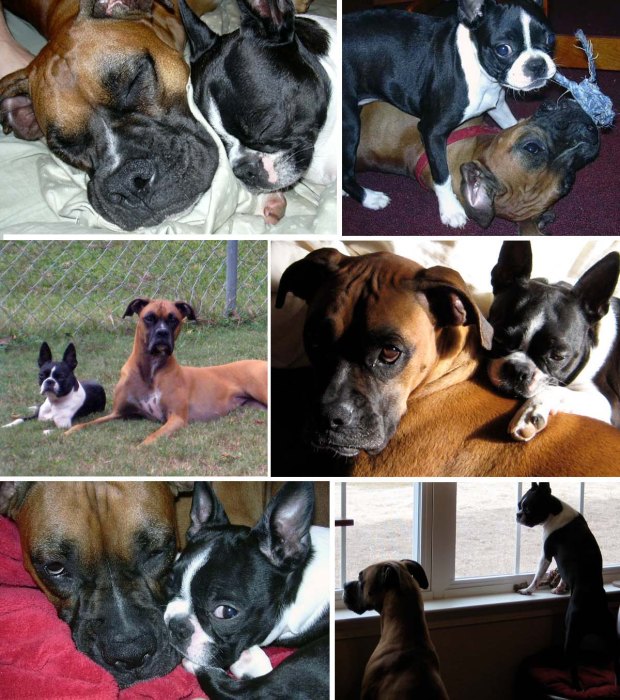
Adie loved me from the moment I first held her, and the love was completely mutual. She always has to be near me… she follows me from room to room, and especially now that she’s older and prone to seizures (thankfully, meds keep them at bay), she’s constantly by my side and underfoot wherever I go.
She’s a funny sleeper…

…she sits like an old man…

…and because she’s my little roomba, sniffing around the kitchen, she ALWAYS has something on her snooter.

She’s an absolutely silly, sweet, and stinky girl (in every sense of the word–aside from having a Napoleon complex, she also has extraordinarily pungent gas).

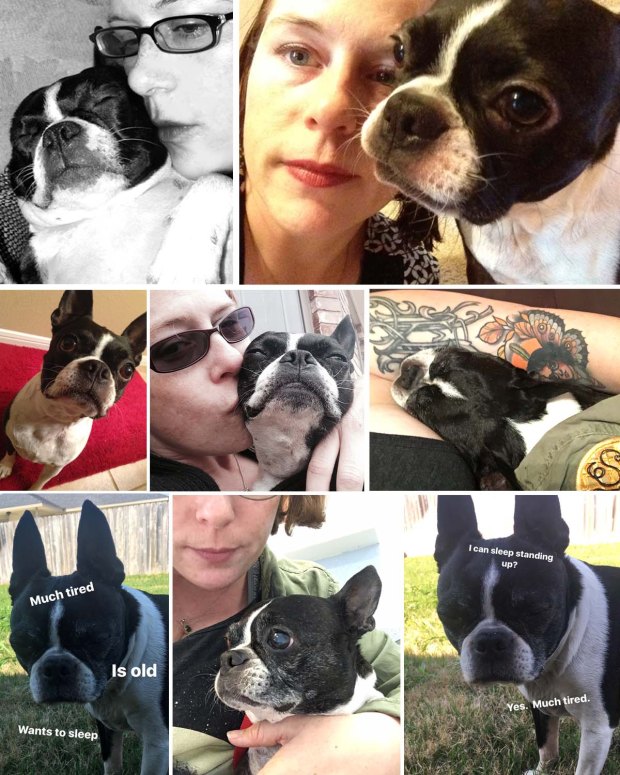
But recently, we were told that a little lump on her nubby tail was cancerous. As a Boston terrier, she barely has a tail ANYway, but now we were told her entire nubby tail needed to be completely removed as soon as possible.
And it’s ironic–my husband just retired from the Army, and suddenly everything breaks down: our AC needed repair, my car tires needed replaced, the dog needs surgery, and one thing after another needed our immediate financial attention. We have some money in savings, but it’s allotted in preparation to get us through his retirement, until the next step of his career. There was no question in my mind that we’d pay for the surgery–both my dogs are family, and if they need it, they need it. But I cringed at our finances taking this kind of hit.
And then my husband half-jokingly suggested I have an art sale. I actually thought it was worth a shot. I have tons of artwork that is just sitting in my house, buried in sketchbooks or folders, waiting to be loved, and if people liked it, maybe I could raise some money for her surgery! I took several pieces out, took photographs of everything, and put it up in my shop. I even decided there were a few of the collaborations from when Myla was age 4 that I was willing to part with (I VERY rarely part with those!).
I made sure that there was nothing I would be sad over losing. I made sure it was all artwork that I love, but I don’t have a deep emotional attachment to. I chose things I thought people might like. When I made my sale stack, there were a couple I decided “nope, I think I need to keep that one.” …It was all for a good cause, and all done with absolute love. I put a post up, and crossed my fingers.
Within a few hours, I was amazed at how many sales we made! The amazing comments that came in, all the wonderful well-wishes, all the kind words from people, it was all so overwhelming in the very best way. Even those who couldn’t buy were happy to share on their own pages to spread the word–something I never expected. We were all smiles over here, let me tell you.

By the end of the evening, with everyone’s amazing support, we made more than enough to pay for Adie’s tail removal! She’s got an appointment for May 1st, and I’ll be sure to update my pages on how she’s doing. Hopefully it’ll be a smooth job, they’ll get all the cancer, and she’ll be better off for it.
So thank you, all of you who helped by buying or sharing! Thank you for all your kind words and thoughts. Art saved the day, and you all made it happen, and I am very grateful for it!
I’ll keep you all posted. Fingers crossed!

How Art Saved My Sanity (and I didn’t even realize it)
Open on the beginning of a long story. The scene: There is darkness. Times are tough. For two years, there is turmoil upon our small family. Thankfully, no one is terribly ill or dying, but events have thrust themselves upon our happy little lives like a terrible monster. Not something between us, but something UPON us…we are worried. We are upset. We feel miserable and unsure of what will happen, and what the state of our future will be. We are in limbo for a long time like this….and there is NOTHING I can do about it.
Hopefully, the vague terms to protect my family’s privacy don’t distract from the telling of the tale. Because really, the details are not important. What is important is that for a very long time, my family was standing on a high cliff with very unstable cracks beneath it, like one of those cartoons where at any moment, the ground falls out from underneath them, leaving nothing but a poof of smoke behind.
I was helpless, and there was nothing I could do but maintain. I kept the house functioning the best I could. I tried to do fun things to get our minds off of the struggle. I put my energy into doing fun things with our daughter, so that she wouldn’t feel the worry that consumed the adults. I kept a brave face. I duct-taped our household together the best I could, and kept on going.
My husband found my stoicism odd. He worried that I was repressing my feelings. I didn’t THINK I was…I felt like I was doing okay, handling things the best I could.
I drew a lot in my sketchbook. Looking back, there were a lot of monsters, a lot of trying to make friends with monsters as they climbed all over you. I didn’t realize it at the time…
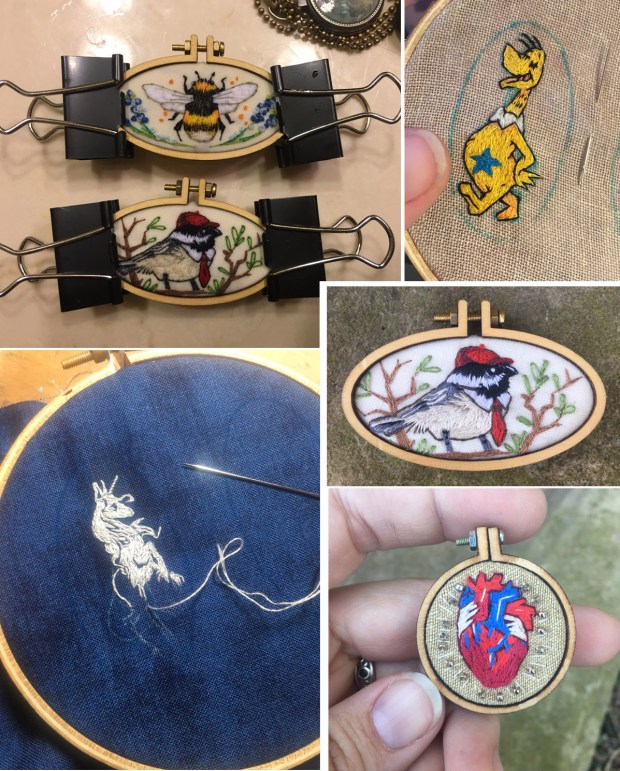
Then I found myself picking up a craft I hadn’t touched in ages: the embroideries. You know the ones? I did a post on them a couple of weeks ago…

They were fun because they were a challenge–what can I fit in the space of these tiny Dandelyne hoops? I found myself bringing them EVERYWHERE. Any free moment I had. Dropping Myla off at school, waiting for her teacher? Bring the ‘broideries. Five minutes in the doctor’s office waiting room? Bring the ‘broideries. On hold on the phone? Bring the ‘broideries. The kid is brushing her teeth? Bring the ‘broideries.

I found myself thinking, “Wow, Mica. You’re kind of sort of obsessed with these silly things…” I was doing one after another, not stopping to think, just making happy little things that made me smile, all in the space of a few inches. It was like my eyes couldn’t see past my hands. It was like my hands were going and going and going and I couldn’t stop them, and all I could do is sit back and watch them go. It was fun, but I also sensed something a little deeper behind it all.

And then a word floated to the surface of my mind, and kept popping up at odd times: Catharsis.

Although there was nothing deeply introspective about Chewbacca or Yoda or a bumblebee, I realized that controlling these tiny little spaces gave me a huge sort of relief. Like, actual PHYSICAL relief. It was like I could breathe. It was like life support that was helping my lungs keep moving. Like, okay–maybe I can’t control what’s going on around me, but I can control this tiny space and make something lovely in it. And it’s not overwhelming. And I consumed that feeling of accomplishment like a junk food junkie, after each one was finished.

It wasn’t so much WHAT I was doing (although that was an additional fun challenge, and still makes me smile), but the process.
I was savoring that feeling of accomplishment over and over and over again. Here were these silly little embroideries, but they were part of making me feel better. I couldn’t DO anything about our situation, so I gave myself the surrogate feeling of accomplishment in these tiny ‘broideries.
AND THEN WE GOT GOOD NEWS. Again, the details are not important. It could be anything. The important thing is, the news was good. Our family was better. Finally, after such a long struggle, we were through the other side, and the outcome was wonderful. We were off on a new adventure, but the ground was reinforced and stable. Things had turned out for the best, and we were going to be okay.
..And there was much rejoicing.

We could breathe again, we could laugh, and things were going to finally–FINALLY–be okay. I felt the obsessiveness sort of slide away, and while I’m still doing the embroideries for fun, I don’t feel that same furious obsession that I felt before.
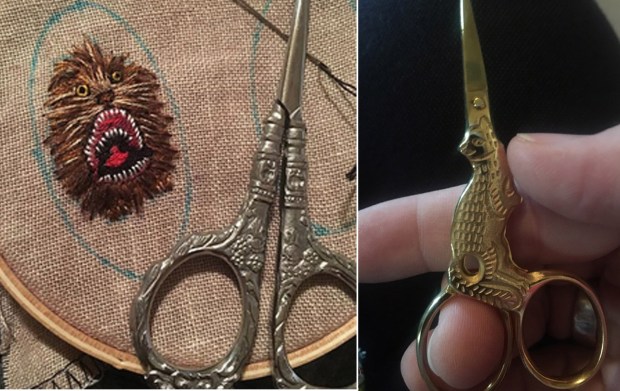
Listen, it’s a strange thing. And it seems silly. But it’s funny how these things that you love have a way of taking over when you feel like you can’t deal. They go on autopilot; they say “hang on, I’ll take care of this,” and they get you through it. For me, it was art and these silly little embroideries, and I didn’t even realize it until it was over. I wish I could tell it “thank you.” The best I could do to show my gratitude was reward it with a couple of pairs of cute scissors…
If I were another person, it might be books. Or cooking. Or painting, or dancing, or filmmaking, or animation or whatever. What do you have that gets you through? What do you do that lets you breathe, that gives you that feeling of relief?
Whatever it is, nurture it, and with luck, it’ll get you past the storm, through the dark forest, across the cliffs–safe and sound, with only a few bumps and bruises to show for it.

DIY Pin Art Display
Enamel pins are kind of a big deal these days, aren’t they? They’re so cute and cool. And aaaaall the kids are collecting them. Displaying them is a whole OTHER deal.
I’ve seen banners, hanging fabric, pennants, and other ways to show of a lovely collection. A common theme is corkboard. I took the quick simple way out a while back, and grabbed the adhesive corkboard squares you find in office supply stores….which lasted a few short months before they all came crashing down in shambles… My friend Aletta came up with a suggestion: what if we DREW a background for them? The best part: it was fun and easy to make, and I could do it with the daughter!
I got a couple of embroidery canvases (it’s made to stitch through, so the fabric is a little softer than regular painting canvas, but those would probably work too), and some Sharpie markers. We started by taking a couple of pins that sort of went together, and drawing backgrounds behind them.
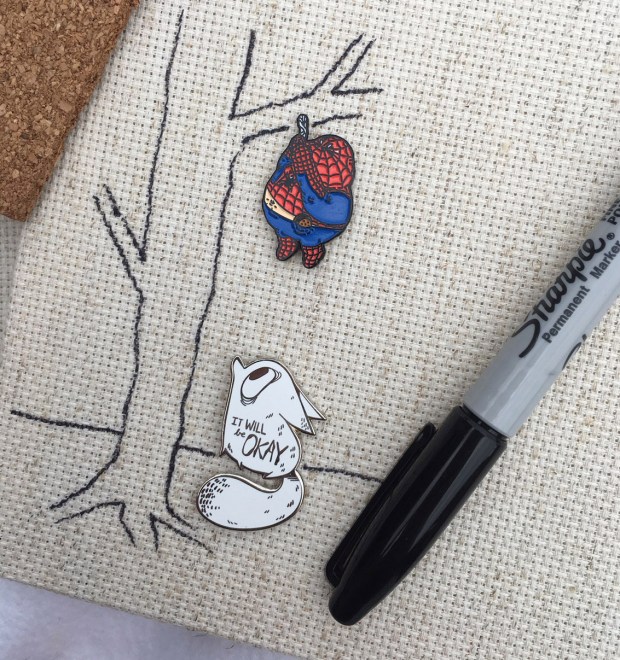 If I started this project having some fun, it was nothing compared to the fun the kid had. Myla is age seven and tells stories as she draws, so this project was PERFECT for her imagination. She’d grab a pin and start doodling, telling stories as she went–adding characters, sceneries, and battles between pins.
 It didn’t take long before we had filled our three canvases up…
 And we ended up with some fun, funky little canvas displays…Mine looking a bit like a Keith Haring comic book …
 And Myla’s turning out pretty cool as well…
 Later, we decided they needed a little color, and Myla gave me permission to add to them all. I didn’t want to take too much away from the pins or the drawings, so very light washes of acrylic paint seemed to really bring everything together.
 And voila–DIY pin displays! Ready to hang right on the wall! And if you feel like wearing a pin for a day, just take it off the canvas and put it back on when you’re done!
 Here’s a better look at them, one by one: Myla’s first one was a tree scene with most everyone hiding in the trees from Casper (who is famous, because there is a camera taking photos of him), and a random arm holding Audrey 2 over everyone…
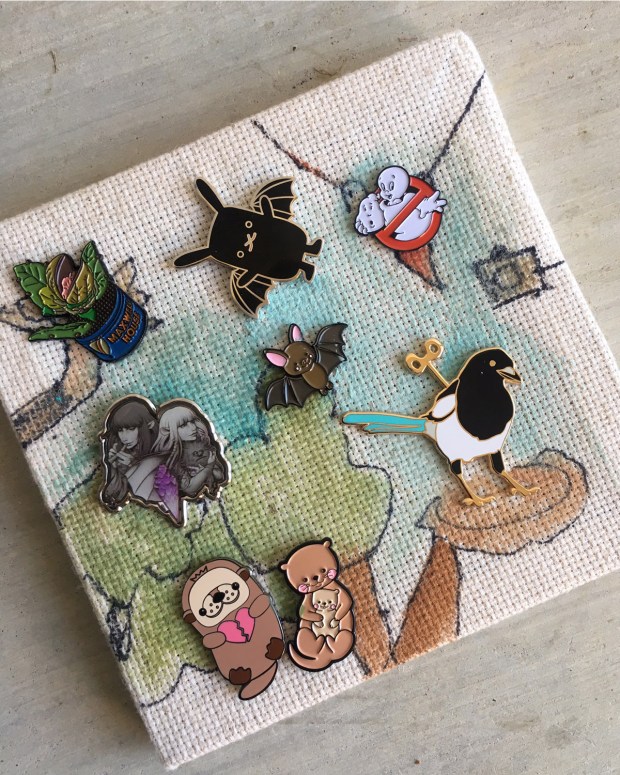 Her next one features Immortan Joe and the “blood bag” Mad Max (see–he’s hanging from the ceiling?) fighting, and two starry-eyed monsters stealing eggos and threatening a very passive, jet-pack flying stormtrooper. At the bottom, a lunch lady chases the running dishes, as the cats all jump on a trampoline, and beetles climb all over a building full of people.
Like ya do.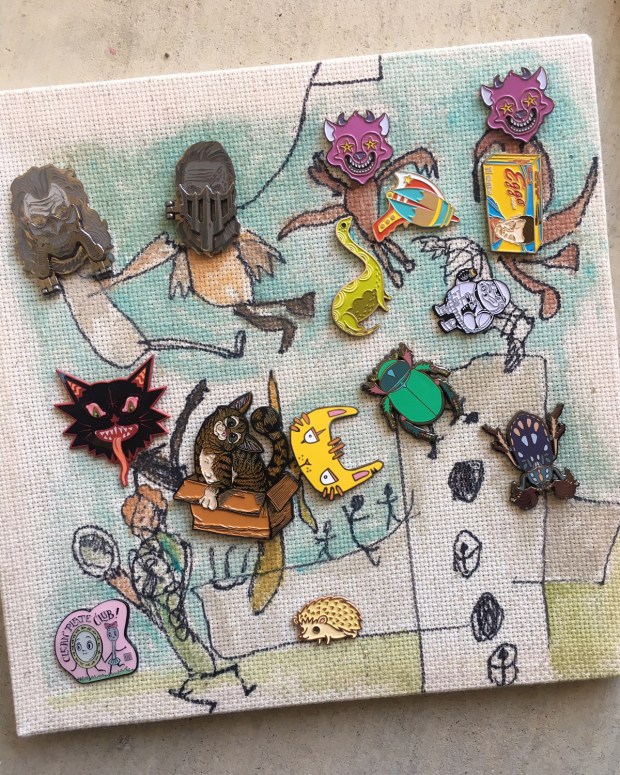 And mine has a skelecorn and magic floating arctic wolf protecting the land from an alien invasion, a strong-arm with tattoos, a very worried arctic fox stressing over tree-climbers, and and Pee-Wee unwittingly driving into a city being attacked by Audrey 2, the Thing, and Godzilla. Yikes!
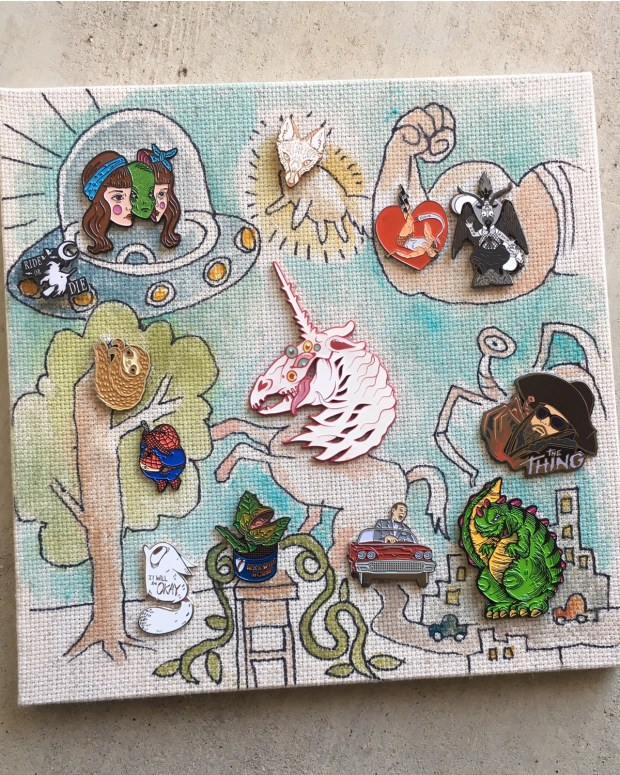 And there you have it! Easy to do…fun for you AND for a kid…looks pretty on the wall, and yet still super functional!
 So go out and give it a try! Or tell me about your DIY pin display ideas–what do you do to enjoy your pin collection?
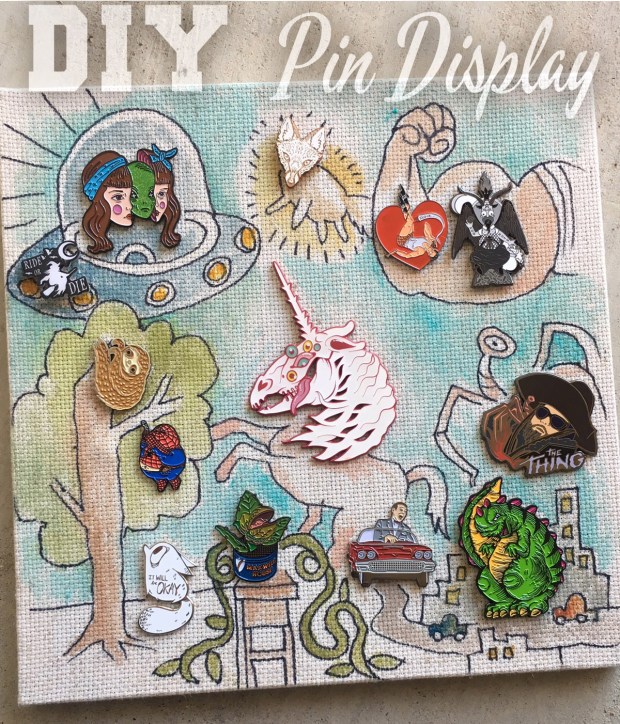
(Our pin collection featured here: anxiety wolf by Namoi Romero , pinup Dale Cooper by Emma Munger, the Thing by Annie Frenzel, chubby Stormtrooper, Spiderman, and Casper unmasked by Alex Solis), windup bird by Bleu Louise, Godzilla and box cat by Noosh Studios, sloth, hedgehog, and Nessie by BoyGirlParty, alien-head girl by Julie Filipenko, clean plate club by Mab Graves, Immortan Joe and Mad Max by Pinhead Company, tiny bat, mama otter with baby, and ray gun by LuxCups Creative, bunny-bat and broken-hearted otter by Flat Bonnie, coleoptera beetles by Dianafloresblazquez, Dark Crystal by Zen Monkey Studios, arctic wolf face by Monica Knighton, starry-eyed monsters by BeATrashCat, skelecorn and wicked black cat by Bbllowwn, and a few others that were either gifts or that I can’t seem to recall…)
My Monster Book of Monsters
Hey did I ever tell you about the time I turned my day planner (yes, I still use a really real paper book day planner) into the Monster book of Monsters? I’ve been meaning to show it to you for a while…

I was sorting through my day planner one day and decided, “you know what? I probably really need to turn this into that.” And I did. And it didn’t take very long! Its removable, and I can replace the day planner with a small sketchbook if I want.
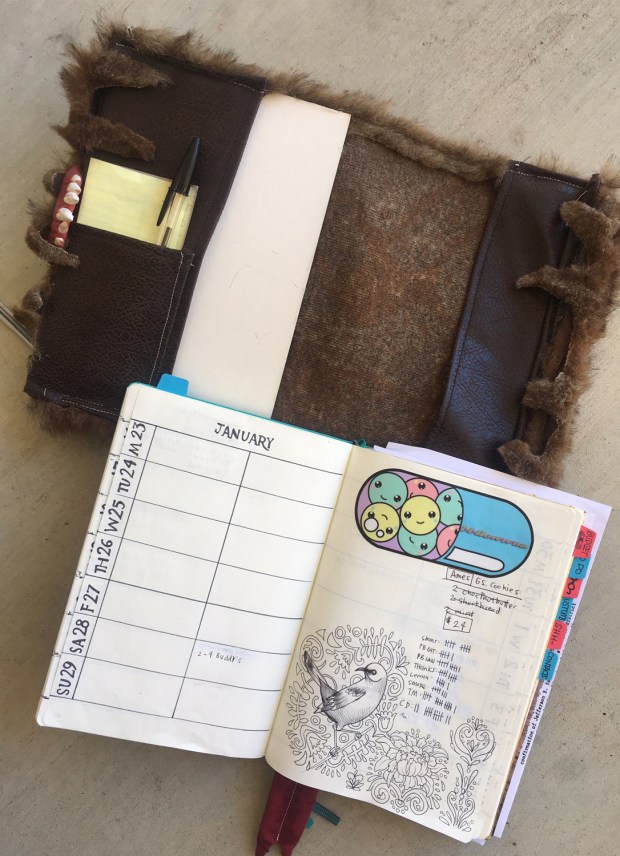
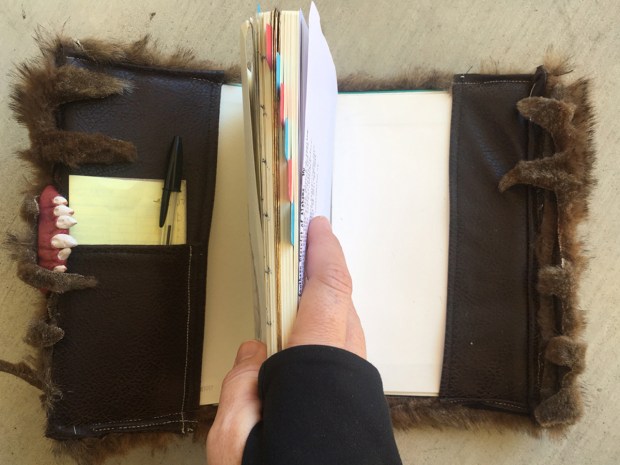
It’s incredibly wonky and terribly made, but it works, and it makes me smile. I started by laying my book open flat on the fabric, cut a big rectangle to size, and sewed the little pockets to the ends, even adding a little side pocket for pens and post-its. After the pockets were sewn on and flipped, I sewed the fringed tentacles straight to it (thankfully, the stitches are fairly well-hidden because of the fur).
And see that piece of white cardboard on the left hand inside, in the photo above? I’ll explain that in a moment…
I sculpted lil teeth and gums from Sculpey, heated them up, and glued them straight on. I didn’t do a bottom set because I wanted it to still be functional, and that just wouldn’t work because I’m right-handed and those teeth would totally get in my way.
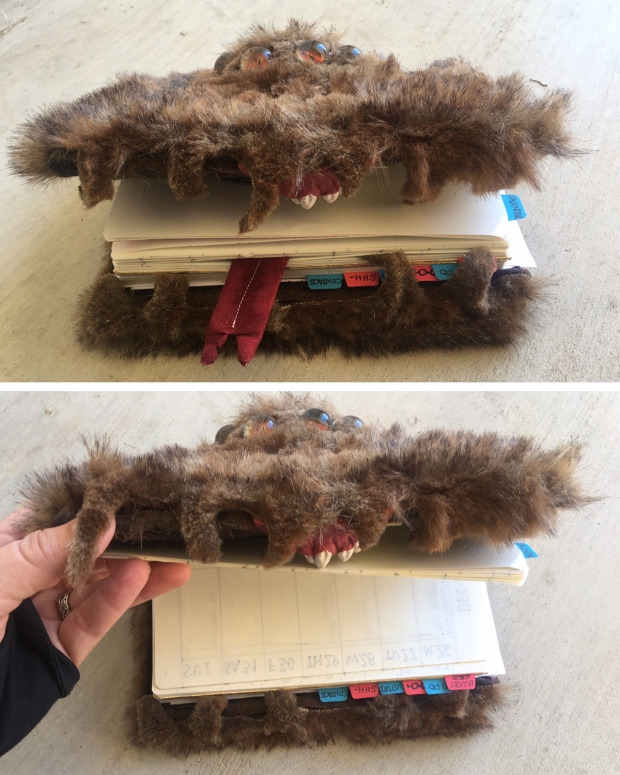
So that white piece of cardboard on the inside I mentioned earlier? That’s sort of the wonky key holding the top part of the “head” together. There are probably a dozen better ways to do this, but I just cut a curved section out of the top fur, added some stuffing, glued another piece of fabric that I attached some glass doll monster eyes to, and closed it all up on the underside with the cardboard. It’s wonky, but it works. The book slides on top of the wonky cardboard, and everything stays together (fingers crossed).
I sewed a quick little “tongue” bookmark, which holds my place on the calendar section.

And there you go! My favorite projects are not only fun, but FUNCTIONAL…so having something that I can actually use AND that makes me smile is pretty much a happy project for me, all around.
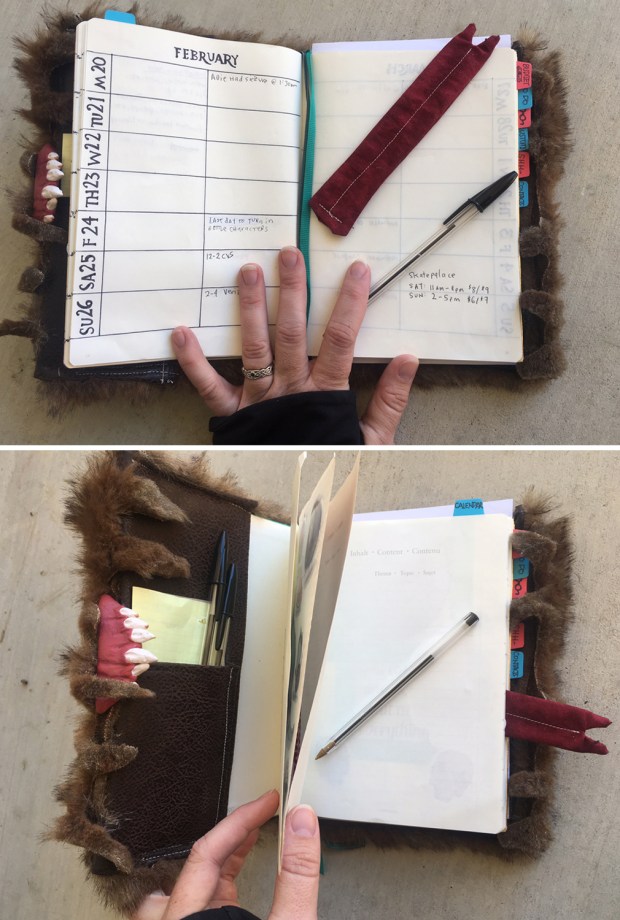
Technically, it should have the bottom teeth and a belt to close it, of course, but again–I needed it to be FUNCTIONAL, and anything that hinders the function isn’t gonna work.
Finally, I used gold paint on some pleather-like material, and cut it out around the letters, gluing it to the top. And BOOM! There’s my Monster book of Monsters day planner!
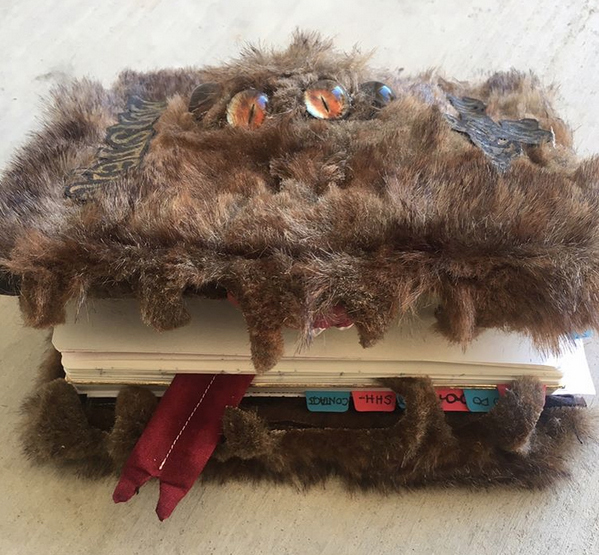
It reminded me of the homemade paper bag book covers I used to make for my textbooks ages ago (because that’s what we did a million years ago). But this was on a much fuzzier scale, of course… ❤

