Making Things Better
A while back, I posted about my little embroidery setup. But since I am a mama bird and constantly building new nests, I was looking for a setup where I could keep ALL my supplies. I kept everything in a photo box for awhile, but then I found this goofy little treasure chest at the craft store, on sale for 40% off. Yay! Trouble was, I thought it was pretty, um…UGLY.
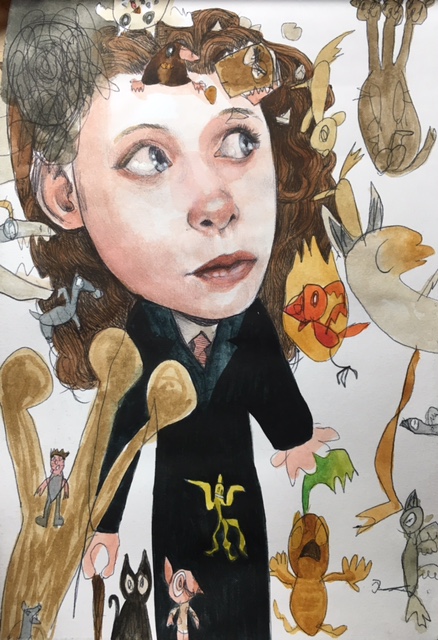
So I asked Myla to help me with it, because she makes everything awesome. She immediately grabbed a marker, and started filling each panel with a new type of dragon. Because she’s awesome, and that’s a great idea.
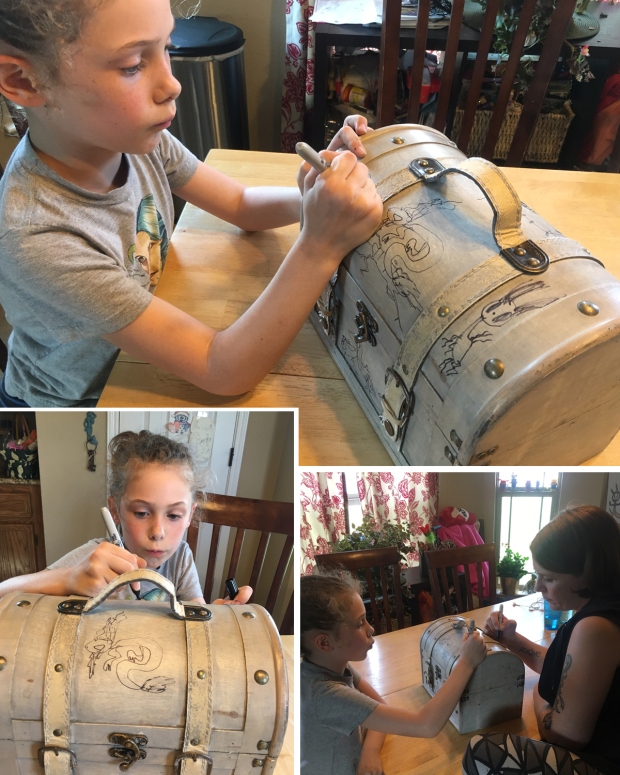
I added some details and backgrounds to it, as she told me about each one…
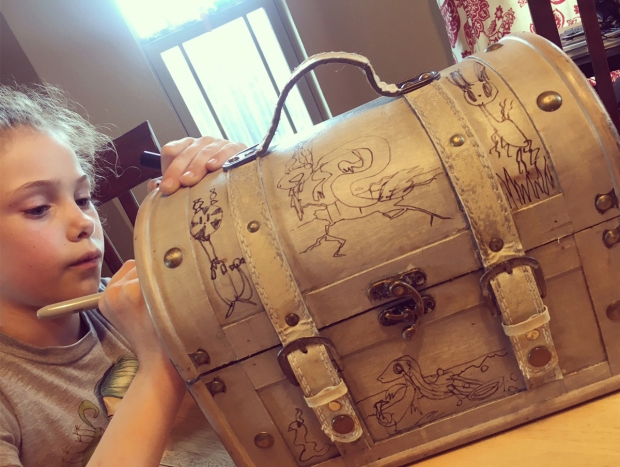
And when I painted it and added the details of what kind of dragon each was, it made me smile super big, because HOW COOL?!?!
On one side, she filled the center panel with a SEWING DRAGON, with pin legs, button eyes, and yarn hair. There’s a skeleton dragon, nature dragon, and something called “zero knowledge dragon” at the bottom center (see how he doesn’t know his abc’s and thinks a dog is a cat and a cat is a dog? That’s because he has zero knowledge). 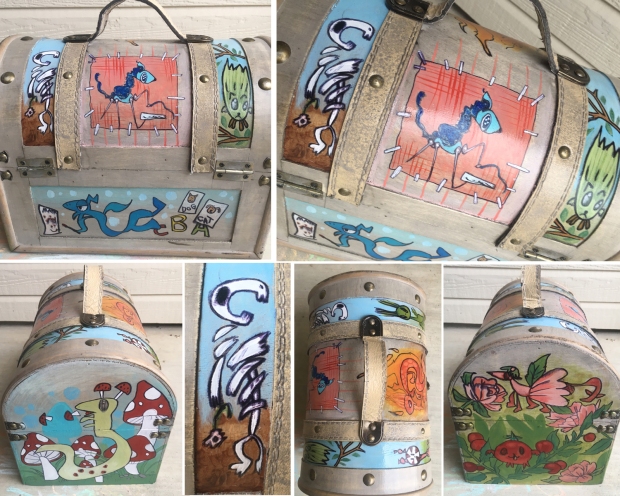
On one side panel (above), she drew a mushroom dragon, the other was a flower dragon and a tomato dragon.
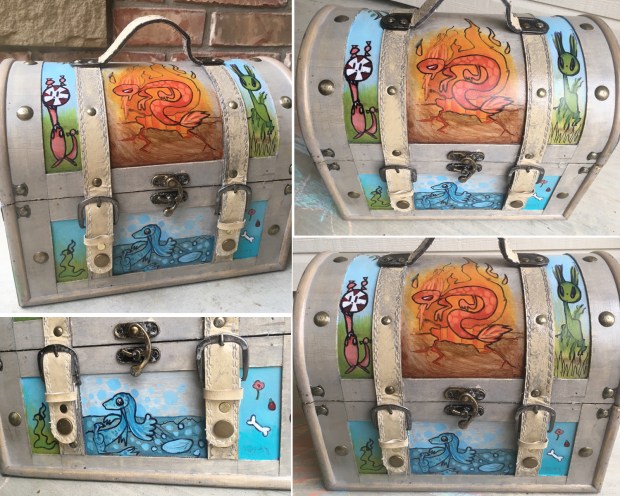
On the flip side, the center panel features a flame dragon, a candy dragon, grass dragon, slime dragon, and a water dragon.
Because OF COURSE IT DOES.
 So now that I have a lovely, magical treasure chest of crafts, let me show you the setup inside…
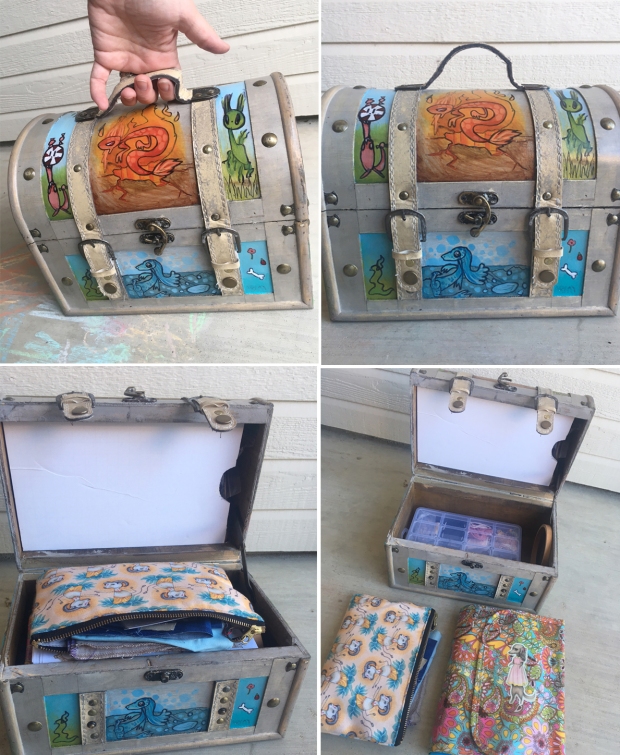 First off, I put a foam core panel in the top lid, to hold things (that was my nephew’s great idea), and then everything else fits inside.
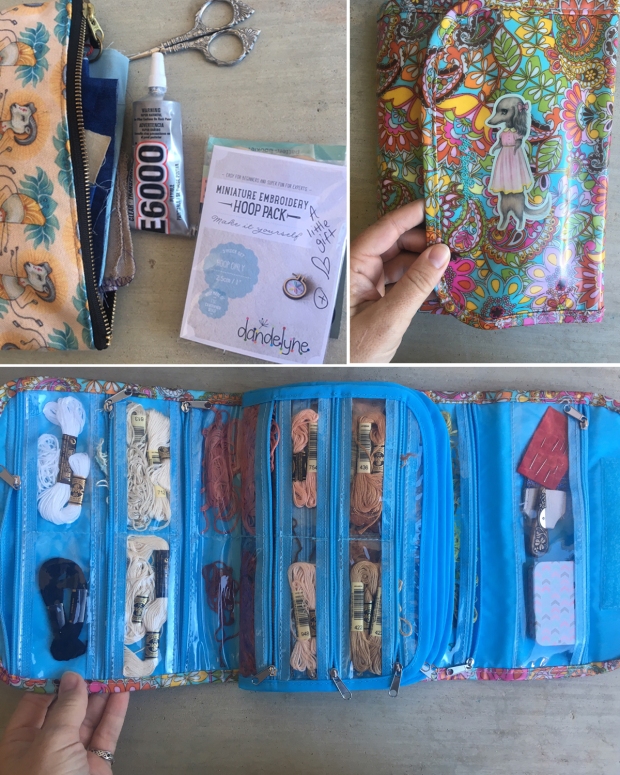
In the little ram zipper bag (which features the spider ram art on Redbubble by me & Myla), I keep fabric, glue, clips, and everything I need to put together the little Dandelyne hoops I use to frame the tiny embroideries. Then I have another little thread folder (with a doxie-girl on the front by Mab Graves) that holds all my cotton threads, separated by colors.
 And the little top panel in the box lid comes down to tuck away the frame hoops (which have 3 parts each, so I separated them all up), and a few specialty threads. But it’s tucked away up there so that it’s out of the way.
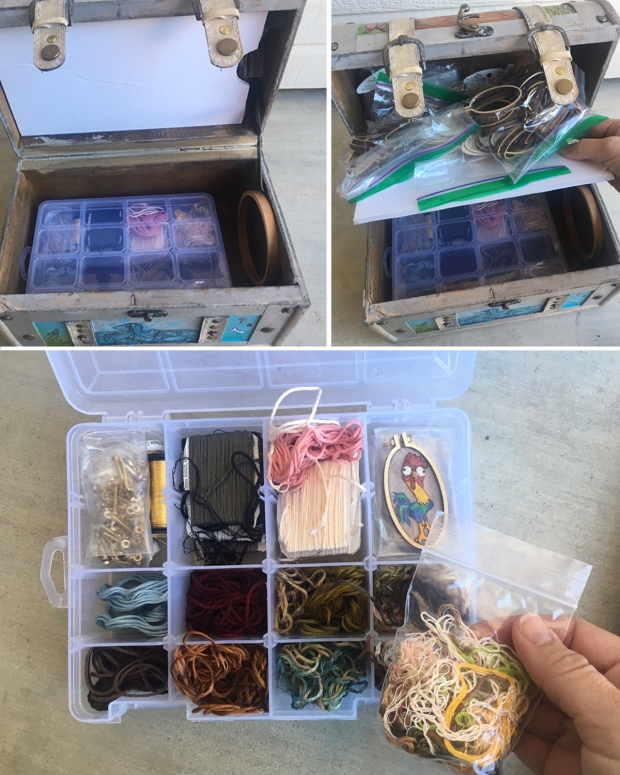 But the new thing (above) is a little box that holds my collection of silk embroidery floss! They’re a new find for me–softer and smoother, just for something a little more fancy. So the silk threads are in this little tackle box, so I don’t get them confused with my cotton threads.
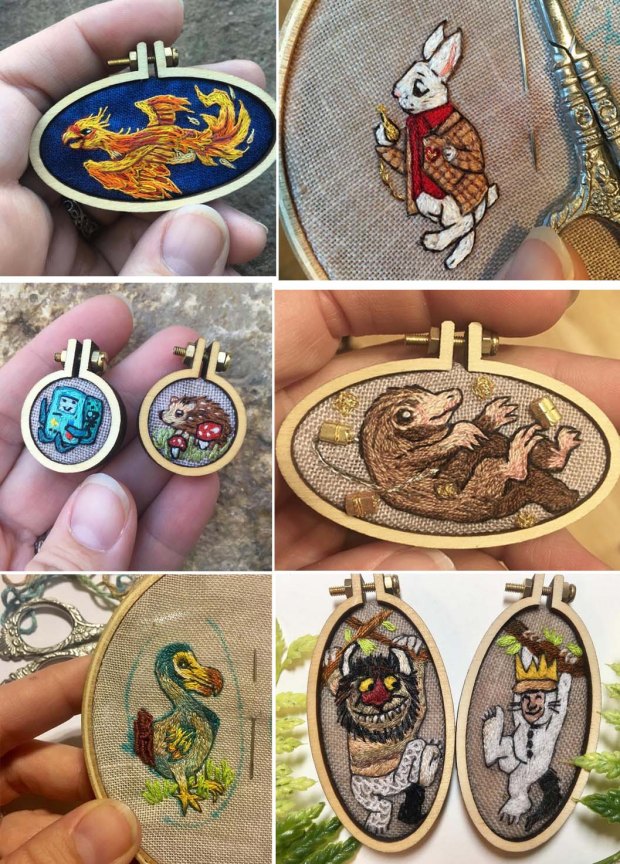 And that’s my setup so far! Do you have special setups for your hobbies?
DIY Pin Art Display
Enamel pins are kind of a big deal these days, aren’t they? They’re so cute and cool. And aaaaall the kids are collecting them. Displaying them is a whole OTHER deal.
I’ve seen banners, hanging fabric, pennants, and other ways to show of a lovely collection. A common theme is corkboard. I took the quick simple way out a while back, and grabbed the adhesive corkboard squares you find in office supply stores….which lasted a few short months before they all came crashing down in shambles… My friend Aletta came up with a suggestion: what if we DREW a background for them? The best part: it was fun and easy to make, and I could do it with the daughter!
I got a couple of embroidery canvases (it’s made to stitch through, so the fabric is a little softer than regular painting canvas, but those would probably work too), and some Sharpie markers. We started by taking a couple of pins that sort of went together, and drawing backgrounds behind them.
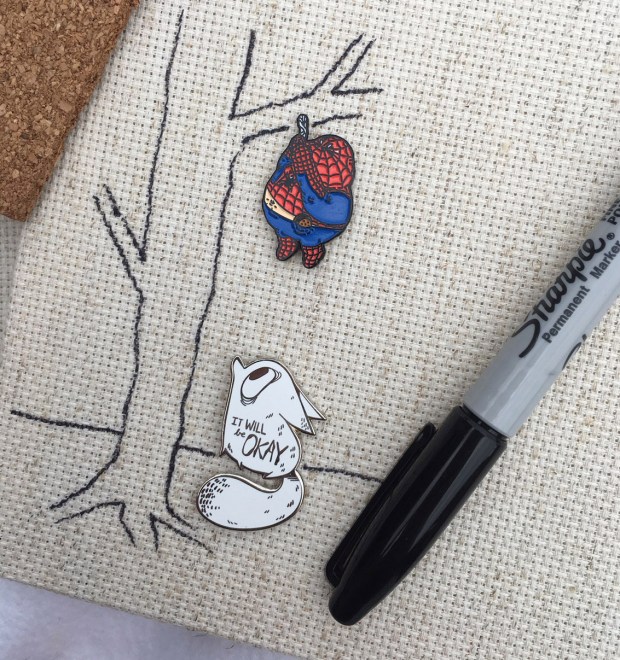 If I started this project having some fun, it was nothing compared to the fun the kid had. Myla is age seven and tells stories as she draws, so this project was PERFECT for her imagination. She’d grab a pin and start doodling, telling stories as she went–adding characters, sceneries, and battles between pins.
 It didn’t take long before we had filled our three canvases up…
 And we ended up with some fun, funky little canvas displays…Mine looking a bit like a Keith Haring comic book …
 And Myla’s turning out pretty cool as well…
 Later, we decided they needed a little color, and Myla gave me permission to add to them all. I didn’t want to take too much away from the pins or the drawings, so very light washes of acrylic paint seemed to really bring everything together.
 And voila–DIY pin displays! Ready to hang right on the wall! And if you feel like wearing a pin for a day, just take it off the canvas and put it back on when you’re done!
 Here’s a better look at them, one by one: Myla’s first one was a tree scene with most everyone hiding in the trees from Casper (who is famous, because there is a camera taking photos of him), and a random arm holding Audrey 2 over everyone…
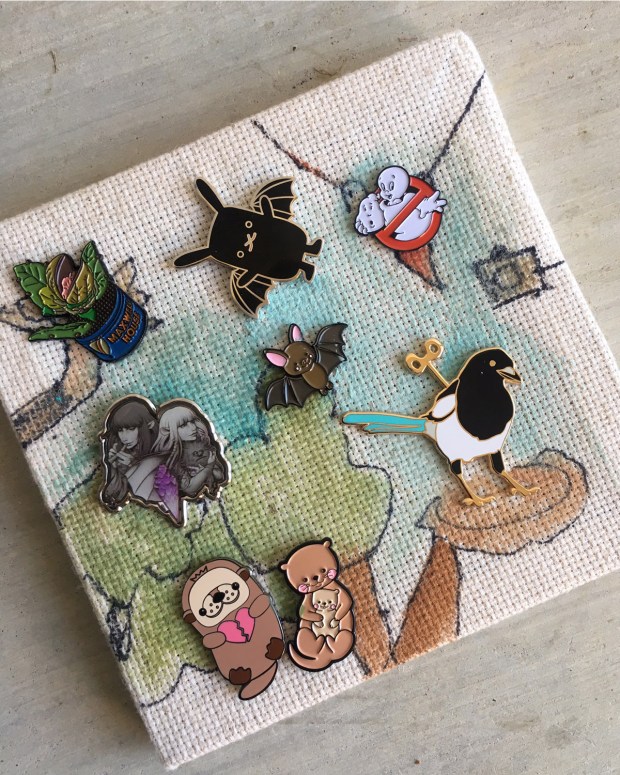 Her next one features Immortan Joe and the “blood bag” Mad Max (see–he’s hanging from the ceiling?) fighting, and two starry-eyed monsters stealing eggos and threatening a very passive, jet-pack flying stormtrooper. At the bottom, a lunch lady chases the running dishes, as the cats all jump on a trampoline, and beetles climb all over a building full of people.
Like ya do.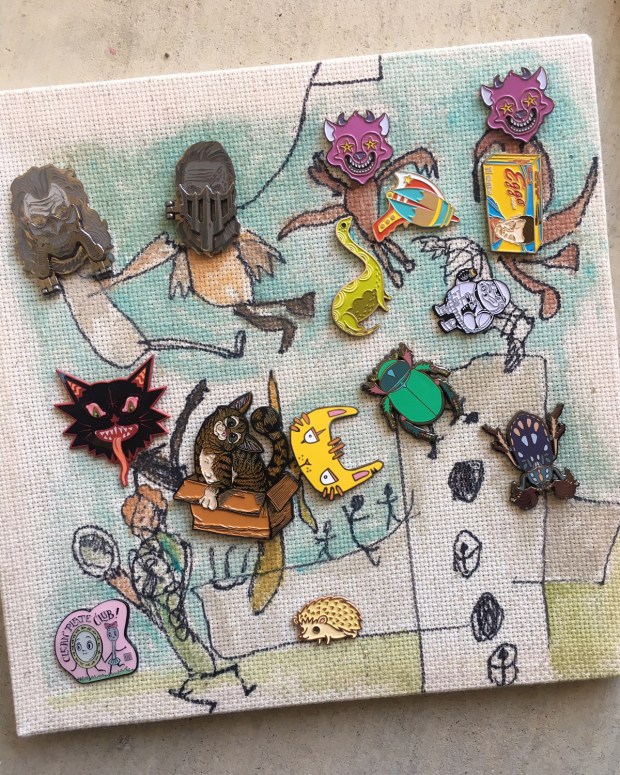 And mine has a skelecorn and magic floating arctic wolf protecting the land from an alien invasion, a strong-arm with tattoos, a very worried arctic fox stressing over tree-climbers, and and Pee-Wee unwittingly driving into a city being attacked by Audrey 2, the Thing, and Godzilla. Yikes!
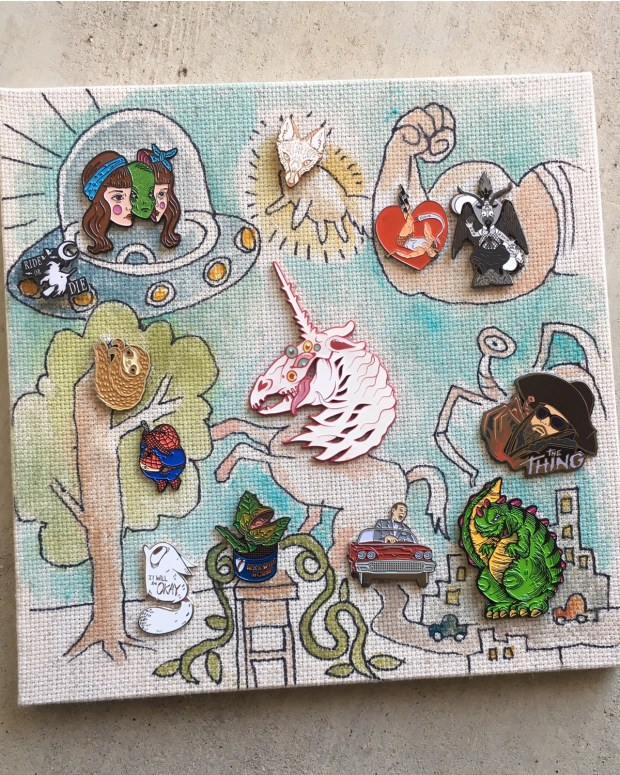 And there you have it! Easy to do…fun for you AND for a kid…looks pretty on the wall, and yet still super functional!
 So go out and give it a try! Or tell me about your DIY pin display ideas–what do you do to enjoy your pin collection?
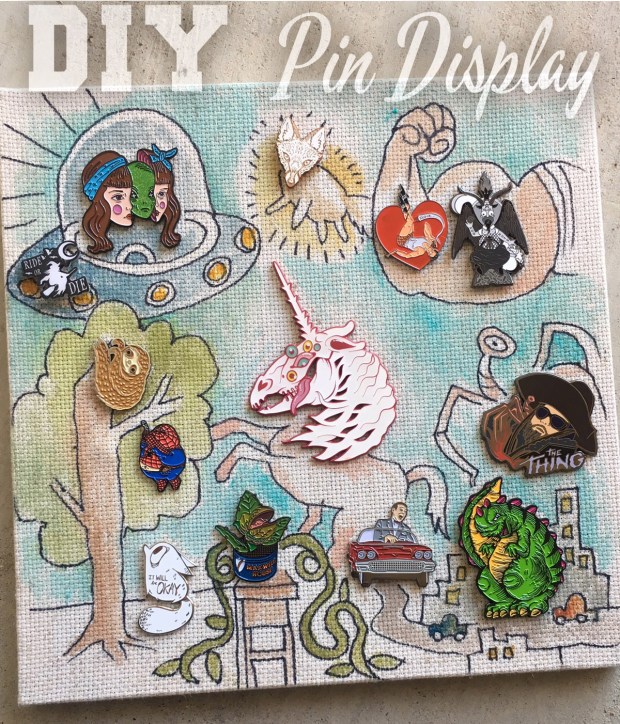
(Our pin collection featured here: anxiety wolf by Namoi Romero , pinup Dale Cooper by Emma Munger, the Thing by Annie Frenzel, chubby Stormtrooper, Spiderman, and Casper unmasked by Alex Solis), windup bird by Bleu Louise, Godzilla and box cat by Noosh Studios, sloth, hedgehog, and Nessie by BoyGirlParty, alien-head girl by Julie Filipenko, clean plate club by Mab Graves, Immortan Joe and Mad Max by Pinhead Company, tiny bat, mama otter with baby, and ray gun by LuxCups Creative, bunny-bat and broken-hearted otter by Flat Bonnie, coleoptera beetles by Dianafloresblazquez, Dark Crystal by Zen Monkey Studios, arctic wolf face by Monica Knighton, starry-eyed monsters by BeATrashCat, skelecorn and wicked black cat by Bbllowwn, and a few others that were either gifts or that I can’t seem to recall…)
Noticing the Little Things
The world can be a frustrating place. Sometimes, it’s all you can do to keep from yelling to no one at the top of your lungs…
I’ll be honest, there are a LOT of things going on in the world right now that I am NOT okay with. And I’m NOT going to advise others to just pretend they don’t exist, because there are a great many things that need action at the moment. But it can all be overwhelming sometimes, and you need to find ways to protect your own mental stability.
It can be tempting to just curl up in a ball, huddling in the corner, crying…but you’ve got to fight for yourself. Thank goodness for a fighting spirit–it’s what keeps me going lots of the time.

My mom used to say, “if it helps to worry about something, if it helps give you a good idea for a solution, then worry. If it doesn’t , then just let it go.” Whether your struggles are literal or perceived, you can’t let things overwhelm you forever…
You can take some moments to yourself to relax and strengthen up. Feel bad a bit, allow yourself to cry and rest up….but then you’ve got to take a deep breath, huddle up, strap on your armor, and dive in…

(Little animation created by Myla from the Goldie Blox app)
When things get like this, I try to focus on taking joy in little things.
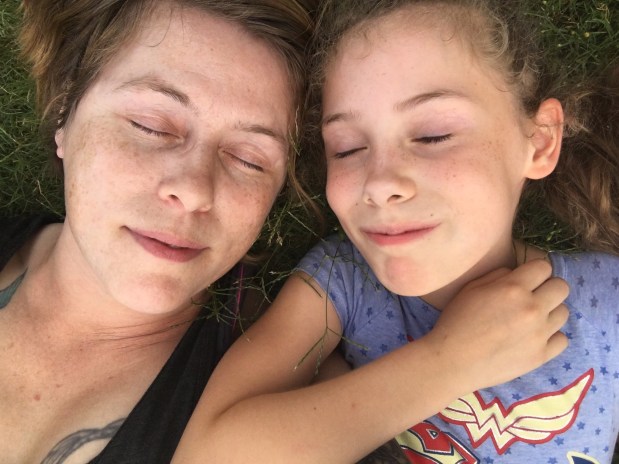
Like new perspectives…like chilling on the ground, or on the floor with the kiddo…
I read once that to keep yourself in the here and now, and to REALLY feel gratitude, start with your own senses, especially your breathing, because if you’re breathing (and I’m assuming we all are), you’re still alive…Don’t think about what’s GOING to happen, what COULD happen, what MIGHT happen. Think about what is happening right NOW. You’re breathing, for starters. You’re alive.
There’s joy in watching someone do something they’re passionate about. Any kind of art, any singing, any play, any museum…
Trying new things helps. I have found myself lost (which I realize is a funny oxymoron) in the world of embroidery lately, and I can’t stop at the moment. It’s all I want to do, creatively speaking. I’ve dabbled in it before, but now I’ve found new challenges, new things in it to explore, so I guess I’ll keep doing that for a while, until I don’t feel like doing it anymore. And when I don’t feel like doing it anymore, it’ll be okay–I’ll do something else.
I have been finding a great appreciation for things that make me smile, things that make me laugh.
Like doggo and pupper memes.


And there are even snake ones!
(For some reason, these CRACK me up, and no one else seems to get it.)
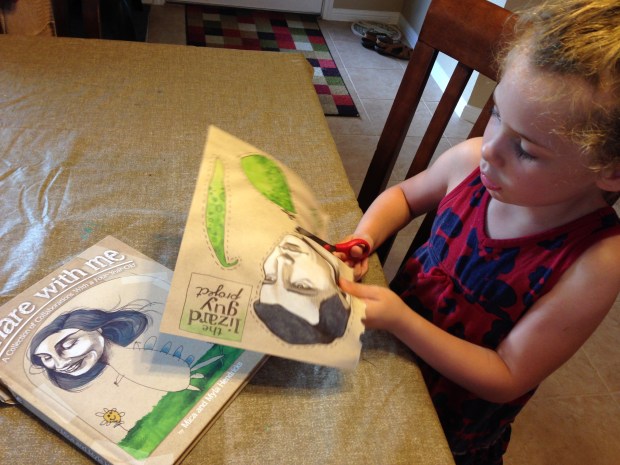
Doing projects with Myla usually helps. When I am feeling down, I sometimes set up a project or a posterboard for us to draw on when she gets home from school. No matter what’s going on, it nearly ALWAYS makes me feel better. (Did you know she even included a cutout project in the book we made together? You can get one too!)
It’s a bit symbiotic, because I get to live in the mindset of a child again with her, and she gets to spend time doing something we both love.

(Beautiful photo by the lovely Molly Thrasher)
Cuddling up is also a good option. “Cuddling up” is simply grabbing a soft cozy blanket, getting your favorite stuffed animals (yes, even if you’re a grownup) and plopping yourself in front of a good movie on the couch.
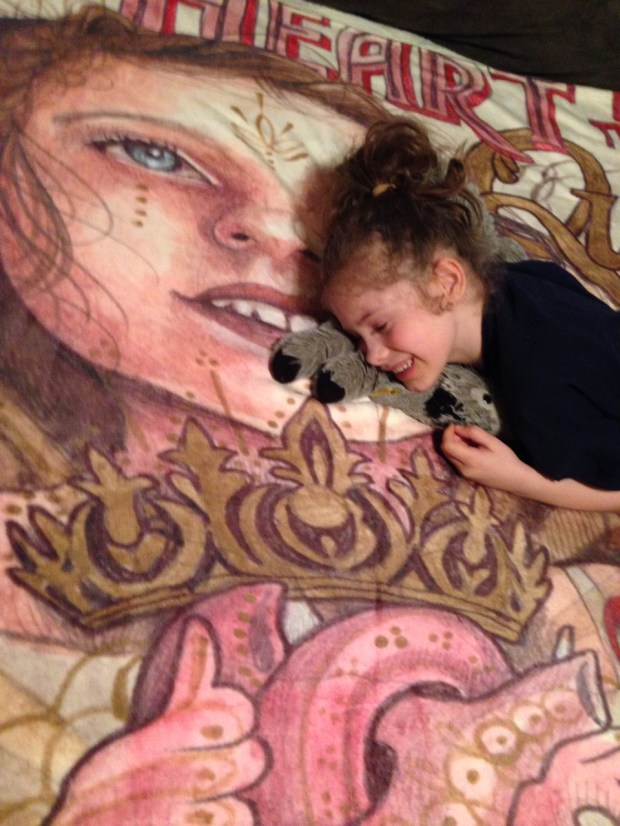
(I may be a bit biased, but our fuzzy blankets from S6 are my FAVORITE…)
And since I can’t JUST sit and watch a movie, I like to multitask by grabbing a sketchbook with the monkey while she cuddles up with me.

It’s VERY important to keep fighting for your own sanity–if you’re still trying, then you’re still alive. But it’s also okay to relax a bit, take care of yourself, and take some comfort in the little things.

And don’t push it to the side! Don’t disregard it as unimportant. Don’t ignore that little voice that tells you NEED little things. That voice is important.

Nothing lasts forever. This is true for good things AND bad things. The bad things will pass…but the good ones will, too–so appreciate all the little things in your life that make you smile. Appreciate the fact that you’re here RIGHT NOW and you’re breathing.
And you can even try to find some small appreciation for the unpleasant things, because they’re also there for a reason, even if it’s just to make you better appreciate the good.

And, as I always say, if you’re looking around, and things seem so bleak that you CAN’T seem to find any good things, then BE the good thing. Do something nice, say a friendly thing, hold a door, help a stranger. Put yourself aside for a moment, and give someone else a hand. It helps.
Make something, even if nobody sees it but you. Because while you’re doing all this for your own self-preservation, you’re also putting some good out there in the world, and goodness knows we could all use a little more o’ that. ❤

(Lovely words by Shel Silverstein)
Accio, Potter Projects!
So, last week, I told you more than you probably ever wanted to know about our family trip to Harry Potter World in Orlando, Florida. Naturally, I came home with a fierce desire for all things Potter, and got right away doing some related projects.
First project: The Dobby doll! My big souvenir from our trip was this wonky little Dobby. I knew he wasn’t the greatest looking thing…

He looked pretty purturbed, actually. Like he just ate something sour and is a bit miffed by it. But I figured I could do something with him.
He’s got a wire poseable frame, and is made of a foamy sort of material, so there’s no chance of changing the face sculpt at all. All I could do was try my best to give him a new paint job and brighten him up a bit.
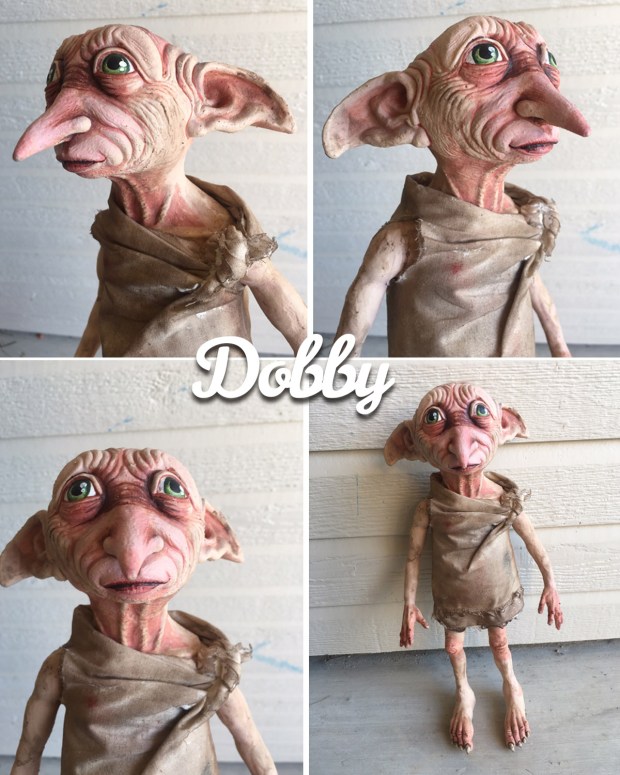
I tried turning his wonky lips into a bit more of a smile, and made his eyes quite a bit bigger. I also took off the nylon fabric they had wrapped around him, and exchanged it for some paint-stained muslin scraps I had in my craft room. And I love him! Myla likes to make him hold his arm up and say, “You must not harm Myla Hendricks!!” which is good for a giggle. I suggested we replace the Elf on the Shelf (which I got suckered into last year) with Dobby, but she didn’t think that was funny.
For Christmas, I had gotten almost the ENTIRE Harry Potter Funko Pop set (I have a bit of a Funko Pop problem), which I happily painted with a bit more detail (because I have a bit of a Funko Pop problem)…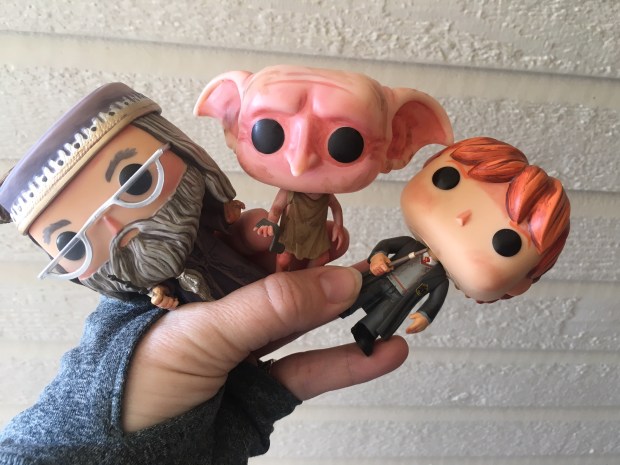
In a geeky facebook group I’m part of, one member told us she used her Ollivander’s wand boxes as display shelves. WHAT. Mind. Blown. So, along with a snitch and a couple of other knick-knacks, my Funko Pops are housed atop ours, and they sit on our wall, making me smile a bit each time I pass them.

As for the wands, my dad (being pretty crafty himself) said he’d be willing to make us a scroll display, but for now, I built a temporary one. I took an oval natural wooden plank, screwed in several cool-looking drawer pulls from the hobby shop, added some cup hooks, and a string to hold it up (the rusty star isn’t part of it–it’s a wall decoration we already had, but it fits well with everything). I bought the leather pull hoops at the bottom intending to have three, but when I got home, I realized I had only grabbed two…and then decided it was perfect for holding the map of wand spells that comes with each wand! It needs some work (never mind those holes I mislined), but I love the basic idea of how it turned out. It seems very homemade, put-together and “Weasley,” and I’m pretty happy with that.

Most likely, I’ll re-do it with a nice piece of wood (and balance the wands BEFORE I drill), but for now, this works.
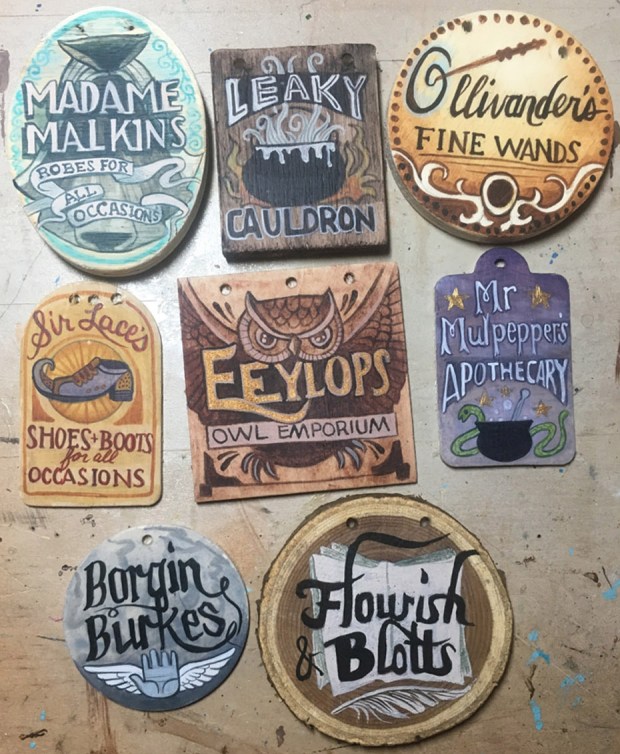
And speaking of my dad, I thought I’d give you an update on his backyard garden train Hogwarts he built by hand. If you haven’t seen it, I wrote a whole post on it here, but for now, this photo shows you the basic idea:

And now he’s working on Diagon Alley!!! Look at the figure for the Weasley shop! I’m so excited to see it. He sort of went off the map for Diagon Alley, enjoying putting his own little shops in there, but it’ll have the main shops, including Weasley’s Wizard Wheezes, and a Gringott’s with a dragon on top! I can’t wait to see it!
For Christmas, I made him a few signs he could hang from some of the storefronts he’s building…
Then I got a bit obsessed by making these tiny corked mandrake seedling bottle pendants!
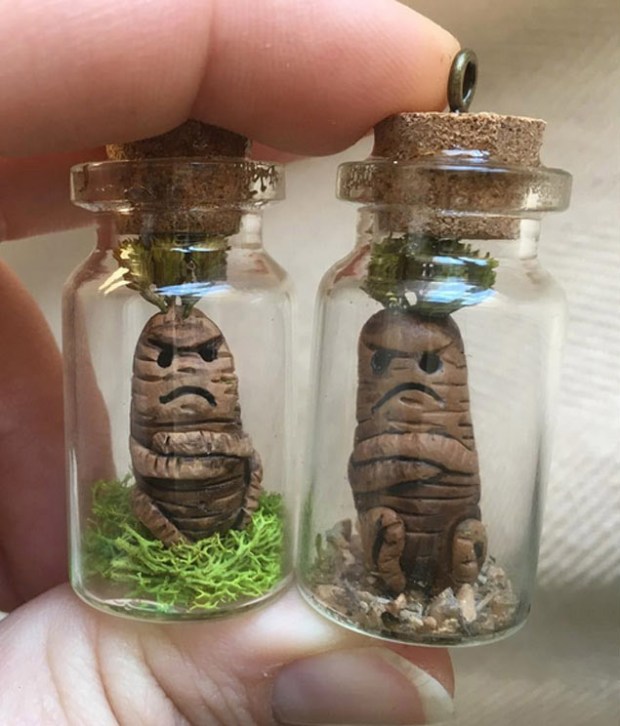
I was inspired once again by a tutorial on one of my favorite blogs, Epbot, for building a large mandrake bouquet. These were SO much fun to make! I made teensy ones, and tried different versions that were a little more involved, and ultimately didn’t work out as well. But after a bit of trial and error, I came up with the more simple design above, and made so many that I put them up in my etsy shop. We couldn’t decide if we liked the moss or the dirt pebbles better, so I made several of each. Now I want to make other tiny things to put in necklace bottles! (But I get the feeling that’s been done for a long time by miniature sculptors much more coordinated than I….)
So there it is! Potter-brain for sure. Along with the Butterbeer lip gloss I found on Etsy, a couple of patches for our patch collection (this one and this one), I’m fairly sure we will never tire of wizarding things…<3
Beasties
Only one week away from our trip to Wizarding World of Harry Potter in Florida, and we’ve got Potter fever!
At some point, Myla and I were talking about the creatures in the Harry Potter movies and books, and I mentioned how I stumbled across this pattern kit by Mieljolie for a Cornish Pixie–One of the little creatures from Harry Potter and the Chamber of Secrets that Gilderoy Lockheart releases in his Defense Against the Dark Arts class.

The Mieljolie kit was super easy to follow, and had nearly everything we needed to make this cute little fella (you can also buy just the pattern as a downloadable PDF).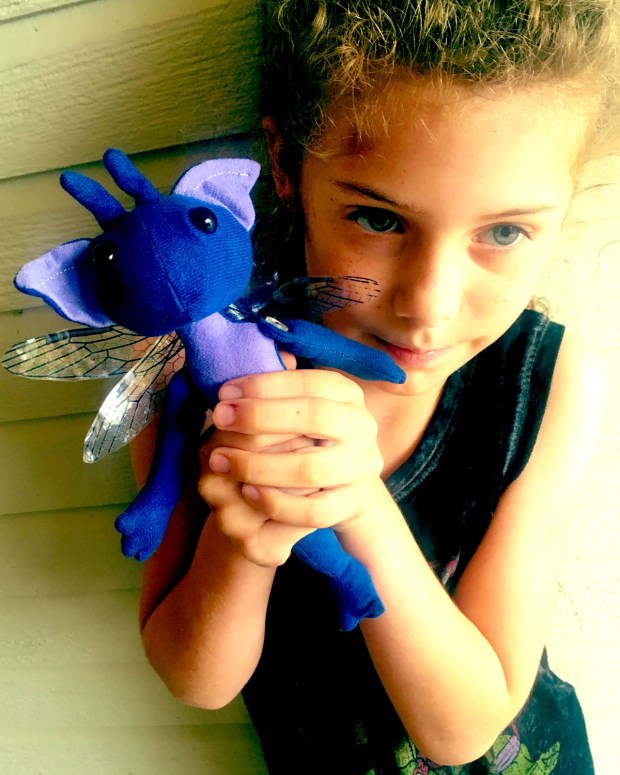
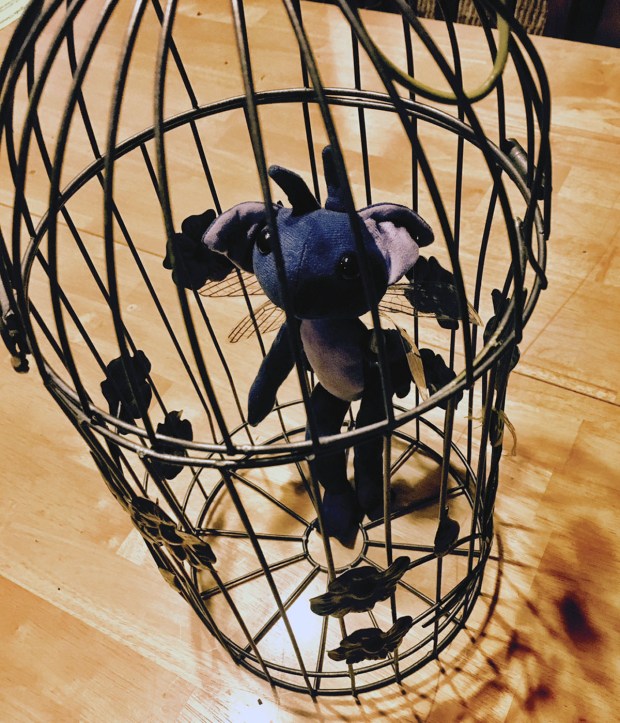
Myla even carried it around in a little wire birdcage we had…
But then I saw Fantastic Beasts and Where to Find Them and I fell in love with the niffler. I told her all about it, and showed her video clips and pictures, and she fell in love too.
The niffler, for those who don’t know, is a little platypus-looking creature from the movie, with a bottomless pouch, who is very much attracted to shiny things.
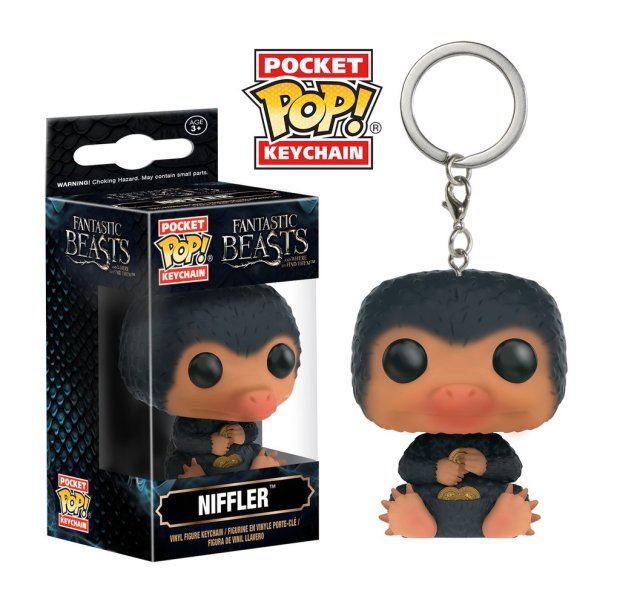
 They even have niffler Funko Pops! We found these adorable Pocket Pop keychains and had to snatch them up:
“I bet he’d make a CUTE doll,” Myla said. But when it came to dolls, I couldn’t find a single pattern online. I heard from a reader that Harry Potter World / Universal doesn’t even have the rights to the characters yet, so they don’t even have plush dolls in any of their shops.
So like I often do, I rolled up my sleeves, and made my own.

It’s a big wonky, and a whole lot strange, but Myla LOVES it.

There’s a great scene in the movie, where Newt Scamander catches the niffler, and shakes him so all the gold coins and jewelry fall out of his pouch, and land in a giant pile on the floor. So fun!

I haven’t made a pattern because I’m like one of those cooks that add a little of this and a little of that and can’t explain to you how exactly they prepared the food? Yeah. Like that.
But its arms are hinged, and can move up and down, and mine even has a little pouch!

Myla LOVES bringing him places. She even took him when she found the nerve to go to the movie, and see the niffler herself, and she LOVED it.

The unfortunate part is that none of the other kids know who or what the niffler is, so they can’t really appreciate it. But Myla’s a bit used to that. She’s learned that she comes from a long line of weirdos, and that even though they’re not always understood by other people, weirdos are the best kind of people. And that just because you’re the only one who knows what something is, it doesn’t make it strange or uncool, it makes it SPECIAL.
One more week til Potter World!
The Robot Zork
I’m not sure if you’ve noticed or not, but I LOVE making costumes for the kid. So far, the biggest, most in-depth one was Furiosa to go with my Immortan Mama, which we took to a convention to properly walk it around.
But Halloween is always tricky. When she was old enough to choose herself (age three?), the first costume she ever asked for was Max from Where the Wild Things Are. So I found a pattern and lovingly worked on the costume for over a month or so (I had never made a full body jumpsuit before), and then the week before Halloween she said, “Well, maybe I just want to be a bee.” Um…no, kid. It’s too late–you’re Max. Hahah! And so she was Max, and she had fun, and all was right with the world. So I always ask her to REEEEALLY think about it. And then I give myself plenty of time to start. And once she decides, there’s no changing.
The next year, I used cardboard, paper clay, knee pads, and gold spray paint to turn her into her favorite droid, C-3PO, and it was WAY cool. Then she learned about Falcon from the X-men, and freaked when she saw the pre-made costume in the store…so I decided to compromise (because it was on sale), and let her wear it to a convention we were going to near the end of October (Even though I reeeeeeeally wanted her to wear the C-3PO I worked so hard on). But Halloween, she was all droid.
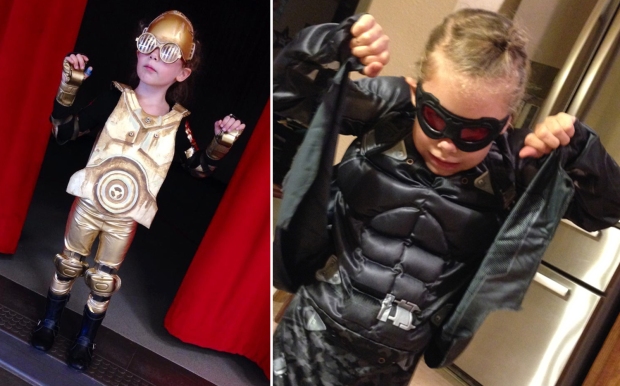
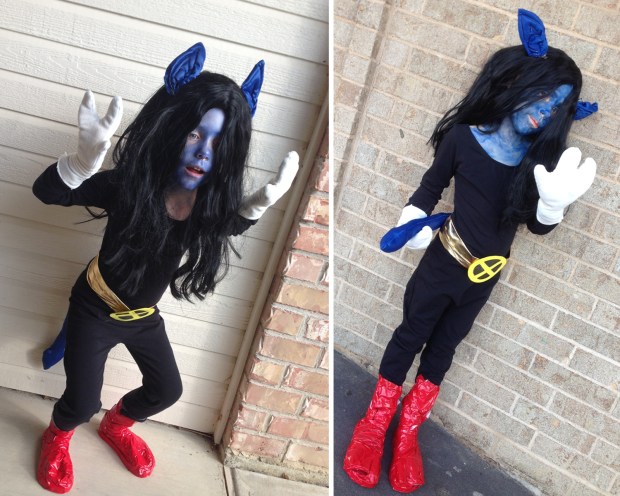
The following year, she was all about teenage Nightcrawler from the cartoon Xmen Evolution, and I threw together a little 3-fingered and 3-toed costume for her. I glued simple blue ears to some hair clips and clipped them into the wig. I used red duct tape over cardboard and flip-flops for the boots, and I just traced around her hand and sewed a simple shape for the 3-fingered gloves.
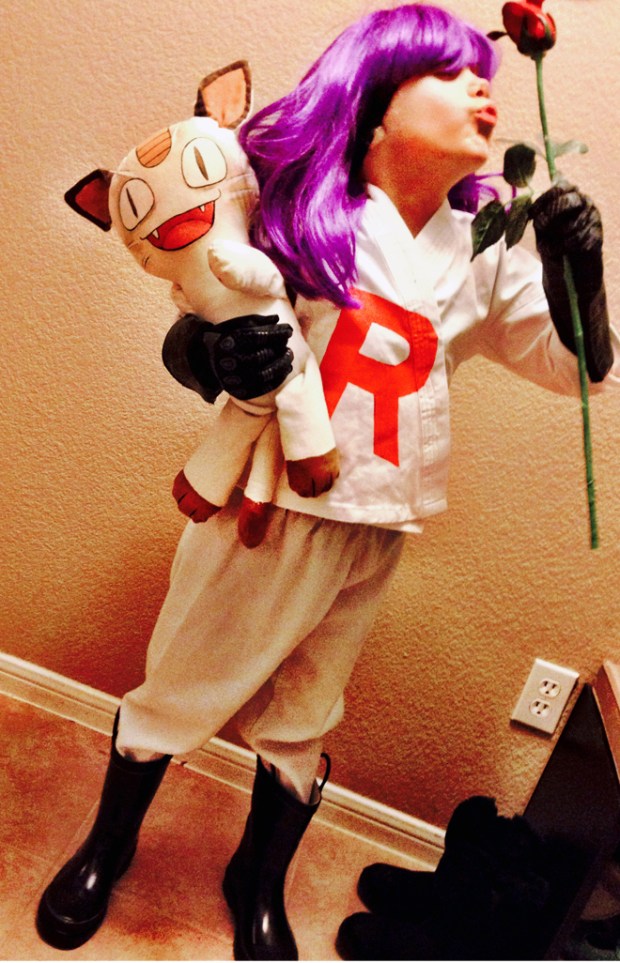
Last year, she was Pokemon-obsessed. Well, more like James from Team Rocket-obsessed, and dressed as him. I used her old karate uniform, her rain boots, and a purple wig, and sewed her a simple Meowth doll with a painted face. Simple, but so much fun!
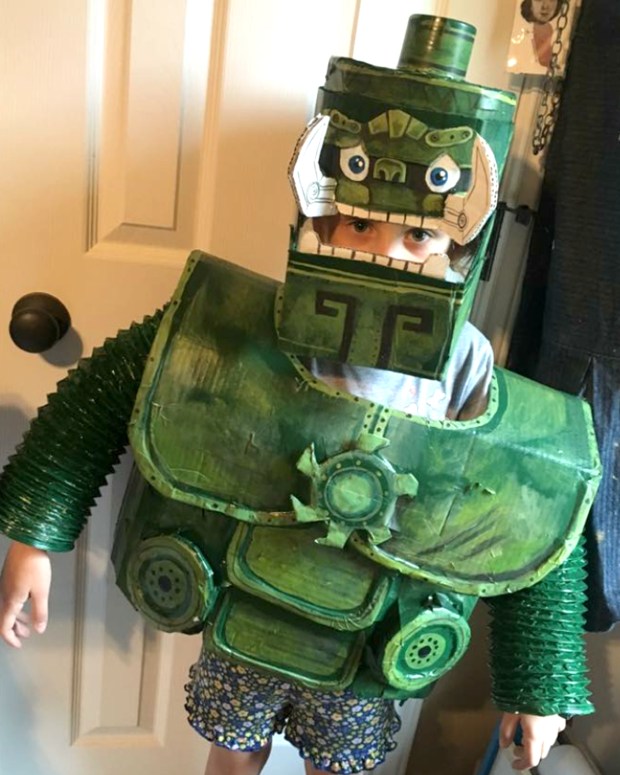
This year, she’s been all about the Giant King. We’ve seen the movie a million times–it’s a foreign film dubbed in English, and she’s in love with the big green robot Zork (which she insists on calling “Zorp”).
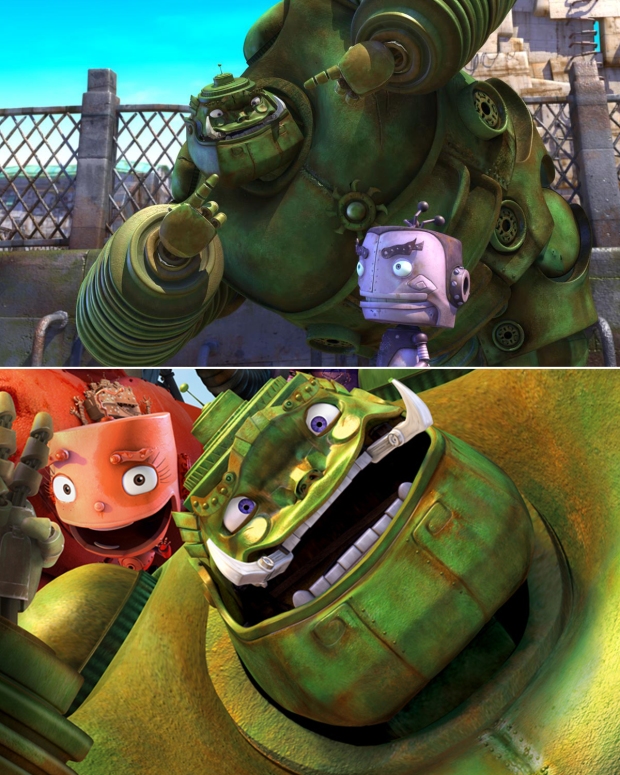
I let her think about it for months, and she settled on him for Halloween. No matter what came and went, she still chose “Zorp.” She even finally saw all the Harry Potter movies, and said she wished she could dress up as Harry some time at a convention or something, but she still insisted on “Zorp,” and he is her Halloween pick no matter what. “Maybe we can save Harry Potter for my birthday,” she said. (Oooooh, YES.)
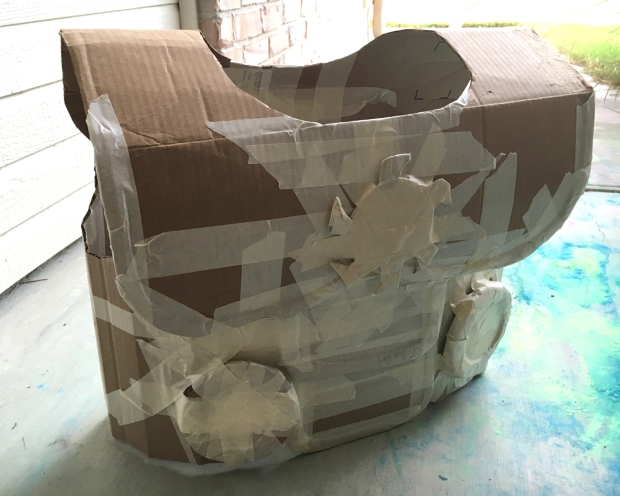
So I got started by raiding our cardboard from the recycling bin, and roughing out a chest piece shape with masking tape and hot glue. Looking back, I could’ve probably done without the masking tape and just used the hot glue, but–live and learn.
Then I built the head like a little hat, and sprayed it with green spray paint, and adding details in acrylic paint.
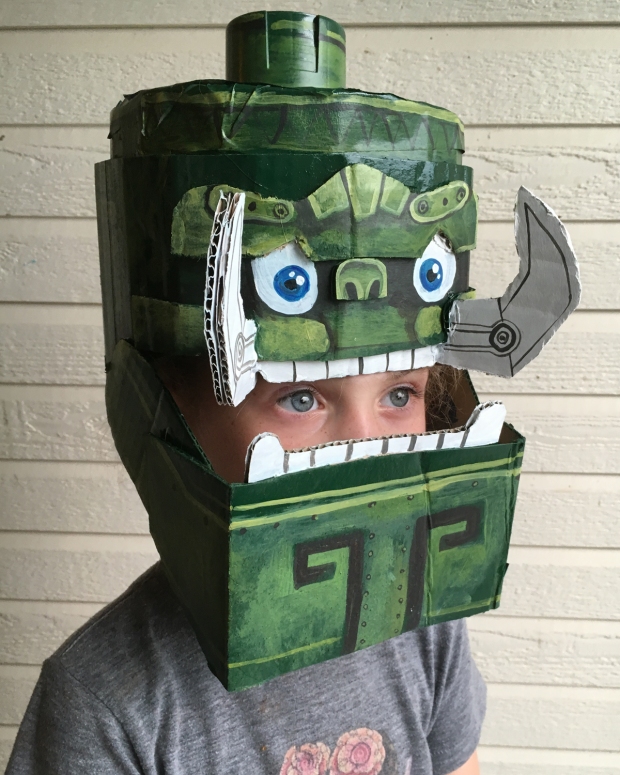
I painted up the details on the chest. The chest piece just slips over her head, and the headpiece has a bit of liner inside it to cushion her head a bit.
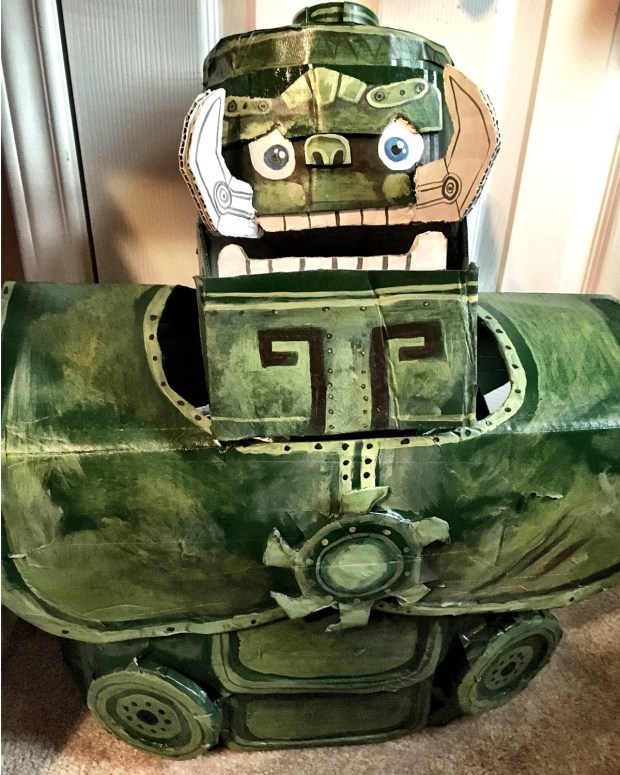
And finally, the arm pieces: The husband picked up one of those accordion-style dryer vent hoses, and I spray painted them green. I also had her try on the chest piece again (I’ve learned that it’s super HARD to get my kid to try on and size things!), and had to add some cardboard to the neck hole so it didn’t fall off her shoulders. The tricky part will be attaching the vent hose “sleeves” to the chest piece so they don’t just slide off her arms. I haven’t figured that part out yet (it will most likely involve a lot of duct tape), but I’ll figure it out in the next couple of days!
She’s so excited! So yeah, she’s probably spoiled with custom-made costumes, but I really do love making them, so it’s a lot of fun for me, too. I always think of it as a fun challenge to see what I can come up with to make it work. It’s a great way to keep the creativity flowing, and make something unique and fun! But really–whether you’ve got a store-bought or homemade costume, the whole point of the thing is FUN. It’s gotta be fun for everyone, right?
Myla asked me what I’d be, and I told her I’d probably just paint my face, robot-style. That’ll be fun. So keep an eye out on Facebook and Instagram for a Halloween update. And have some good, clean, safe fun out there!!! Happy Halloween!
We Made A Backpack
Last year, at the end of first grade, Myla told me “I have an idea for a backpack.” She drew out a doodle that sort of looked like Yoda hanging on Luke’s back, but with her own little character she created: an arctic fox in an orange sweater.
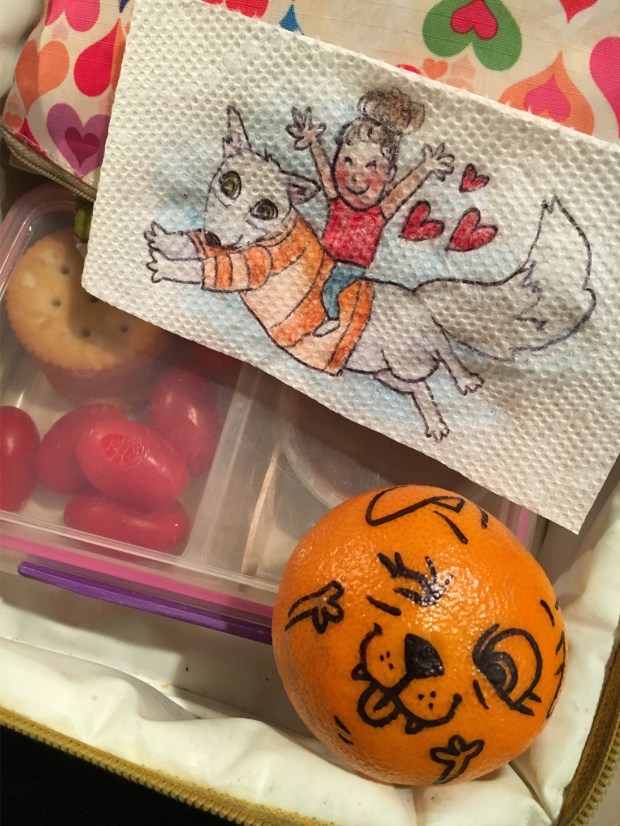
(I drew it on a napkin in her lunch once:)
Since I have no magic skills in patternmaking on my own, I found a beautiful little backpack pattern from a website called Birch that was functional, not too complicated, and adaptable to the idea Myla had. (The free tutorial I used & altered a bit is HERE.)

Then I gathered supplies at the craft store. The idea of a WHITE backpack–especially for a kid–is daunting, but thankfully Myla gave me some artistic leeway by at least letting me choose fabric with pattern–a thicker canvas with stripes, and another with zigzags. I had some orange fabric in my own stash, and purchased everything else I needed on the pattern’s supply list. I bought extra, because I decided to add a little extra to the measurements to make it larger all over (it’s perfect for a smaller kid, but I needed to really make sure I could fit her school folder and her lunchbox in there).
The cool thing about this pattern was that it closes & opens with velcro with an elastic bunched opening under the flap–no crazy buckles or zippers to deal with, and even an intermediate amateur like myself was able to figure out the elastic situation pretty easily.

The tutorial itself was very easy to follow (like I said, I’m no pro) and I made little tweaks as we went along. She chose the inside liner herself, which was a brown pine cone pattern…
And BOOM here it is! She wanted to be sure there was a little white fur tail at the bottom (which lines right up with her pants, making it look like SHE has a tail, which is fun). I added a face & ears to the flap (she initially wanted the flap to be the face but cut to a point like an animal nose, but we met halfway, so it could be functional). Admittedly, I got a little confused with the strap situation, but it’s probably because I was trying to alter the straps a bit to make part of them look like paws, lying over her shoulders.

She drew the little body on the back in pen, and I painted it with acrylic paints. One reader thankfully suggested sealing it in Scotchgard, which was a VERY good idea, so it’ll hopefully protect it a bit from dirt and stains for as long as possible.

Sometimes people think working together is some sort of ethereal, magical situation, but it does take some patience that I don’t always possess. I got pretty crabby near the end of this one, because she was trying to explain the arm situation and I wasn’t understanding what she was wanting, but we finally worked it out, and overall it turned out to be another good collaboration!
I may not always be rosy and cheery working through some ideas, but I always consider it a fun challenge when she has an idea she wants to make. I’m working on teaching her a little bit of sewing here and there so that one day she might make things herself, but at this age, she doesn’t always have the attention span for it, and I don’t always have the patience. So we start of sharing for a bit, then she runs off and does projects nearby, while I work at my art desk. But at least she can say she was part of building it!
So, yeah. BOOM. We made a backpack. Yay!
Designing Dolls
The other day, I was in a crafty mood, and felt like doing a project with Myla. I pushed all my “to do” things and other commitments I’ve been putting off, and asked her if she wanted to make a doll.
She ALWAYS wants to make a doll. “There’s a creature I’ve been thinking about,” she said excitedly. “I think it would make a great doll!” She grabbed her markers and started drawing it out.
When I do projects like this, I like to let her feel like she’s a big part of making it. We went to the craft room, and picked out some fabric from my stash. Apparently, this creature is a sort of cat-like mossy dragon, so we found some mossy-looking fabric that fit perfectly. I let her decide what fabric would work best. She gave me details on how it should look–long tail, webbed feet, spiky hair…
I sat her on my lap and had her help a little with the beginning. She’s still a little needle-shy, but I showed her how to guide the fabric without pushing it. After awhile, it’s easier to finish it up myself, so she bounced off to another paper project while I finished up the sewing.
Later, when the body was done, I asked her to draw the eyes on with a pen the way she wanted, so I could paint them.

And finally, the little mossy cat-dragon was done! I’m no master sewer by any means, and my dolls are ALWAYS quite wonky, but the best part is that she doesn’t care, because we made it together and she designed it herself.
I always ask her what she thinks when it’s done, and she always says she loves them so much. Once, she said “when we make dolls, it doesn’t always turn out exactly like I thought in my drawing….but it always turns out so much BETTER.”
I noticed she uses dolls as an icebreaker with other kids at the child care room at the gym, and sort of walks up to kids and just starts playing dolls with them. Sure, they ask what the heck it is, but when she tells them, I think they sort of dig it. I brought it to visit her at school lunch the other day, and made it move around like a puppet and play, and had the kids (who had at first looked at me like I was odd…which I am, btw) cracking up and laughing at the silly antics of her little mossy doll.

So wonky or not, it took me about an hour and a half to make something that she could make connections with. In just a short amount of time, we made something she could proudly tell people she designed…and that little feeling of pride glows on her face when she talks to other kids. Which makes ME smile. And that’s what it’s all about, isn’t it?
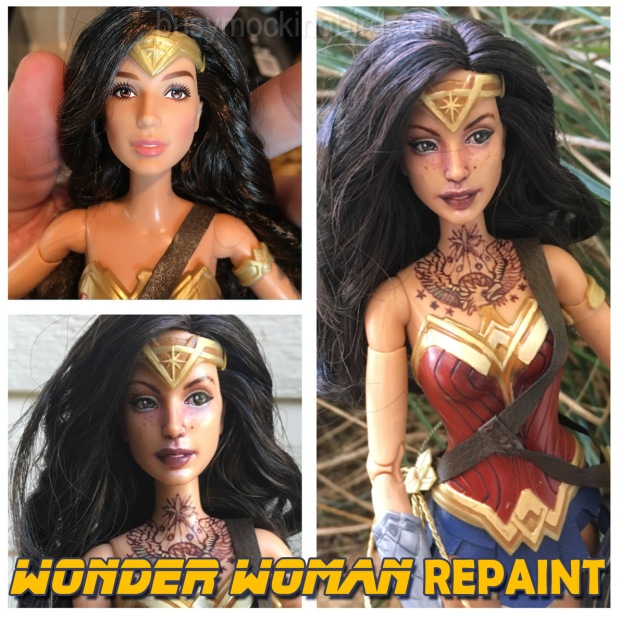
Wonder Woman Repaint
While I was browsing the grocery store toy aisle the other day, I came across something that made me gasp out loud. A Wonder Woman Barbie! I’m not really a big fan of Barbies, but this was something I had to splurge on, because I am a responsible adult, and sometimes you just need a really awesome Wonder Woman doll in your life.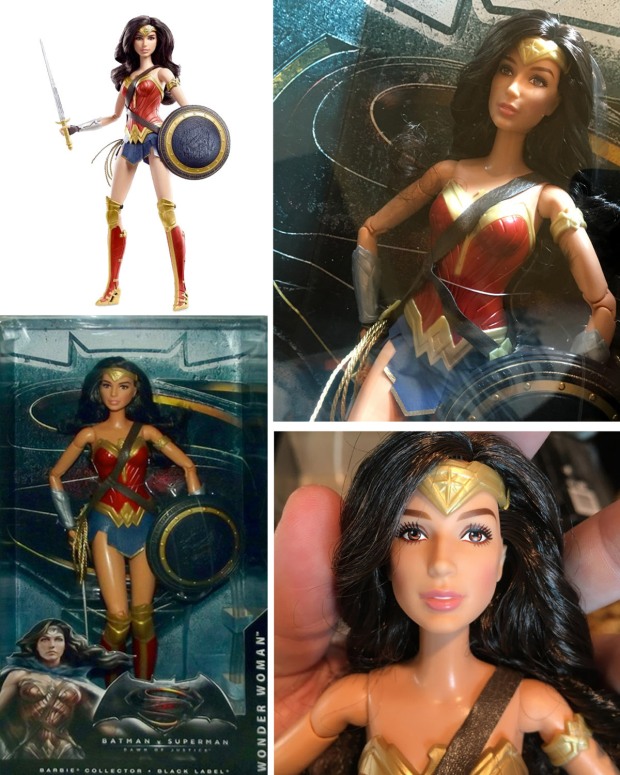
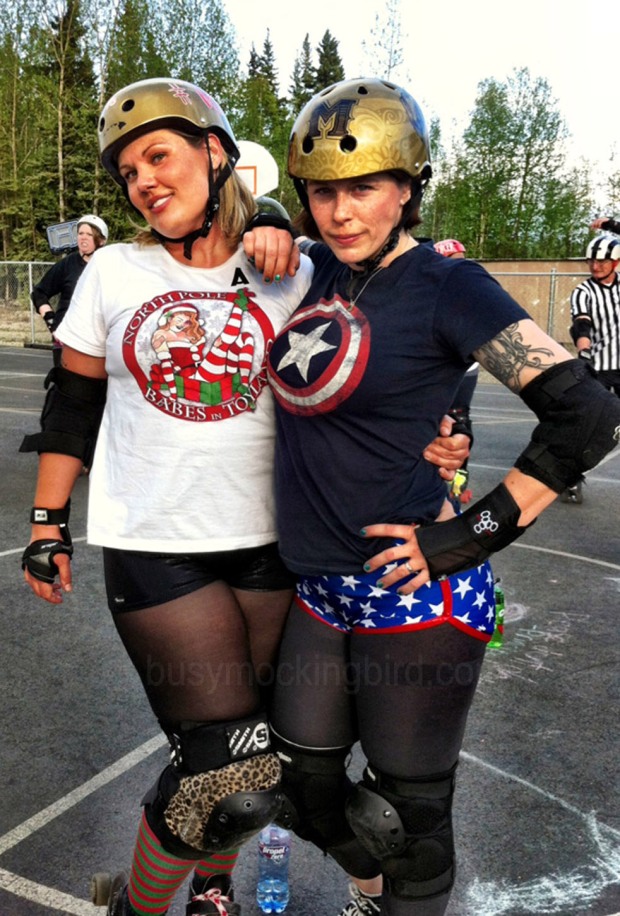
I’ve had a love of Wonder Woman for awhile, shared mostly between me and my roller derby friend–we even used to wear matching WW derby shorts! (Here’s me on the right as Captain Wonderpants, and her wearing our team shirt–from North Pole, Alaska.)
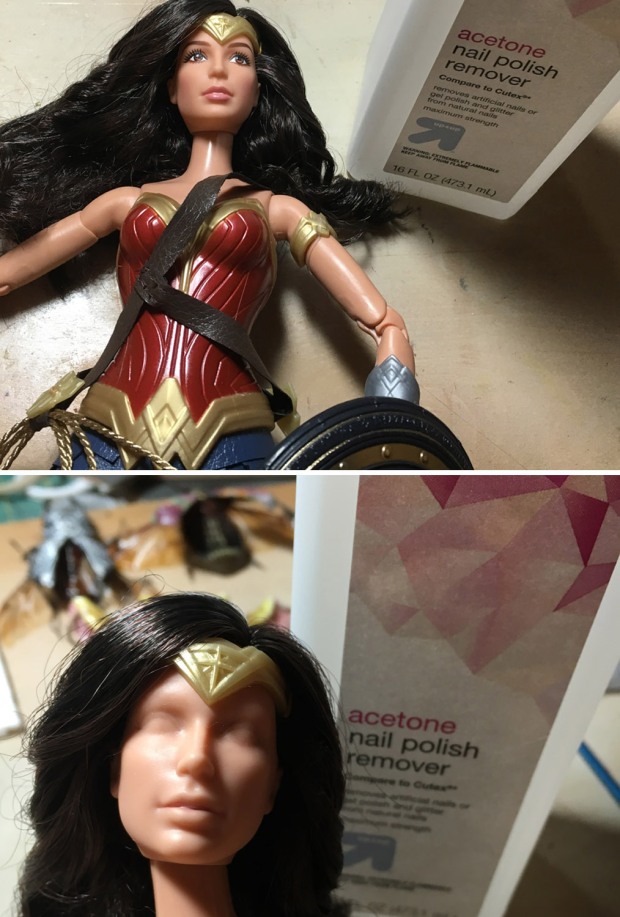
So back to the doll…Since I couldn’t just leave her with a factory paint, I was thrilled to learn of the amazing custom repaints people do online! I’m nowhere near that level of detail and professionalism, but I always love the idea of painting everything and making it my own.
The first step: taking off the factory face paint. This can be done easily with acetone-based nail polish remover and a washcloth. I used a little tiny paintbrush to get the hard-to-reach places in her eyes and mouth.
I printed some photos of the new Wonder Woman actress, Gal Gadot, to look at as reference, but I didn’t really follow them too closely. And I wanted her eyes staring to the side, instead of just straight ahead. I used acrylic paint, and started out with a soft dark pinkish color to find the shapes I wanted, remembering that if I absolutely hated it, I could always wipe it away with the acetone.
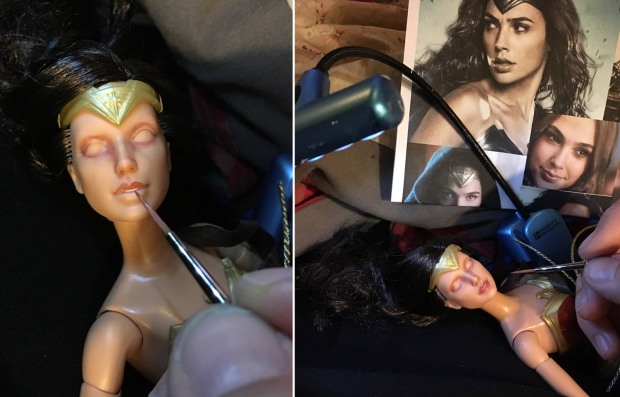
There were several moments I did actually consider wiping her away completely–it’s so difficult to paint a three-dimensional figure that small! But I kept working with it wiping small areas here and there and starting over again, and finally got it where I liked it. I’ve read that most of the pro doll painters use chalks and blushes, but I sort of enjoyed the painted look for some of the shading, and since it’s mine and I’m the boss of it, that’s what I did.
I also added quite a lot of shading and highlight detail on her headpiece and uniform to make it pop out more, and not look so plasticky.
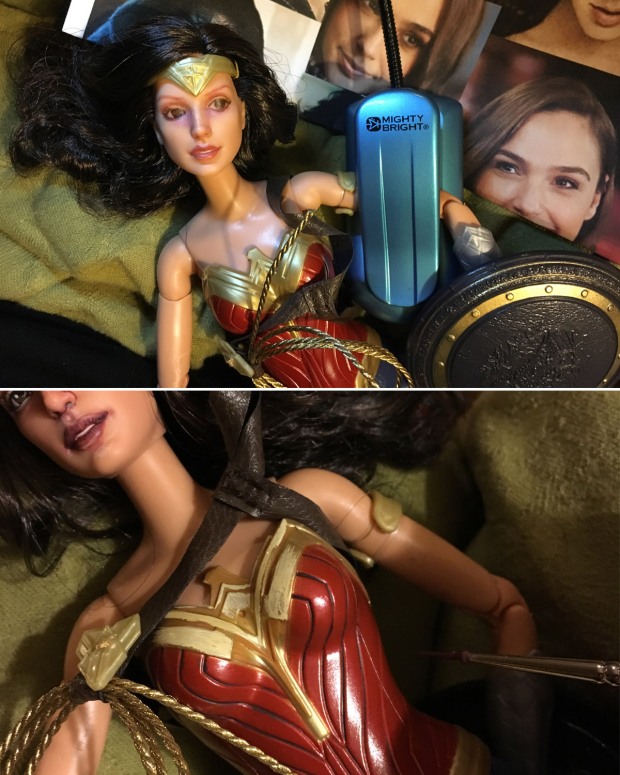
And lastly, I decided she needed a chest tattoo of a big ol’ eagle because Wonder Woman is awesome like that. I might fill her up with more. In fact I’m pretty sure I will…those legs look a little bare for my taste. 🙂 And I debated on it with myself a bit, but finally decided she needed a few freckles, because…why not? And to finish her up, I gave her a good spray-down with Testors varnish, which works well on dolls, and dries to a matte finish.
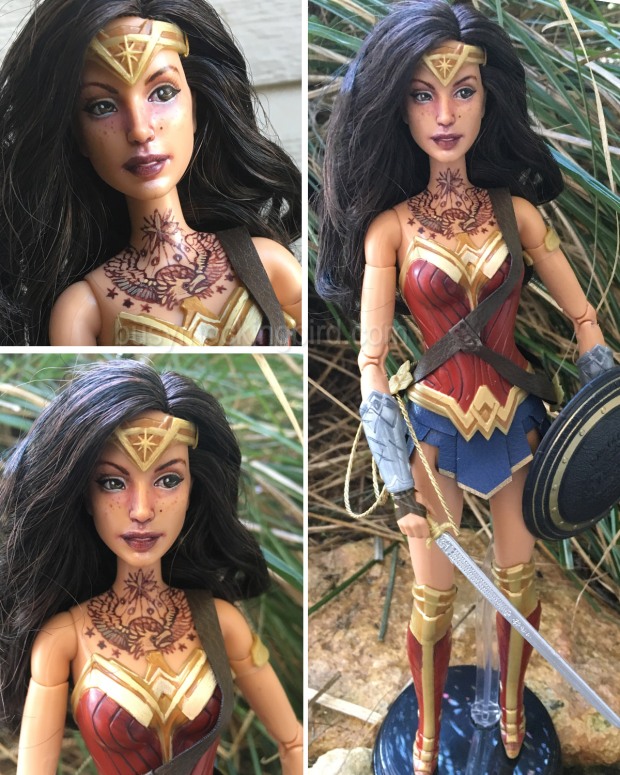
And there she is! Someone on Instagram already commented that they didn’t like her eyebrows, but since I didn’t really ask for her opinion and I didn’t paint it for her, I don’t care. I like how she turned out.
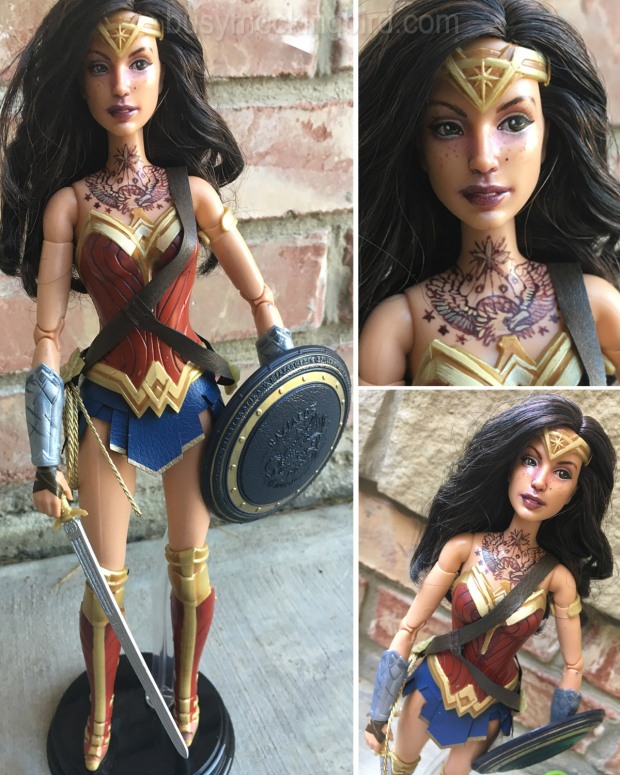
She’s really mine now, and she’ll protect our house as well as a Barbie-sized Wonder Woman can, maybe on the fireplace mantle.
Have you ever had to have a kid doll, and made it your own somehow? I’m pretty positive I’m not the only one (I’ve got my eye on some Dark Crystal and Labyrinth Funko toys, too)…. So have fun and have a WONDERful day!
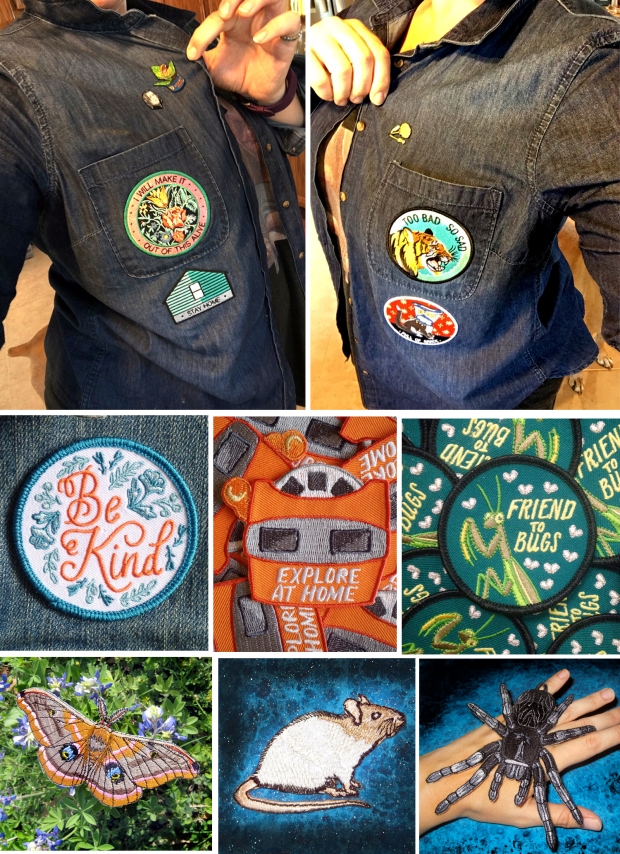
Patch it Up
Remember in our summer post, how I said Myla and I were collecting patches to put on our patch jackets? Well, we decided to make our own larger patches for the back!
It’s easy: We took some off-white fabric, cut it in circles, and went to town with the permanent markers.
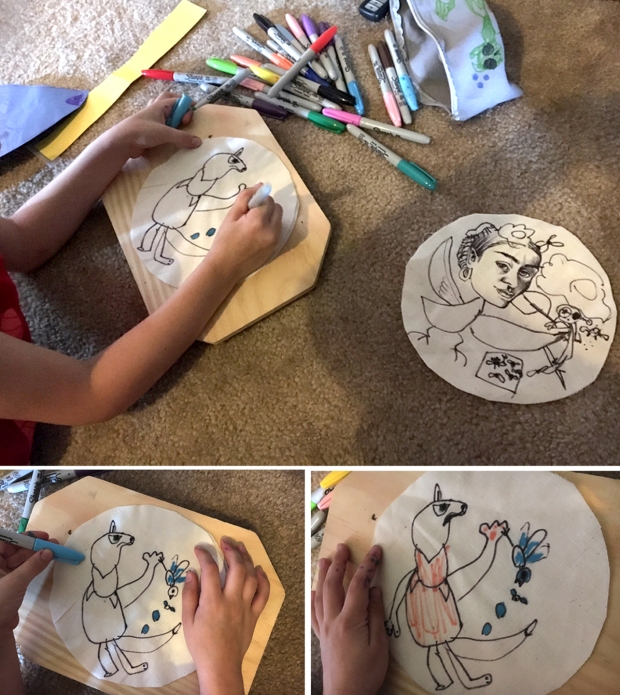
Myla drew a fox on hers, and I drew Frida and let her finish it. She added flowers, a caterpillar, mosquito, a frog eating a fly, and put a mockingbird body on Frida.
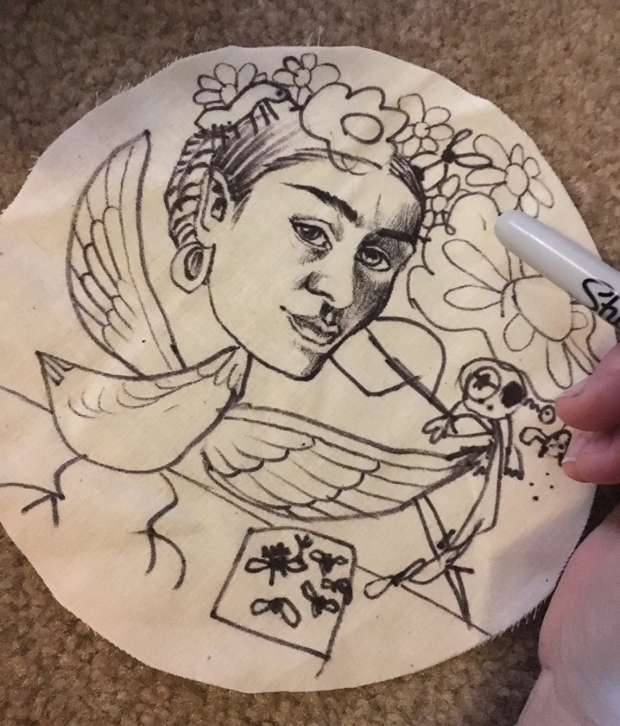
Then I sewed them on to the backs with a quick stitch, and BOOM! Cool patches. (That big moth on mine is from Spiders Stitches Parlor.)
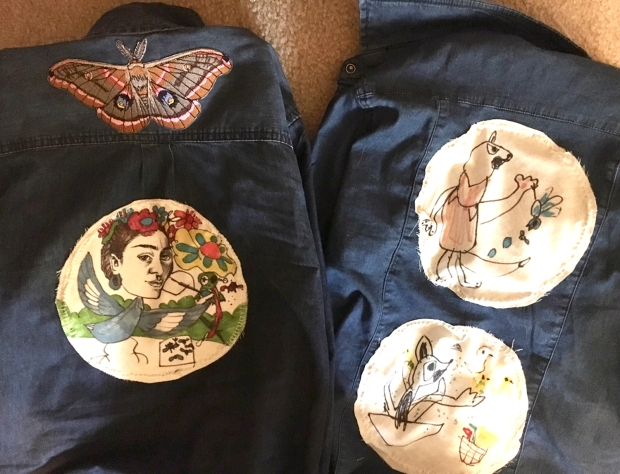
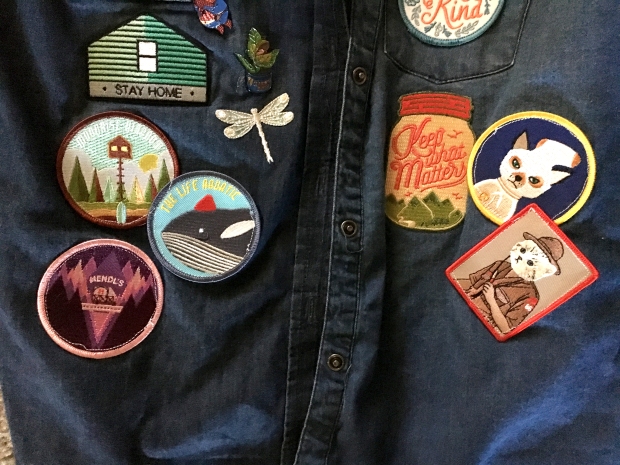
All in all, our jackets are looking pretty spiffy so far! Here’s how Myla’s looks when worn:
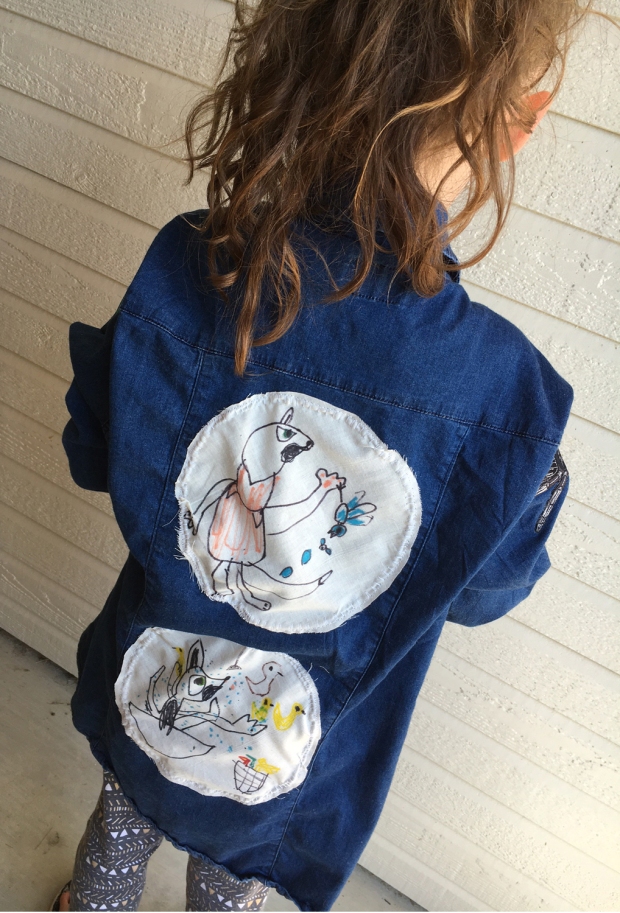
She loves looking through patches and pins and looking for new ones. Her favorites are the animals and insects. And we’ve got a pretty good collection going so far:
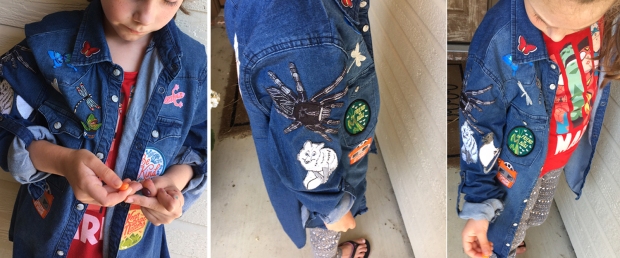
Myla loves finding patches, and choosing where they go on her jacket. She’s got a rough “food chain” on her sleeve, which is an interesting concept she came up with.
If you’re interested in patches and pins, take a look at some of the places we find ours:
Stay Home Club , Frog and Toad Press, and Spider Stitches Parlor.
And I found some lovely Wes Anderson patches over at For The Love of Patch… I just love the Zissou whale and the Ash fox!
It’s so hot, though, we can’t wear them in summer. I’m thinking I may get a sleeveless jacket to continue the fun.
I’m even looking into making a few of our early collabs into patches. Wouldn’t that be so much fun? I’ll keep you posted!

