Quick! I Need a Crafty Gift!
It happens. I understand. Things get hectic, and you inevitably forget someone on your gift list. And the teachers! What about the teachers?!? Well, I have a habit of making many of my gifts myself (when time permits), and have learned a few pointers that will help you give them a personal touch, even if time is running out.
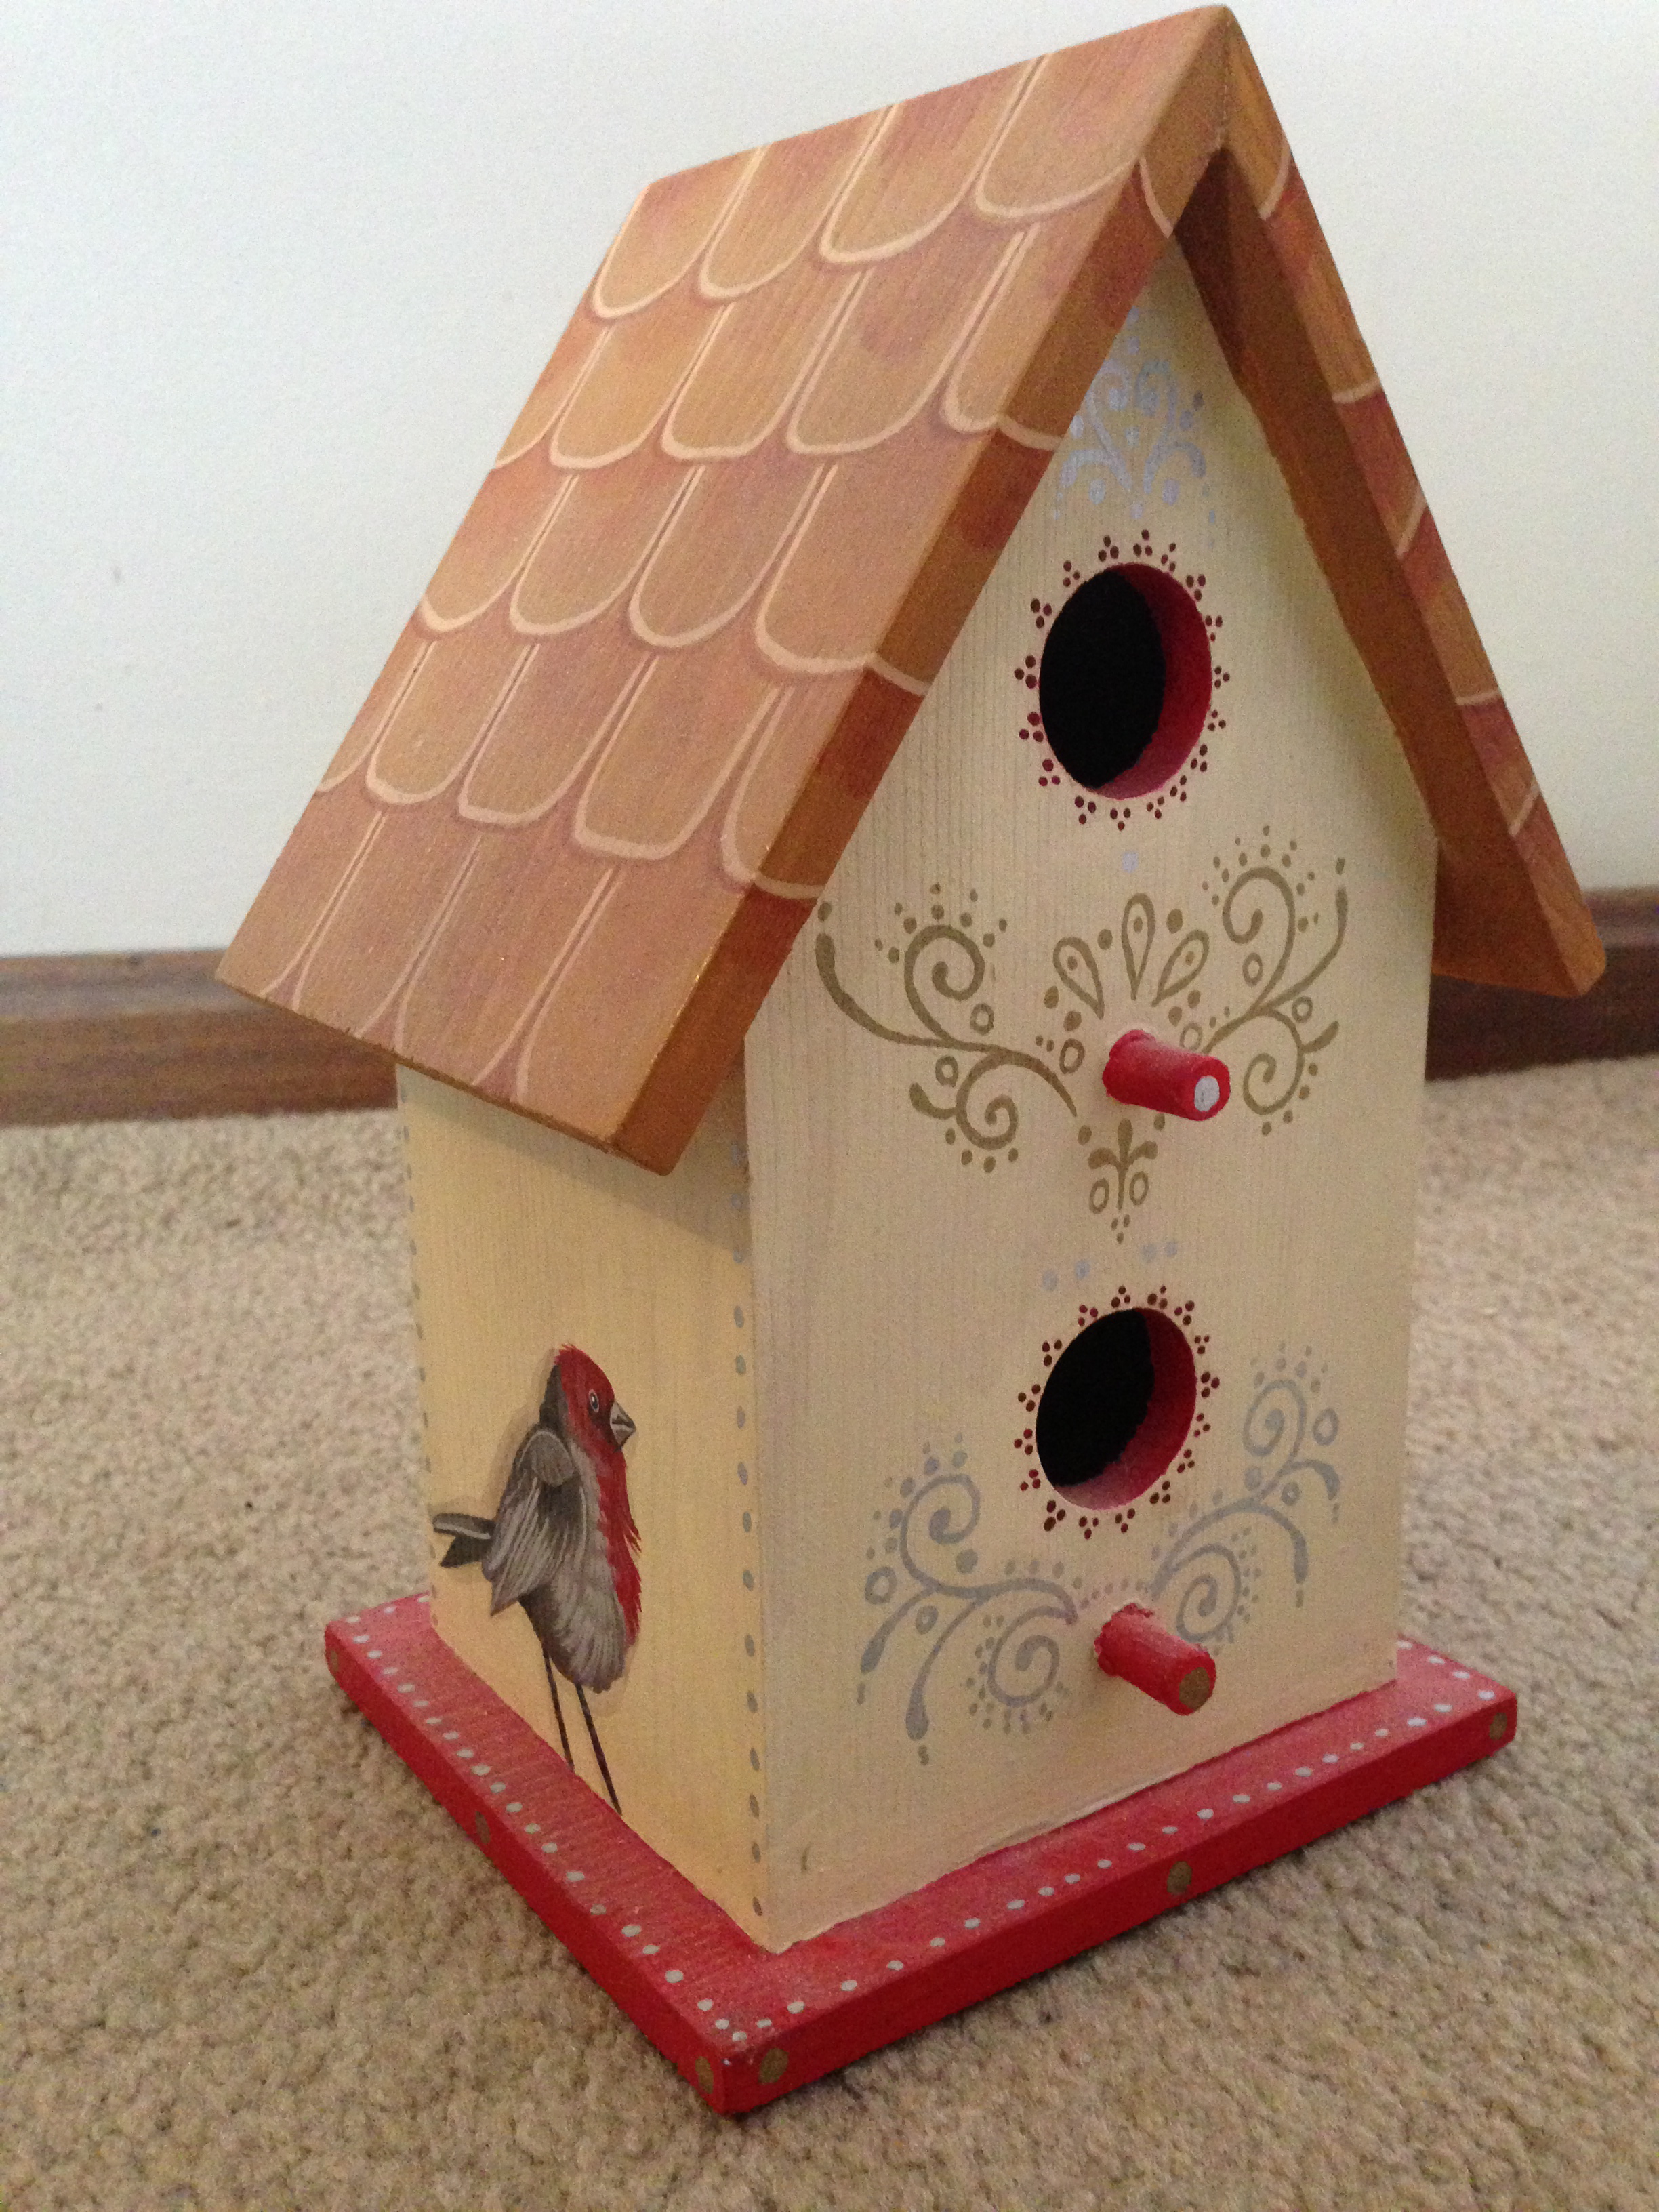
1. Something Wooden. In any craft store or section, there’s usually a decent selection of random wooden things. Grab a sharpie, get to doodling, then spray it with gloss varnish to set it.

If you’ve got a little more time, you can paint it in a little more detail with acrylics, or decoupage some little graphics onto it. Doodle some final touches with a permanent marker or paint pens, and you’re good to go!
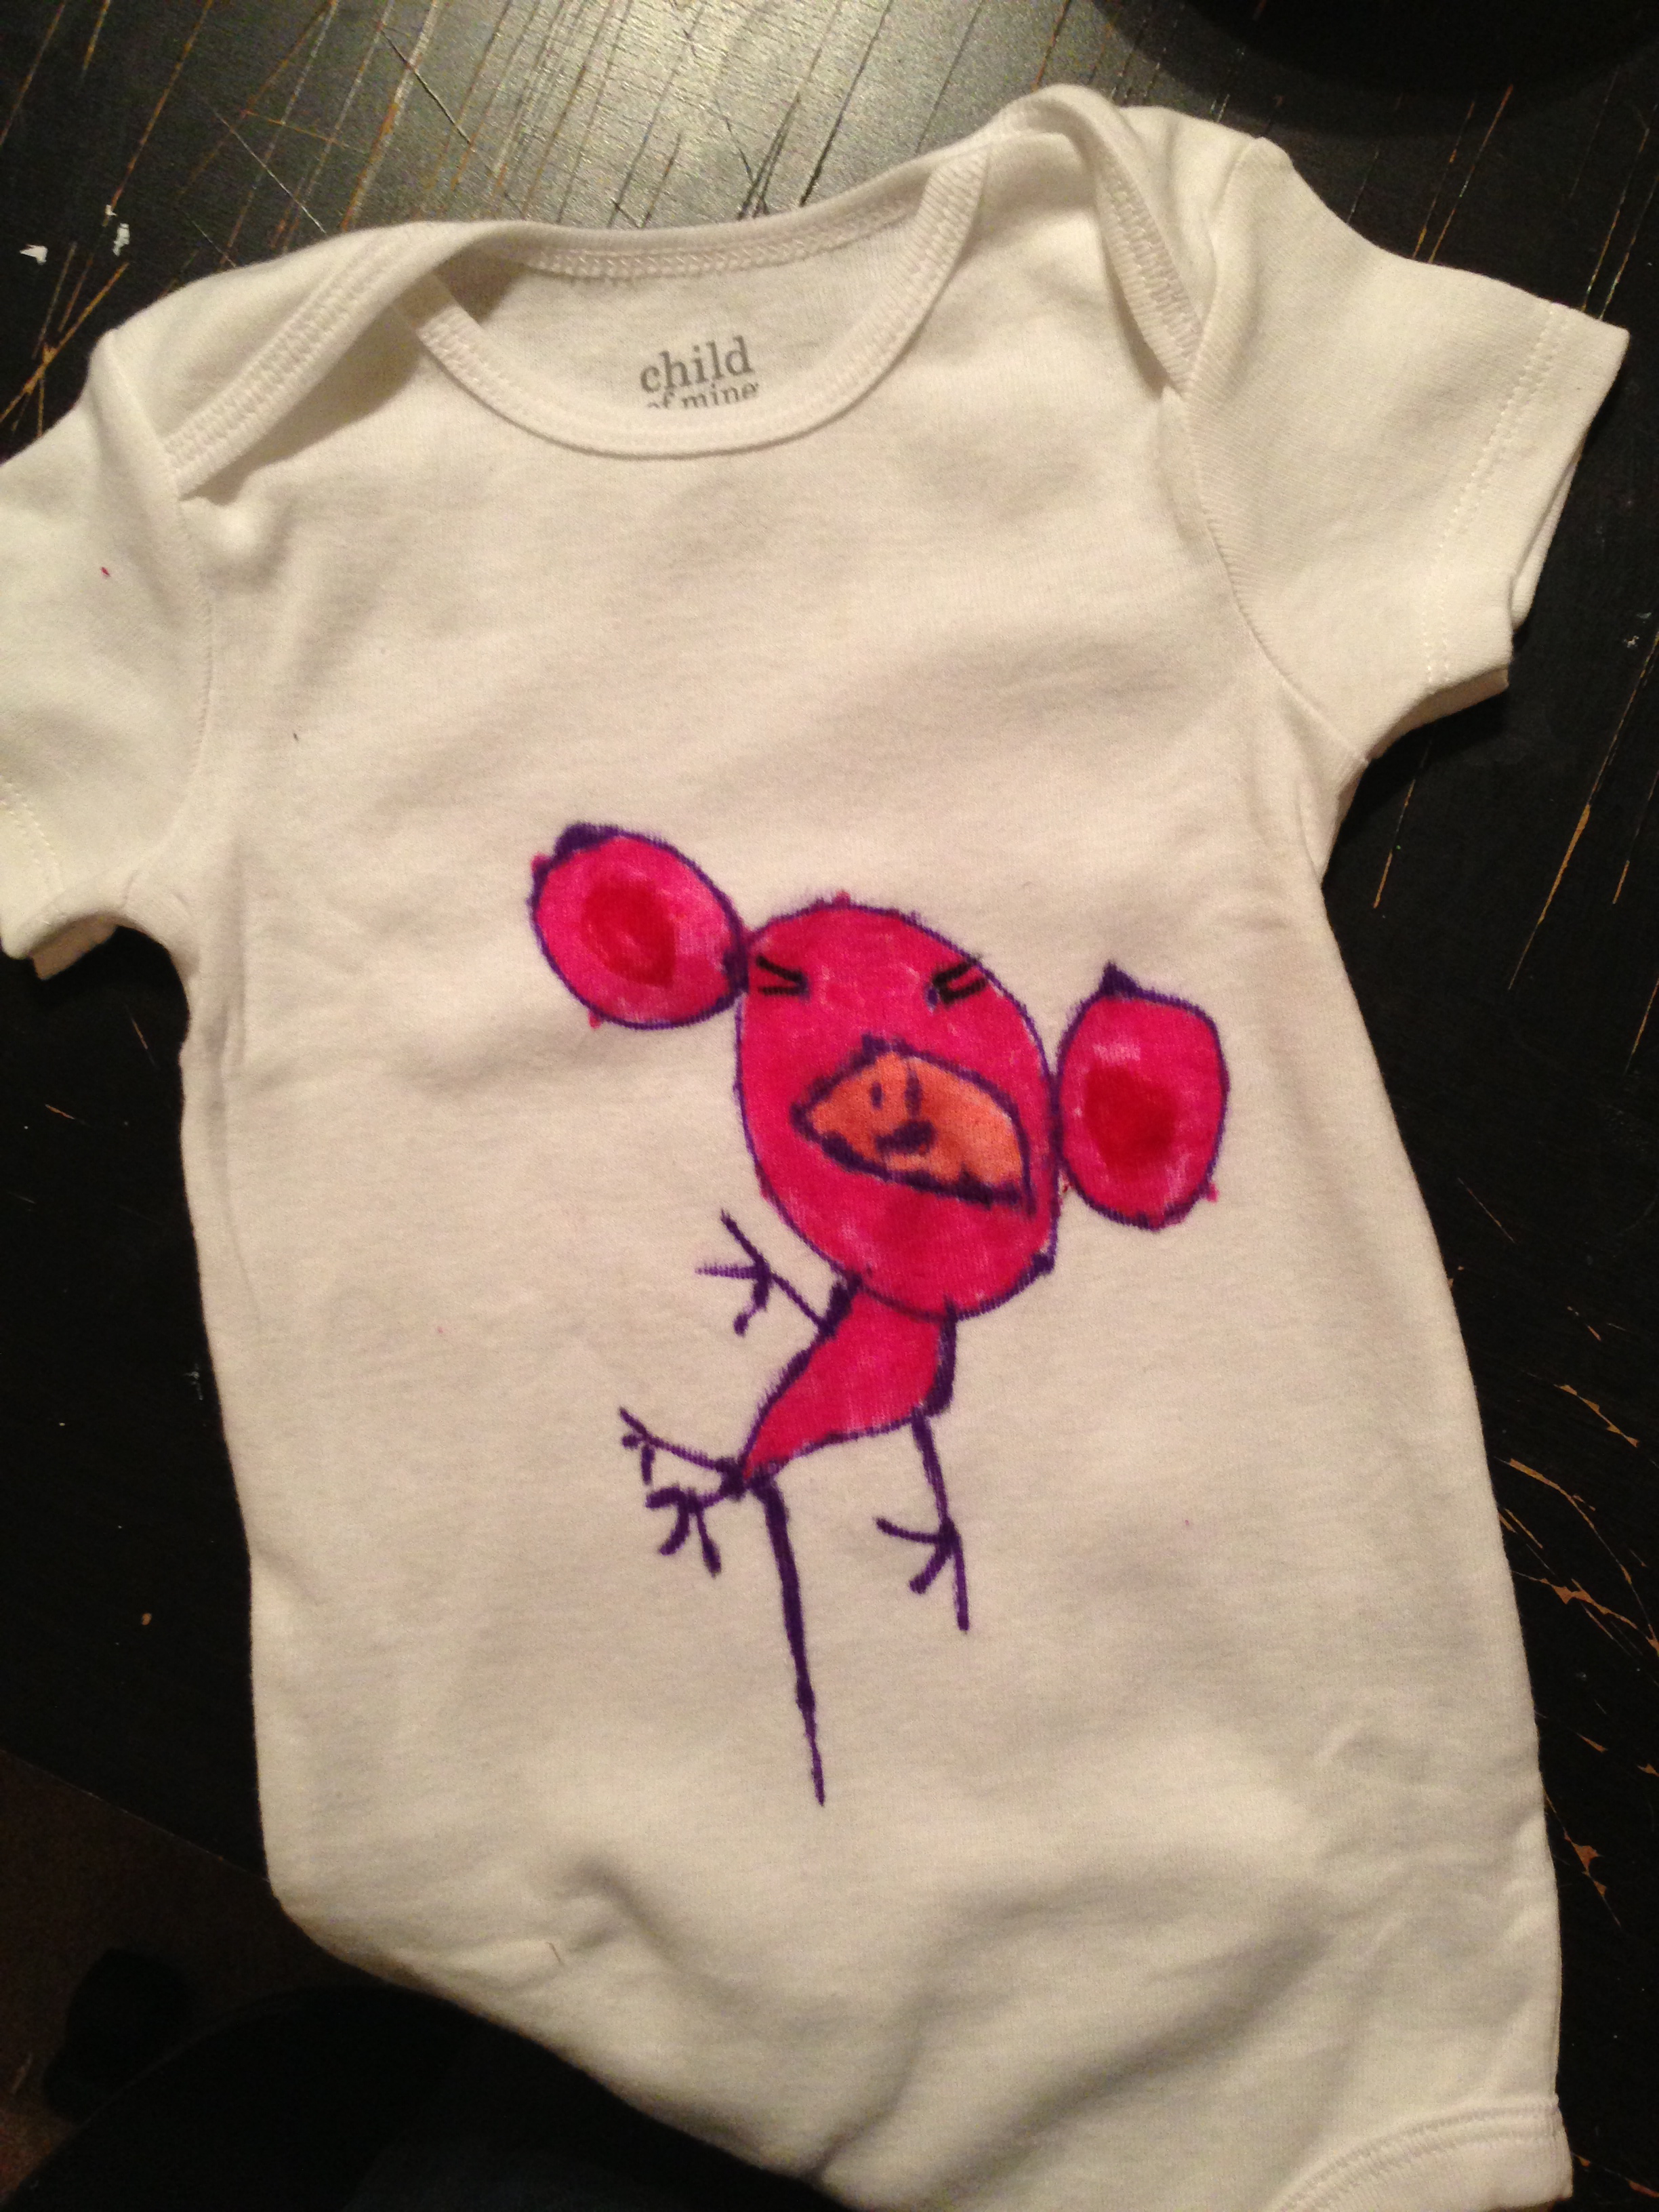
2. Personalize Some Clothing. Inexpensive shirt + permanent marker and a little heat-setting=cute little something for someone.
Got a new baby in town that you need a creative gift for? Give your kid free reign with some permanent markers (hey–be careful with those!) on a package of plain onesies and it makes a cute (and wearable) keepsake. (These are ones our daughter did for her new baby cousin.)

You could also personalize it with some iron-on transfers or shapes you made yourself…(I did a blog post about it ages ago).
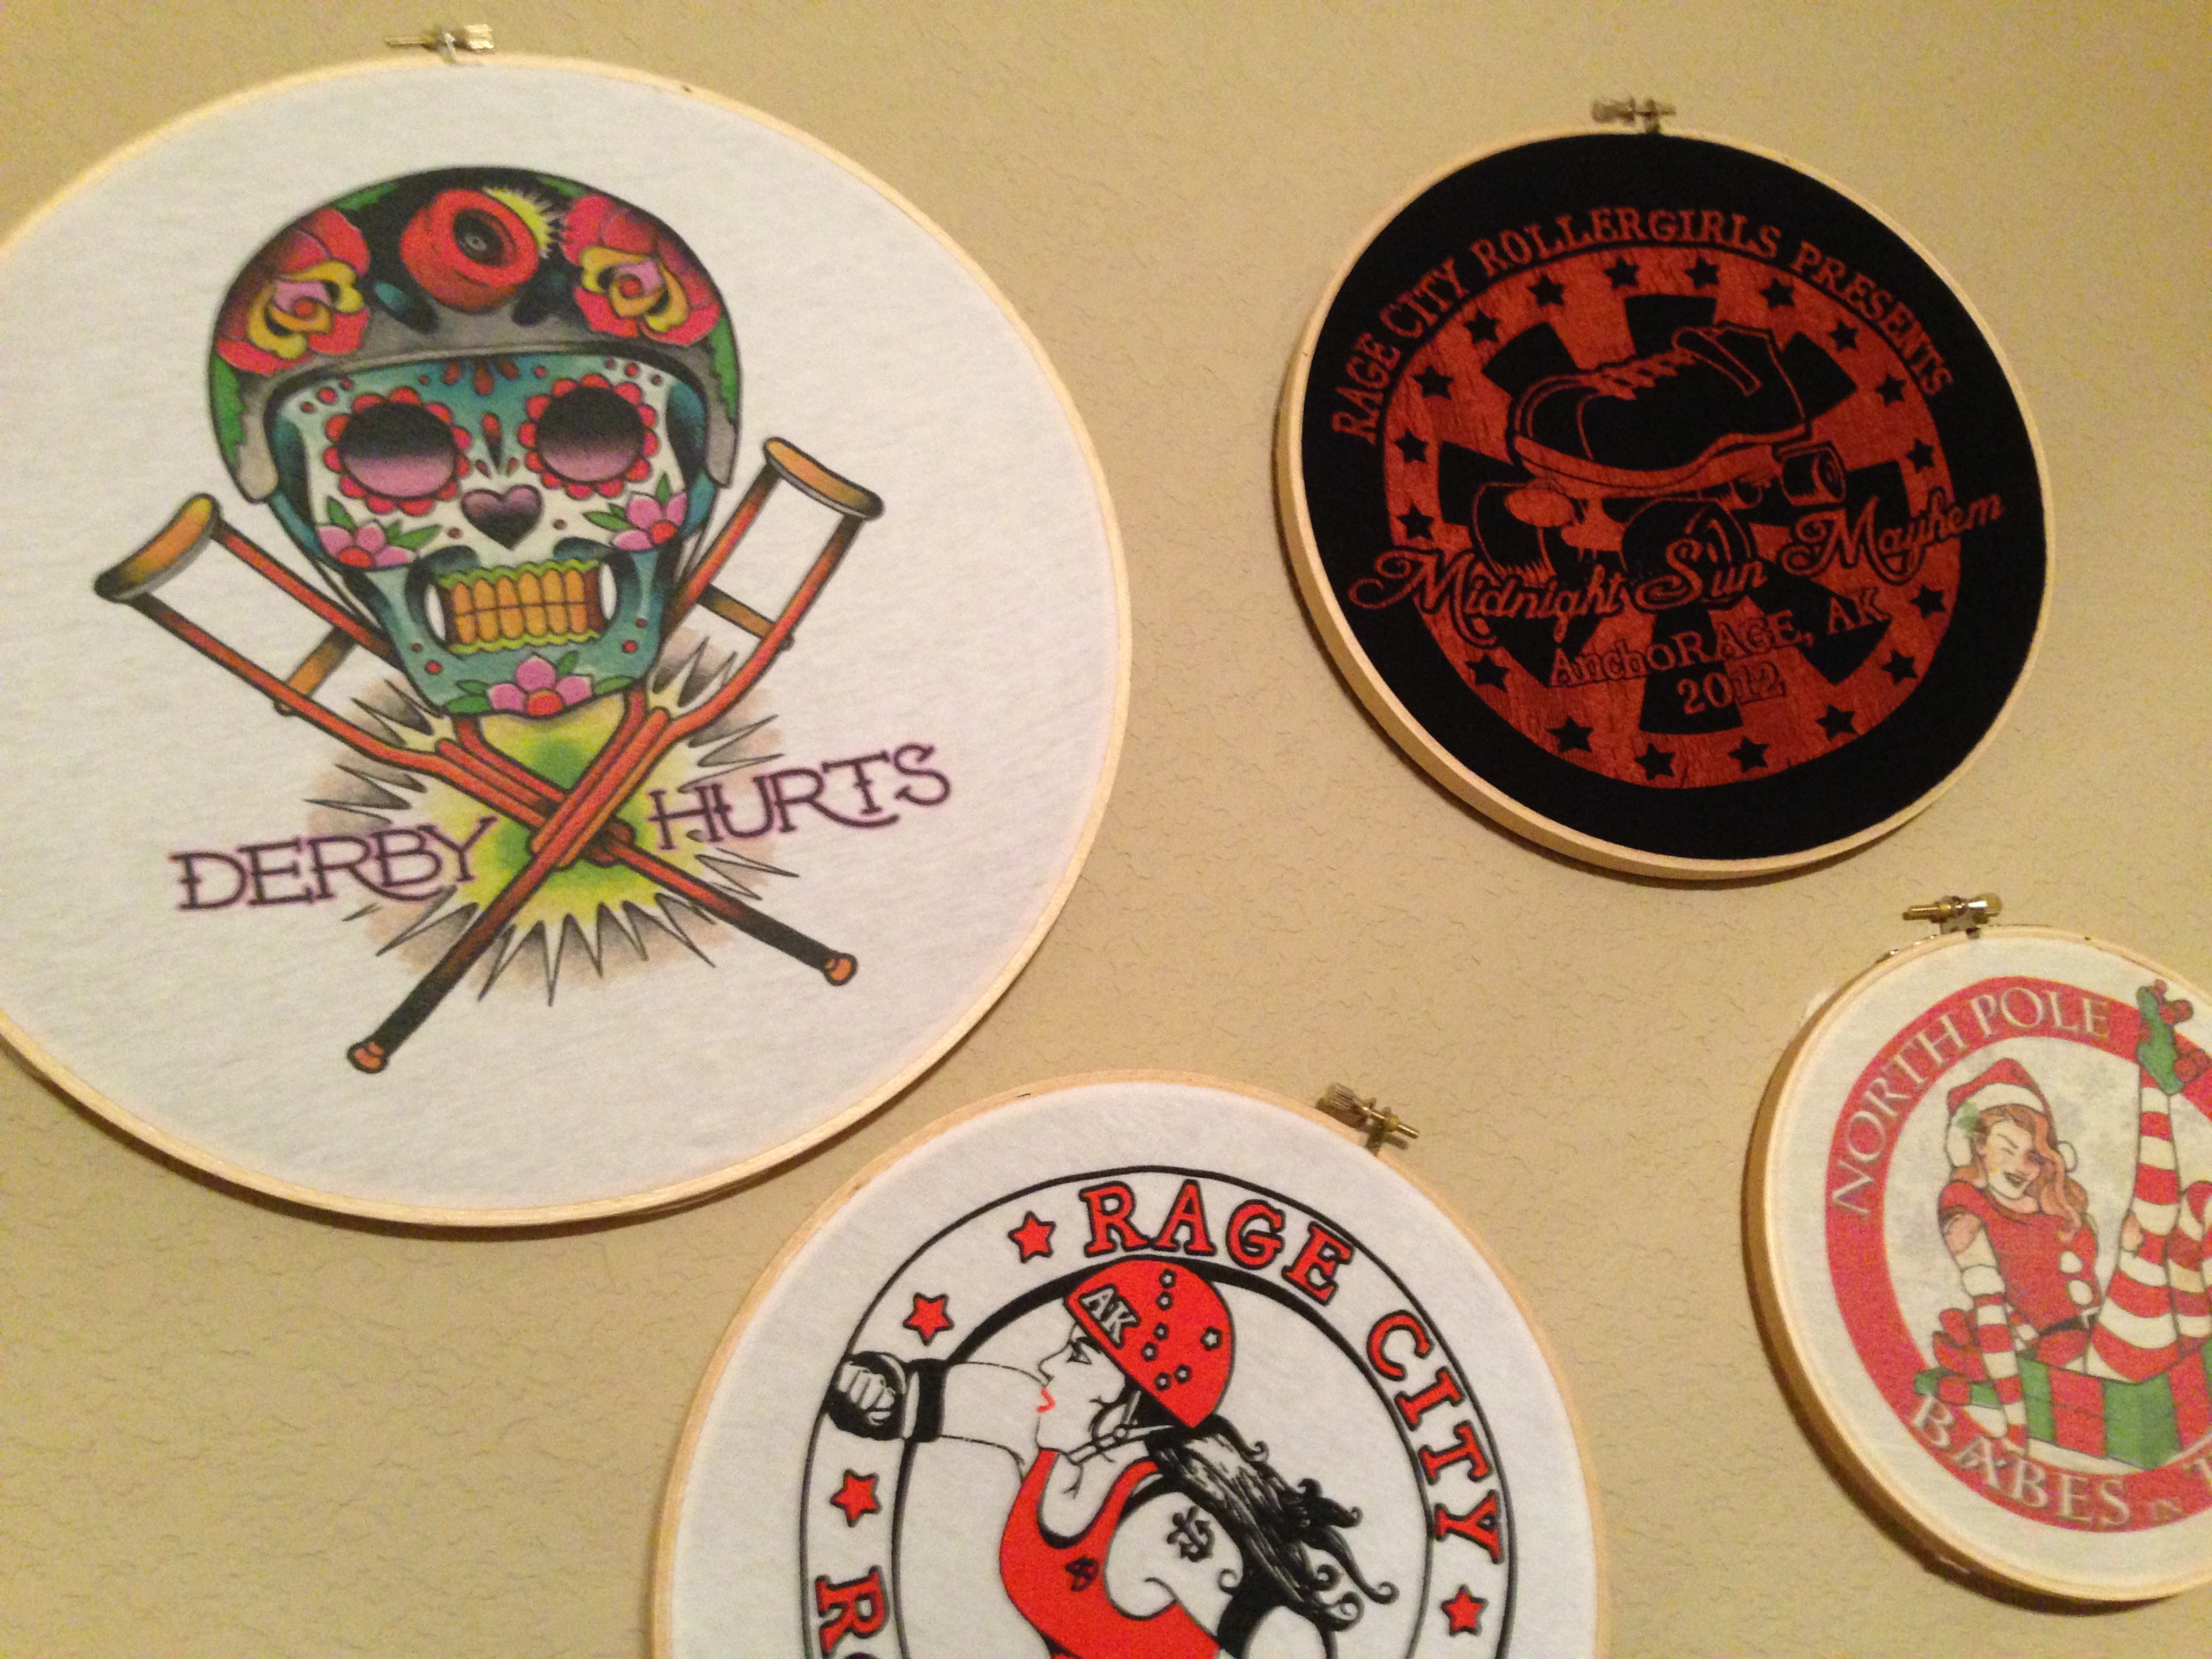
3. Embroidery Hoop T-shirt Art. SUPER easy. Take some favorite old “retired” t-shirts, cut ’em up, and stretch them across some embroidery hoops to hang on the wall. Voila! Fancy wall art!
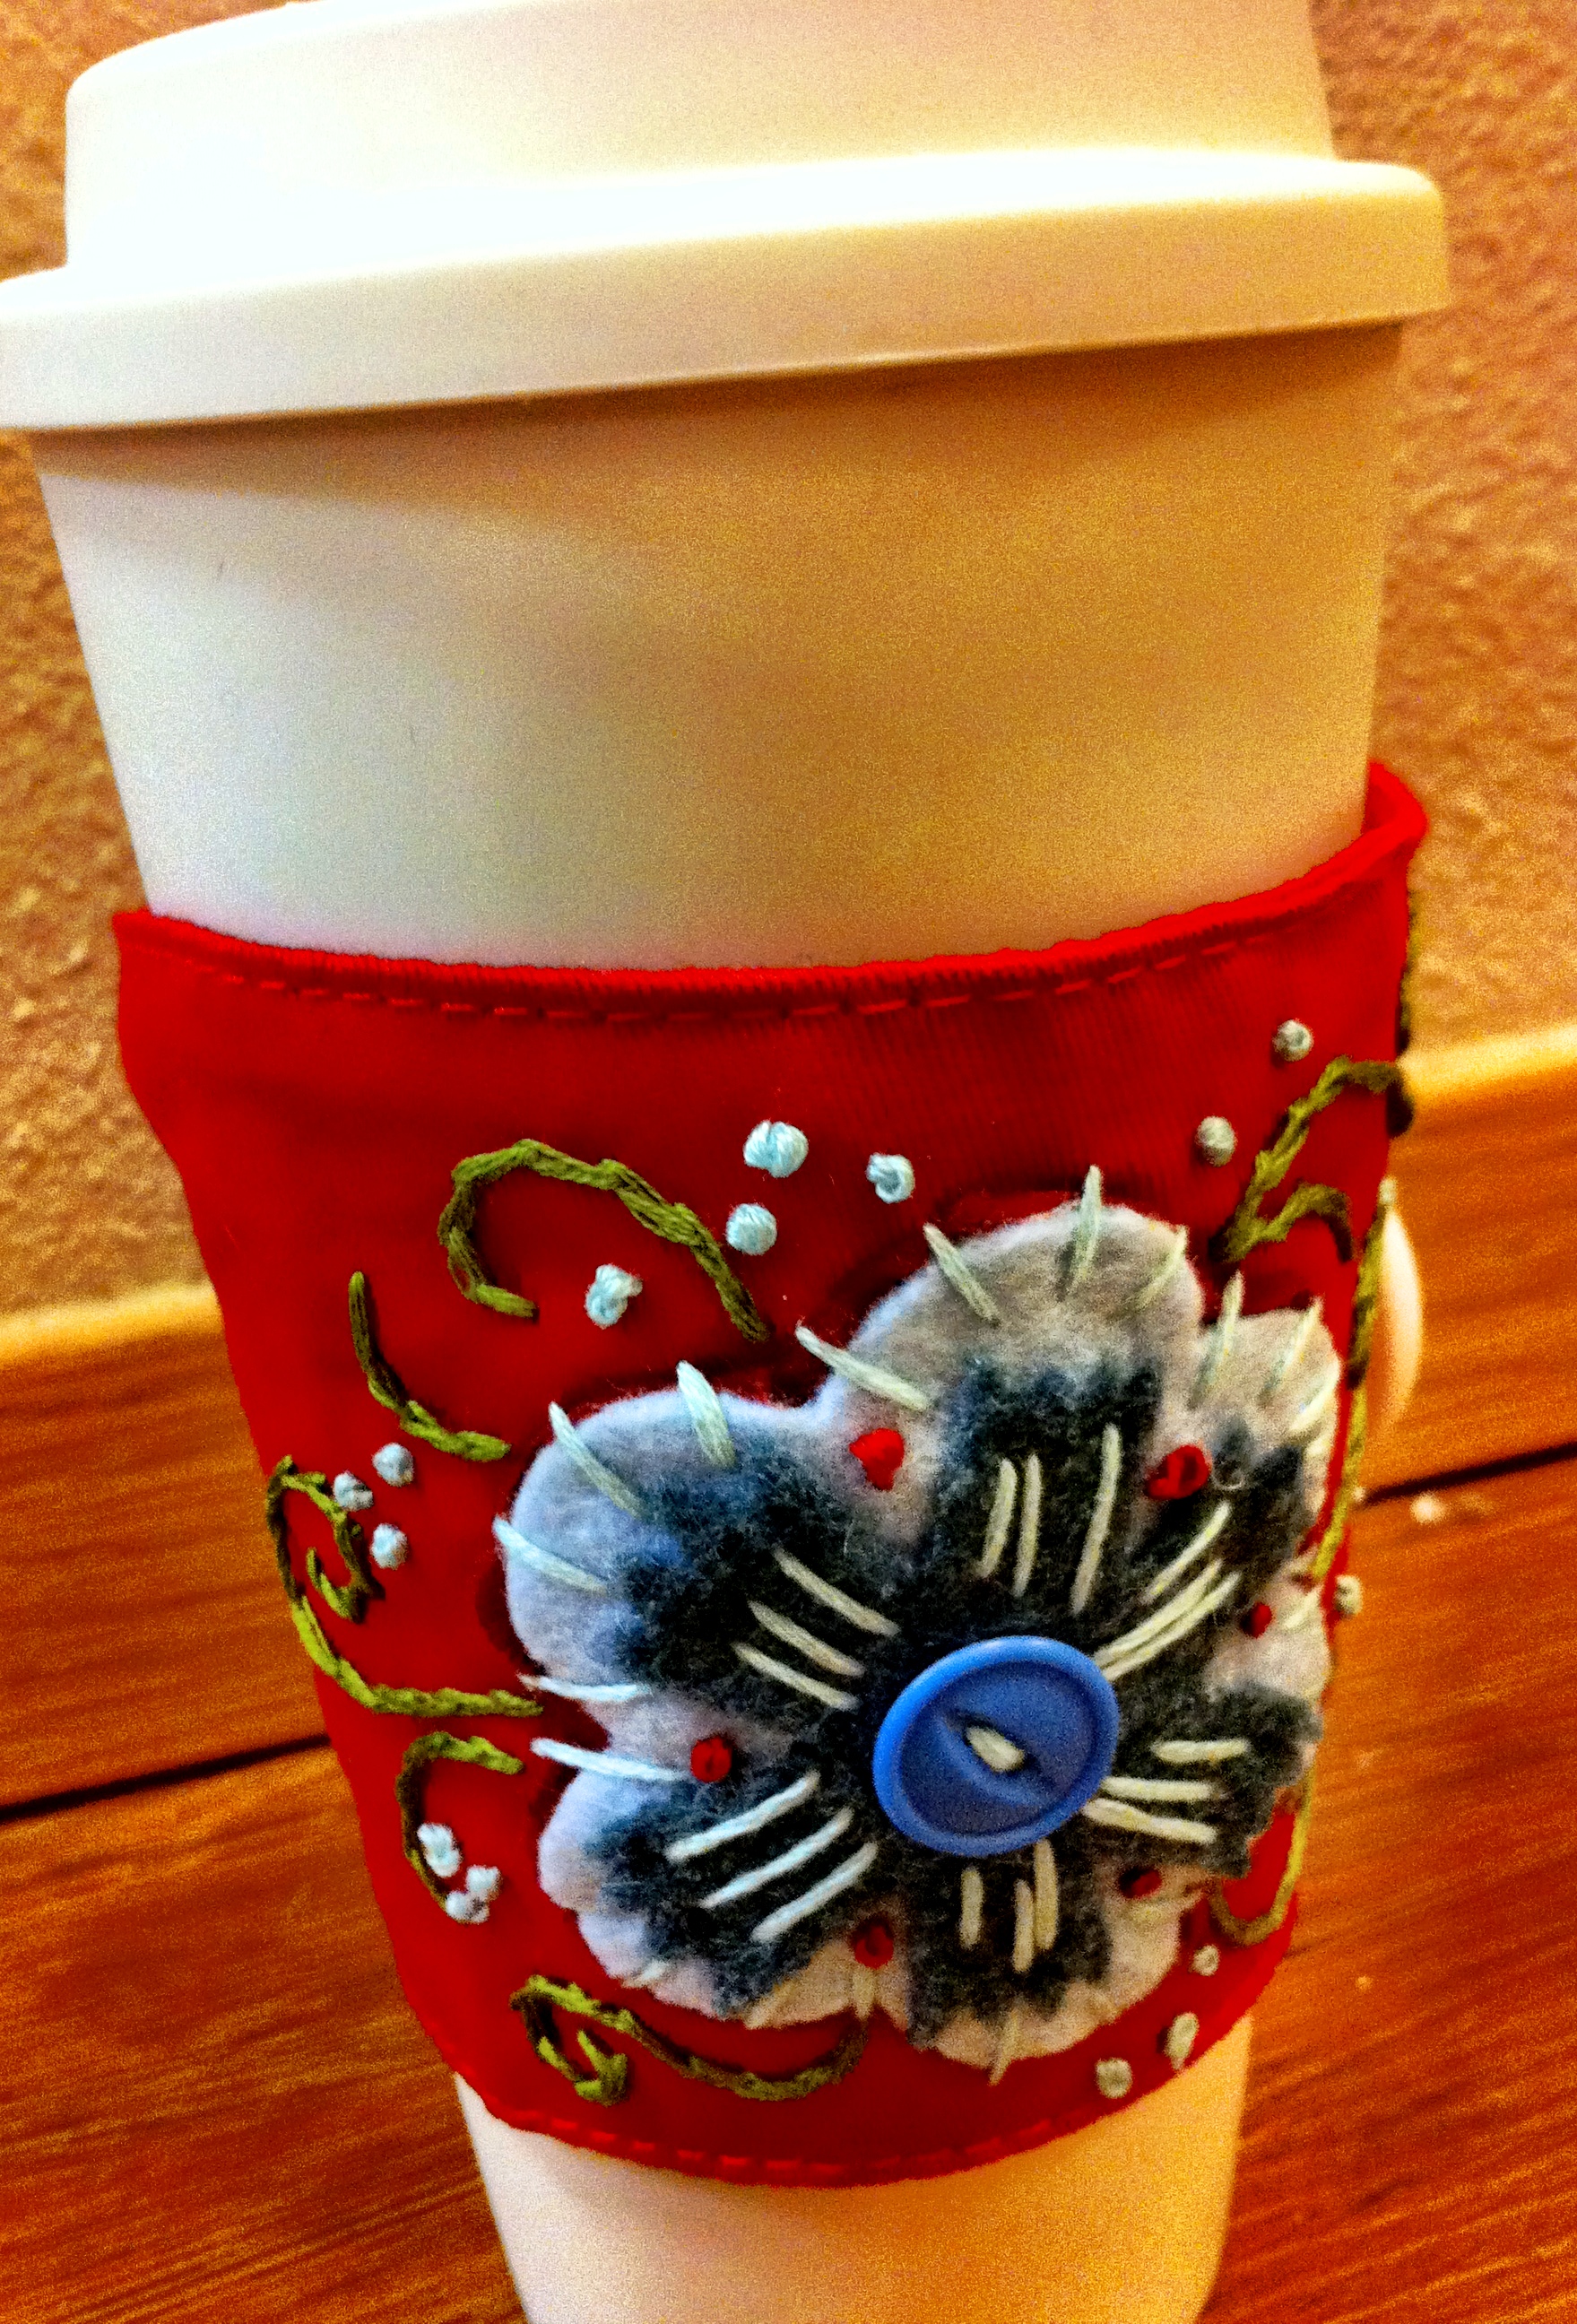
4. Cup Cozy. With some iron-on appliques or your own brand of embroidery work, a quick little cup cozy is a nice touch around the office (at least, I hope my manager thinks so). They even have pre-made base parts in some crafty places. Wrap it around a reuseable coffee cup with a button hook or velcro, and toss in a gift card, or a few packets of tea.
5. Shrinky Jewelry. A good gift for a loved one. We love shrinky art. But what do you do with all those wonderful little doodles? You can make these doodle chimes. Or drill some tiny holes in them and hook them up to a ready-made charm bracelet.

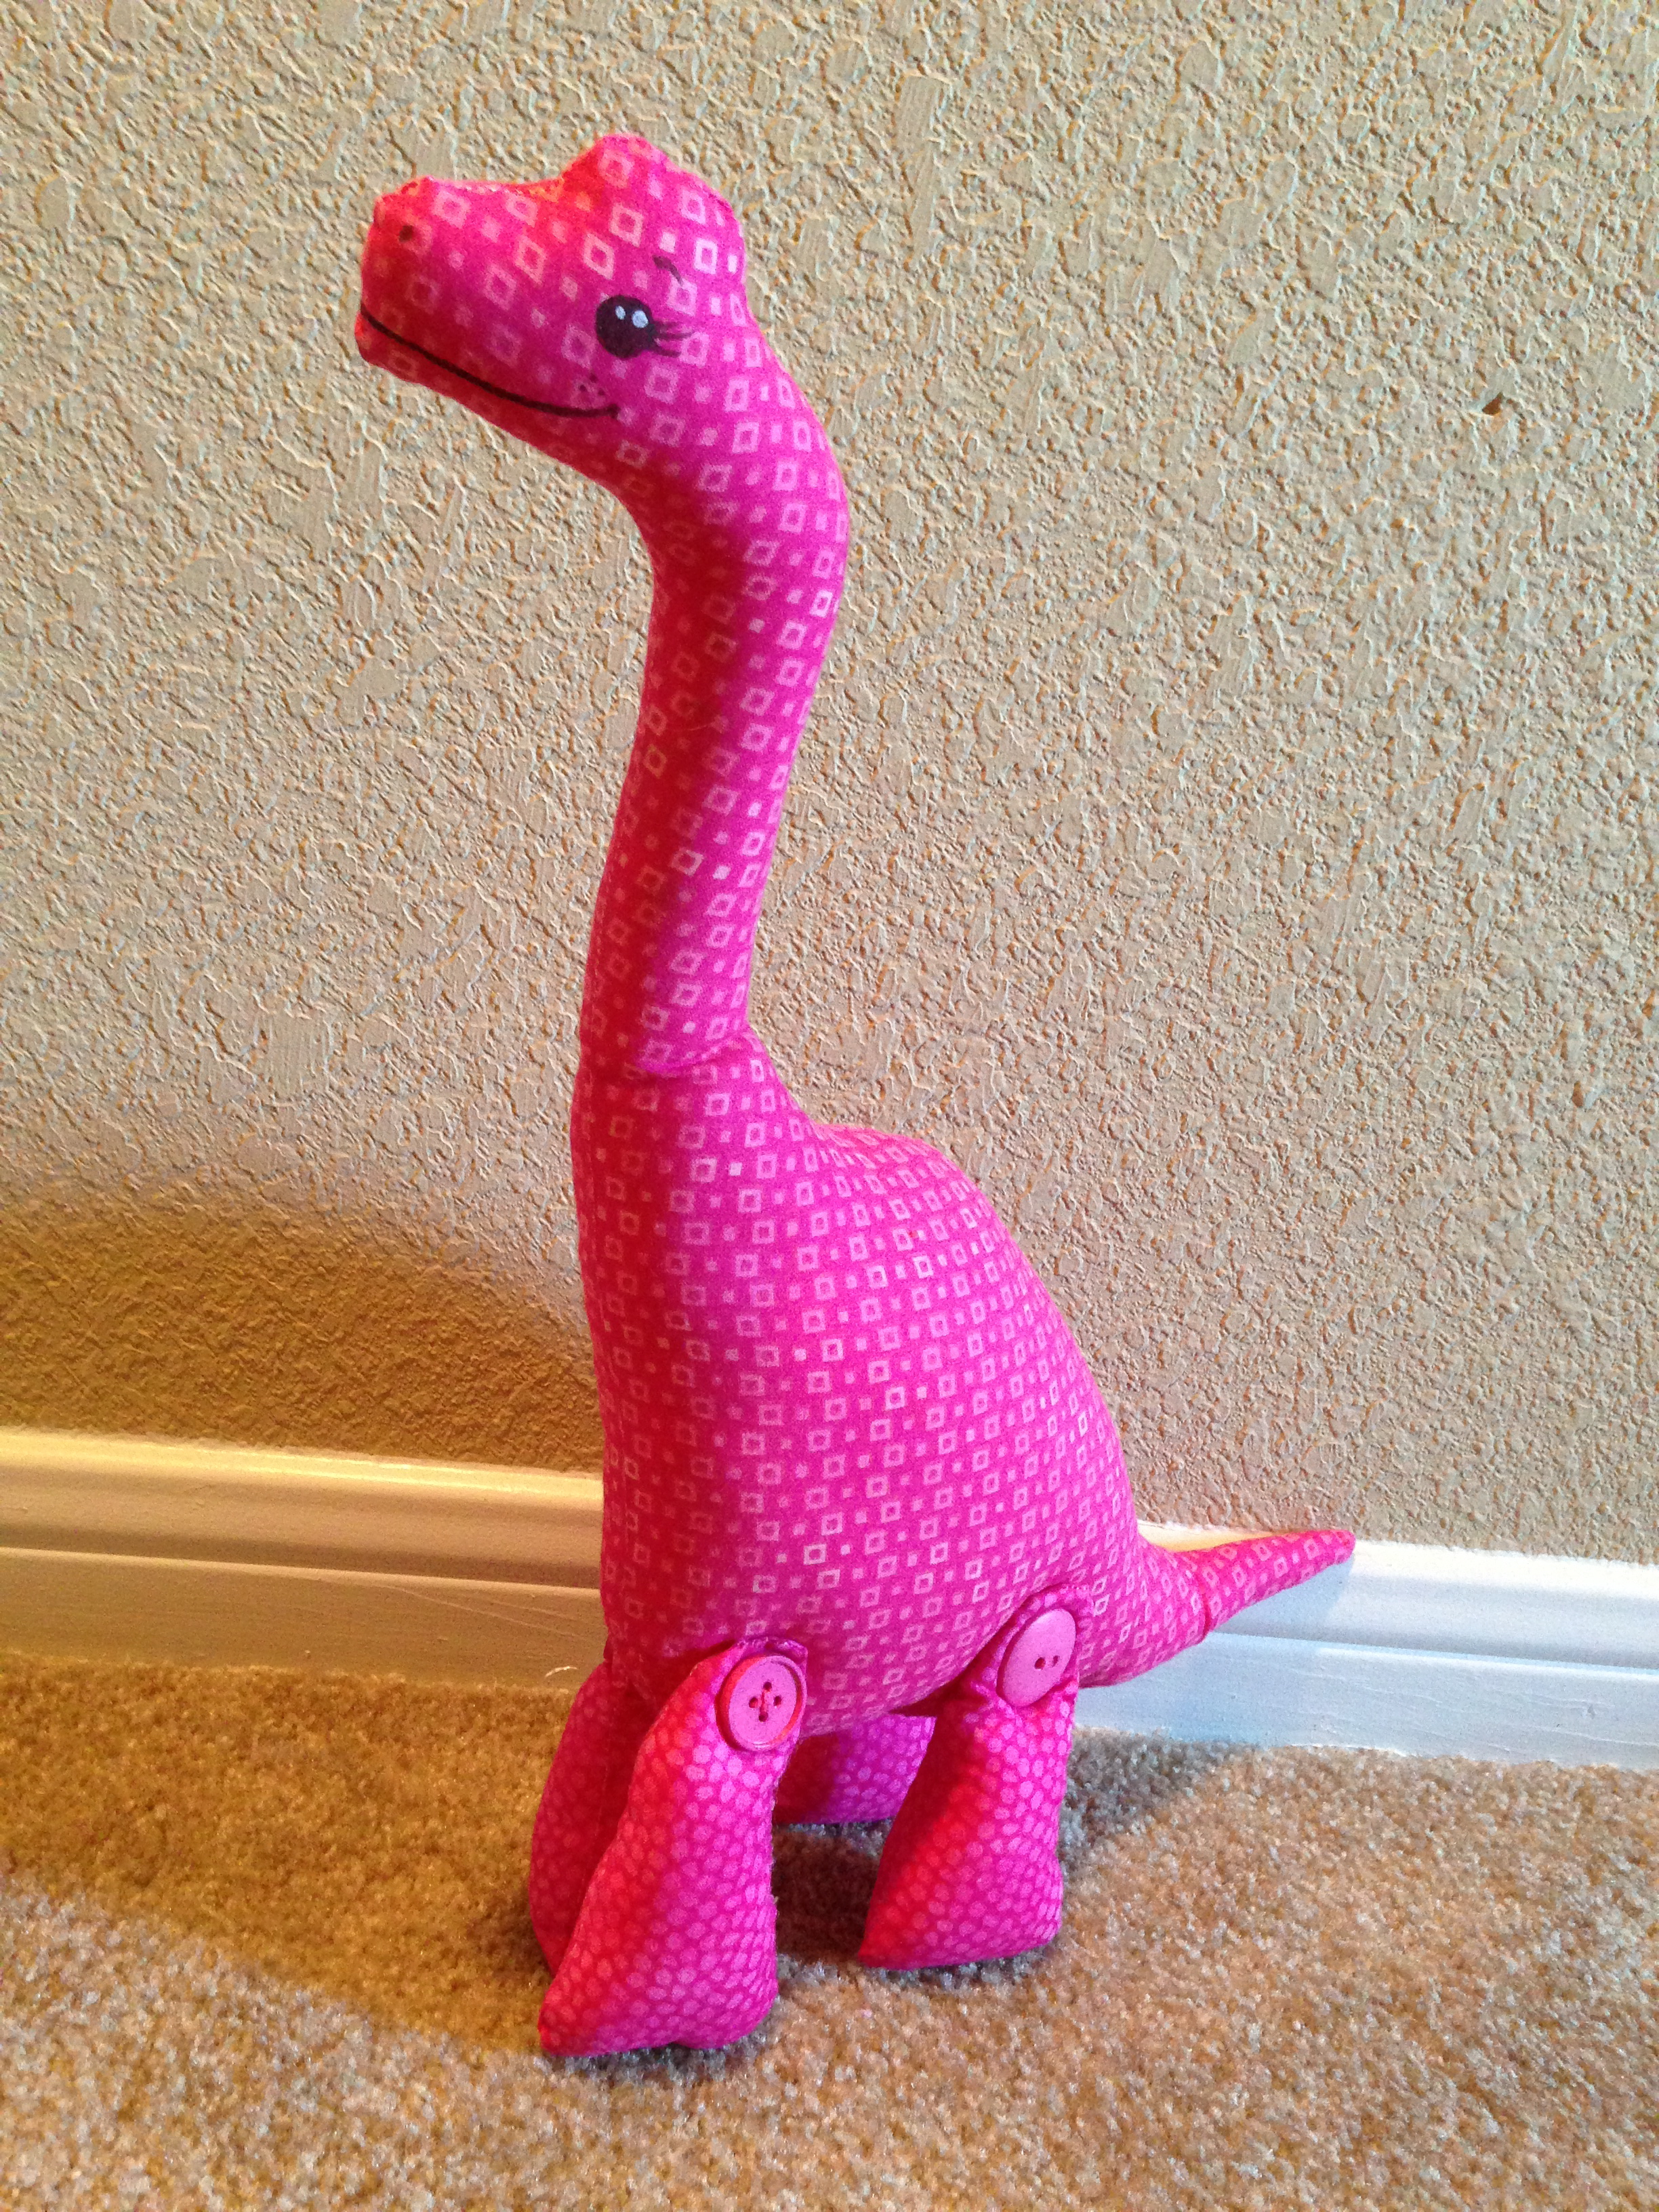
6. A Quick Little Doll. I’m not sure, but most kids like dolls, don’t they? Mine does. If you’re skilled with the sewing of things, a quick little doll can be made with a little bit of fabric and some easy shapes. I made this little brachiosaurus in just a couple of hours. I probably wouldn’t turn to me if I needed help with the basics of sewing, but if you can handle your own, this is a quick & easy gift to make that kids should like.
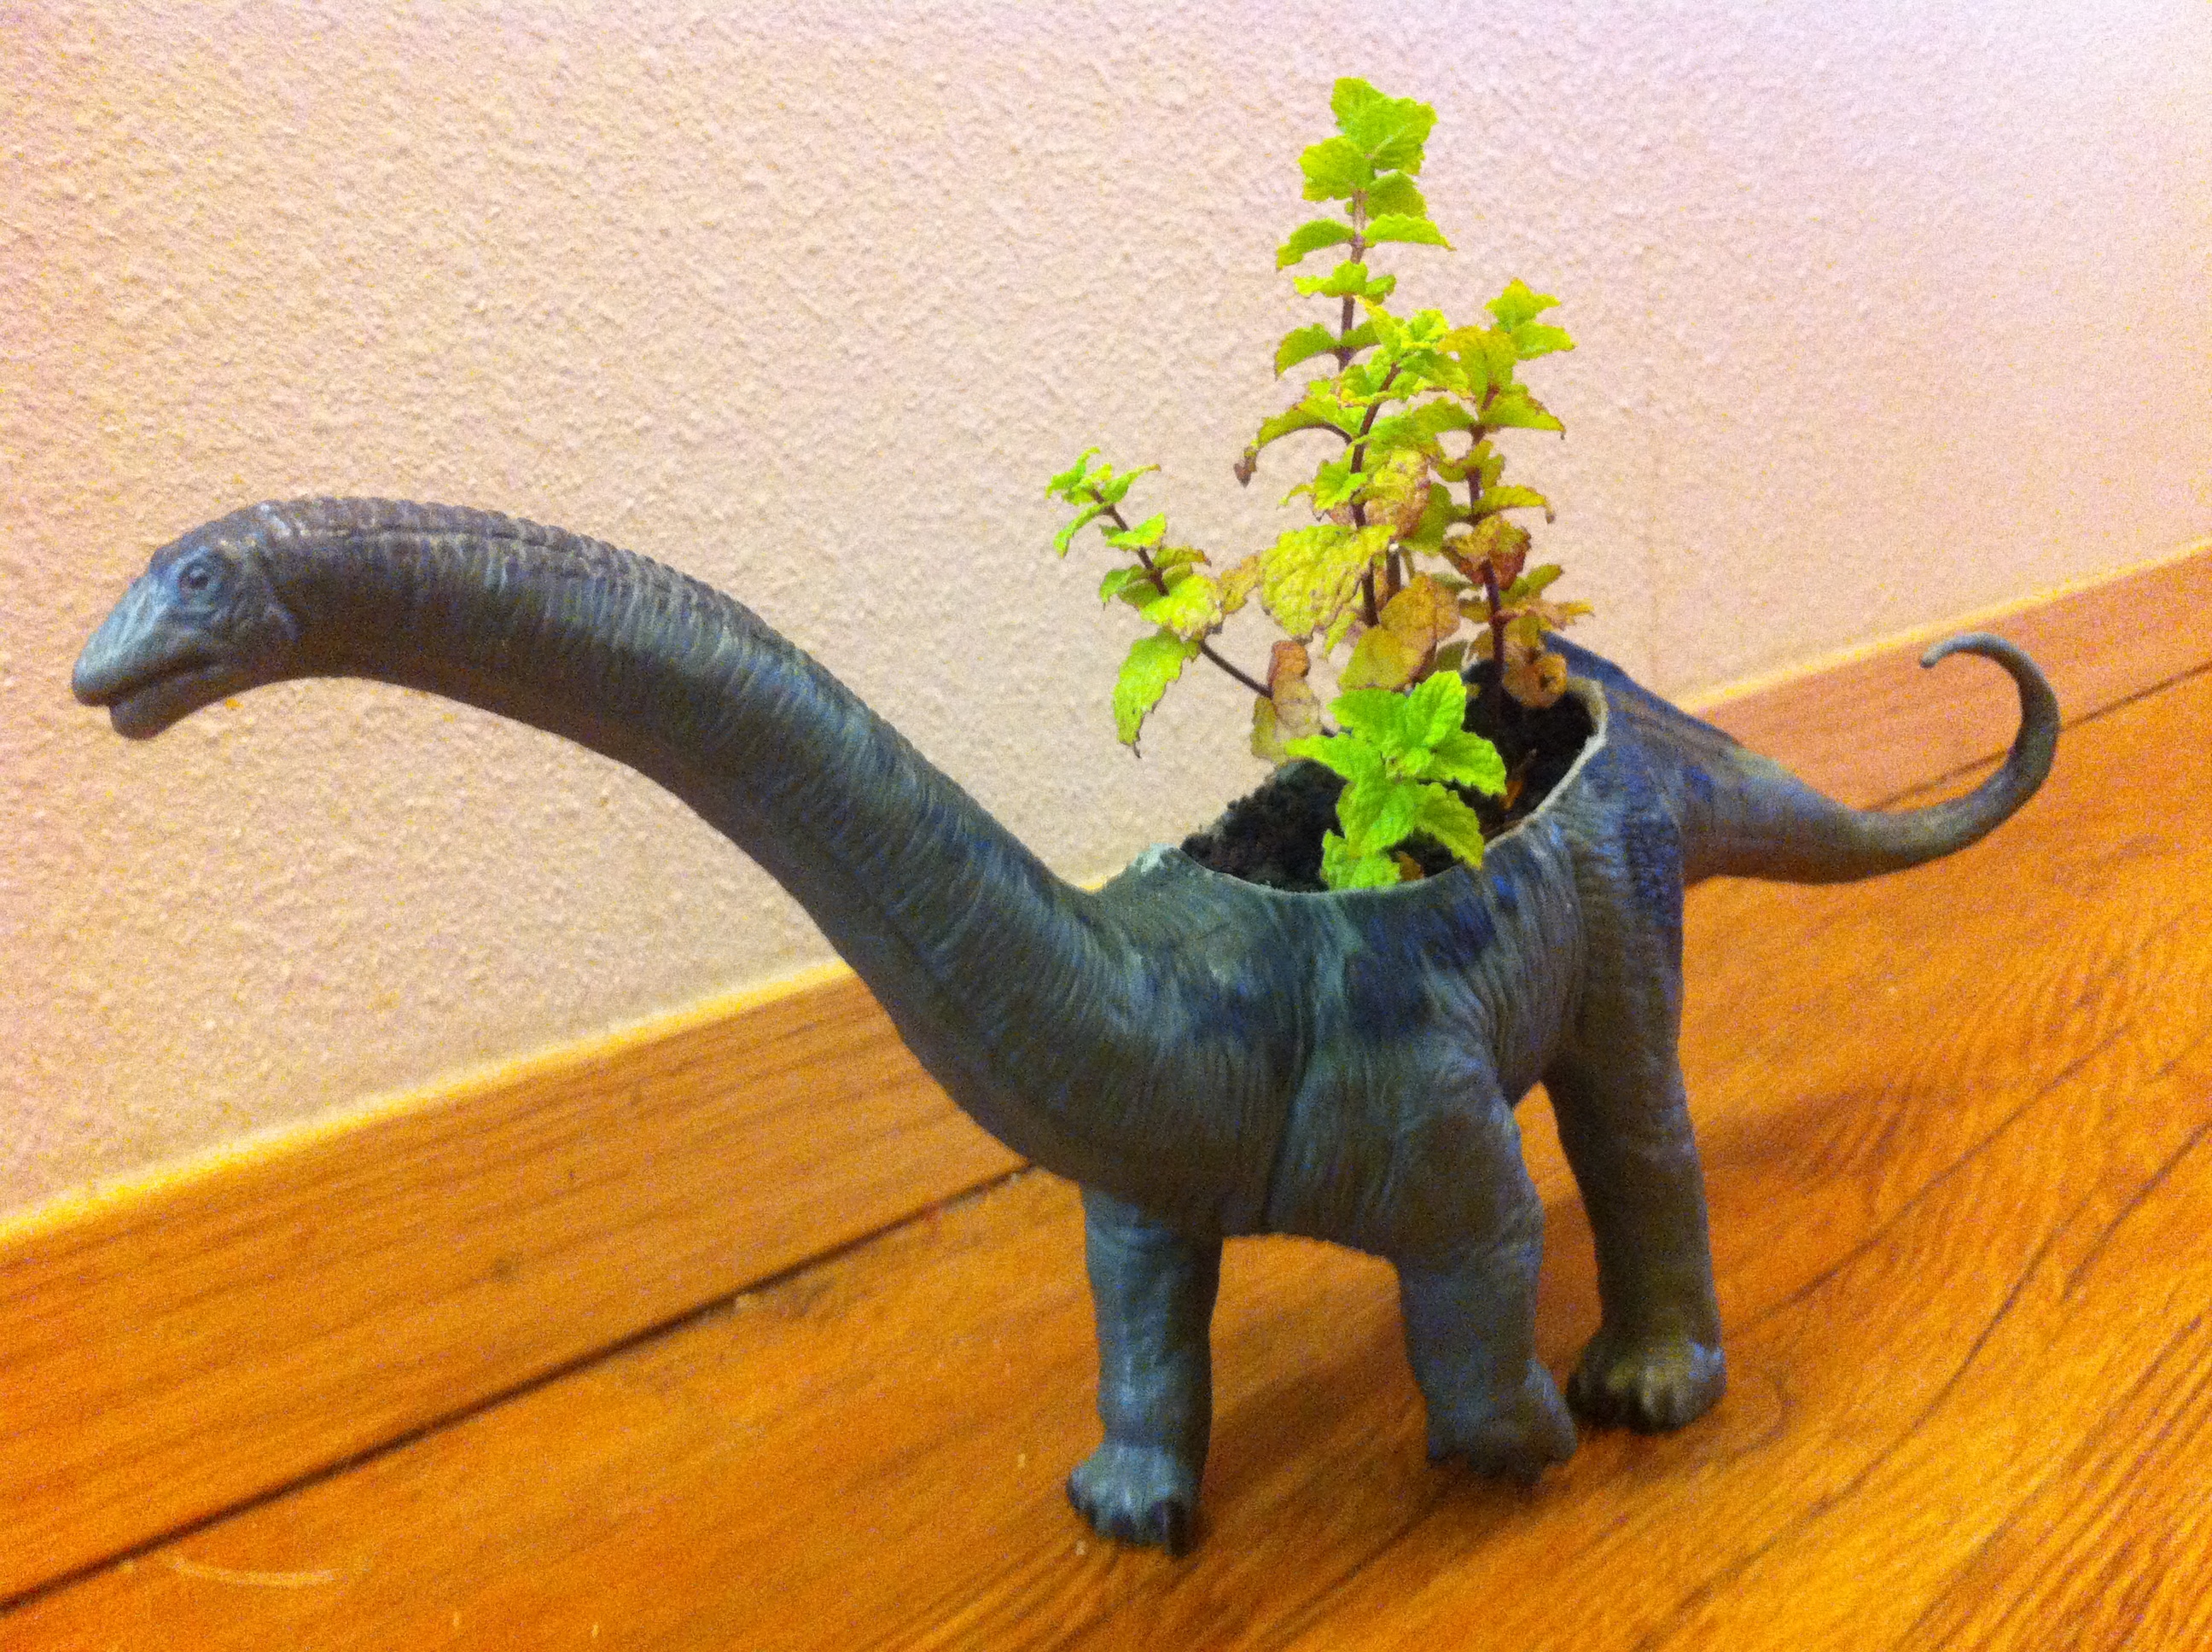
7. Drill a Hole in a Dinosaur. Okay, I found this on Pinterest somewhere. I got an inexpensive little plastic dinosaur toy & used my Dremel tool to cut his back out, filled him with dirt and put a little mint plant inside. Easy peasy!
8. Turn a Watch into a Locket. Got a little more time? Find a used watch or order a cute crafty-looking one. Take the back apart (just go with it–I had to experiment myself) and replace all the guts with a cute little photo of your intended person’s family, pet, or special something-or-other.

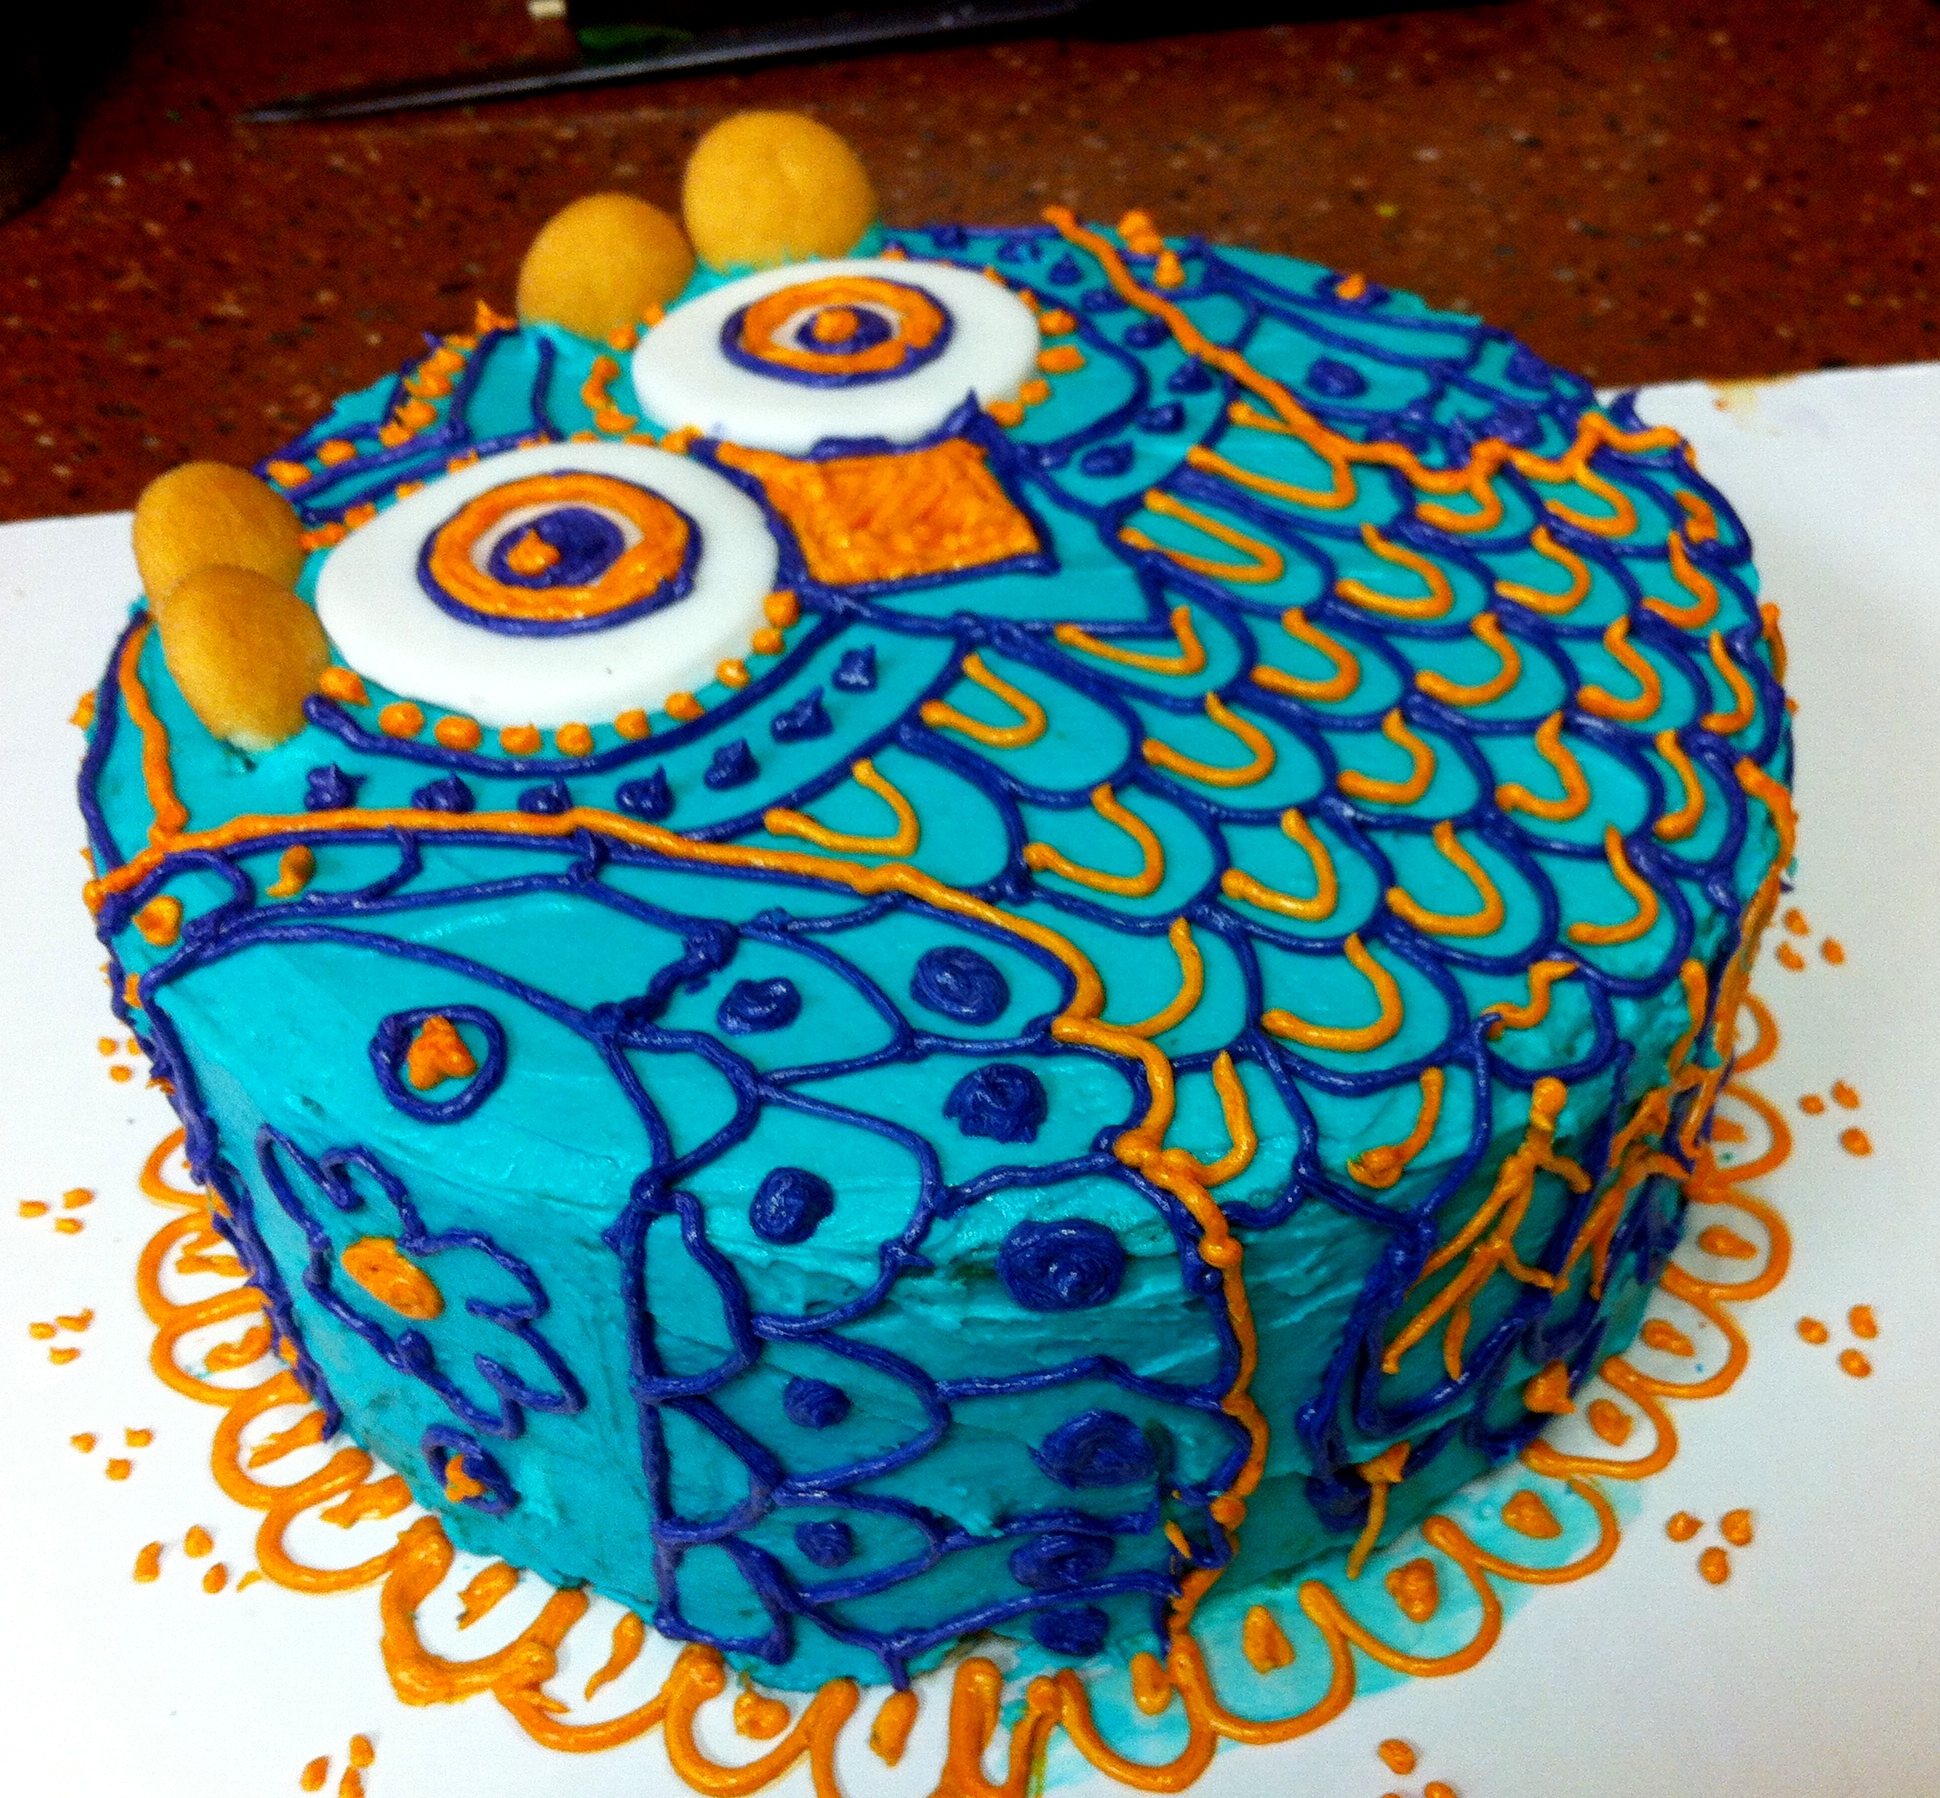
9. Something Edible. If baking’s your thing, you could make all kinds of fantastic, wonderful, edible things. I’m not so good at that sort of thing, but I know an edible thing is nearly always appreciated (as long as you’re aware of someone’s possible allergies or food restrictions). This is an owl cake I made for our daughter’s 3rd birthday. Okay, I’m not suggesting you make someone a full-on CAKE, but if baking is your thing, I’m sure you already have ALL sorts of wonderful, edible ideas. We made cookies for the local firefighters, and they were so happy to have us stop by, that they didn’t even notice (or care) that I pretty much stink at making decent cookies.
10. Fill Up A Cup. This is an easy go-to I like to do for teachers or friends. Find a cute cup (OH! Look! This one happens to be from the shop of our collaboration doodles! Um. Yeah, a lot of people might be seeing those for Christmas this year…). Anyway, fill up the cup with a handful of chocolate kisses or candies, a pen and a notepad, and show your teacher how much you appreciate them!

So there you have it! Just a few little easy ideas for some last-minute gifts. I hope it helps if you’re in a pinch. I know most of my friends and family have personally already seen half the things on this list, or gotten them as gifts already. If not….well….Keep an eye out, you’ll probably see them THIS year, too. Not because I waited til the last minute….but BECAUSE I CARE! 🙂
And since I’ll be out of the loop and full of all kinds of good cheer next week, here’s wishing you all happy holidays, everyone! And my fingers crossed for another very happy new year…
A Quick Little Kneecap Post
Okay, we’ve been sick. We’ve been feeling all around miserable around here this past week. So I’ve been slacking in the blogging department. Hey, I can’t keep it ALL together ALL the time. I’d run out of duct tape.
So I thought I’d share this quick little project as a sort of mini half-post. I promise I’ll write a better one in a few days.
I’ve told you before how much our daughter loves Star Wars, and has a crush on C-3PO? So I should also mention, she’s a pretty rough-and-tumble little girl. She’s not afraid of a few bumps and bruises. Which also means sometimes she wears holes in the knees of her jeans. When I decided to get a little more life out of those jeans with a patch, I thought, “Oh, cool! I’ll put some simple, cute design with iron-on patches, and BOOM, done.”
…Until she said, “Can you do one as C3P0 and one as R2D2?”
Well, darned if I don’t like a challenge. So I did.
It took me AGES to figure out if that was even possible. I thought about hand-sewing felt, about stitching the detail on with embroidery thread. I thought of all kinds of magically impossible ways this could possibly work, and was coming up blank every time. Until finally, I lowered my standards.

I finally just cut a simple outline of the body out based on the references I printed out (in black & white in the center), filled the detail in with Sharpie, and ironed them on. Bam, easy peasy.
She liked them so much, she insisted she wear her Lego Star Wars shirt to match.

FAIR WARNING: One trip through the washer, and the edges started rolling and looked horrible, so maybe this isn’t such a cool project after all, unless you’ve got wicked mad sewing skills. …In which case, can you please sew my daughter some Star Wars patches? 🙂
Anyway, we’re all on the mend here. Hope you’re all feeling well!
Post-Halloween Post

I had planned on making my own R2D2 costume (at my daughter’s request), but since Halloween plans were dampened by a bad week-long case of strep throat for the little one, I was a bit distracted, and time sort of slipped away. Luckily, inspiration struck at the grocery store, when I found a sad little kid’s Vader costume for 6 bucks in the Halloween aisle. It came with a tiny cape that was way too tight around the neck, so I just extended it by sticking a longer piece of velcro to it where the ends met up. I mean, technically, Vader DID CREATE C3PO, so I think it’s a better companion piece than R2. …At least, that’s what I’m telling myself.
But Vader alone wasn’t enough–I wanted to spice it up a little, so I wore a sugar skull shirt (because it’s black and I already own it), which gave me the idea of painting the helmet. There are a bajillion sugar Star Wars characters online (which I love), so I just grabbed a paint pen (which I already had) and BOOM–two minutes later, my costume was complete.
The kid was feeling better, but still pretty sick, so we just went down the street & back. She had a chance to do her thing, and then she had fun handing out candy. People seemed to dig her homemade costume. We even saw a kid dressed as Vader, one as Yoda, and another as a Jawa! Star Wars still lives, if you ever have your doubts.
So if the costume giddiness is over and you’ve got the dressup blues, I present, for your consideration, a paper doll I made ages ago for an art show I once had. She’s got a mix of old-skool circus performer, pinup girl, derby blocker, and steampunk fanciness. And if paper dolls aren’t your thing, just head on over to that bucket of candy. There’s one in there calling your name….

…AND THE WINNER IS…
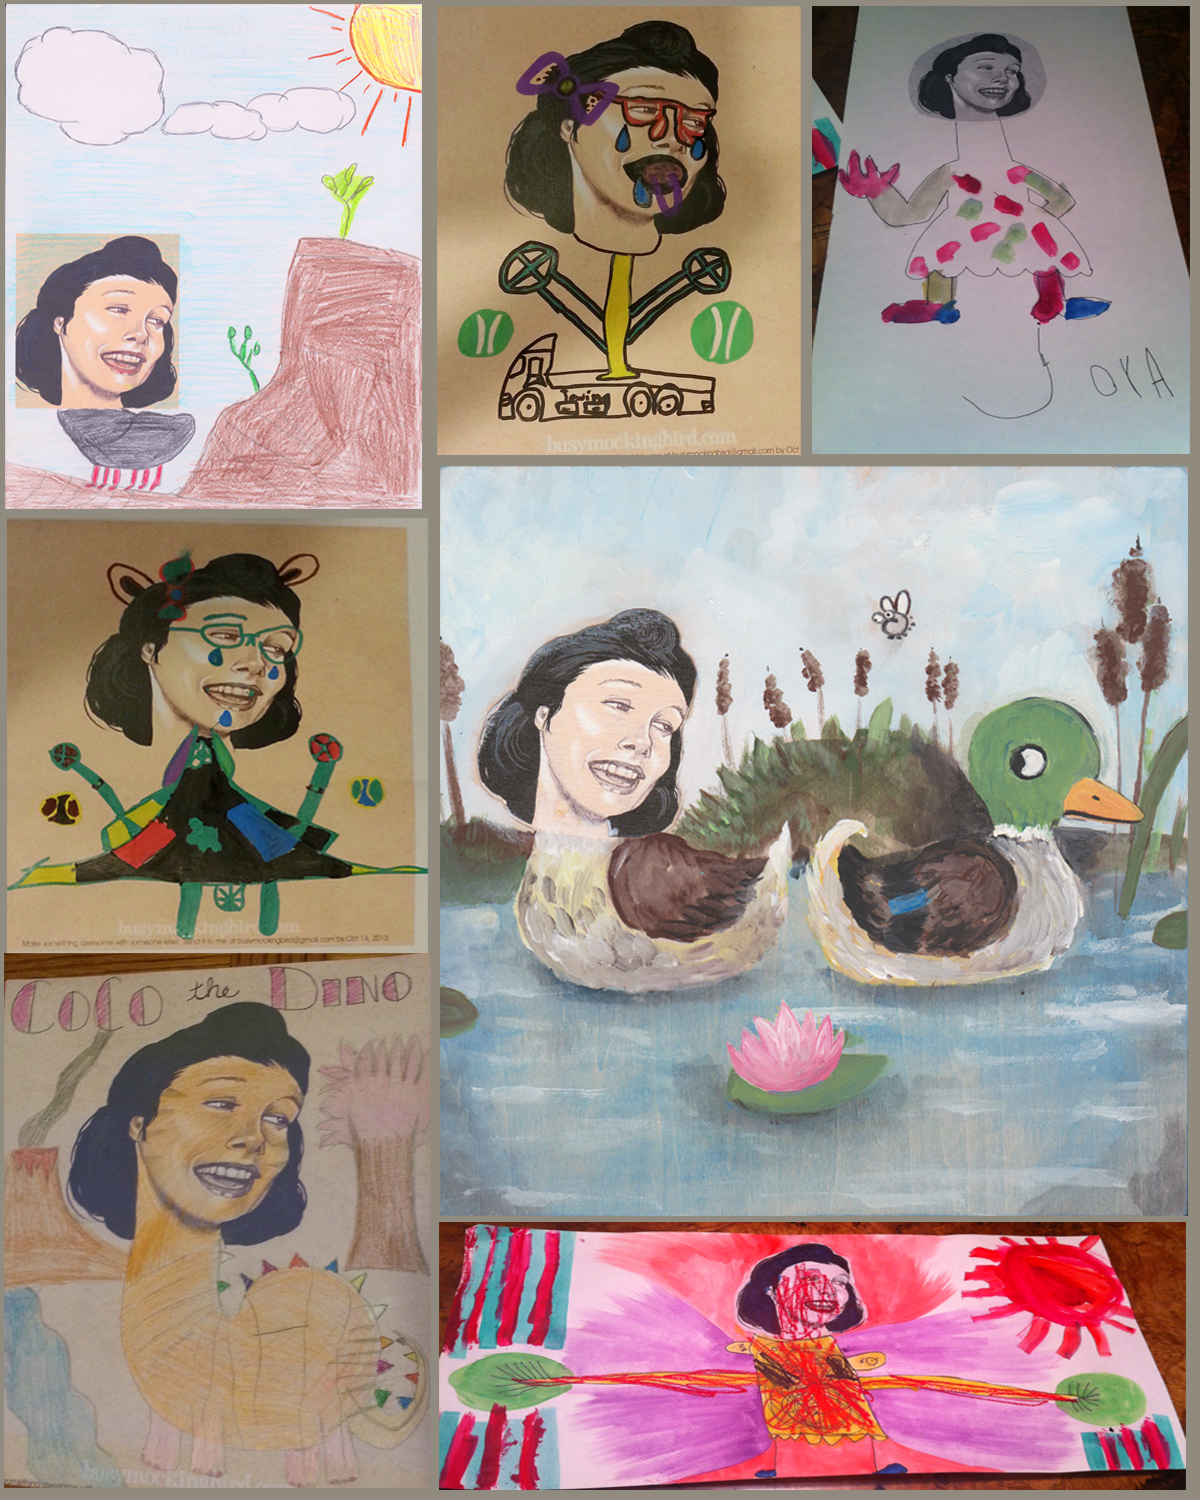
First off, I want to give a great big THANK YOU SO VERY MUCH to everyone who participated in our little contest! Win or no, I think it’s amazing how wonderful it is that everyone was able to connect with someone else for such a wonderful experience. Myla said as we were looking through the over 200 entries: “I’m so very PROUD of those people!” And I am, too.
I sent each entrant a personal message of thanks, and our own doodle of the contest head, just for them. Myla & I spent a long time sorting through the entries, and I have to tell you, she was SO excited at what everyone had done. I mean, visibly excited and thrilled. It took a lot of honing down to get her to narrow it down–she wanted to pick them all. And since it was SO very difficult to choose, I decided to not only pick one winner…but THREE. I pretty much let the 4-year old take the lead on choosing, and I respected each of her choices. So, without further ado, here are the winners, in no particular order (since the prize is the same):

Now, when our kid doesn’t win, she gets upset. (She was actually a little upset at first that she couldn’t win THIS contest.) But I’ve taught her to say “I really really wanted to win, but I’m very happy for you.” 🙂
Telling a wonderful story was not factored into our decision, but in the spirit of stories, I will tell you some tales of the winning pieces.
- The girl and her robot were created by Christine Kenney and her 6-year old son Desmond. Since the collaborations post, Christine had been meaning to try this with her son, and hadn’t found the time until the contest idea came up, and they enjoyed it a great deal.
- The next (very colorful) piece was created by Susan Garver and her 5-year old Eden. Eden saw the woman as a unicorn with a flower friend. Later, when adding the final touches, Susan remembered the loss of a family friend’s child, whose favorite color was “rainbow.” She finished it with her in mind, and hopes to eventually give it to the family.
- And finally, Laurie Silverstein passed this drawing back & forth to her older daughter. The story goes that when her daughter was around 4, she was happily singing “zip a dee doo dah” in a grocery store cart, and then suddenly burst into tears at the thought of being a mommy…It occurred to the little girl that her own future kids might starve because she “didn’t know where the stores are.” Years later, the daughter got a shoulder tattoo that said “zip a dee doo dah,” to remind her, I suppose, that it will all be okay.
There were so many beautiful stories that weren’t told, and so many beautiful pieces that weren’t chosen, from ALL OVER THE WORLD. Teachers sharing it with their classes, nurses collaborating with patients, families doing the project at a family get-together. Friends adding to the piece from far away to combine a single piece. I sincerely hope it was a fun and fair experience, win or no, for everyone involved. The most amazing thing to come of the Collaborations post, for me, has been hearing about all the wonderful ways the post has inspired you all to do similar projects with your family & friends. And that’s the best thing of all, in my book.
So thank you again to everyone who entered! They were all so beautiful and we are all so very proud. Thank you SO VERY MUCH!
And please, go check out all the beautiful entries on the Facebook page!
A Star Wars Crush
Once upon a time, in a galaxy far far away, our daughter was terribly sick from a flu and was relegated to basically lying in front of the television. We had watched nearly every kid’s movie imaginable already. It was my birthday, and I had just gotten the entire Star Wars series on blu-ray. I wondered…is New Hope too “grownup” for a robot-loving kid? I asked her if she was interested in a movie about robots and outer space. She said yes…
And that was where her love of C3PO began.
Funnily enough, C3PO was my favorite as a kid, too. (When had I painted our Munny family portraits well before her discovery, you may notice I was C-3PO.) Yes, R2 was funny and silly and snarky, but you wouldn’t really know what his beeps & whistles meant without the other half of the conversation. 3PO was silly and personable and charming. And our daughter developed a “crush” of sorts on him. All you’d need to do is say “Oh deah!” in that dainty little accent, and she’d giggle tremendously, as if she had just been spoken to by a movie star. This meant that she would often ask ME to pretend to be C3PO, which I didn’t usually mind doing (even in the grocery store).
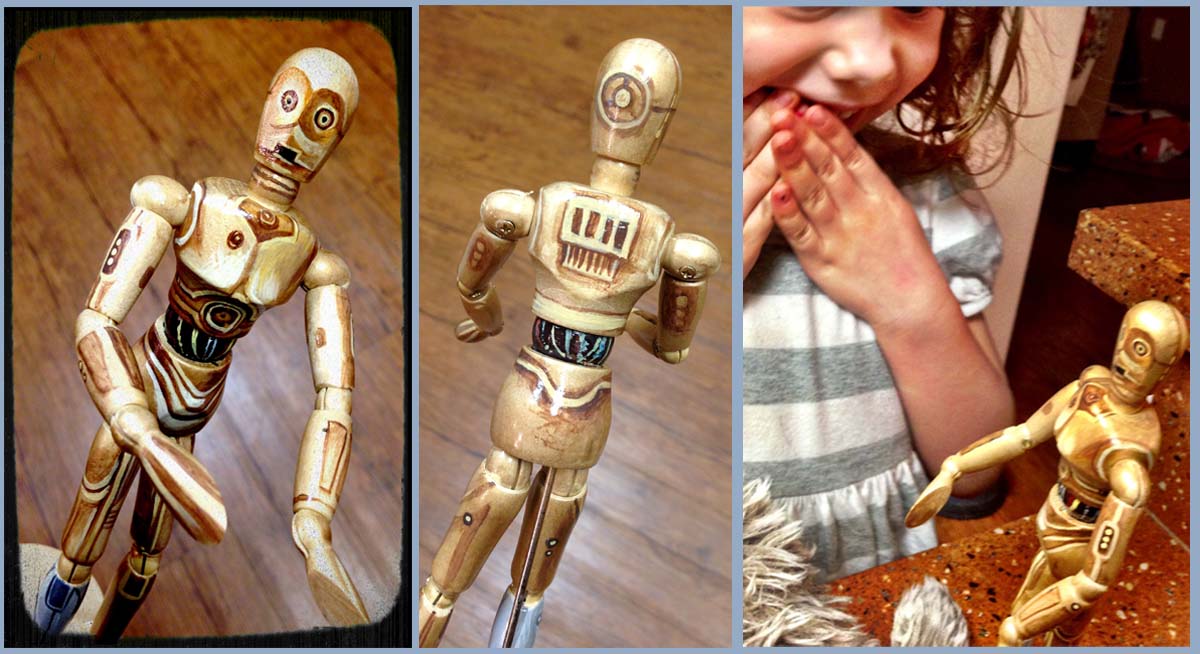
When she asked for a doll, I decided to scour the internet for one I might make, and came across the idea to make one from a wooden artist’s figure model. Once painted and presented, he brought lots of kid-smiles.
I made her a shirt with sharpies.
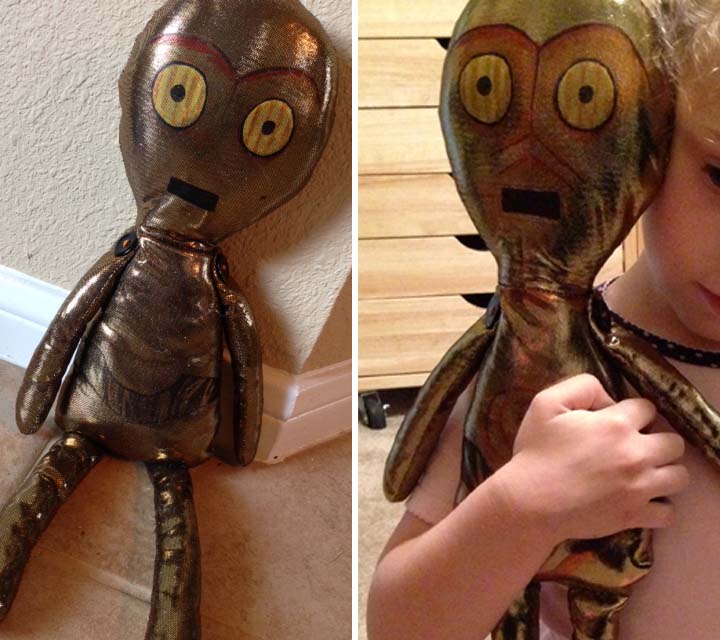
 I made her (by request) what turned out to be one of the (unintentionally) creepiest dolls I’ve made. (C-3PO doesn’t work well as a soft doll, we found out. But she liked him anyway.)
I appliqued a shirt.

And she even made her own C-3PO shrinky dinks and drawings.

So this year, when it came to Halloween costume choices, she had one request from the get-go: she wanted to be C-3PO. Now if you’ve seen the pre-made costumes online, they look pretty goofy. So I decided to get abstract with this, and see if we could pull it off cosplay-style.
Since I didn’t want her face to be covered completely, I cut up a gold plastic craft store mask. I had seen all these awesome online tutorials about how to build your own cardboard armor, so I built up a chestplate and back with cardboard, masking tape, and paperclay (which is super fun stuff). When it dried, I sanded it and painted it gold. I got a black bodysuit, and used fabric glue to tack on little pieces of gold “plating” to the arms.
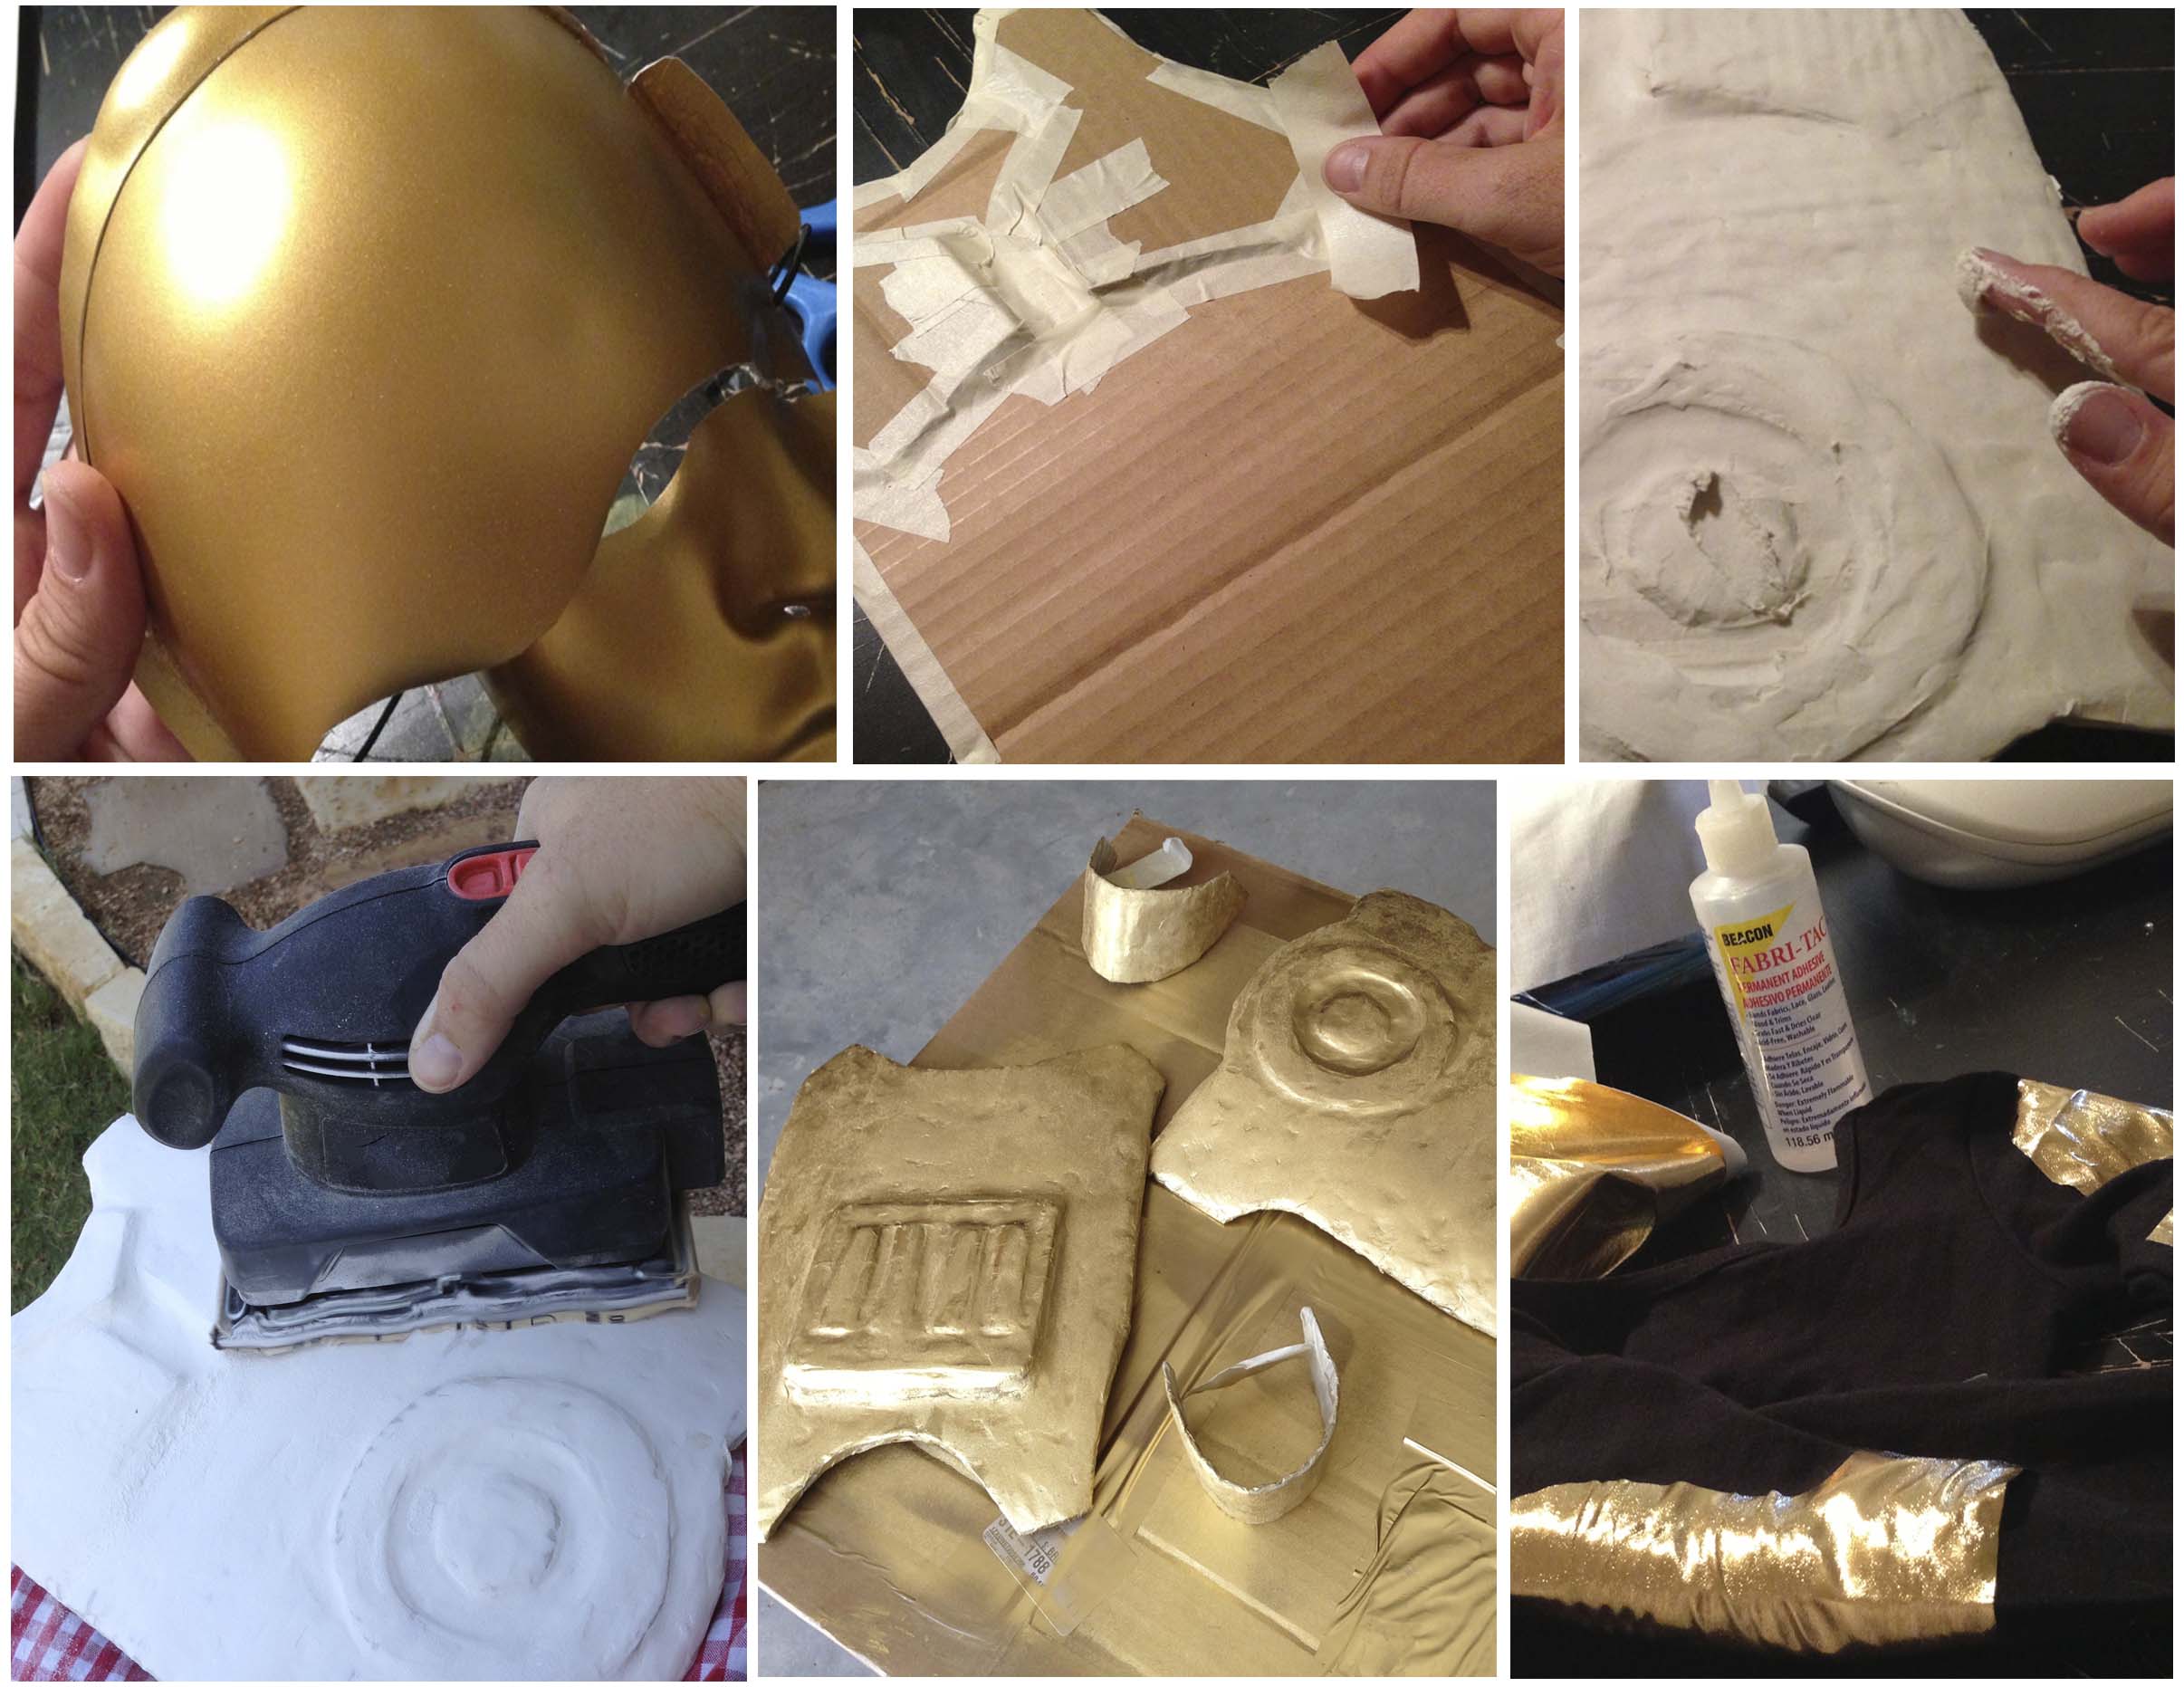 I got a super cheapo set of kid’s elbow, wrist, and kneepads and painted them gold. Got a pair of gold dance leggings for kids, to which, after putting them on for the first time, my daughter exclaimed, “Oooh! These feel soft to my legs!”
A pair of costume glasses spraypainted gold (with stripes on the eyes–she was VERY insistent that it have stripey eyes), and BOOM! We have a funky C-3PO costume.

So there you have it! Yes, it’s strange. And yes, it’s unusual. But you know, it was fun to make and she ABSOLUTELY LOVES it. She walked around with her arms stiff, saying “Oh DEAH!” Hopefully it’s at least a step above the storemade ones, and passable enough that people won’t make fun of her while she walks by (because if they do, they can expect my momma banshee to come out).
I was going to try maybe a little brown pullover and get by as a Jedi, but she asked if I could be R2 with her. Oh lord! I guess if she’s willing to go all out, I should too. But I think I might go a LIIIIIIITTLE simpler on mine. 🙂
Your’e So Lovely!
It’s SO amazing to see all the beautiful entries coming in from all over the WORLD for the contest…and even more amazing hearing all the wonderful stories of the fun you all had creating them! Don’t forget, Monday is the last day to enter, so let’s see what you’ve got!


Keep ’em Coming…
Contest entries are coming in from all over, and they’re so awesome! Have you entered yet? …Looks like you all are having a lot of fun with it, and I want to see MORE! One more week to enter! If you want to give it a shot, head on over to the last blog post and try it yourself. Good luck and most importantly: have a great time with it!

Unusual Dolls
Sometimes, inspiration is found in strange places.
There are some children’s books that are so dull and obnoxious that every word irritates you as you read it to your wide-eyed kid. These are usually the same books that your kid is madly in LOVE with, and therefore insists you read them over and over and over again until the grumble inside your head starts to show on the outside of your face. But there are good ones, too. Sweet ones with beautiful drawings and lovely stories and poetry, charming and funny and endearing.
And then there’s Calef Brown. He’s a different sorta bird.
We discovered “Polkabats and Octopus Slacks” quite by coincidence, but the fact that the poems are so strange and lovely, combined with the use of the words “polka turds” cracked the Kid up, and we were hooked. I had never seen a kid’s book like that before. I’ve read them all tons of times, and I have yet to be bored by them. He’s a whole lot of funky, a little bit full of one of those giggles you cover with your hand, but all kinds of fun.
One of my daughter’s favorites (especially, I think, since we like to combine animals and people in our own doodles), is in a book called “Flamingos On The Roof.” I was reading one of her favorites, called “Allicatter Gatorpillar,” when she said, “I sure wish I could see an Allibutter Gatorfly.”

You know what? I would, too, kid. That sounds like fun.
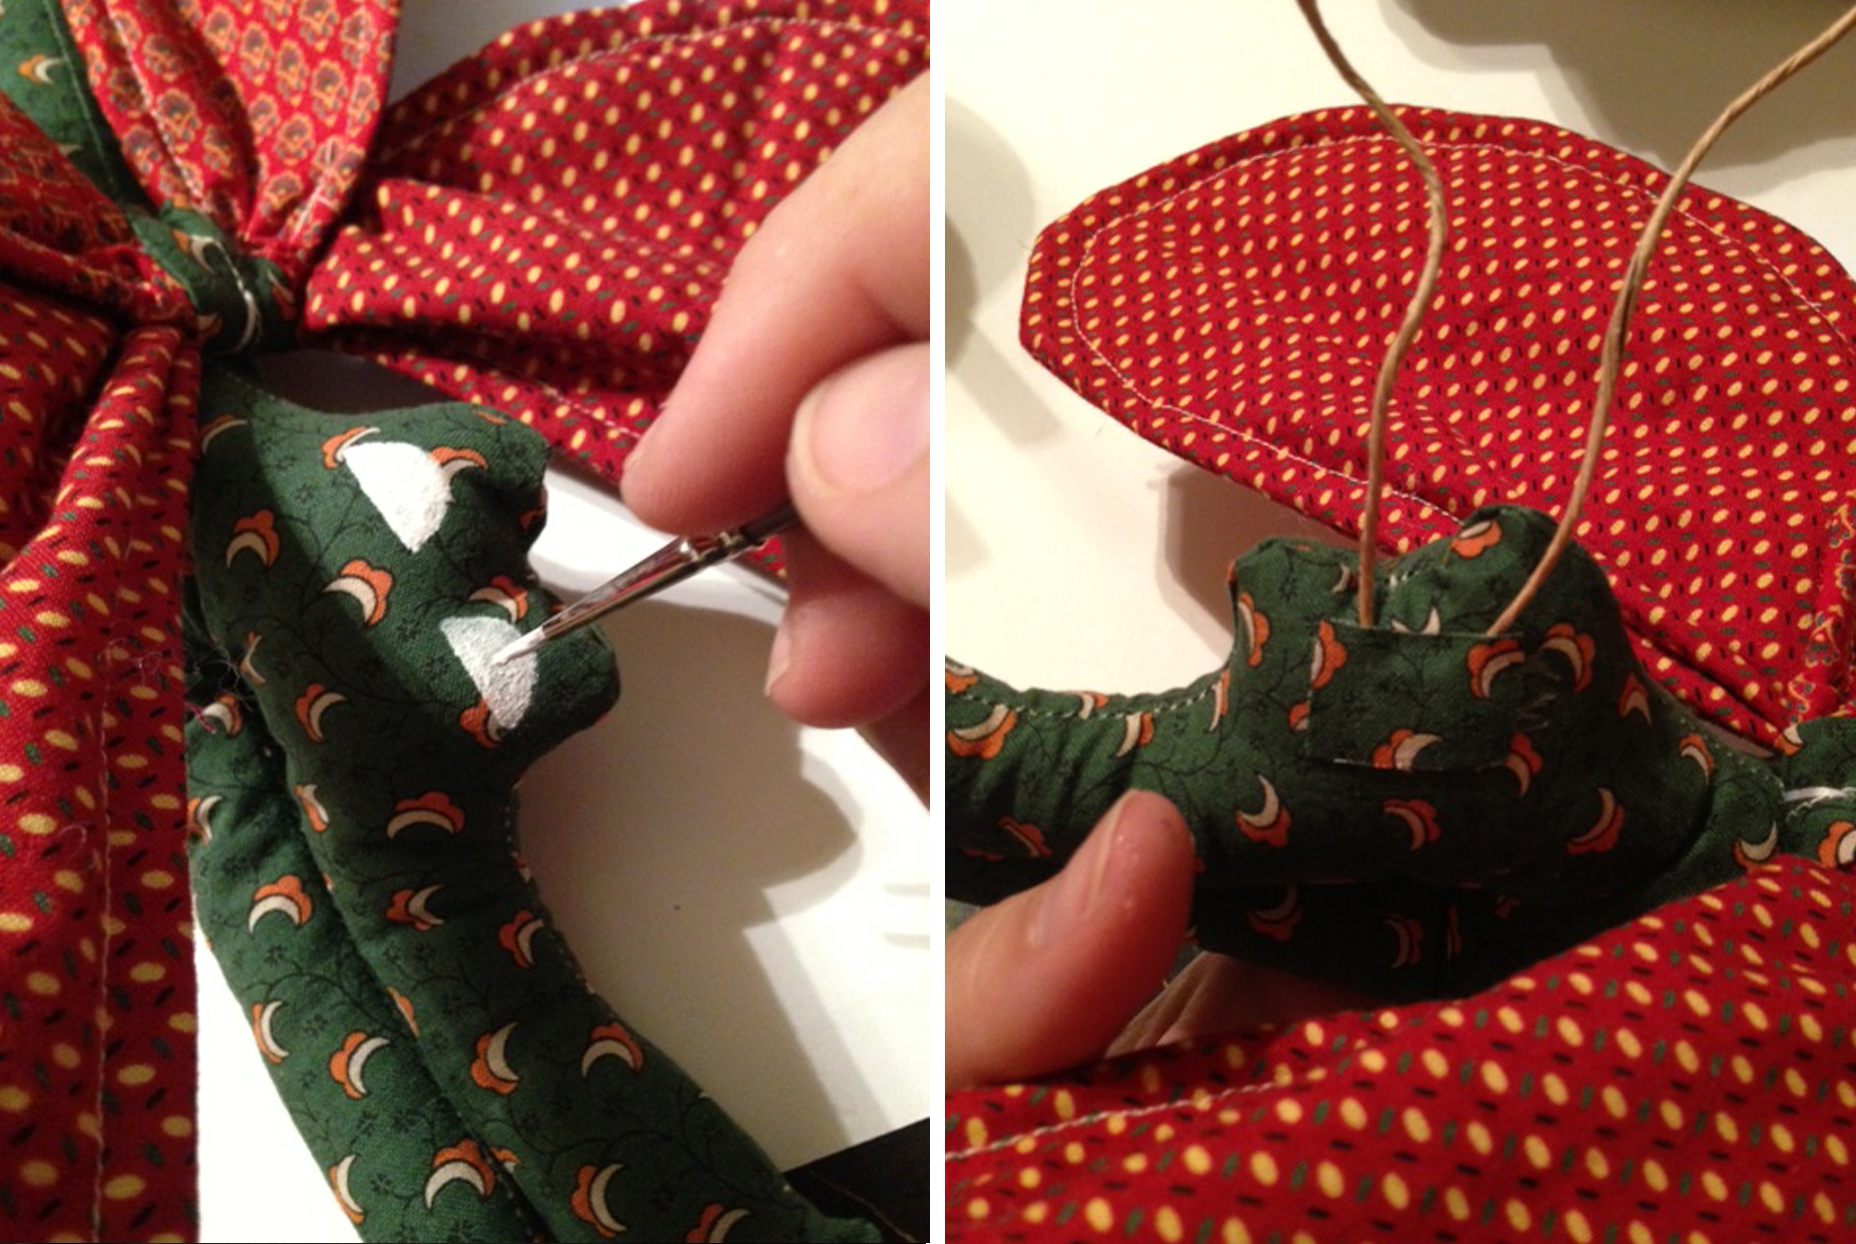
So I decided to sew one. Challenge accepted.
I’ve made a few dolls before…..thing is, I can only follow a very simple pattern, and can’t really do anything fancy. But this shouldn’t be THAT difficult, right? I’ll walk you through what I did for your own amusement, but I’ll have you know I’m no perfectionist when it comes to this sort of thing. With things like this, I sort of frantically jab and tie and cut everything together and glue it and tape it and bandage it up and say (dusting my hands off), “whelp, that should just about do it.”
So I sketched out a little shape of the gator part, and just sewed the top seam, from the tip of the tail to about the bottom of the…”chin?”

I wanted the wings to be bendable, so I dug in my wire drawer for some very flexible wire I have used in sculpture before, and laid it out on two separate wing shapes. There was a front & back to one side, and a front & back to the other. I sewed them together without the wire, right sides together with the end open, and turned them two make two top wings. Then I did the same for the bottom wings. (PS, from the looks of my desk, I should probably make better use of my cutting board.)

I wanted the wire to go all the way across to span the top two wings for strength and the bottom two wings the same. I pushed the wire into the open wings, and held the wire in place with machine stitches. I also stitched the top set of wings to the bottom set, so they’d sort of stay in place. Now I had a pretty cool pair of wings…with no way to attach them together. I decided to at least get some embroidery floss and sew the open ends to each other to sort of hold the wire in place and keep the wings from just sliding off. This is where all hell broke loose.

So now I’ve got all these exposed seams on the wings. How the heck do I get it on the body? I can’t sew through wire. So I made a little green “belt,” wrapped it around the open seams (which covered them fairly well) and then stitched that onto the back of the gator’s body. Pretty sloppy, and if you look at it closely, the wires will pop out. Good thing I bent the edges so they don’t totally cut you like a brassiere underwire.

So with the wings shoddily attached to the gator skin from both the outside and the in, the time for stuffing had come.

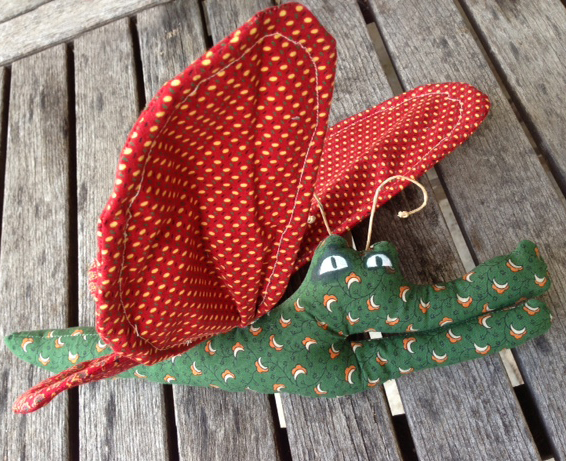
After what seemed like 18 hours of hand-sewing the bottom of the gator’s body (a good tutorial for hidden stitches here, by the way), it was time to paint the eyes. I got out my acrylic paint, and risking my daughter’s critique for putting both eyes on the same side of the head (it’s like that in the illustration!!), I painted them on. I wanted to add some antennae as a final little touch, and found some bendable wire floral rope that I had lying around that I can’t for the life of me remember why I own. Do I have any clue how to attach it to the head? No. In hindsight, I probably could’ve just used embroidery floss to tack it to the back (Yep, I probably should’ve done that). Instead, I cut a couple of tiny snips in the back, threaded the wire through, and glued a fabric panel down with fabric glue. This did actually keep the antennae standing upright, but I suppose a few good stitches could’ve accomplished the same effect without making this fella look even MORE strange.
 And so here is the final result in probably the weirdest little doll I’ve ever made. The thing is, though, I think he sort of matches the style of the one in the book, which is sort of what I was going for. I mean, an allibutter gatorfly’s not SUPPOSED to be “cute”…right?

Well, it’s okay if he’s a little creepy. When I picked my daughter up from school and presented her with it, she sighed with delight. “He’s so BEEEAAAUUUUTIFUL!” she said.
And that’s all that really matters.
So have you been inspired by weird art to make something in tribute?
Felt Top Hats and a Wonderland Party
When my daughter was nearly two, she was VERY MUCH into the Disney version of Alice in Wonderland. She also loved tea parties and hats. (See where I’m going with this?)
Since my husband was deployed, I decided to make a “Mad Hatter’s Tea Party” for my daughter’s second birthday, and have a fun time of it with some friends. Keep in mind, deployment can make you a little cuckoo. I threw myself into it, but I didn’t need any additional stress, so I planned it WELL in advance, and although it seems like a ton of work, by the time party day came around, I just sort of got everything out & laid it nicely around the room. Easy peasy.
So I had this funny sketch I had done of my daughter intensely focused on her “tea” that was perfect for the invitations.

The idea was that kids could show up in hats & have some fun. My friends surprised me, and most had not only their kids in hats but themselves as well! One thing I’ve learned from homemade kid’s parties is to have something for kids to DO right off the bat, so there’s no awkward waiting-around-for-everyone phase (kids have been known to have short attention spans). So I got some inexpensive foam visors from the craft store, a few plain stickers, lots of foam stickers, and let the kids have at it. We didn’t even have chairs–I just laid tablecloths on the floor (which fit the “tea party” theme anyway) and let the kids play with the stickers & hats while the mamas talked.

I got plain ol’ cookies (I think they were pre-made grocery store ones), and decorated them with hearts and card symbols with a simple tube of icing.
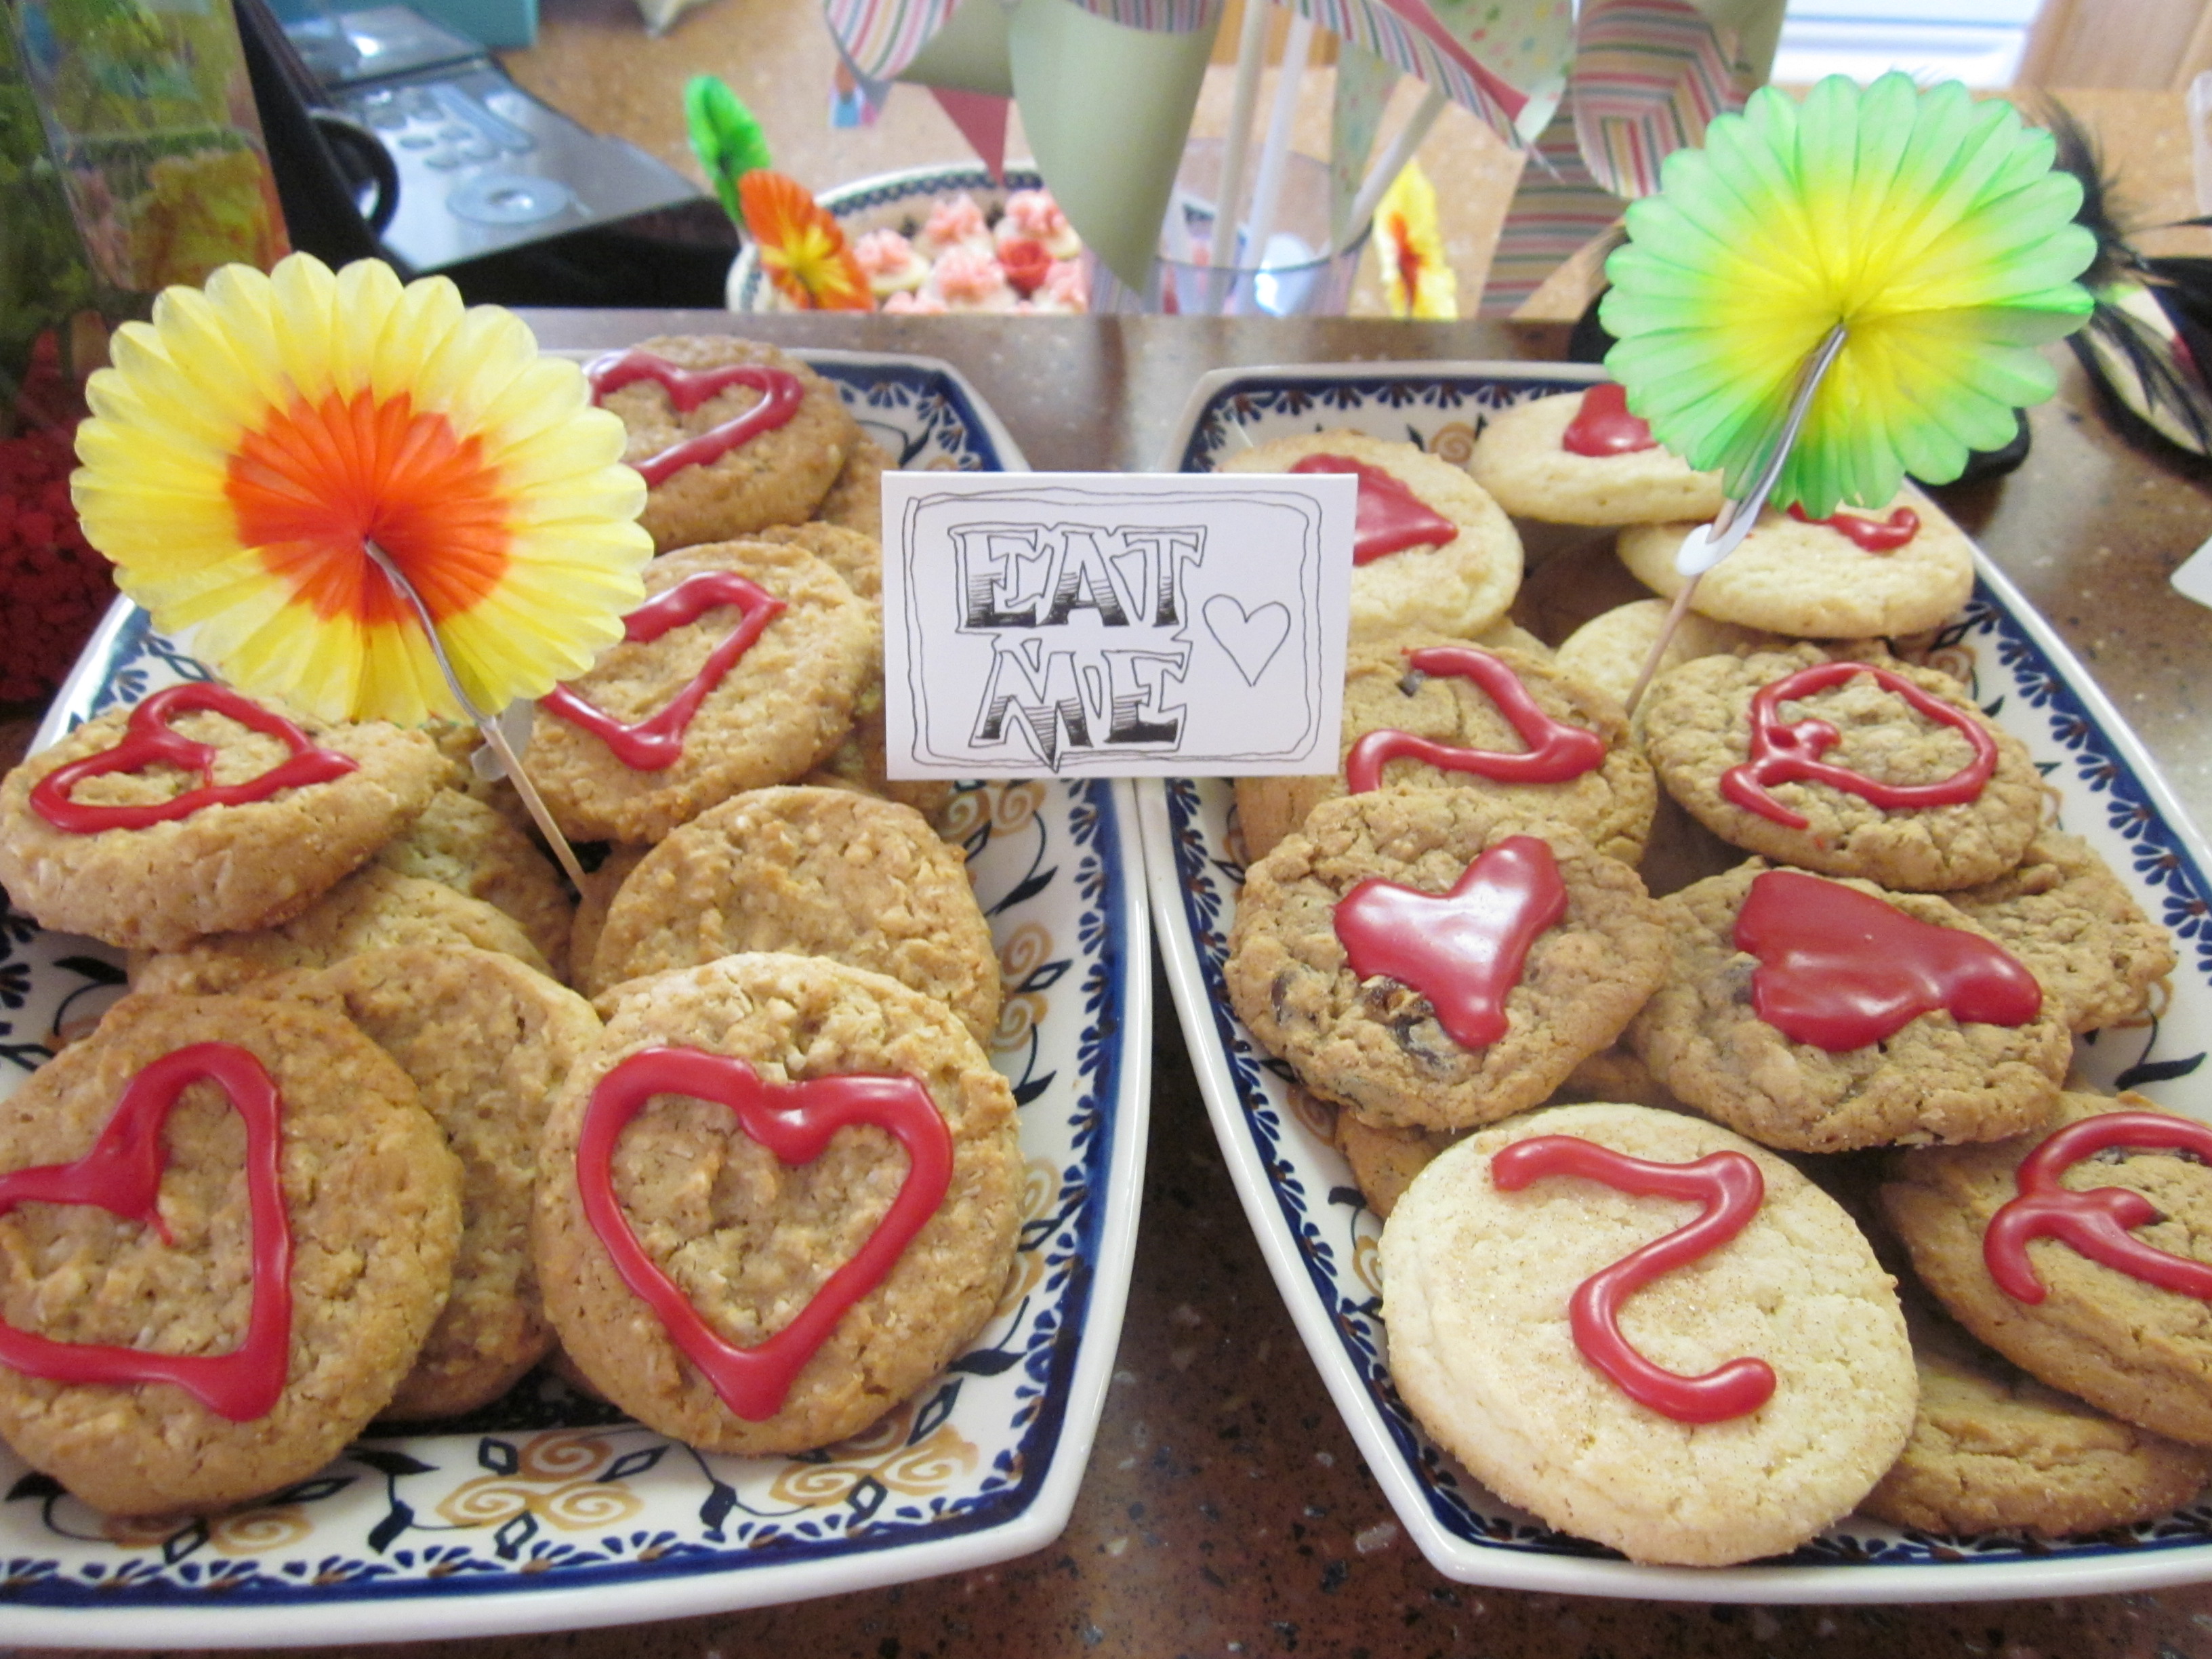
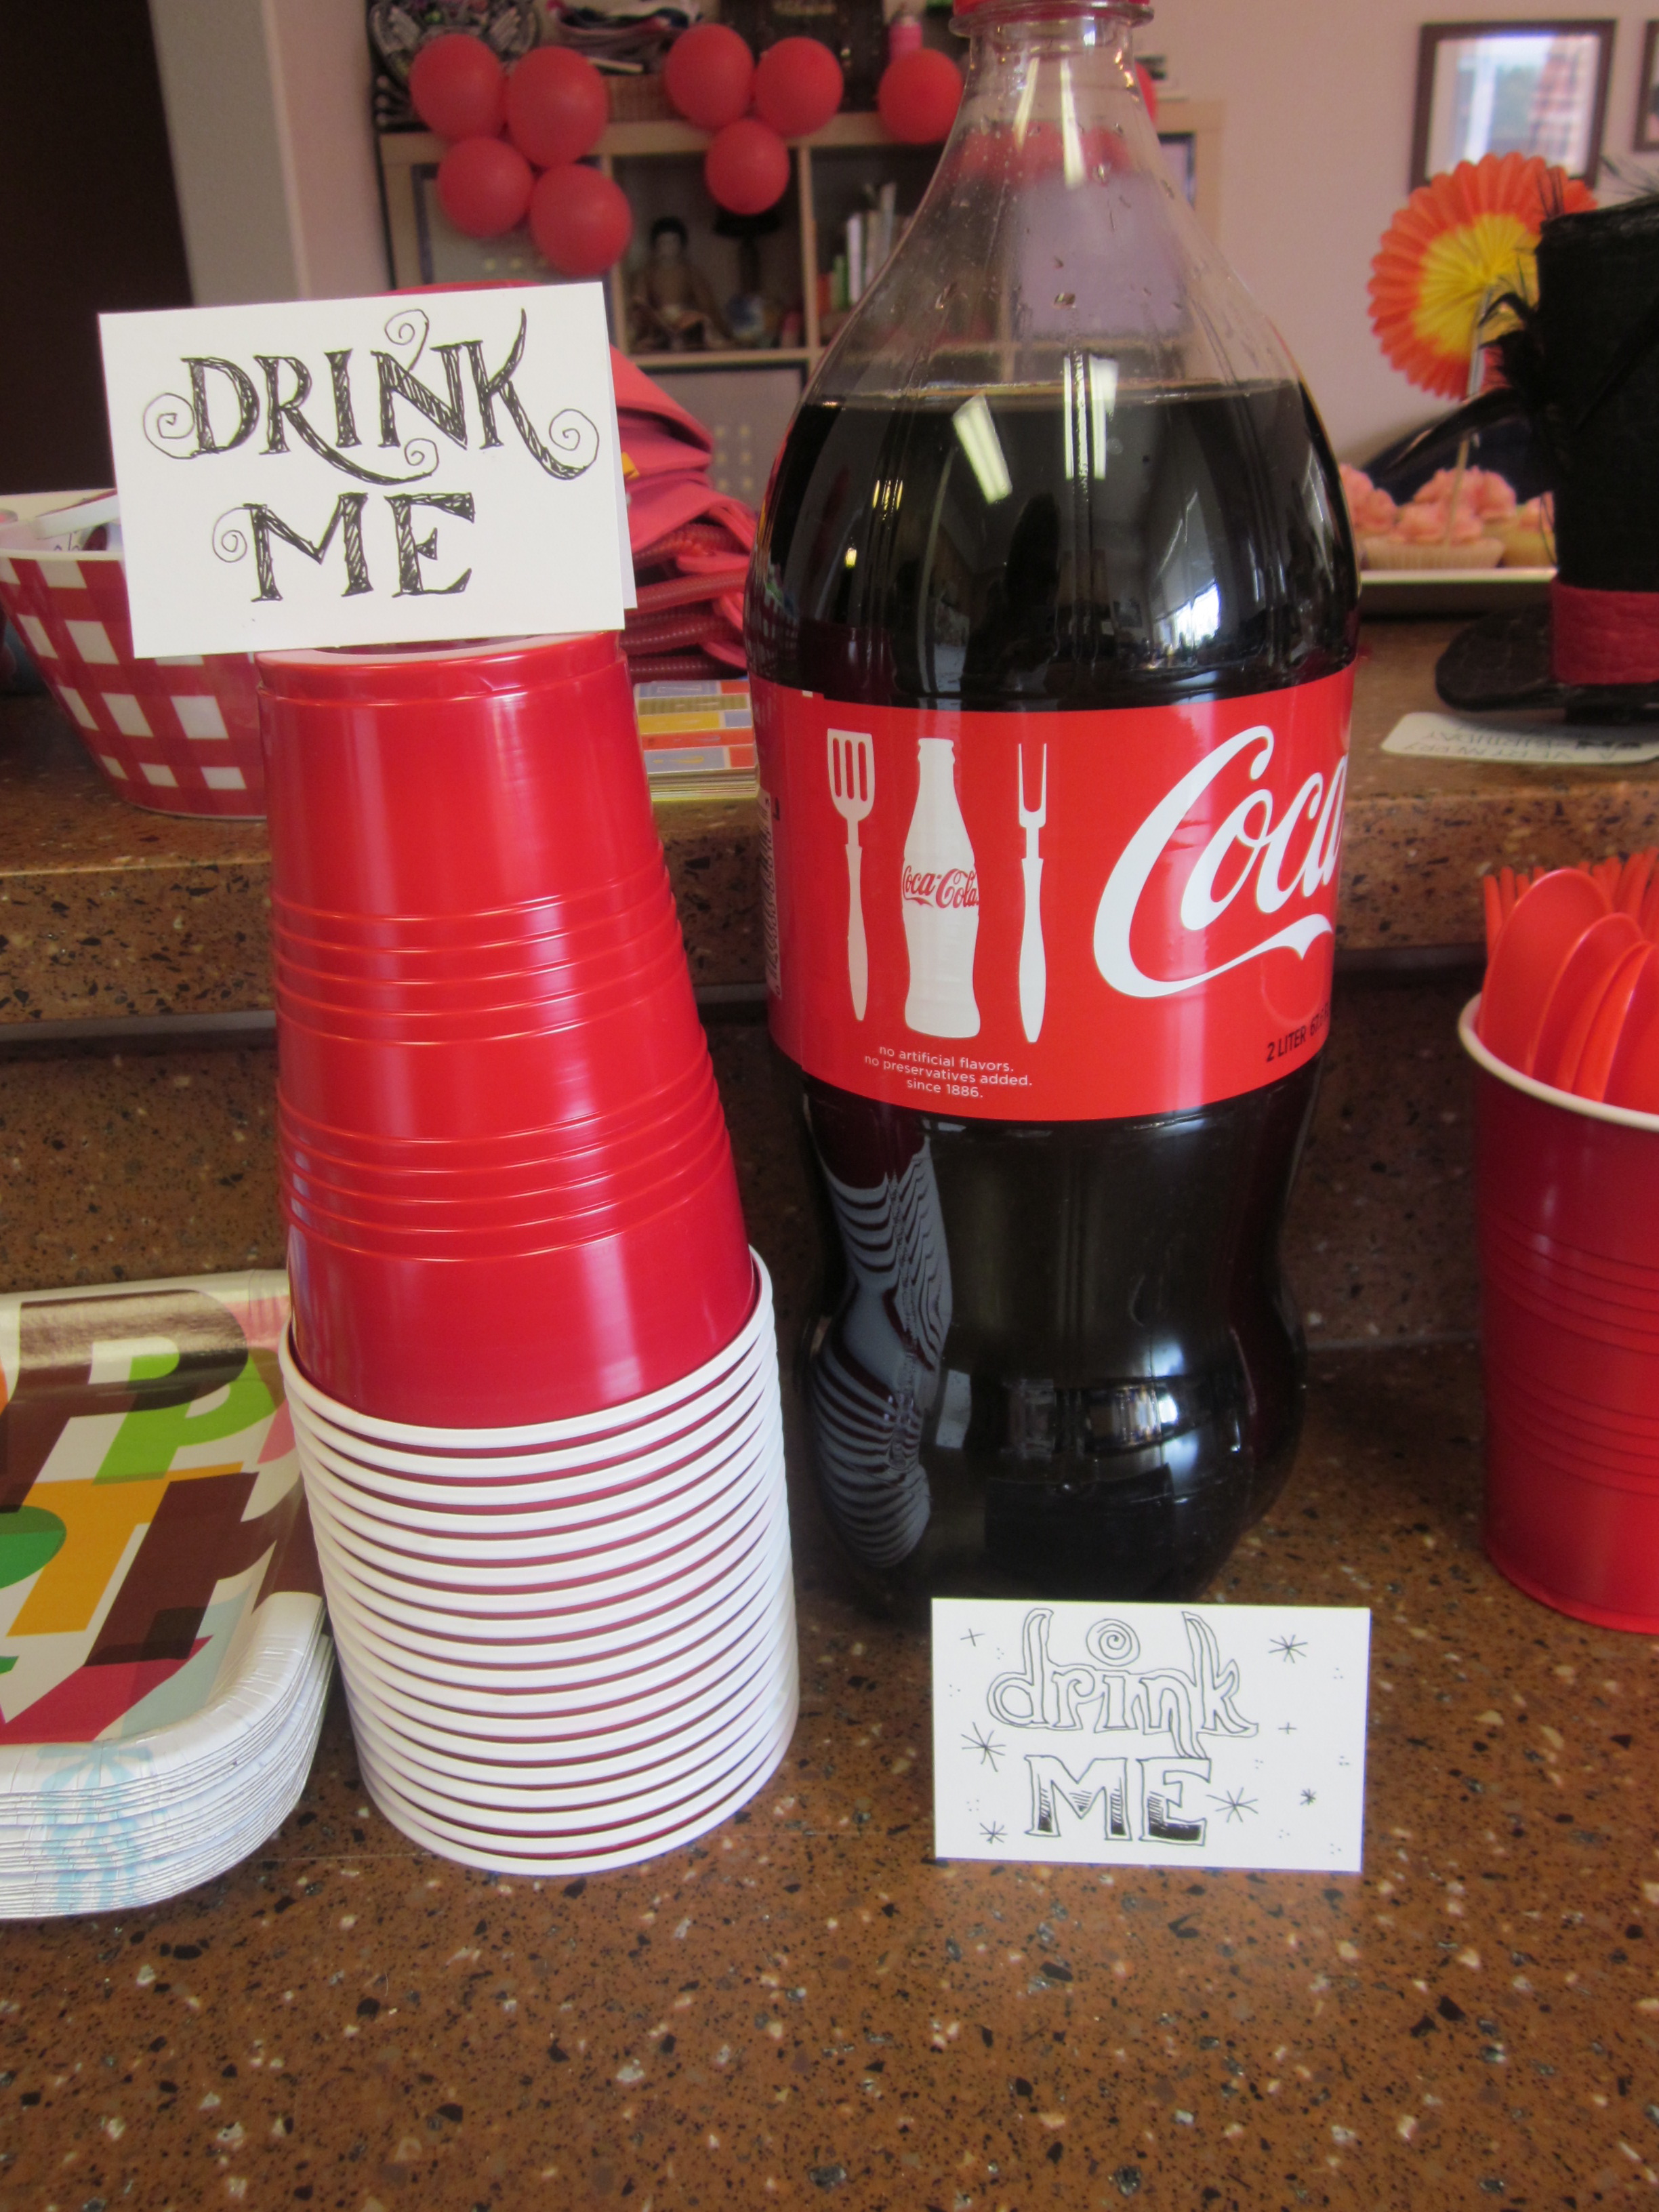
I had little paper signs that said “eat me, ” “drink me,” “we’re all a little mad around here,” and “don’t step on the mome raths.”
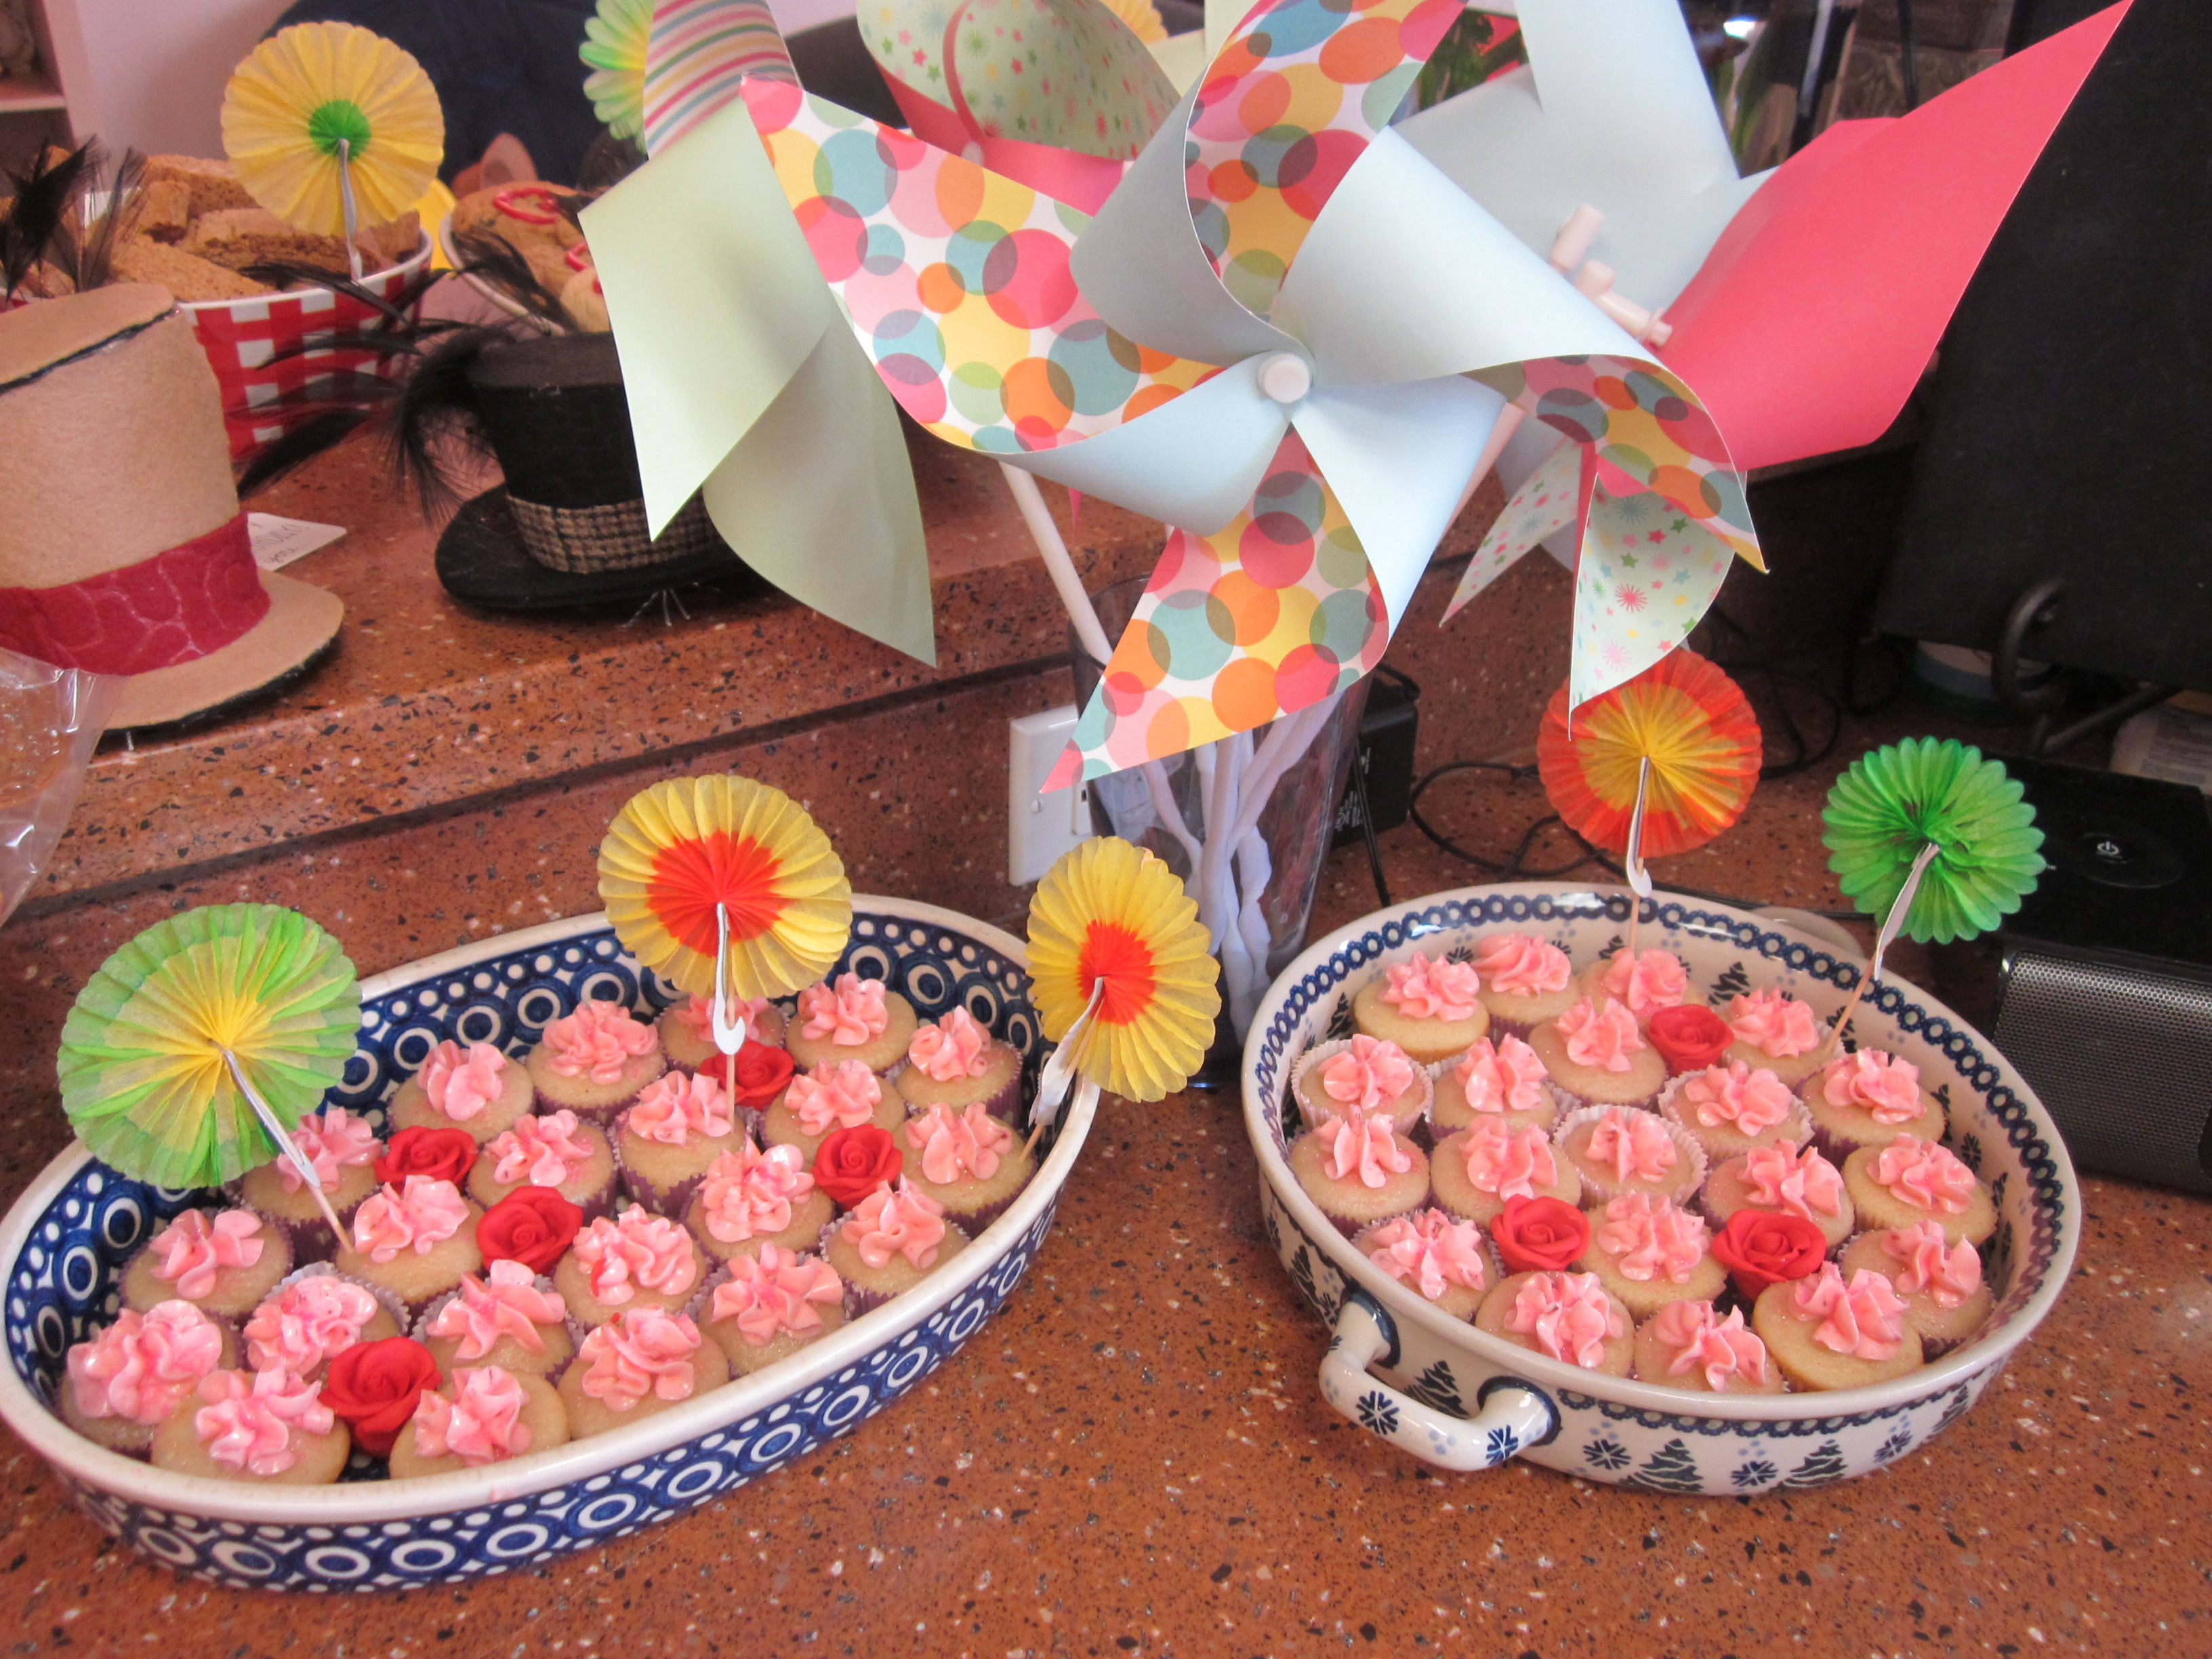
I had splurged a little on a local bakery’s mini-cupcakes, and put store-bought little sugar roses (from the cake decorating section of stores) in them.
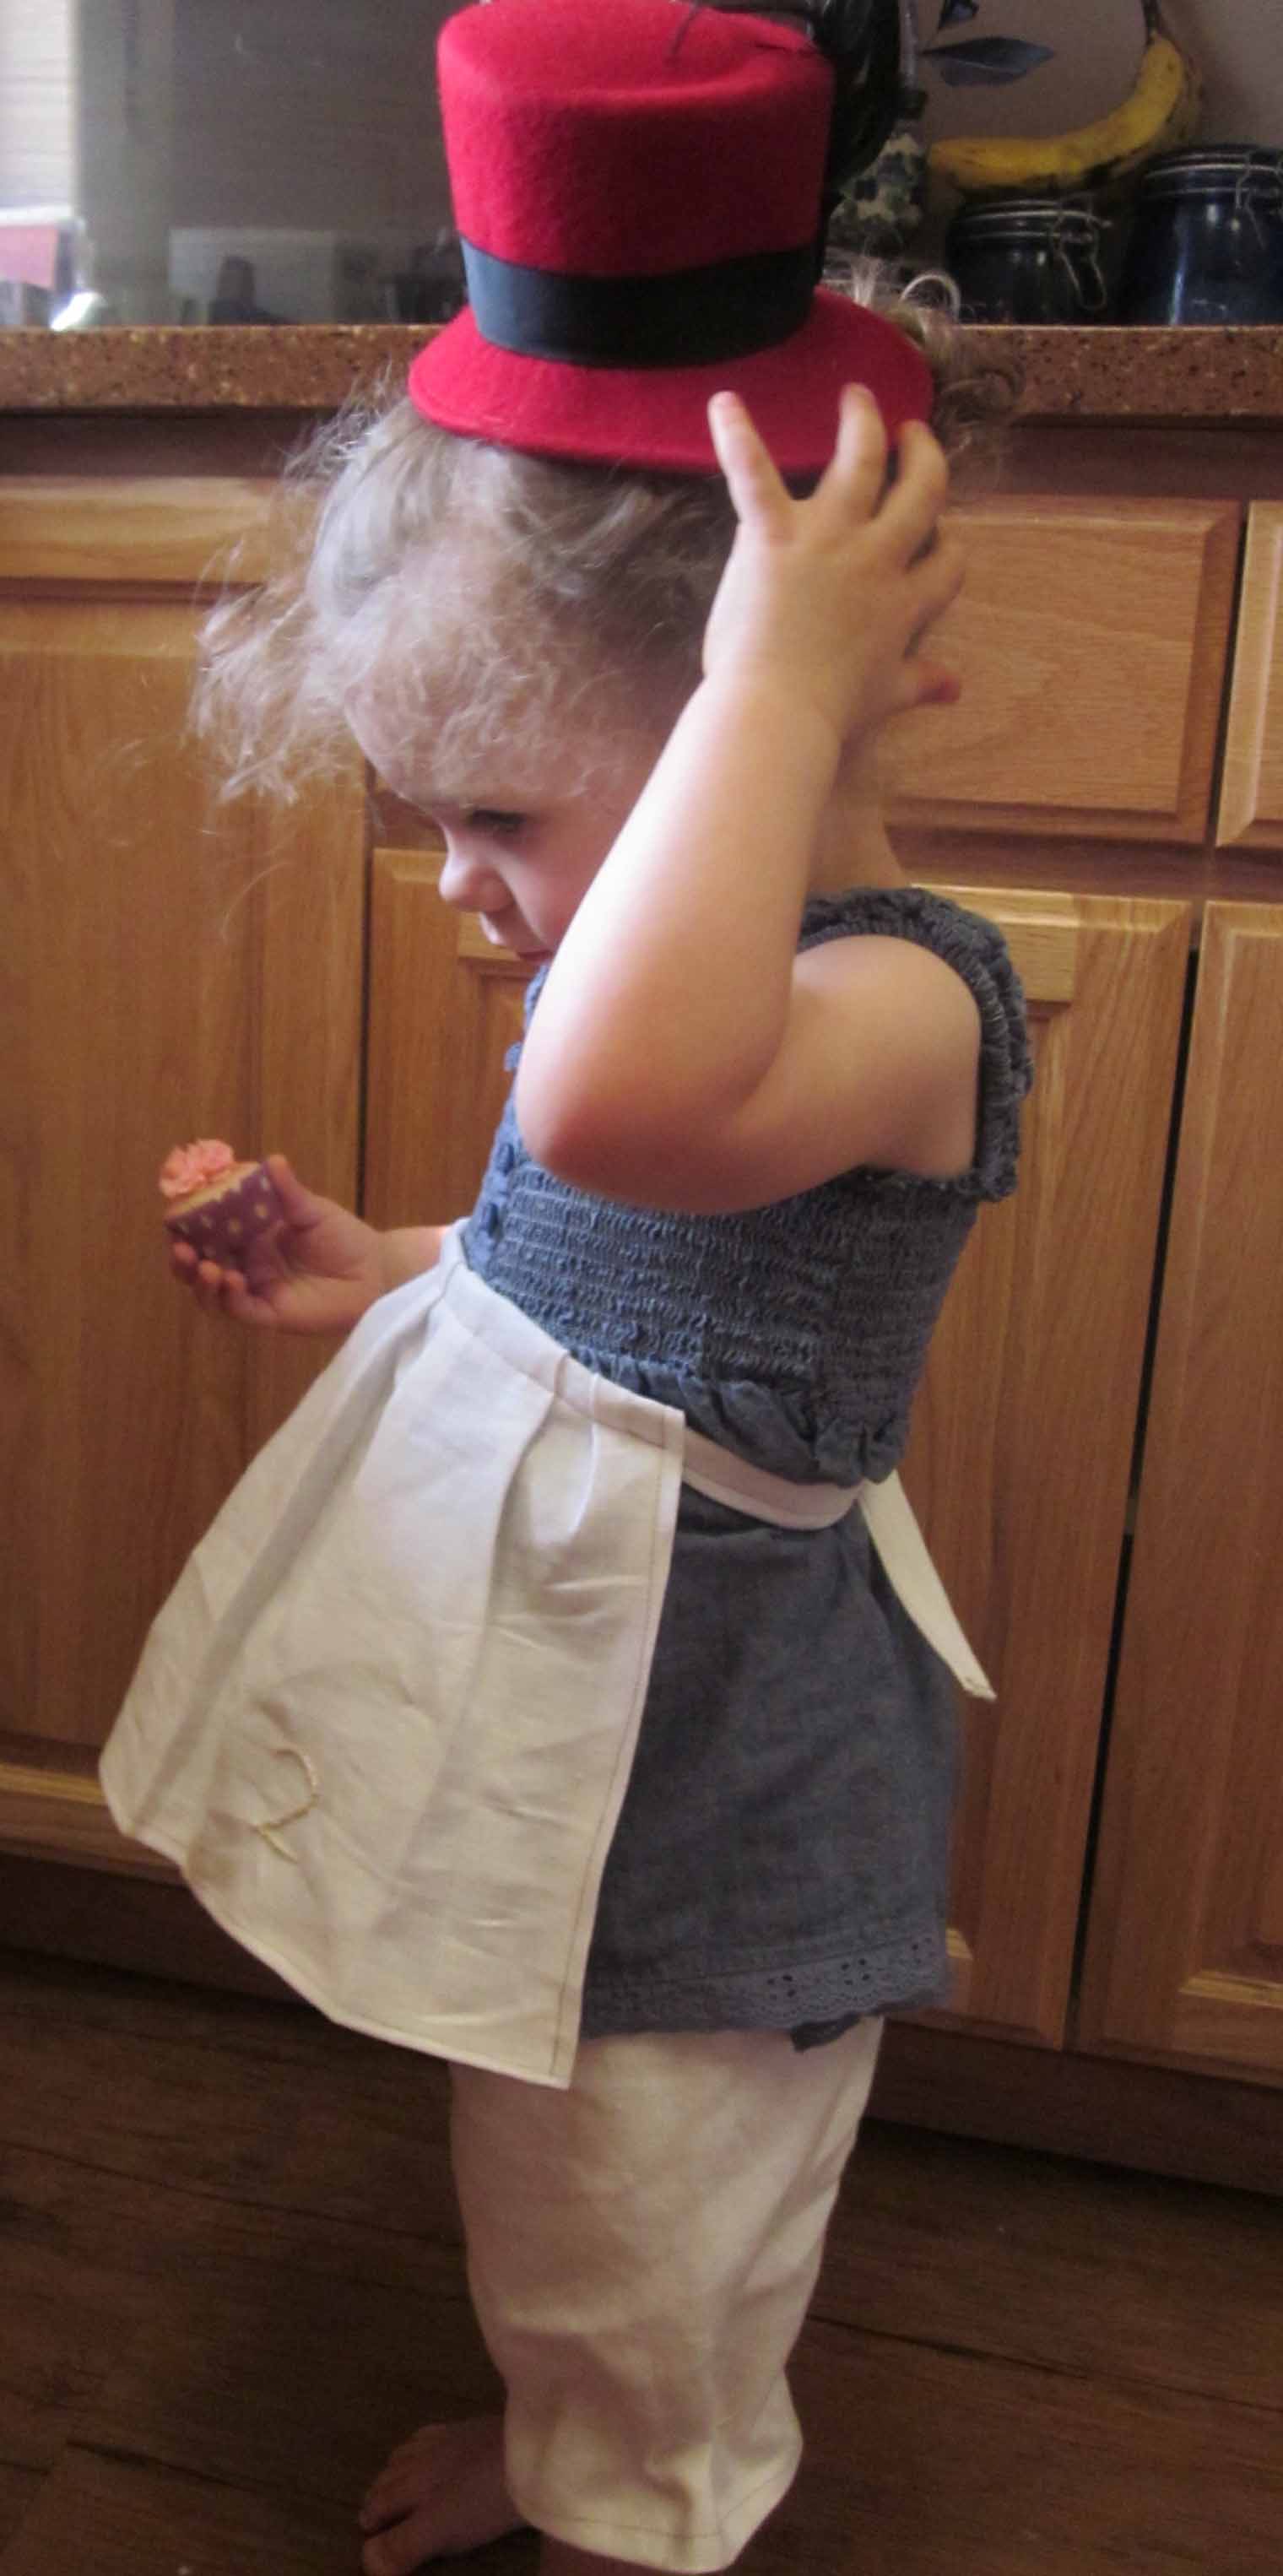
My neighbor, a crafty friend, had helped me sew some little bloomers and an apron for my daughter, to pull of a sort of “Alice” look.
The fancy footwork came with the cake. I had done a full-fondant cake for our daughter’s first birthday (more for me, just to see if I COULD), and didn’t really feel like taking that route again. But I did have my mom’s awesome buttercream recipe, and a ton of food coloring. I even made the cake batter rainbow swirl, as I had seen all over online. Fondant eyes, teeth & nose, 2-layer cake, and boom–the Cheshire Cat. (I even accidentally jacked up the top layer, and calmly just cut it out and drew his ears on the bottom.)

As one of the fun parts of the party, I had a few mini felt top hats for anyone who didn’t come with a hat and didn’t want to feel left out. (Also, they decorated the place nicely.) When I was researching some party ideas early on, I had seen an awesome tutorial online that was super easy and fun to do, and basically used felt and random embellishments.

I hot-glued everything together, and mostly used plain felt sturdied with cardboard (although the pre-made sturdy felt works best). I had seen some hot-glued to headbands before, but I wanted something a little sturdier, so I decided to hot glue the top side of hair clips to the underside of the hats, and it worked REALLY well. It allowed the hat to stay on through the whole party.


They were so fun to decorate and embellish with pennies, feathers, buttons, and whatever else I had lying around, and I even invited some guests to take them home as party favors.

All in all, a “fancy” birthday party that seems like a lot of work, but when done in little steps well in advance, wasn’t so bad at all. I had a great time with friends, the kids had fun, and the best part is I wasn’t stressed at all! Seems silly for a party she’ll never remember, but as I said, during a deployment, sometimes your friends are all you have to help you make things better. I was grateful for everyone that showed up, and I’m pretty sure everyone had fun!
The felt hats were especially fun. Might be a cool kid’s project to make a couple of hats up in advance, and let the kid decorate them…
Another Back-To-School Idea: Custom Clothes!

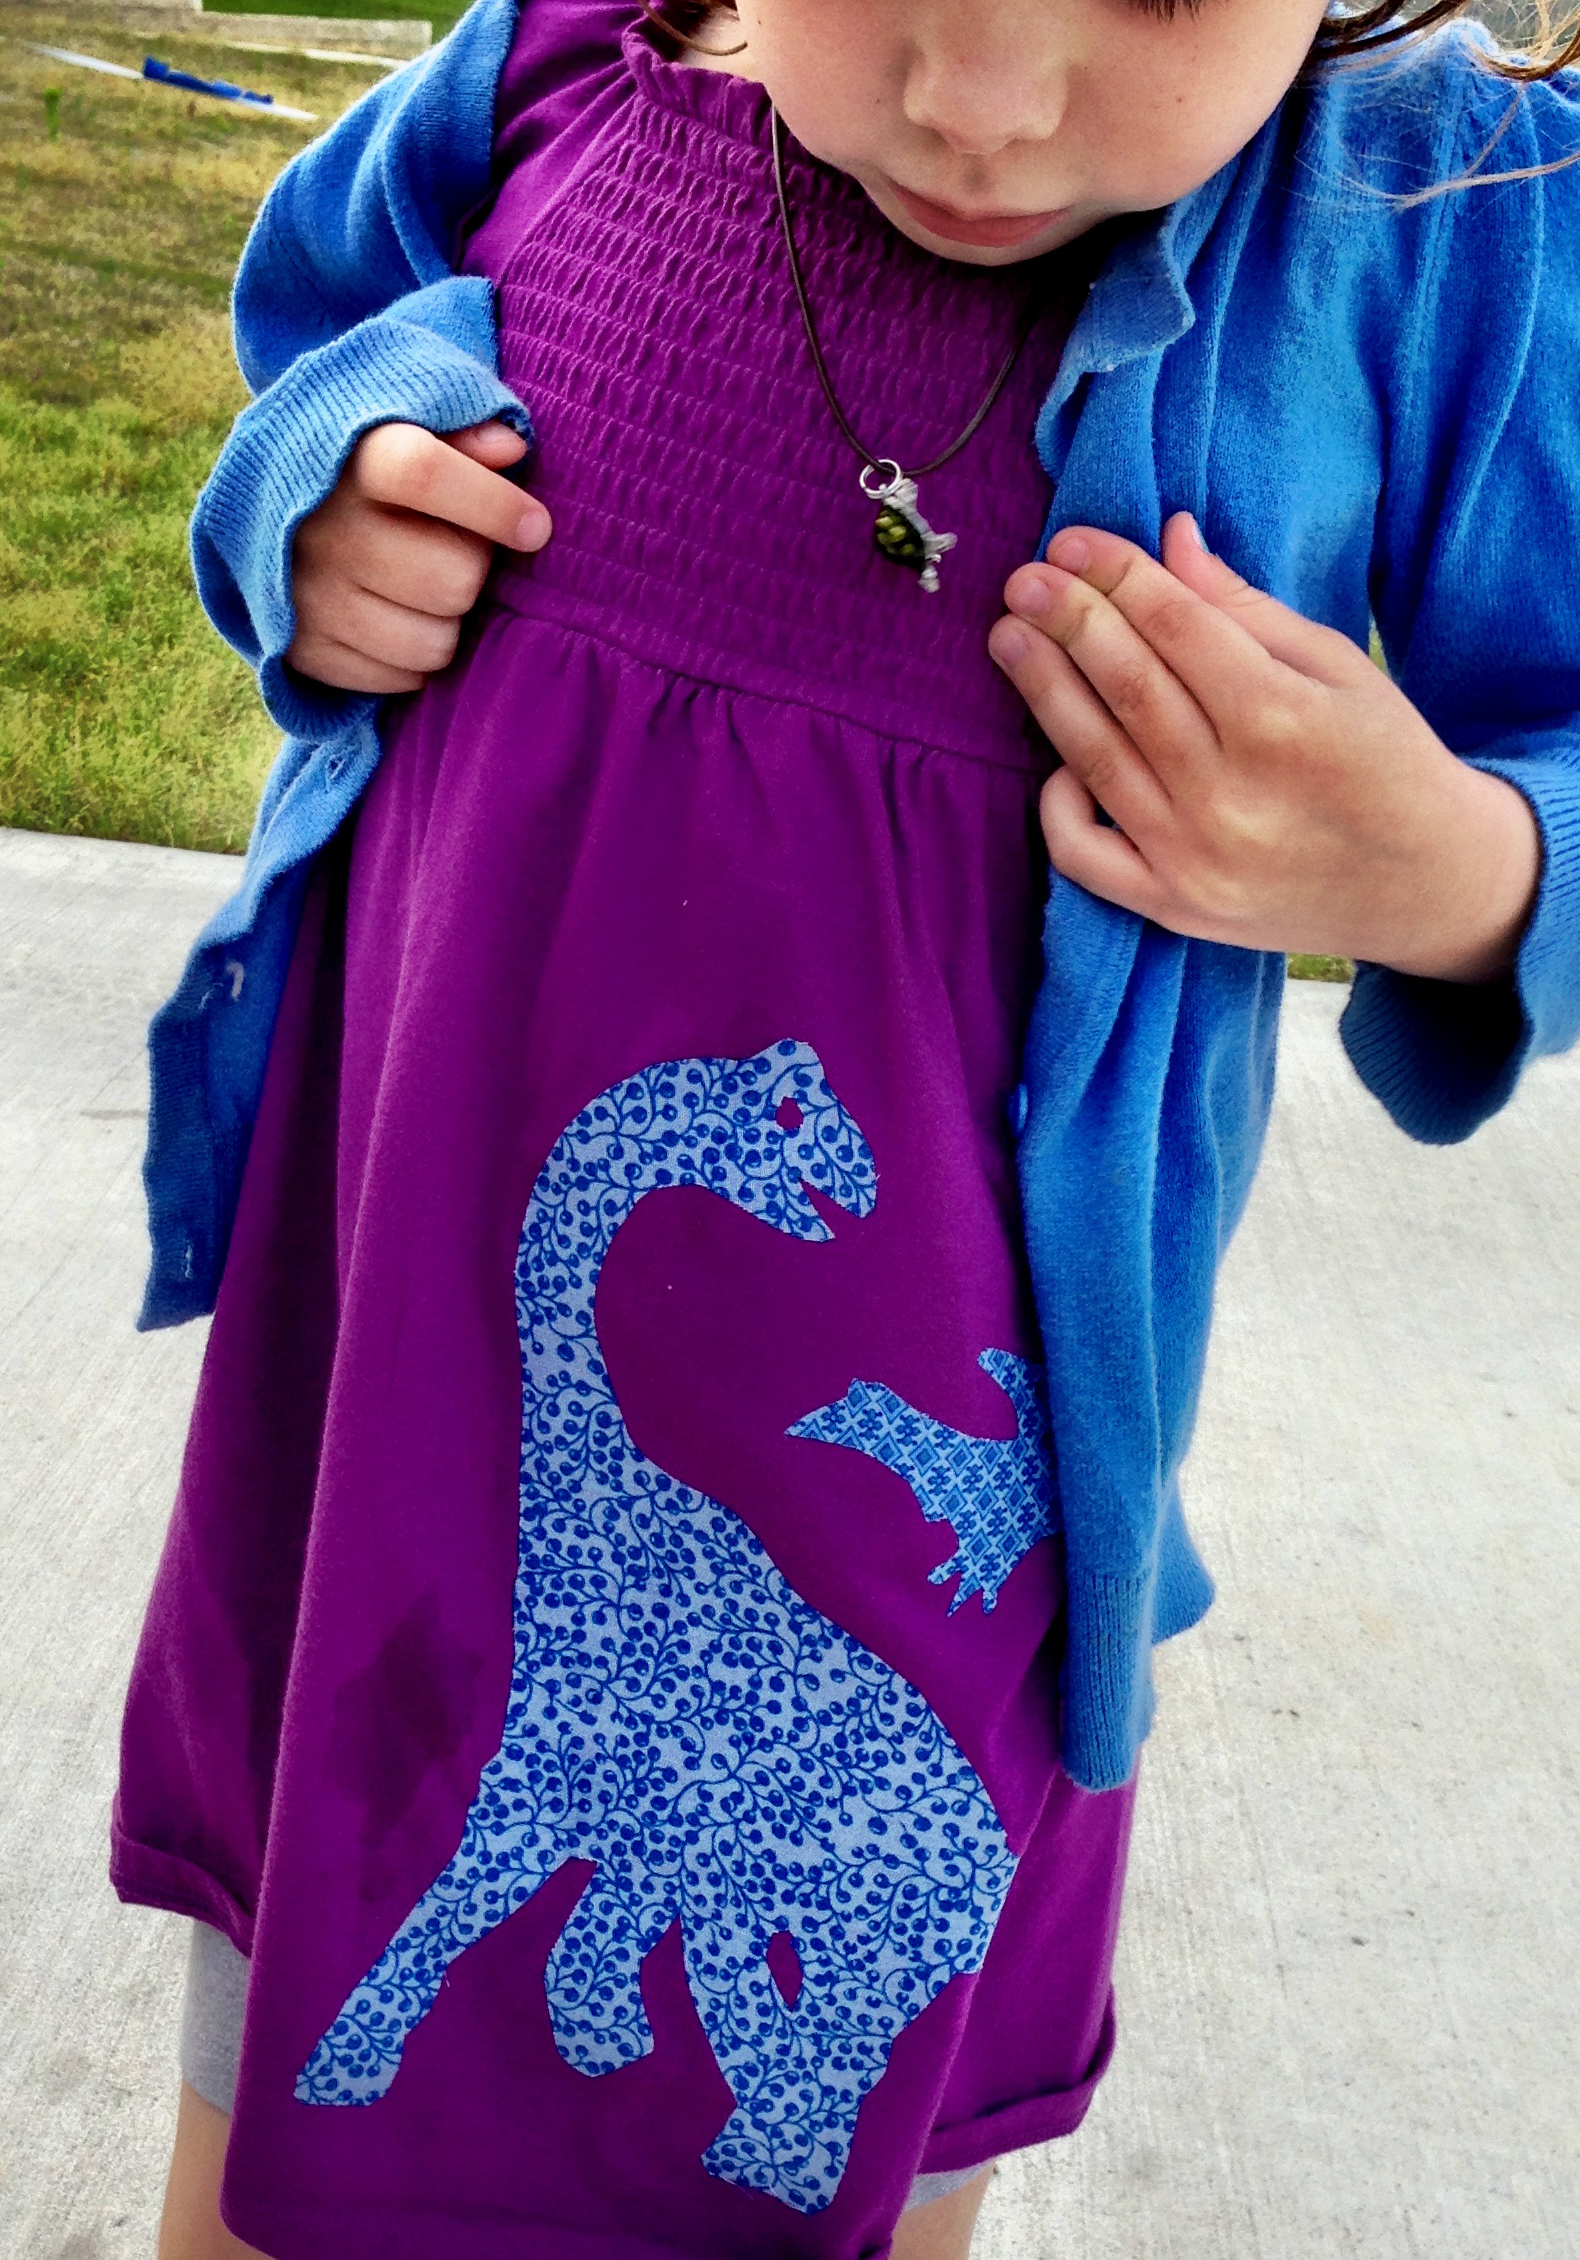
I’m not a big one for character clothes, and sometimes it’s hard finding kids’ clothes that don’t have cutesy sayings all over them. So in getting ready for the first day of school, consider customizing a plain ol’ dress or shirt! You can usually find pretty inexpensive plain clothes any ol’ where, hiding in the kids’ section of WalMart or your local craft store–shirts for around $4 or a little dress shirt (like the purple one above) for around $9.
A tricky, fun tool to have is this fusible, iron-on web. The directions are very easy, written on the back side of the package. Super easy.

Simply stick the web like a sticker to the back side of the fabric you’d like to fuse to your clothing (in the case above, a brachiosaurus and pteranadon my daughter wanted on her dress shirt). Then draw the design on your fabric and cut it out (it’ll have the fusible web stuck to it). Then iron it on your clothing, and BOOM you have a customized piece of clothing of whatever you like!

You could do this for all sorts of things. When I was in roller derby, we’d customize all sorts of things for ourselves. It’s not just for kids! Backpacks, bags, pants. So far, it seems to have held up after several washings, and with living through the wear and tear of a 4-year old. No sewing required, but I’m sure if you wanted to get crafty, you could embellish with beads or embroidery. So have at it! Get creative!
(On a side note, if you want to get your kid involved, I’ve also let ours go crazy on a $4 shirt with some Sharpie markers. Now it’s one of her favorite shirts!)


