Tiny Wands
Sometimes I go through phases, where I furiously draw….or sculpt…or sew. But lately, it’s embroidery, and I’ve been pretty hardcore into embroidery lately (“hardcore embroidery” being a phrase that makes me giggle).
As with any new craft obsession, I jumped in with both feet, full-in, when I first started. I got a couple of little books on stitches, and practiced those. I watched stitch tutorials on YouTube. And then I just sort of “winged” the rest.
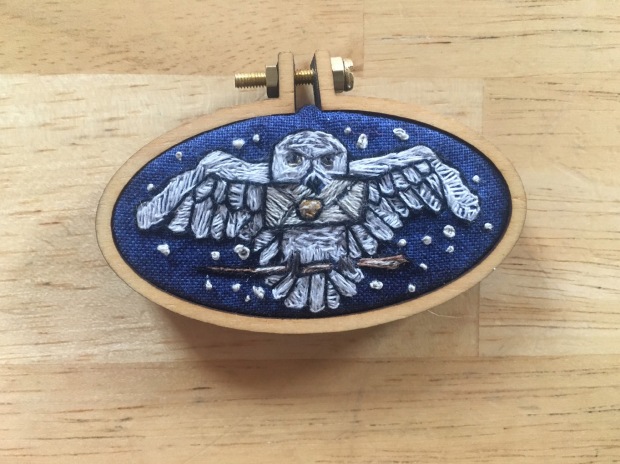
Usually, it’s been these large pieces, based around my parallel obsession with the wizarding world and Harry Potter characters…

But then I discovered tiny embroidery, and have been going at it full-force…

I found these tiny little blank hoops from a site called Dandelyne, and that got the ball rolling. Functional art? I am TOTALLY okay with that.
And since I’d consider myself an intermediate embroiderer, I thought I’d share my wonky setup with you.
It all starts with this totally awesome little travel bag, which I found by chance at our local craft store. I like it because I can quickly shove everything in there and take it with me wherever we go.

It opens up to several little compartments, with places to hold my stitch guidebooks, needles, scissors, thread, and anything else I might need.

WHOAH. Wait, did you get a good look at that? I’ll zoom in for you, in case you somehow overlooked it:

Yep, since I taught myself, I am TERRIBLE at organizing my thread. I tried those long plastic binder pieces above, and they end up tangled. I tried putting them on the little keychain tabs, and they end up tangled. And often, as I’m working with a particular color, I just end up shoving it in this little zippered pouch, tangled for all eternity.
Finally, I’ve tried this other method, which is a little binder:

And I think it seems to work the best? Maybe? I haven’t found an easy way to separate the strands (the embroidery thread I buy comes in strands made up of 6 strings, and since I am sewing tiny things, I often only want to use one string, for detail. So when I’m getting ready to start a new project, I painstakingly separate them (with a mild amount of swearing) and shove them into little pouches in this strand binder I found in the embroidery section of our local craft store. That’s the best I can do.
(Do you know an easy way around this? Should I be embroidering with special thread instead of embroidery floss? This can’t be the best way of doing things, I’m sure…)
Anyway, as for tools, that little travel case is awesome, because I can carry all the goods: a leather thimble for tough fabric, little beads (since I often like to add texture), a seam ripper, and a few little books on simple stitches (believe it or not, they come in handy quite often).
 I just discovered this little blue fabric marker that I can draw with, and when I want my lines gone, I just wet it, and it disappears! So cool (unless you’re making small sketch corrections, as it’ll take forever to dry the fabric so you can draw over it again). Another useful tool is next to it, in the photo above: a little metal threader, for threading problems. I have trouble threading metallic threads (they’re very wobbly and they fray), and that tool’s saved me from throwing my project across the room in anger more than once.
I show you this wonky setup to demonstrate that I don’t really know what I’m doing. Meaning, I’m not some super experienced expert who’s been doing this for ages and has all the answers. I’m learning, and there is always more to learn. If you’re into something, you can learn a bit about it, and jump in, like I did.
The world’s at your fingertips–literally, on the device from which you’re reading this! Look up some videos about the hobby you’re interested in–it doesn’t have to be embroidery, it could be ANYthing. Check out some hashtags and see what other people are doing. I’m pretty willing to bet you can do it too, or that it might inspire you to do something similar in your own way.

When I asked Myla what she’d want on one, she immediately requested Fiona and Cake, from Adventure Time (our current favorite show).
And if you try it, and you’ve given it your best, and it’s just not working out, don’t consider it a loss; it might just not be your time! I can’t tell you how many times I’ve tried needlefelting with disastrous results. Doesn’t mean I’ll never try it again, it’s just not my thing right now, and that’s okay. Maybe some day I’ll get it, maybe some day I won’t. But I TRIED.
I’ve actually wondered why this embroidery is such a thing for me right now. I sometimes find myself FURIOUSLY “IN” to something. Sometimes it doesn’t last long. I do it til I just don’t feel like doing it anymore. Right now, this is what I feel like doing. I’ve tried drawing recently, and it doesn’t come out right, which happens sometimes, and is a sign that my brain doesn’t WANT to do that right now. Right now, it wants to poke things with a tiny magic wand, and that’s okay.

You’ve got to follow whatever you’re into–it helps you get through things. For me, I think it comes from a tendency to want to control some very out-of-control situations we’ve been going through. I might not be able to control what’s going on in our lives, but I can control this little tiny space, and that’s okay, too.

I’ve been asked if I’d sell them, and I’ve decided I will, but I’m going to just sew what I like. I wish I was the type of person who could do the same design again and again, or that thrived on custom orders, but I’m just not. I can handle it a bit, and sometimes I really can do it. But with these, it just feels good to do what I like, and let the chips fall where they may.
So that’s where I am at the moment…holding a tiny wand with my head down, furiously stabbing a little piece of fabric, unable to control the world, but trying my best to manage this tiny space. Sure, it’s a little obsessive. Sure, it’d be more productive if my obsession involved housekeeping or making lucrative stock picks or something useful.
But it’s been making me feel better, and that’s definitely okay. ❤

We Made A Backpack
Last year, at the end of first grade, Myla told me “I have an idea for a backpack.” She drew out a doodle that sort of looked like Yoda hanging on Luke’s back, but with her own little character she created: an arctic fox in an orange sweater.
(I drew it on a napkin in her lunch once:)

Since I have no magic skills in patternmaking on my own, I found a beautiful little backpack pattern from a website called Birch that was functional, not too complicated, and adaptable to the idea Myla had. (The free tutorial I used & altered a bit is HERE.)

Then I gathered supplies at the craft store. The idea of a WHITE backpack–especially for a kid–is daunting, but thankfully Myla gave me some artistic leeway by at least letting me choose fabric with pattern–a thicker canvas with stripes, and another with zigzags. I had some orange fabric in my own stash, and purchased everything else I needed on the pattern’s supply list. I bought extra, because I decided to add a little extra to the measurements to make it larger all over (it’s perfect for a smaller kid, but I needed to really make sure I could fit her school folder and her lunchbox in there).
The cool thing about this pattern was that it closes & opens with velcro with an elastic bunched opening under the flap–no crazy buckles or zippers to deal with, and even an intermediate amateur like myself was able to figure out the elastic situation pretty easily.

The tutorial itself was very easy to follow (like I said, I’m no pro) and I made little tweaks as we went along. She chose the inside liner herself, which was a brown pine cone pattern…
And BOOM here it is! She wanted to be sure there was a little white fur tail at the bottom (which lines right up with her pants, making it look like SHE has a tail, which is fun). I added a face & ears to the flap (she initially wanted the flap to be the face but cut to a point like an animal nose, but we met halfway, so it could be functional). Admittedly, I got a little confused with the strap situation, but it’s probably because I was trying to alter the straps a bit to make part of them look like paws, lying over her shoulders.

She drew the little body on the back in pen, and I painted it with acrylic paints. One reader thankfully suggested sealing it in Scotchgard, which was a VERY good idea, so it’ll hopefully protect it a bit from dirt and stains for as long as possible.

Sometimes people think working together is some sort of ethereal, magical situation, but it does take some patience that I don’t always possess. I got pretty crabby near the end of this one, because she was trying to explain the arm situation and I wasn’t understanding what she was wanting, but we finally worked it out, and overall it turned out to be another good collaboration!
I may not always be rosy and cheery working through some ideas, but I always consider it a fun challenge when she has an idea she wants to make. I’m working on teaching her a little bit of sewing here and there so that one day she might make things herself, but at this age, she doesn’t always have the attention span for it, and I don’t always have the patience. So we start of sharing for a bit, then she runs off and does projects nearby, while I work at my art desk. But at least she can say she was part of building it!
So, yeah. BOOM. We made a backpack. Yay!
Stitched
One thing I’ve ALWAYS enjoyed is the fine line between hard and soft, aggressive and sweet, monstrous and dainty.
A long time ago, in a blog post far, far away, I wrote about playing with sewing my paintings, and my embroidery inspirations…

I’m pretty inexperienced with embroidery, but I loved creating with thread. I loved the feel of mixed textures on paintings, as well… I got a little book on different types of stitches and just played around with them…


And even tried painting on canvas fabric and hand-sewing on top of it. I was able to keep some of the detail of painting that I couldn’t get (or didn’t have the patience to get) with embroidery.


And then a reader asked if I had tried machine stitching. And I hadn’t! So I immediately gave that a try. And OH what fun!
I think the first one I did was the Galdalf below–I loved the idea of working various stitches on my machine into his beardwork. So much fun. I started adding it to the backgrounds and into parts of peoples’ hair…

I even used it, in some cases, to represent part of a character’s story–like the battle-scarred Hound and Tyrion Lannister from Game of Thrones, below.

I can’t get enough of stitching everything now! I love the variations of texture. I still love hand-embroidering, especially when I can add the little beads and things. Have you tried experimenting with a new medium?
Monster Kittens

In my ongoing experiments with sculpting, molding, and resin casting (like this one), I wanted to try out a more functional use for resin casts….Could I maybe make some kind of doll with a resin-cast face?
After a few rough sketches, I got some Sculpey out on an index card, pushed marbles in for eyes, and played around to see what I could come up with. Of course, since Myla loves to be involved, I let her have a lump, with which she made the little figure on the top left, and I came up with these two monster faces on the right (people on Instagram said they looked like monster kittens):

I still have some tricky times with molding and casting, and have wasted more than my fair share of molding rubber and resin…So I let Myla have a few of the wonky ones to paint herself…

And I added some color to a few molds that actually came out well…

(Initially, I put resin on the mouth and eyes for a “wet” look, and only sealed the faces with varnish, but later ended up sealing the whole face in ModPodge Dimensional Magic for better wear & tear).

Aside from painting them, the most fun part was trying to figure out what sort of fabric to use. So many options that completely change the look of each face! And I just used scraps of things I had in my fabric bins, including fun fur, industrial felt, mismatched fabrics, and excess pieces of a patchwork quilt I once made.
I learned from talking to other artists (have I mentioned how much I love Instagram??) that the best way to affix the heads to the fabric is to use E600, and put them under a heavy object overnight. Granted, they smell like chemical warfare afterwards, but if you let them air out awhile, the smell eventually goes away.
The first creature I made was a basic doll-shape:

…And Myla loved him.
Then I made a body for the one she painted herself:
…And Myla loved him.
I tried a more “pillow-like” one, with octopus-legs…

…And Myla wasn’t crazy about that one. (Don’t worry–it’s found a good home at my friend Corrie’s house.)
I did what Myla describes as a flying fish-fairy:

And a sort of dragonfly-dragon:

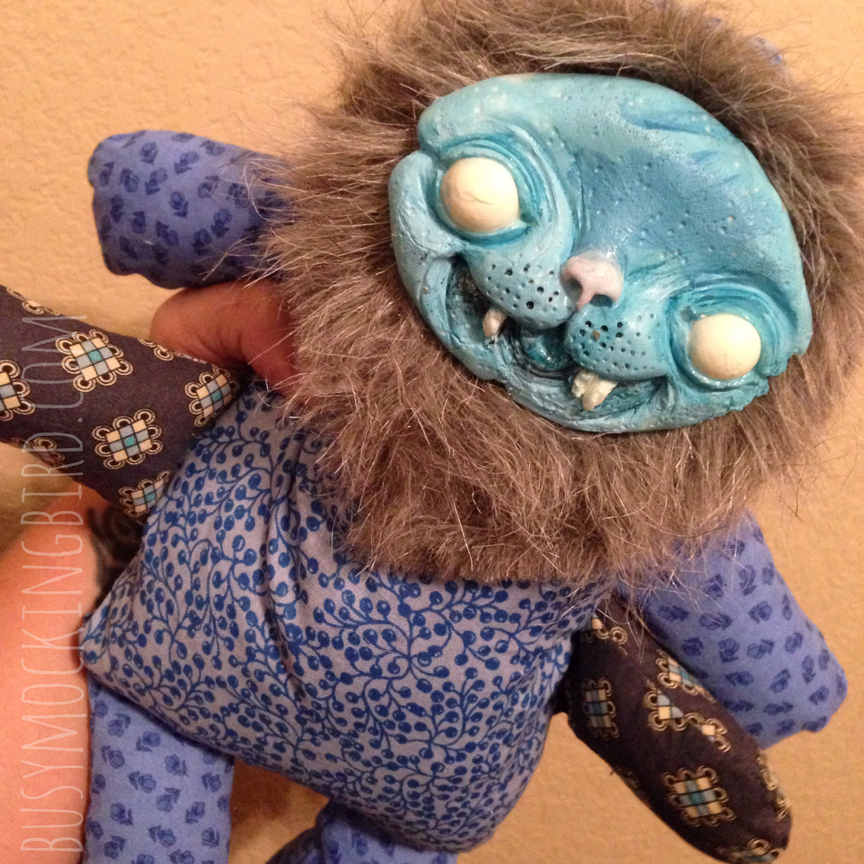
But by far, my favorite was when I tried something completely different, and made a more 3-dimensional body, with three little legs on each side.
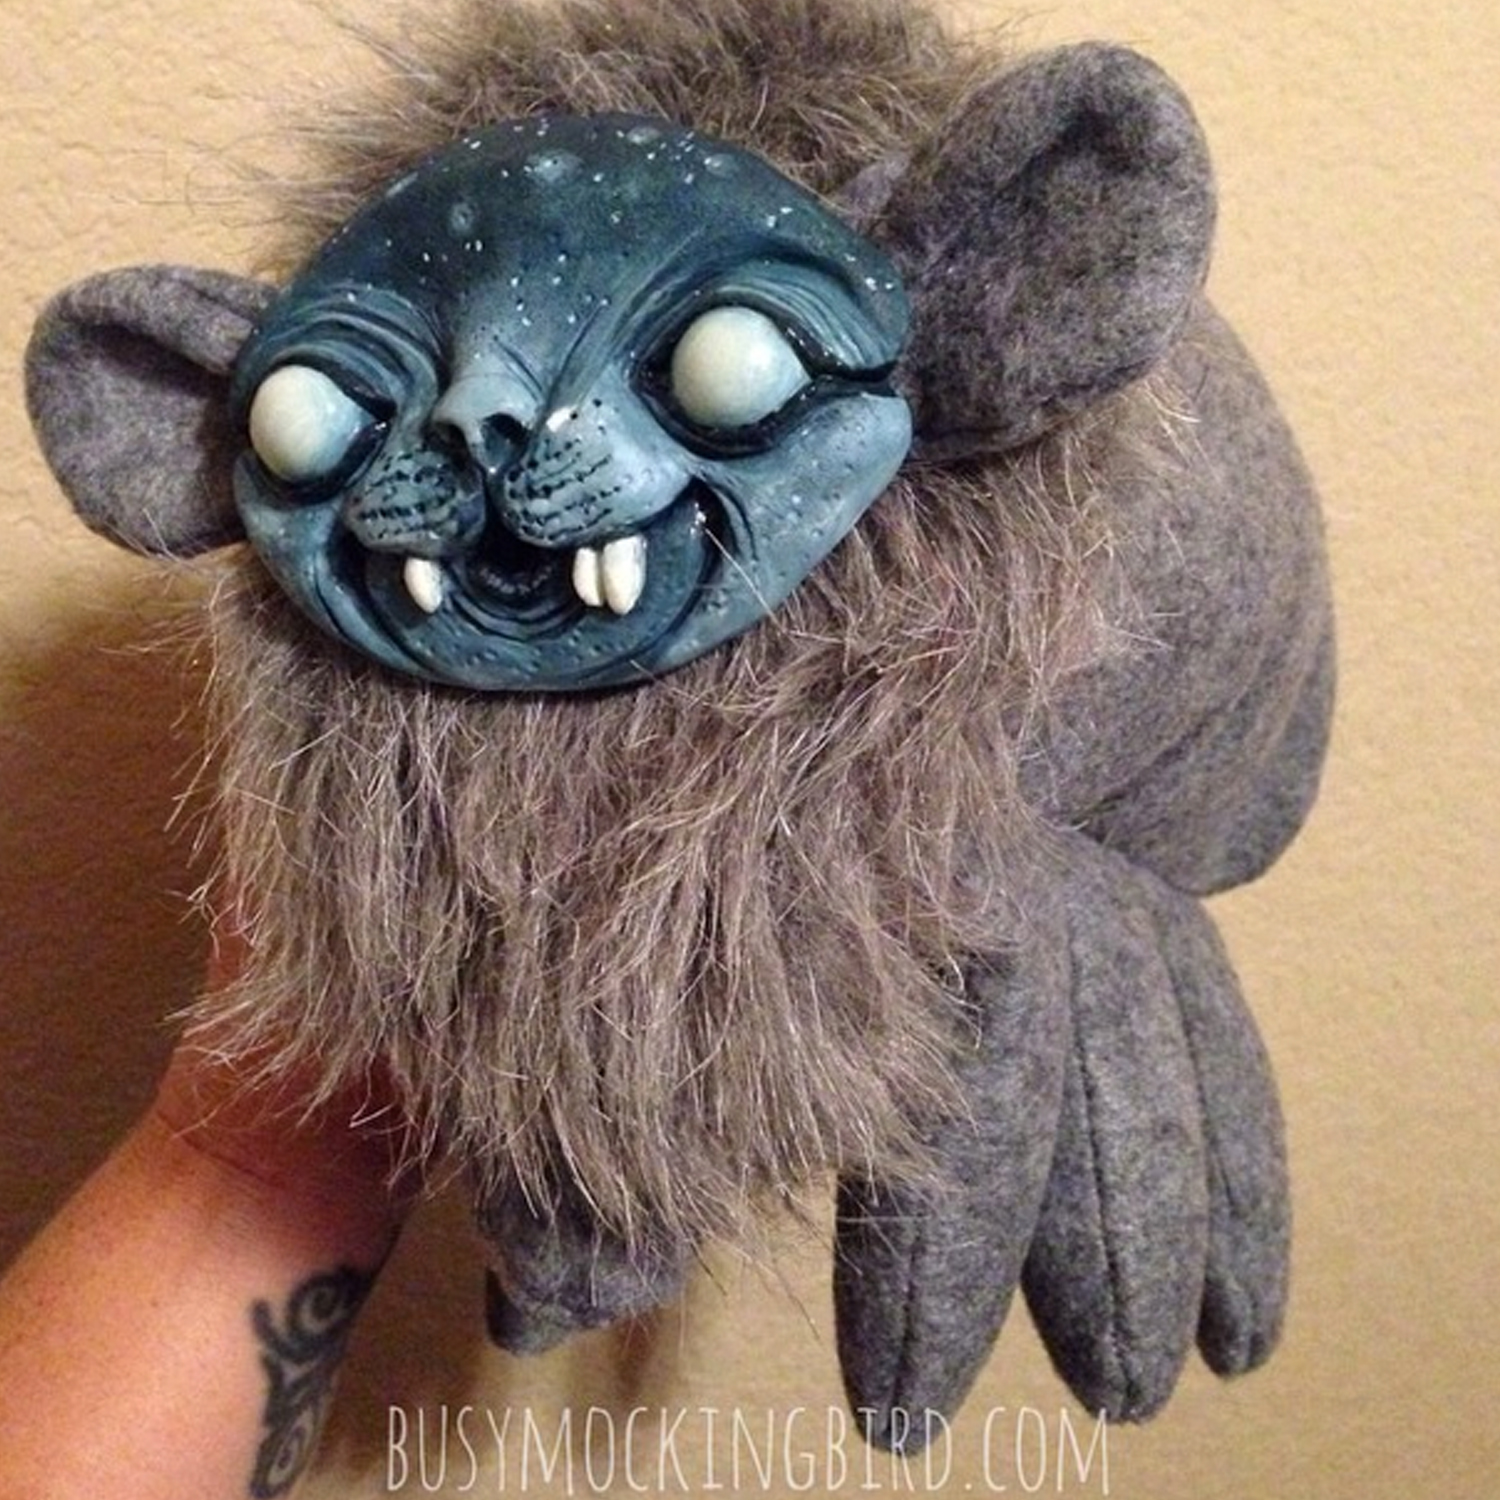

It was my first time making one that wasn’t just a flat front & back without using a pattern, so it’s a little wonky, but I quite like it.
Annnnnd, of course, Myla loved it. She calls her “Midnight” and carries her everywhere lately. I realize these things are not necessarily made to be ‘toys” (how much they hold up to the wear & tear of kid life is still being determined), but she treats her dolls pretty well, so why not?
Thankfully, the horrendous glue smell has gone away. And after repairing her chipped little resin face a couple of times, I think a good coat of the ModPodge stuff has really helped keep her shiny & new.
It’s a funny thing, though, when she takes her little monster places. Other little girls will look at Myla and smile sweetly, and Myla will smile back…then they’ll look down at her fuzzy little monster, and their face will inevitably change to a mortified “what the HECK??” When she takes Midnight anywhere, the comments she gets stem from either complete disgust, or absolute fascination. And when people ask where she got such a doll, she says, with her sweet little 5-year old voice, “my mom sculpt it and cast it in wesin.”
Listen, I know we like weird things. And I know most people won’t “get” the same things we’re into. So we could teach her to either hide what she likes to be “normal,” or take it as an opportunity to share our weirdness with someone else.
We teach her that when someone doesn’t like something, or doesn’t “get” it (like maybe her references to characters she has heard stories of and loves, like Gamora and Groot, or Storm, or Star Wars), it might be because they just don’t UNDERSTAND it, or haven’t heard about them….but that it doesn’t make it wrong. It might just mean that they don’t know, which would be a good chance to teach them something new. People don’t always like the same things, but they shouldn’t try to make someone else feel bad for liking what they like. And no matter what, you should never EVER feel bad or ashamed for liking what you like, no matter how weird, as long as you’re not hurting anyone else. If they don’t like it, that’s okay–that’s their business.
So far, she’s done pretty well with that, thankfully. She doesn’t go out LOOKING for a conflict, but so far, she handles it with grace when she does.
On a side note, people have asked if I sell these, and so far, there are many reasons I haven’t. I quite like doing them just for fun, and as much as I’d love to share them, the thought of doing them to order is quite intimidating! (Not to mention, the effort that goes into sculpting, molding, casting, painting, and sewing might be worth a bit more than people are willing to consider.)
I have trouble with that–the thought of custom work and getting rid of the things I make. It really is daunting. I worry that it might lose it’s “fun” or its spontaneity. Also, I’m not sure how well they’ll hold up. Maybe one day, when things aren’t so busy, and I’ve got this whole resin-casting thing down pat/ Maybe I’ll make a few and put them up in a shop as-is. (I keep saying I’m going to do that….)
Until then, have any of you tried resin casting? Have you tried making dolls from them? I’d love to see your creations and hear from you about your resin-adventures!
Quick! I Need a Crafty Gift!
It happens. I understand. Things get hectic, and you inevitably forget someone on your gift list. And the teachers! What about the teachers?!? Well, I have a habit of making many of my gifts myself (when time permits), and have learned a few pointers that will help you give them a personal touch, even if time is running out.
1. Something Wooden. In any craft store or section, there’s usually a decent selection of random wooden things. Grab a sharpie, get to doodling, then spray it with gloss varnish to set it.

If you’ve got a little more time, you can paint it in a little more detail with acrylics, or decoupage some little graphics onto it. Doodle some final touches with a permanent marker or paint pens, and you’re good to go!

2. Personalize Some Clothing. Inexpensive shirt + permanent marker and a little heat-setting=cute little something for someone.
Got a new baby in town that you need a creative gift for? Give your kid free reign with some permanent markers (hey–be careful with those!) on a package of plain onesies and it makes a cute (and wearable) keepsake. (These are ones our daughter did for her new baby cousin.)


You could also personalize it with some iron-on transfers or shapes you made yourself…(I did a blog post about it ages ago).

3. Embroidery Hoop T-shirt Art. SUPER easy. Take some favorite old “retired” t-shirts, cut ’em up, and stretch them across some embroidery hoops to hang on the wall. Voila! Fancy wall art!

4. Cup Cozy. With some iron-on appliques or your own brand of embroidery work, a quick little cup cozy is a nice touch around the office (at least, I hope my manager thinks so). They even have pre-made base parts in some crafty places. Wrap it around a reuseable coffee cup with a button hook or velcro, and toss in a gift card, or a few packets of tea.

5. Shrinky Jewelry. A good gift for a loved one. We love shrinky art. But what do you do with all those wonderful little doodles? You can make these doodle chimes. Or drill some tiny holes in them and hook them up to a ready-made charm bracelet.

6. A Quick Little Doll. I’m not sure, but most kids like dolls, don’t they? Mine does. If you’re skilled with the sewing of things, a quick little doll can be made with a little bit of fabric and some easy shapes. I made this little brachiosaurus in just a couple of hours. I probably wouldn’t turn to me if I needed help with the basics of sewing, but if you can handle your own, this is a quick & easy gift to make that kids should like.

7. Drill a Hole in a Dinosaur. Okay, I found this on Pinterest somewhere. I got an inexpensive little plastic dinosaur toy & used my Dremel tool to cut his back out, filled him with dirt and put a little mint plant inside. Easy peasy!

8. Turn a Watch into a Locket. Got a little more time? Find a used watch or order a cute crafty-looking one. Take the back apart (just go with it–I had to experiment myself) and replace all the guts with a cute little photo of your intended person’s family, pet, or special something-or-other.

9. Something Edible. If baking’s your thing, you could make all kinds of fantastic, wonderful, edible things. I’m not so good at that sort of thing, but I know an edible thing is nearly always appreciated (as long as you’re aware of someone’s possible allergies or food restrictions). This is an owl cake I made for our daughter’s 3rd birthday. Okay, I’m not suggesting you make someone a full-on CAKE, but if baking is your thing, I’m sure you already have ALL sorts of wonderful, edible ideas. We made cookies for the local firefighters, and they were so happy to have us stop by, that they didn’t even notice (or care) that I pretty much stink at making decent cookies.

10. Fill Up A Cup. This is an easy go-to I like to do for teachers or friends. Find a cute cup (OH! Look! This one happens to be from the shop of our collaboration doodles! Um. Yeah, a lot of people might be seeing those for Christmas this year…). Anyway, fill up the cup with a handful of chocolate kisses or candies, a pen and a notepad, and show your teacher how much you appreciate them!

So there you have it! Just a few little easy ideas for some last-minute gifts. I hope it helps if you’re in a pinch. I know most of my friends and family have personally already seen half the things on this list, or gotten them as gifts already. If not….well….Keep an eye out, you’ll probably see them THIS year, too. Not because I waited til the last minute….but BECAUSE I CARE! 🙂
And since I’ll be out of the loop and full of all kinds of good cheer next week, here’s wishing you all happy holidays, everyone! And my fingers crossed for another very happy new year…
A Quick Little Kneecap Post
Okay, we’ve been sick. We’ve been feeling all around miserable around here this past week. So I’ve been slacking in the blogging department. Hey, I can’t keep it ALL together ALL the time. I’d run out of duct tape.
So I thought I’d share this quick little project as a sort of mini half-post. I promise I’ll write a better one in a few days.
I’ve told you before how much our daughter loves Star Wars, and has a crush on C-3PO? So I should also mention, she’s a pretty rough-and-tumble little girl. She’s not afraid of a few bumps and bruises. Which also means sometimes she wears holes in the knees of her jeans. When I decided to get a little more life out of those jeans with a patch, I thought, “Oh, cool! I’ll put some simple, cute design with iron-on patches, and BOOM, done.”
…Until she said, “Can you do one as C3P0 and one as R2D2?”
Well, darned if I don’t like a challenge. So I did.
It took me AGES to figure out if that was even possible. I thought about hand-sewing felt, about stitching the detail on with embroidery thread. I thought of all kinds of magically impossible ways this could possibly work, and was coming up blank every time. Until finally, I lowered my standards.

I finally just cut a simple outline of the body out based on the references I printed out (in black & white in the center), filled the detail in with Sharpie, and ironed them on. Bam, easy peasy.
She liked them so much, she insisted she wear her Lego Star Wars shirt to match.

FAIR WARNING: One trip through the washer, and the edges started rolling and looked horrible, so maybe this isn’t such a cool project after all, unless you’ve got wicked mad sewing skills. …In which case, can you please sew my daughter some Star Wars patches? 🙂
Anyway, we’re all on the mend here. Hope you’re all feeling well!
Unusual Dolls
Sometimes, inspiration is found in strange places.
There are some children’s books that are so dull and obnoxious that every word irritates you as you read it to your wide-eyed kid. These are usually the same books that your kid is madly in LOVE with, and therefore insists you read them over and over and over again until the grumble inside your head starts to show on the outside of your face. But there are good ones, too. Sweet ones with beautiful drawings and lovely stories and poetry, charming and funny and endearing.
And then there’s Calef Brown. He’s a different sorta bird.
We discovered “Polkabats and Octopus Slacks” quite by coincidence, but the fact that the poems are so strange and lovely, combined with the use of the words “polka turds” cracked the Kid up, and we were hooked. I had never seen a kid’s book like that before. I’ve read them all tons of times, and I have yet to be bored by them. He’s a whole lot of funky, a little bit full of one of those giggles you cover with your hand, but all kinds of fun.
One of my daughter’s favorites (especially, I think, since we like to combine animals and people in our own doodles), is in a book called “Flamingos On The Roof.” I was reading one of her favorites, called “Allicatter Gatorpillar,” when she said, “I sure wish I could see an Allibutter Gatorfly.”

You know what? I would, too, kid. That sounds like fun.
So I decided to sew one. Challenge accepted.
I’ve made a few dolls before…..thing is, I can only follow a very simple pattern, and can’t really do anything fancy. But this shouldn’t be THAT difficult, right? I’ll walk you through what I did for your own amusement, but I’ll have you know I’m no perfectionist when it comes to this sort of thing. With things like this, I sort of frantically jab and tie and cut everything together and glue it and tape it and bandage it up and say (dusting my hands off), “whelp, that should just about do it.”
So I sketched out a little shape of the gator part, and just sewed the top seam, from the tip of the tail to about the bottom of the…”chin?”

I wanted the wings to be bendable, so I dug in my wire drawer for some very flexible wire I have used in sculpture before, and laid it out on two separate wing shapes. There was a front & back to one side, and a front & back to the other. I sewed them together without the wire, right sides together with the end open, and turned them two make two top wings. Then I did the same for the bottom wings. (PS, from the looks of my desk, I should probably make better use of my cutting board.)

I wanted the wire to go all the way across to span the top two wings for strength and the bottom two wings the same. I pushed the wire into the open wings, and held the wire in place with machine stitches. I also stitched the top set of wings to the bottom set, so they’d sort of stay in place. Now I had a pretty cool pair of wings…with no way to attach them together. I decided to at least get some embroidery floss and sew the open ends to each other to sort of hold the wire in place and keep the wings from just sliding off. This is where all hell broke loose.

So now I’ve got all these exposed seams on the wings. How the heck do I get it on the body? I can’t sew through wire. So I made a little green “belt,” wrapped it around the open seams (which covered them fairly well) and then stitched that onto the back of the gator’s body. Pretty sloppy, and if you look at it closely, the wires will pop out. Good thing I bent the edges so they don’t totally cut you like a brassiere underwire.

So with the wings shoddily attached to the gator skin from both the outside and the in, the time for stuffing had come.

After what seemed like 18 hours of hand-sewing the bottom of the gator’s body (a good tutorial for hidden stitches here, by the way), it was time to paint the eyes. I got out my acrylic paint, and risking my daughter’s critique for putting both eyes on the same side of the head (it’s like that in the illustration!!), I painted them on. I wanted to add some antennae as a final little touch, and found some bendable wire floral rope that I had lying around that I can’t for the life of me remember why I own. Do I have any clue how to attach it to the head? No. In hindsight, I probably could’ve just used embroidery floss to tack it to the back (Yep, I probably should’ve done that). Instead, I cut a couple of tiny snips in the back, threaded the wire through, and glued a fabric panel down with fabric glue. This did actually keep the antennae standing upright, but I suppose a few good stitches could’ve accomplished the same effect without making this fella look even MORE strange.
 And so here is the final result in probably the weirdest little doll I’ve ever made. The thing is, though, I think he sort of matches the style of the one in the book, which is sort of what I was going for. I mean, an allibutter gatorfly’s not SUPPOSED to be “cute”…right?

Well, it’s okay if he’s a little creepy. When I picked my daughter up from school and presented her with it, she sighed with delight. “He’s so BEEEAAAUUUUTIFUL!” she said.
And that’s all that really matters.

So have you been inspired by weird art to make something in tribute?
Another Back-To-School Idea: Custom Clothes!

I’m not a big one for character clothes, and sometimes it’s hard finding kids’ clothes that don’t have cutesy sayings all over them. So in getting ready for the first day of school, consider customizing a plain ol’ dress or shirt! You can usually find pretty inexpensive plain clothes any ol’ where, hiding in the kids’ section of WalMart or your local craft store–shirts for around $4 or a little dress shirt (like the purple one above) for around $9.
A tricky, fun tool to have is this fusible, iron-on web. The directions are very easy, written on the back side of the package. Super easy.

Simply stick the web like a sticker to the back side of the fabric you’d like to fuse to your clothing (in the case above, a brachiosaurus and pteranadon my daughter wanted on her dress shirt). Then draw the design on your fabric and cut it out (it’ll have the fusible web stuck to it). Then iron it on your clothing, and BOOM you have a customized piece of clothing of whatever you like!

You could do this for all sorts of things. When I was in roller derby, we’d customize all sorts of things for ourselves. It’s not just for kids! Backpacks, bags, pants. So far, it seems to have held up after several washings, and with living through the wear and tear of a 4-year old. No sewing required, but I’m sure if you wanted to get crafty, you could embellish with beads or embroidery. So have at it! Get creative!
(On a side note, if you want to get your kid involved, I’ve also let ours go crazy on a $4 shirt with some Sharpie markers. Now it’s one of her favorite shirts!)

Back to School Baggies
My daughter just started preschool at the end of last school cycle and she loves it. She loves having a backpack and a packed lunch. I have very fond memories of the little notes my mom would leave for me in my lunch box. Since my daughter’s only 4 and can’t read, for awhile I was having a ton of fun decorating her lunch bags with Sharpie doodles…

But being a bit of a pseudo-hippie, it bothered me a little, throwing so many bags away every day. I mean, I’m not super hardcore, but when I notice ways I’m being wasteful, I try my best to find ways that might be a little better and aren’t TERRIBLY inconvenient. We used cloth diapers when she was little, we use cloth grocery bags (when we don’t forget to take them into the store), so why not whip up a few quick reuseable bags?
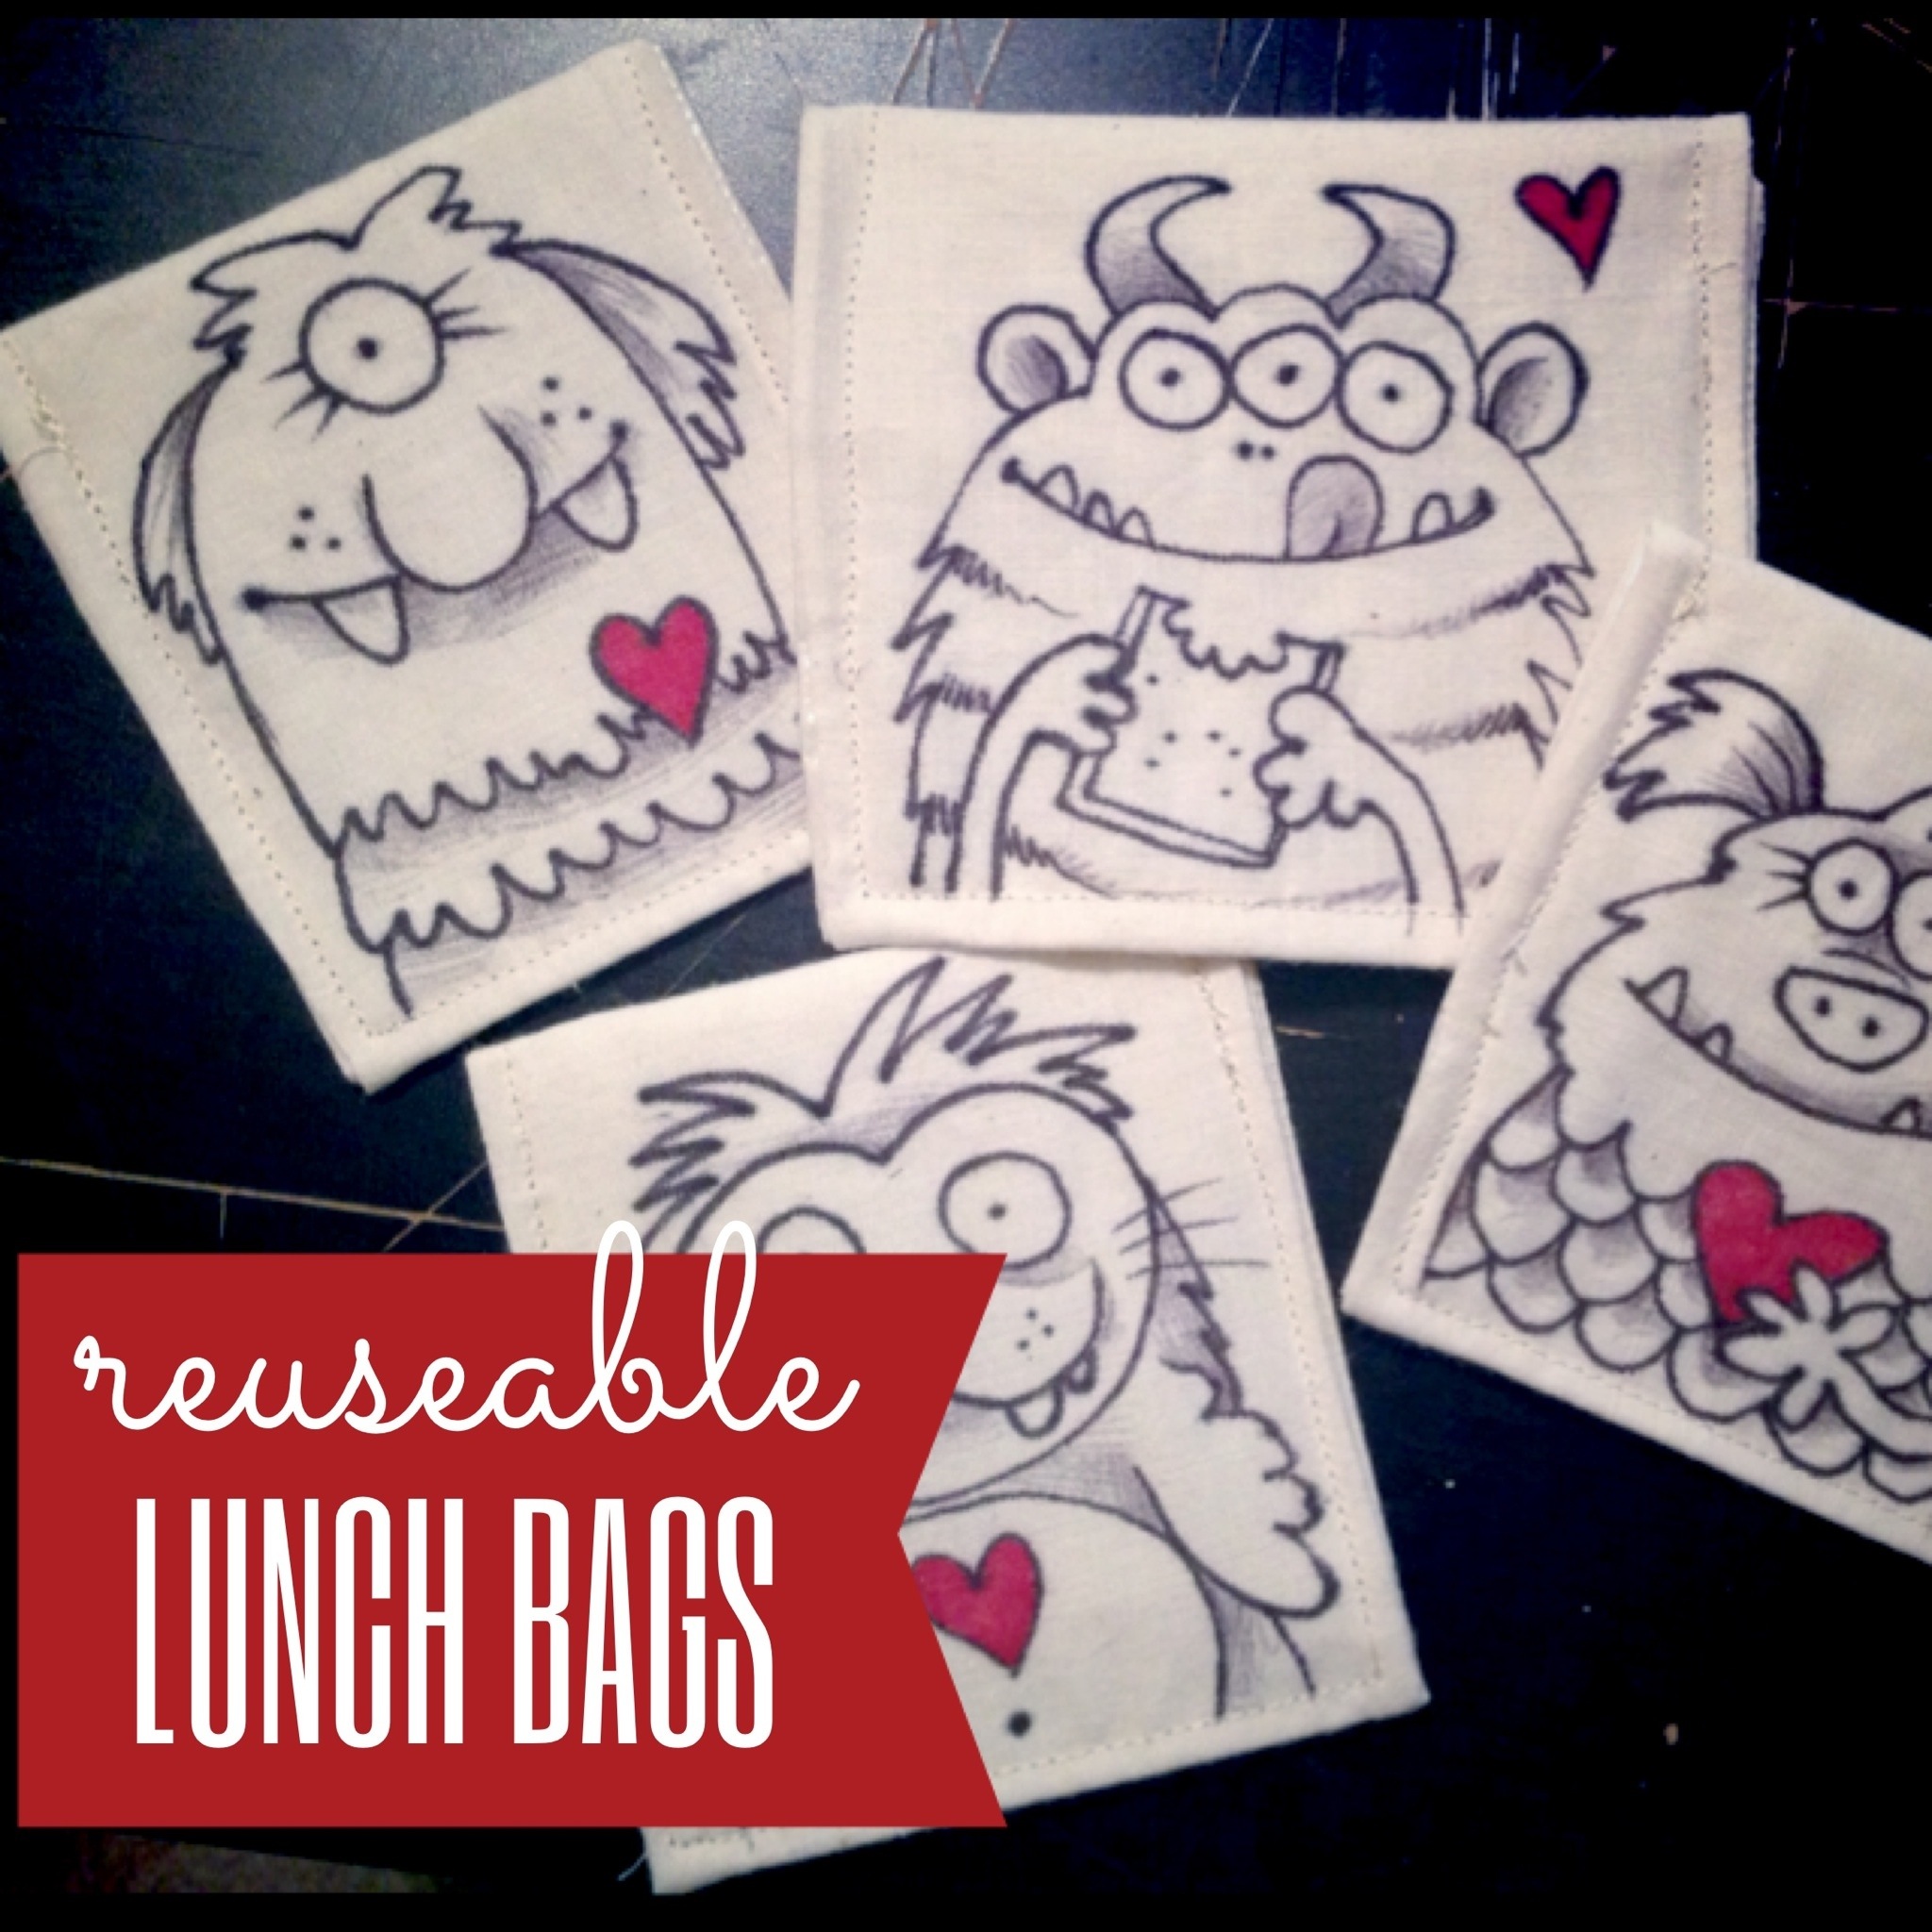
When I looked around online, there were a great many DIY options, several of which seemed quite complicated for an amateur like myself, with zippers and pulltabs and fancy fabric and such….except for one: this tutorial from Rhinestone Beagle. Our local fabric department didn’t have any of the fancy nylons I had seen in some DIYs, but they did have very inexpensive fusible vinyl, which is SUPER easy to use. You iron it on, and boom–whatever you’re making is water resistant. So that was good. Secondly, I’m not good with zippers, but I can sloppily fake some velcro like no one’s business, so score another point for this tutorial. Thirdly, I worried that certain opening fasteners would be difficult for my kid to open at lunchtime, so if I wasn’t fancy enough to put in my own zippers, I wanted one that folded over a bit. And lastly: I felt a little like I was taking the easy way out, not being able to doodle something new with every lunch. (I felt I had to live up to things like this)…I compromised by going with a plain fabric, so I could doodle some monster faces on the bags (with Sharpies, of course. …They should sponsor me).
And there you go! Personalized lunch bags!

Now, in hindsight, they’re a BIT small.
…Okay, they’re tiny. The sizes I had seen online just seemed so HUGE, so I sort of winged it and made them smaller. But I can fit a cookie or two in there, or a couple of small strawberries. But just for giggles, I decided to try a few of the fancy ones. I found a shop on Etsy called Cute Little Bugs, who seemed to have the best quality & the best deal. Zippers, nylon liner, cute fabric, and even a little tag for you to write your kid’s name on it. Super cute. And they’re not tiny at all.

So, as my daughter gets ready for her second year of Pre-K, I think I’m going to have to look into trying again to make some more baggies of my own–this time human-sized. That can fit actual food inside. The point is, I want to make lunch a little special for my kid. And there’s always room for some creativity!
Derby Dolls

I know I do a lot of posts about derby, but this one is pretty crafty, too…
With just a little tweaking and customizing, I can do a lot with a single pattern. I’ve bought a lot of patterns from MMMCrafts on Etsy, and the one I’ve had the most fun with is this Little Red pattern. I’ve never actually made Little Red, but I used the same doll pattern to make a sweet Princess Leia doll for my Star Wars-lovin’ daughter (separate Chewie found here, by the way).

But when my very good “derby wife,” Sunny (also the early founder of my derby team, NPBT), was moving out of state, I wanted to make her something cool & quirky & special.

Since she has short hair, I just left off the ponytails. I handpainted our team logo on her “shirt,” but I’ve done similar things where you can use iron-on transfers with computer paper and just iron on a logo.
Since our colors were red, white & green, I made the bottom half a different color to look like derby shorts. She has several tattoos, but I added several more to decorate her arms all up. I used acrylic paint for her face and tattoos, which (if you’ve ever gotten it on your clothes by accident you know) stays on fabric really well.

I put her number & name on back, made cute little wheels out of buttons and paint, and painted on the kneepads and wrist guards. The high socks are just a strip of fabric instead of doing one solid piece for the leg, as the pattern said.

I liked it so much, I had to make one for myself! Uh…I mean, for my daughter.


If I had a long, long time to spare, I’d maybe consider doing custom orders, but they sure do take awhile, and I might have to charge a bit for them. For now, give it a try it for yourself! It doesn’t even have to be derby-related. I think it’d be COOL to have a doll that looks like your friends or family….

