Healing
These past couple of weeks have been a little rough, getting used to the loss of my beloved Boston, Adie. It’s still strange not having her here by my side every day, following me from room to room, especially by my bed when I wake up every morning.
This past week, her ashes were returned to us, which I knew would be a little rough, but when I saw they had included a set of her pawprint impressions, I broke down all over again. I had gotten an imprint of her nose before she passed, but I didn’t think to get one of her paws. I didn’t think I even needed one, but it was such a lovely surprise, it makes me smile.

There are several ways I’ve been trying to feel better. I’ve been drawing portraits of her before she was ill, because I knew it’d be hard afterward. I tried drawing her later, but it was difficult, and made me sad, and just didn’t look right. So I went to a different medium, and tried embroidery, stitching this little portrait of her, surrounded by her favorite thing, popcorn.
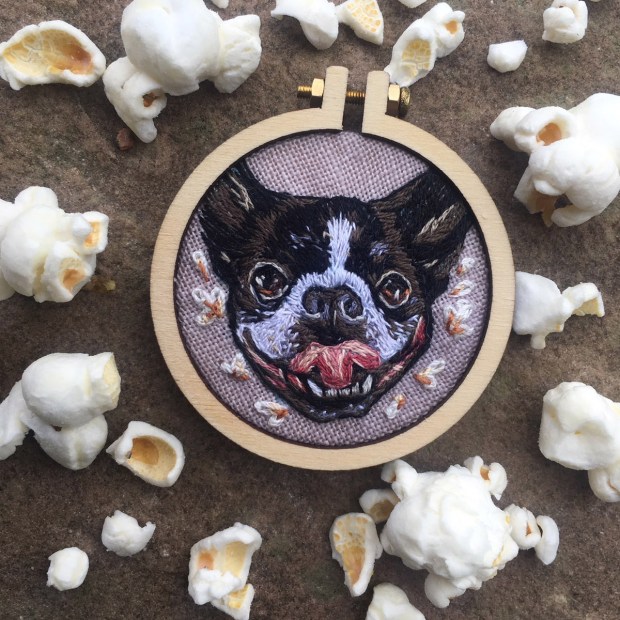
I loved spending time with all the little pieces of her face. I like that the popcorn ended up looking like little flowers, in a way.
Someone on Instagram sent me a message, saying “maybe you could make one of your Dream Creepers for yourself that looks a little like Adie?” It was a good sign, as I had already been tossing the idea around for a little while. I chose the fabric, something soft (because Dream Creepers make great neck pillows for long trips), and my husband helped me put it all together.

If you look closely, you can even see I added a little something on her snooter: a little foil heart on her nose, sealed in resin. She ALWAYS had something on her snooter from sniffing the floor for crumbs, and people used to laugh at my photos with the same caption over and over again: “Adie, you’ve got something on your snooter.”

I started to realize that those funny moments, the ones that made me smile, were where the healing was. The best memories were the happy ones, and instead of dwelling on how much I missed her, I started remembering all the funny things.
Recently I visited a friend who is a tattoo artist. Annie and I have known each other for awhile, and she knew how special Adie is to me. She drew up the most perfect design of Adie with her favorite thing–popcorn–and added a piece to her snooter. She tattooed it on me, and I was floored at how wonderful it looked (because Annie is an amazing artist). I love it immensely, and I love that I get to carry her little happy face with me wherever I go. Instead of being a super serious portrait, it makes me smile.

Like the time I sculpted a goofy portrait of her, and she was less than impressed…

One of the biggest realizations for me was this portrait I drew. Initially, I wanted to draw her sitting in her “old man” pose, with her little pink belly hanging out, which always made me smile. But it ended up looking sad.

…Until I added a fart. Because my hairy girl could clear a ROOM. You wouldn’t expect something so small would make a smell so obnoxious, but it always made me laugh as I was gasping for air. And it didn’t bother her in the slightest.
So that helped a lot. For some reason, something like that goofy drawing makes me instantly remember the funny side of her, and makes me feel happy. It wasn’t something I expected, but I’m grateful for it, that something so little helped me heal with a smile.
And in a perfect moment of great timing, my husband sent me this image, which happened to be in his Instagram feed DIRECTLY after my post of how a little toot-doodle made me smile again…
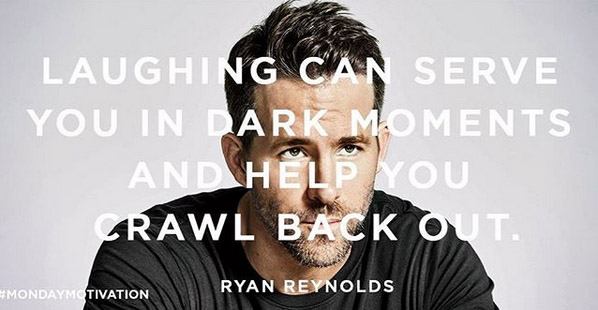
And it’s the truth.
Snooters
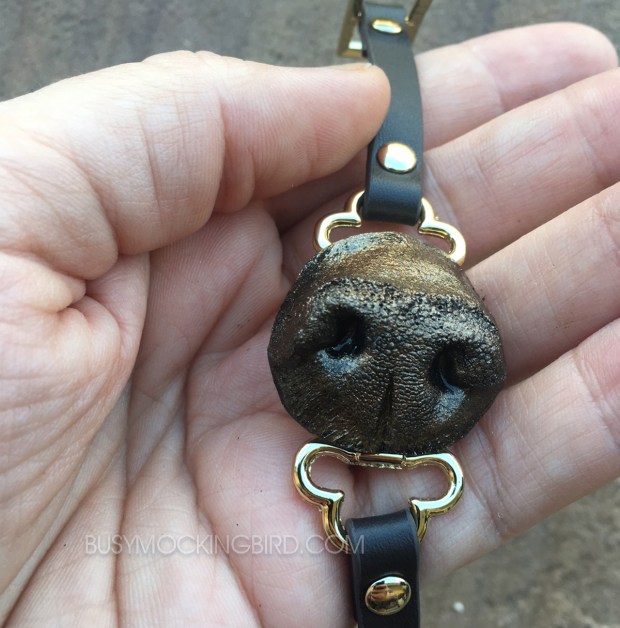
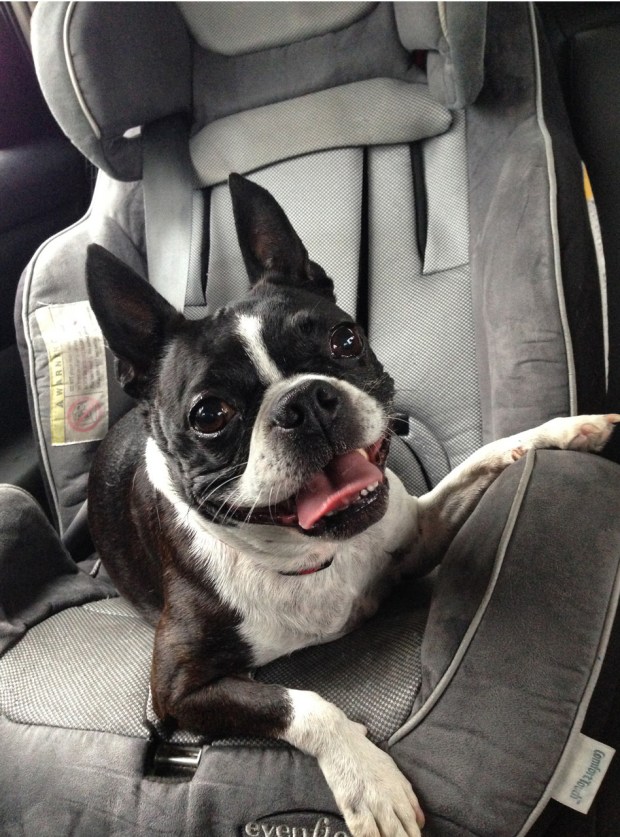
I had to say goodbye to my sweet dog this week, and my heart is broken. It’ll get better in time, but it hurts a lot right now. I won’t flood you with every detail of my dog’s life, but I wanted to share the process of my memory bracelet, and how I made a mold of Adie’s snooter.
Adie was 11 years old and had been sick for awhile, and battled both cancer and seizures. And while medication was helping, I didn’t realize my remaining time with her would be as short as it was. In the very end, I held her face and kissed her snooter, but she had had so many seizures that her little body couldn’t handle it. She was already gone before they told me she was gone.
Adie (named “Awesome Dude” after a line from an SNL skit–A.D. for short) was my baby before I had a baby. She was pretty sure SHE was my baby, too….
She was a tiny thing when we first got her, only 2 pounds (and rescued from what I’m pretty sure was a puppy mill), and we brought her home with worms and ear mites, and made her good as new. She grew up around our gentle boxer, Scout, who was so sweet and careful with her, that Adie lived her life assuming she was as BIG as her.

She licked my face constantly, because I loved her doggy-kisses. She followed me EVERYWHERE. She cuddled with me CONSTANTLY. She had to sit by me ALWAYS. And she could clear a room with her toots.

She loved me, and I loved her, and she made me smile. She was a food-junkie, and constantly sniffed our floors looking for any possible scraps of food…which left her inevitably with some random scraps of paper or dirt stuck to her nose. Family would laugh when I’d post a picture with the simple caption–over and over and over again through the years: “Adie, you’ve got something on your snooter.”

I had the feeling she was getting pretty bad. We made an appointment to talk to the vet, hopefully about upping her medicine to help with the seizures. I started thinking of the worst, and what sort of thing I’d want to remember her by.
She didn’t wear her collar at home, so I didn’t have an emotional attachment to it. I’ve seen art made from whiskers or toenails, but that just didn’t seem like my thing. What I was going to miss most of all was kissing her little snooter.
I looked around the internet, and found that there are artists on Etsy that would send you a moldmaking kit, you’d send it back to them with an impression of your dog’s nose, and they’d make a lovely piece of metal jewelry. It’s a beautiful thing, but I wondered, since I have worked with moldmaking and resin, if that would be something I could do myself. I didn’t find much online, so I thought I’d walk you through the process I had of making my own, for those of you who wanted to give it a whirl, or–like me and Adie–whose time was short.
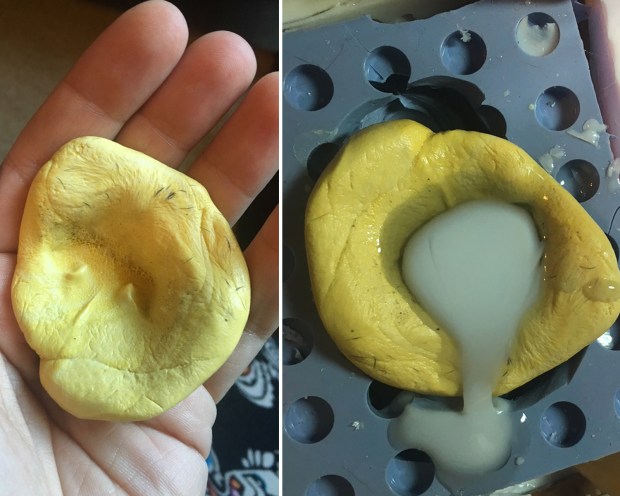
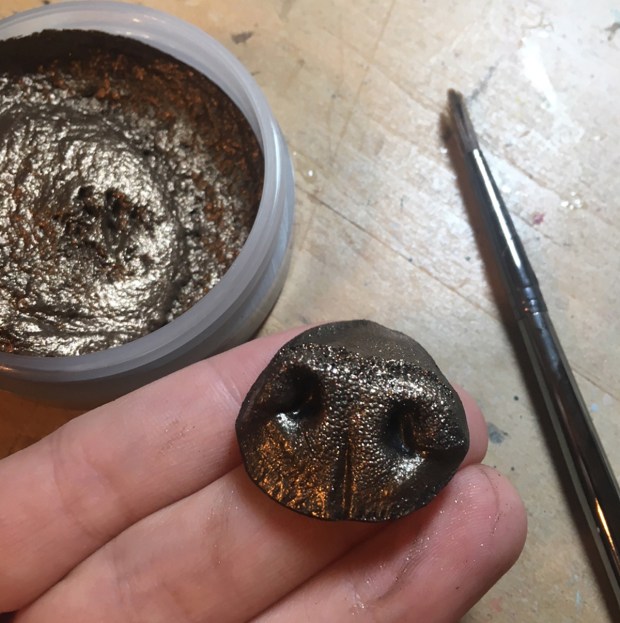
1. First off, I got this Amazing brand mold putty at our local craft store. It’s a nontoxic 2-part quick-curing mold formula. As you can see in the top right of the box, it comes in two tubs. You pinch equal parts of each, and squoosh them together in a ball and mix it until it doesn’t have any streaks in it. You have to work fairly quickly, as it starts setting once it’s completely mixed.

2. Next, I held Adie gently, and quickly pressed the ball up against her nose, making sure to keep her mouth open to breathe. She was tired and lethargic anyway, and didn’t seem to mind much. She just kind of let me hold it there for awhile, and if you press gently (not completely squooshing), you should be able to pull away after awhile with a decent nose print.
3. So here’s a picture of the nose print (minus a few shedded hairs–don’t worry, it didn’t hurt her at ALL and she’s shed WAY more than that in a day–but maybe be more careful if your dog has long hairs). Next up, I set the mold carefully in a messy container (because I knew it would be messy) and poured my resin mix in it, waiting for it to cure (the kind I got takes around 10 minutes).
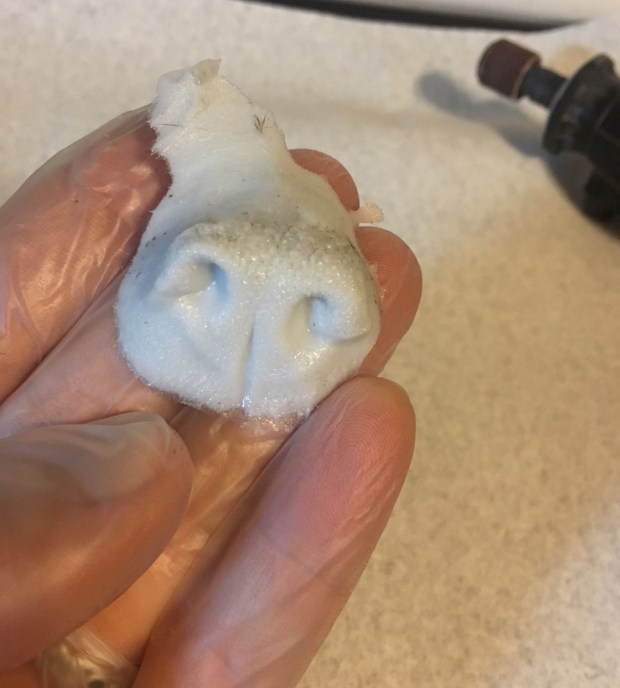
 4. And here’s the little resin cast of Adie’s lovely little snooter. I used my little hand-held dremel sander and shaped the edges into a smooth sort of oval.
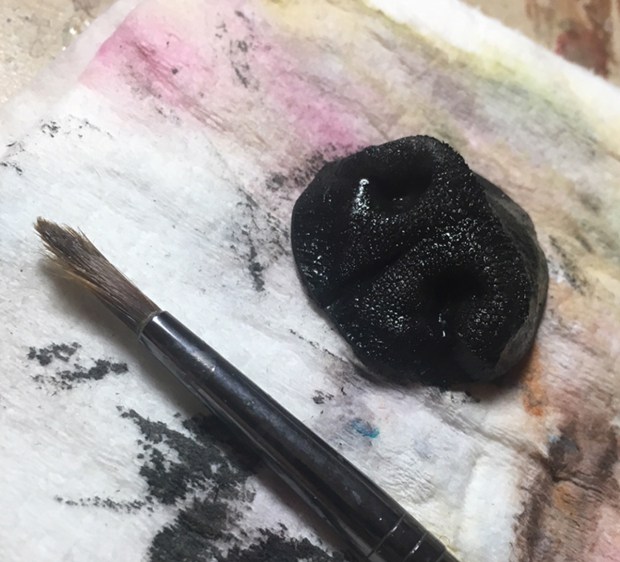
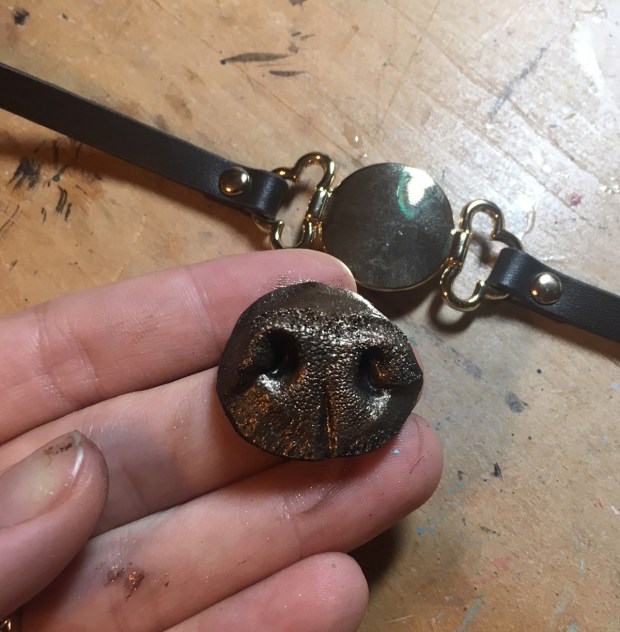
5. Next up, I painted it solid black. I didn’t want it to be realistic or anything; this is just an undercoat of acrylic paint, in preparation for the next step.
6. I found this water-based Metallic Lustre by DecoArt in “Iced Espresso” to match the wrist bracelet setting I had found at the craft store, and painted it over the black.
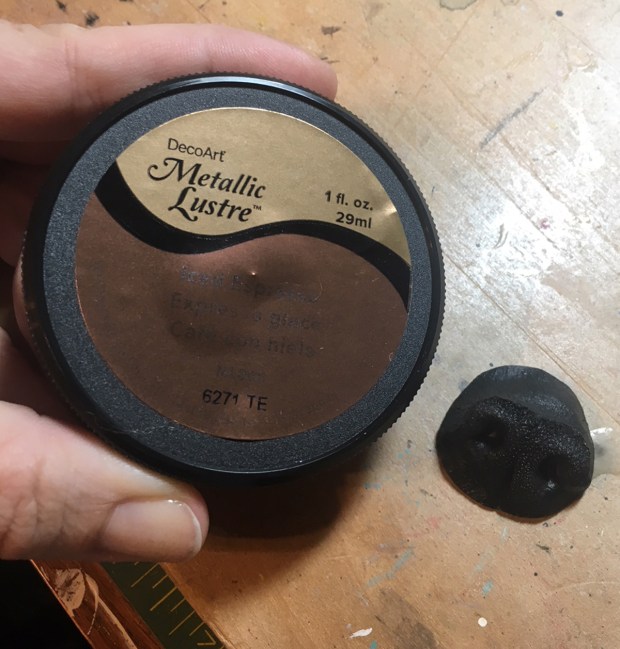
7. Look how pretty! The black undercolor really makes the details pop.
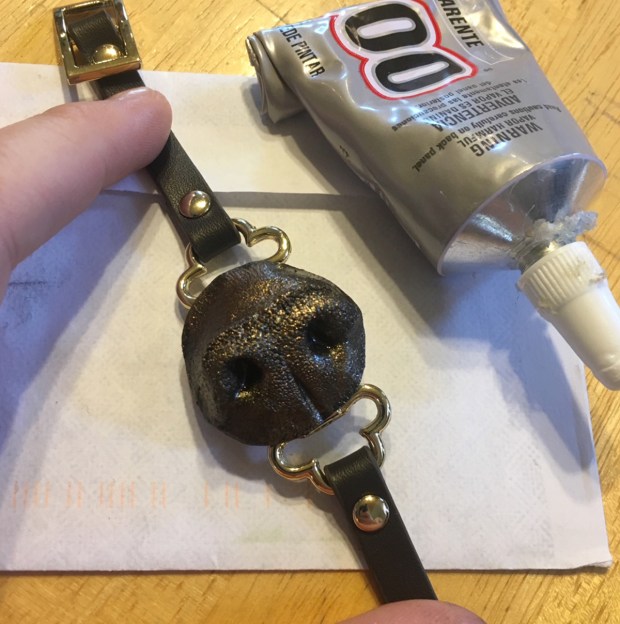
8. Here is the blank bracelet base I found at the craft store. There are several options you can choose…this one is a leather adjustable band with a flat panel to glue things on. I knew I didn’t really want a necklace–I felt like it’d be comforting and easier to give her snooter a kiss if I wanted to, to have it on a bracelet.
It’s glued on with E6000, and I later went back and sealed it in clear resin, to avoid scratching it up (which is what happened the first day I wore it, even though it had been sealed with clear varnish).
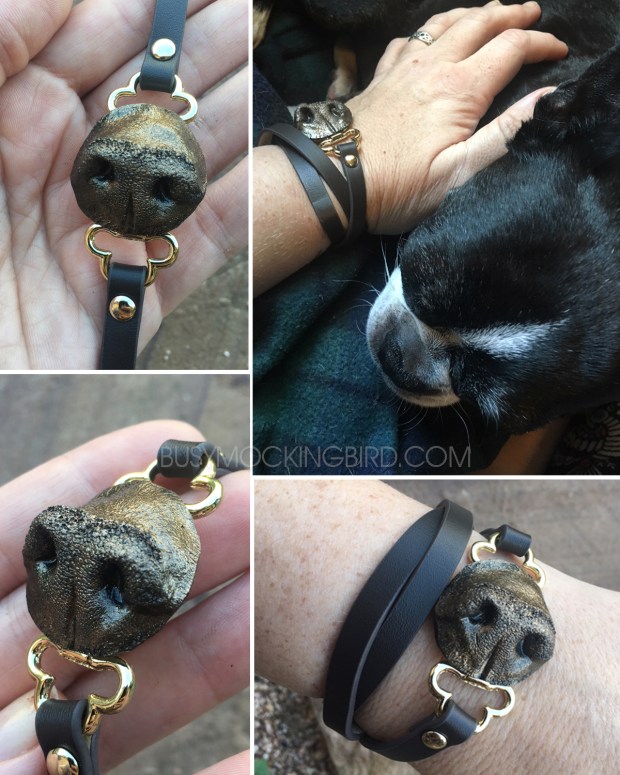
And there it is. And two days later, she was gone. And I miss her so much, but I’m so glad I had a chance to do this.

Whatever people need to do to grieve, as long as they’re not hurting anyone else, it’s okay. There’s no “right” way to remember a loved one. For me, having a mold of her little kissable nose around isn’t nearly as good as her real nose, but it helps the hurt a little.
Myla handled it well. We cried a lot about it. She asked if I could make her a bracelet too. (The next day, a kid at school asked if she cut her dogs’s nose off….because kids can be insensitive jerks sometimes.)
So there you go. I miss my sweet Adie. I miss the spot by my bed where she slept. I keep looking down and forgetting she’s not there. It’s weird feeding only one dog instead of two, and the boxer isn’t NEARLY as excited about food as Adie was. It’s strange sitting on the couch and not having her snuggled up against my side.
I miss kissing her little face.

I got so many kind words over on Instagram about losing my sweet Adie. She made people giggle in the IG Story posts I made of her whining while she was waiting for dinner (two hours early). And many people asked me about the process of making the bracelet.
It’s not the same as having her back, but hopefully, if you’ve got a hairy baby, you can make a nose mold too, and have a snooter around to kiss goodbye.
Goodbye, sweet Adie.
Good girl.
Frog Rider
Hey stranger. It’s been awhile.
I’ve been a bit in the dumpers lately, and trying to get out. Nothing big, nothing serious. Just the dumpy dumps. But while I work my way out, I thought I’d share this little frog rider with you.
It started when I was sick in bed. I have been getting back injections in preparation for a spinal ablation, and although it’s supposed to be a fairly speedy recovery, I have had a hard, painful road with it….so I’ve been spending a lot of my down time in bed.
Like Frida painting in bed, drawing is a really good way for me to be engrossed in something other than pain. For a time, I am so focused on what I’m drawing, that I don’t feel so bad. It’s like floating somewhere above your body, until someone or something reminds you that it’s attached to you.
I used to hate the feel of pencil on paper, like nails on a chalkboard. But you can hold a pencil upside down while you lay in bed drawing, so there are times when it has its moments. Plus, I’ve learned to make peace with a pencil, in a way…. A blending stump, some workable fixative, and some watercolors make for an old-fashioned illustration feel that I can’t always get with my pens. It’s not the right move for everything, but it has its moments.

So I drew a little frog rider. It’s our daughter, Myla, but it doesn’t HAVE to be her….it’s just that I have a million reference photos of her, and I love every one of them. I could draw her little face a million times and not get tired of it.

I try to get caught up in detail, but it doesn’t always work. I get lazy with backgrounds, but I love trying anyway. Even one of my favorite artists, Matt Gordon, says he “fakes” a lot of his intricately detailed backgrounds with squiggles….but somehow, I can’t pull it off nearly as well as he can…

But it’s a happy distraction. Maybe sometimes I use it too much, as a crutch to avoid discomfort…but it’s my happy place. My safe place. My place that doesn’t hurt so much.

My little frog rider might not know where she’s going, but she’s looking back a little to make sure the rest of it stays behind her. And that froggy–maybe she’s keeping an eye on things, too. Maybe they’ll get where they’re going one day, but for now, they’re trying their best to hang on tight in the instability of a bumpy ride…

Hopefully, that road’ll get a little smoother, froggy.
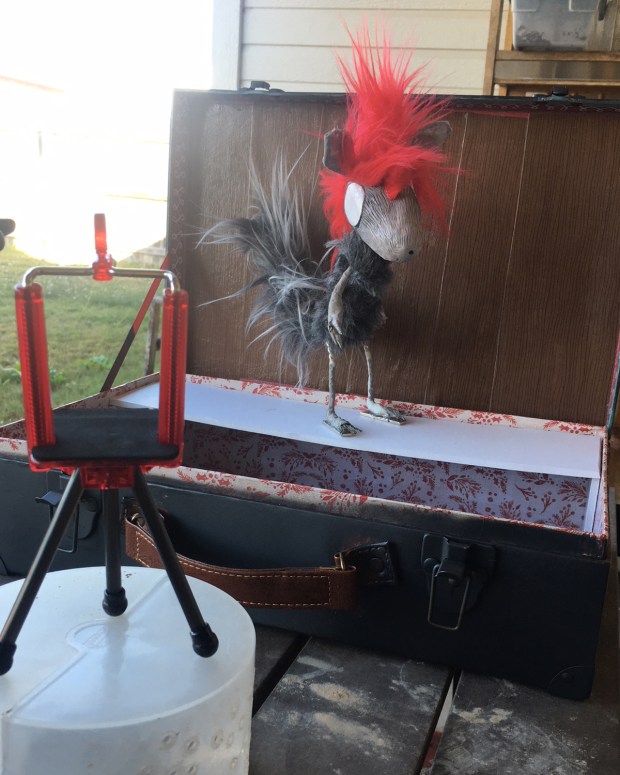
Building an Animation Station
After weeks of working on this project, I would like to unveil how we made Myla a wonky little Animation Station….CUE THE FANFARE!!
TA-DAAHHHHHHHHHHHH!!! *confetti*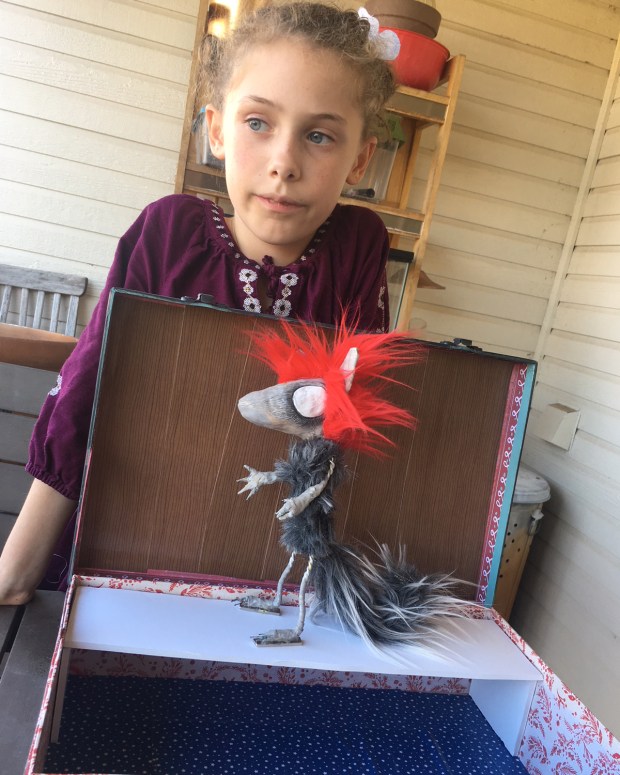
AND NOW….a quick backstory: Myla is 8 years old and LOVES animation. The first time she understood it was at a children’s museum called The Thinkery in Austin, where they had a station set up where a camera was positioned over a flat surface, with a screen in front, where you could arrange the blocks, push a simple button for each frame, and see what you’re doing on the screen above. She was ENTHRALLED.

(There are usually various-shaped wooden blocks on the tray around that center “stage”)
She’s played with drawing animation apps like GoldieBlox for awhile, but this was the first time she really understood stop motion, and a fire sparked. These days, she uses Stop Motion Studio on her Ipad, which takes some getting used to, but is mostly user- and kid-friendly. You can also adjust it where it “ghosts” an image of your previous frame, so you can see where you were before.
In the past, she’s worked with clay, making stop motion videos…
https://www.instagram.com/p/BY3baUZhjbn/?taken-by=mylamockingbird
https://www.instagram.com/p/BY3YFB3hxIW/?taken-by=mylamockingbird
But one day, while watching some behind-the-scenes LAIKA videos of Kubo and the Two Strings on YouTube, we decided we should try to build a simple-ish figure and set up our own portable station that maybe she could carry around and set up wherever she wanted. So here’s our wonky project, and what we’ve learned so far…
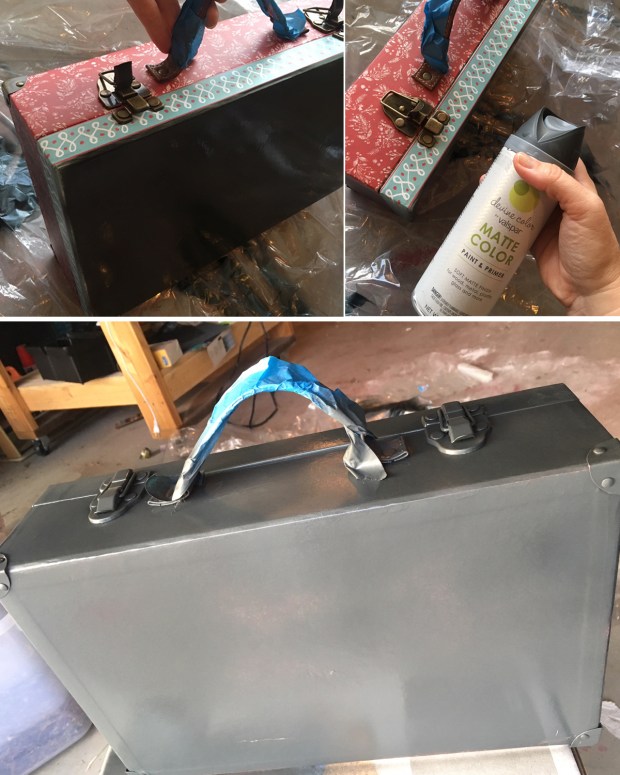
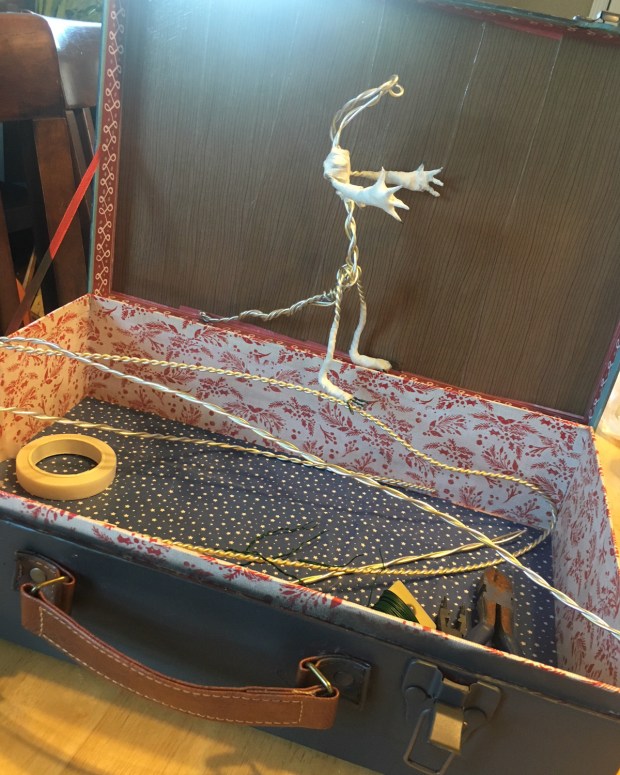
First off, I wanted it to be mobile–something she could use to carry accessories and things, and maybe the lid could flip up to be used as a background. I found this decorative holiday “suitcase” at our local craft store, and spray painted it a matte color and then decorated it with stickers…

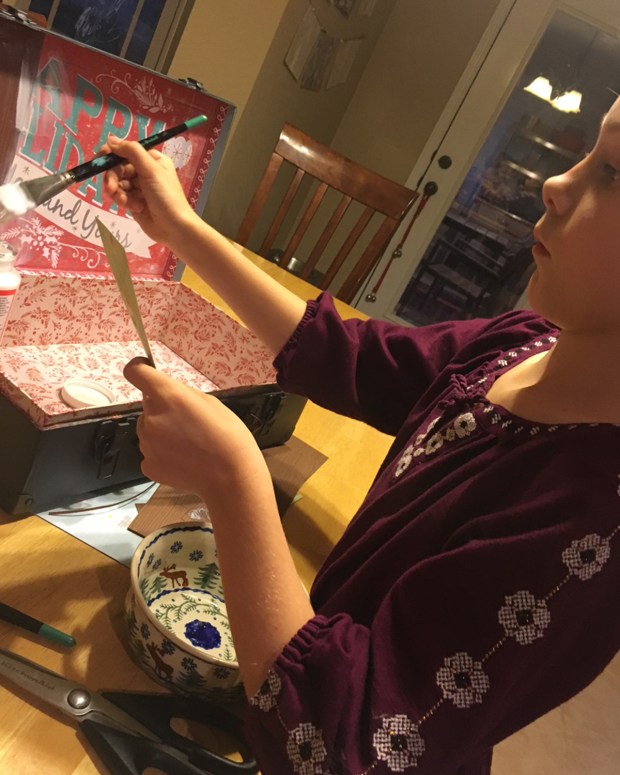
We used Mod Podge for the inside, to “glue” a flat background to the inside lid. I figured she might be able to lay a sheet of paper over it to change out the background whenever she liked, but primarily, a “wooden” craft paper pattern served well to cover up the holiday cheer that the box initially came with.
Next up, she designed her character. She LOVES animals, and creates the most amazing little characters. This one is named “Zeen,” and is a little wolf-girl.
We talked about how it would move, what we could and couldn’t do. We talked about how to make the face and eyes change, and how it would stand. I looked up some simple armature techniques online (THAT’S a rabbit-hole of possibilities), and started building a body that would be big enough to do what she wanted, but small enough to fit in the box and still be able to use the background.
I’m not sure the gauge of the larger wire that I used, but in hindsight, I might’ve gone softer, as it ended up maybe a little too stiff. I twisted two pieces together with a drill (which was a hilarious endeavor), and used wirecutters to twist it into shape. The legs are tightly hinged, but they can bend at the “waist,” which I thought would add more movement–but if you’re not careful, she does end up flopping over.
I used floral wire for the smaller appendages, and floral tape to smooth it out a little.
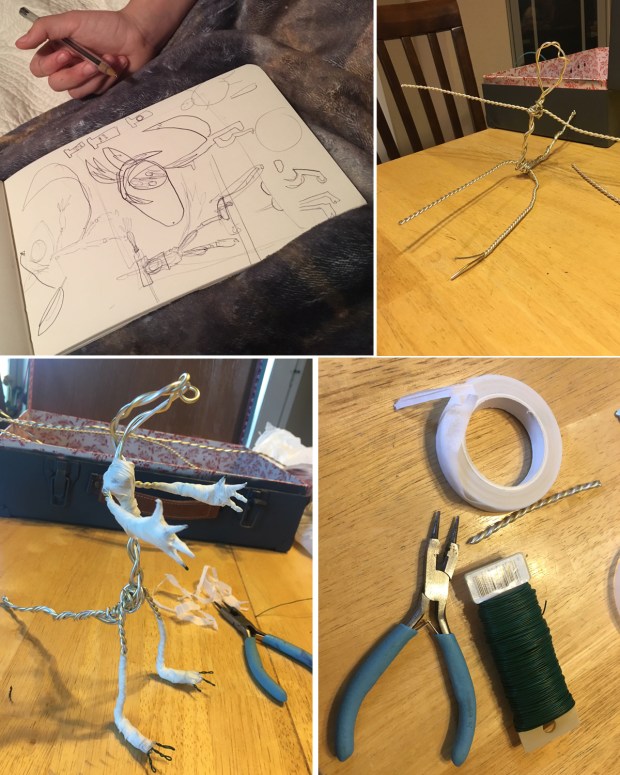
And after a bit of messing about, I finally came up with a basic structure that fit in the box, and still met all of her sketch ideas. (I have learned, with my kid, to be very clear about what is and isn’t possible, and to remind her that things in her head don’t always look the same in mine, so we do our best to talk about it in great detail beforehand.)
I built a base from balled-up aluminum foil to keep the head light, and wrapped Super Sculpey around it, embedding floral wire where I wanted the ears to be.
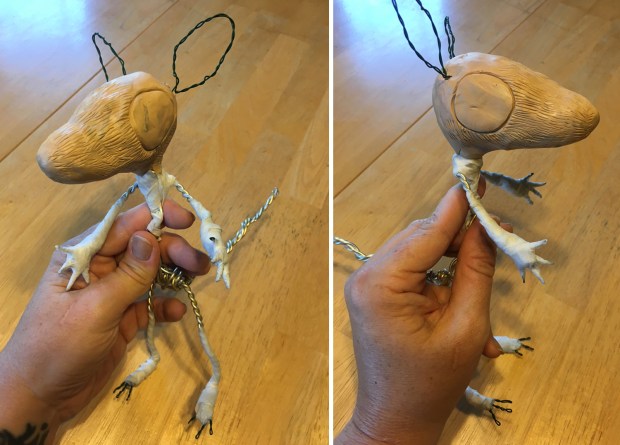
After baking it, I painted the face, and added fur. (Yes, fur is very tricky to keep consistent during an animation, but she doesn’t mind–she was excited about the fur, and it’s all about having fun right now).
I left the eyes blank, because we decided that she could stick a little circle of paper to the eyes, and that way she could “move” it in the animation like a pupil.

The next step was to make something for it to stand on. The professionals use this peg system, wherein they mount the feet over and over again into a board depending on what movement they need. Instead, I opted for ultra-strong neodymium magnets.
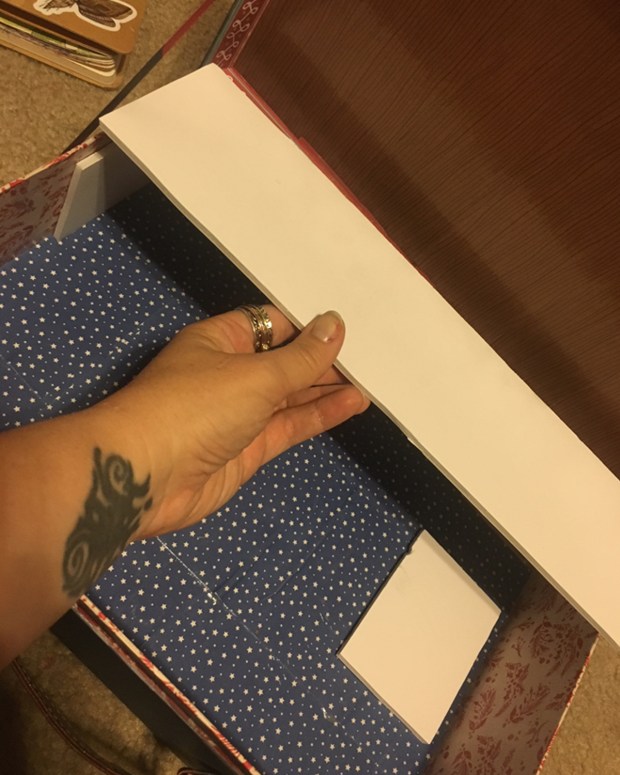
First, I mounted a piece of foam core to a little “stage”at the front of the open suitcase. I kept the top removable in case we needed to access the whole case or something.
I sloppily hot-glued the magnets to the bottom of her feet, and other magnets to the underside of the foam core sheet.

(Looking back, I might’ve tried finding some piece of flat metal for the magnets to stick to? Since I couldn’t get much coverage due to polarization, we have trouble standing her up in certain places.)
And finally, after much trial and error, she works!!! SHE’S ALIIIIIIIIVEEEE!!!! Mwahahahah….. Well, you know. SORT of.

There are, as is to be expected, some kinks to work out….
First, I might’ve tried finding some piece of flat metal for the magnets to stick to, instead of foam core (if only I could get it to fit PERFECTLY in this box). Second, the wire I used is a little to stiff (as I mentioned) so motion (especially small movements) are hard to manage without moving the whole character. Third, we need a better tripod stand for Myla’s ipad, because we just lean it against things, which works, but…could work better.
She’s been so excited by it, and has already animated a little, but we’ve only JUST finished it, so there’s still some practicing to do.
https://www.instagram.com/p/Ba-JitPgELe/?taken-by=mylamockingbird
But the best part? When I posted it on Instagram, someone suggested I contact Kevin Parry. They said “he works with Laika studios and he is awesome.” So I looked at his page and sure enough, this guy was the EXACT SAME animator in the VERY SAME VIDEOS Myla and I had seen on YouTube, that first inspired us to make a character! He’s worked on Kubo and on Box Trolls, and I’ve even seen his personal videos (usually animation tricks, and silly-walking references) online, shared by friends. I just didn’t know his name. It’s such a small world!
I messaged him, and to my surprise, he replied and mentioned how cool it was that she was animating at such a young age, and that the details would come with time–that she should just enjoy animating as much as she can. He was incredibly helpful, and told me that a simple trick for the eyes would be to coat them in vaseline and stick a little paper circle to it and move that around. He gave me tips on structure and magnets, and practicing simple movements. The poor guy must get bombarded with the same questions over and over again and again, but he was so enthusiastic it was exciting.
And when I told Myla about it the next day, she was inspired all over again. And I was reminded of how good it is to share what you love with other people. It only helps, when you encourage others and help them learn. And it doesn’t take anything away from you–it’s up to them what they do with it.
And that’s the thing–It’s like when people ask me how to “become a good artist,” all I can tell them is if you love something, you’ll do it, and you’ll never stop learning. You’ll do it and do it, and soon you’ll find you’re doing it SO much that you’re getting better at it, and you don’t even realize it. It’s a passion. If you don’t have it, you’ll likely put your energies elsewhere, and that’s okay too. But if you’re excited about something, you’ll keep doing it, and you’ll keep learning, and you’ll just get better and better.
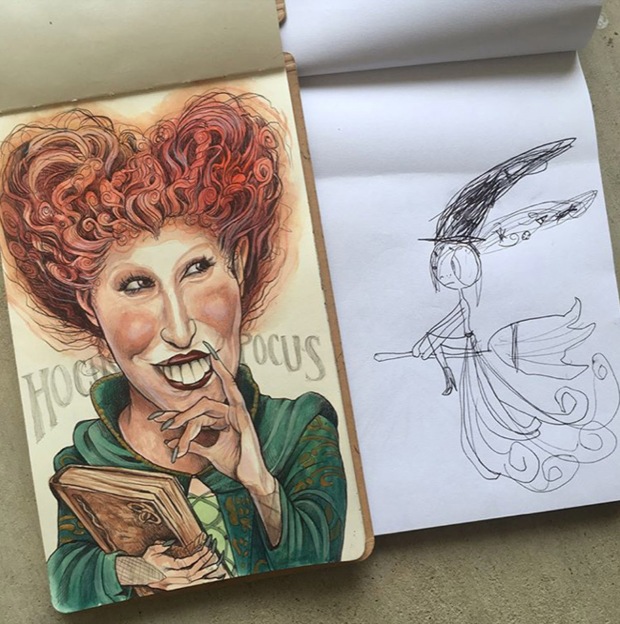
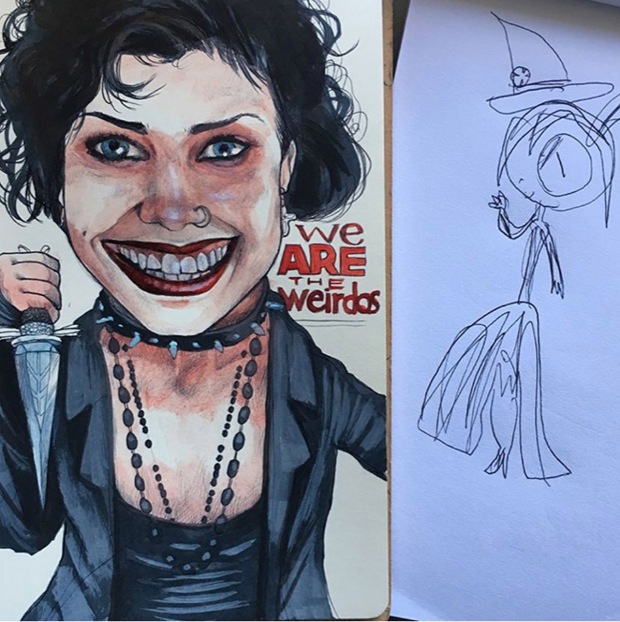
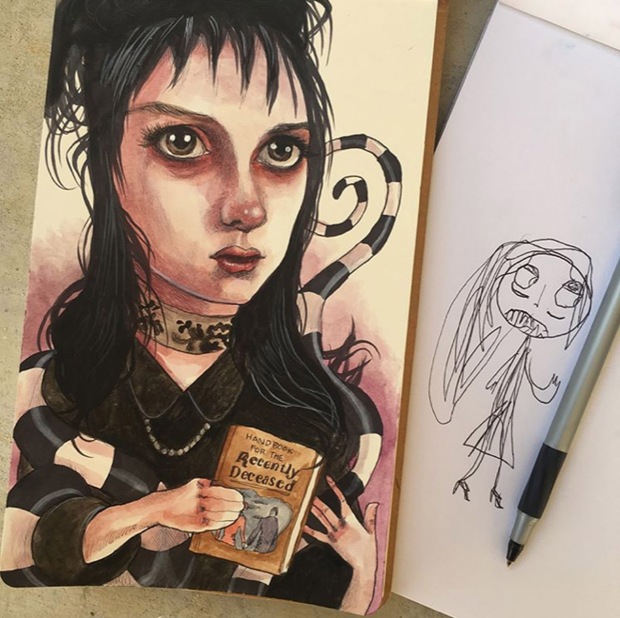
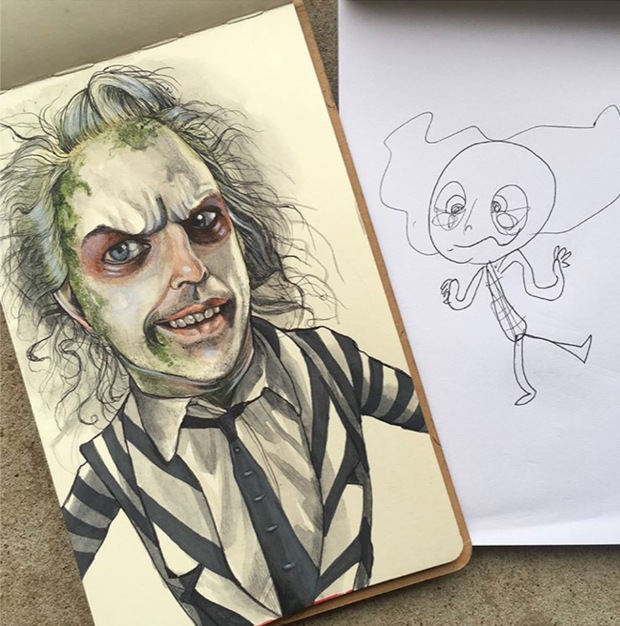
Mockinktober!
Happy Halloween! And with it, sadly, comes the end of the Mockinktober challenge Myla and I did, where we completed a spooky drawing each day, for the month of October. But we can call it a success!
I won’t post them all–you can see them on my instagram page @busymockingbird, in the hashtag #mockinktober, or on our facebook page.
Our goal was to complete all 31 days, and we did it! Myla’s goal was to try to make all of hers be original characters, and–whenever possible–make them female. She’s only 8 years old, but the expression she gets in her drawings and the unique ideas she has are already so amazing to see!
We jumped around a bit from our initial list, and bounced around (as I predicted) with our friend Mab’s Drawlloween list. Near the end, though, we chose a few categories of our own.
We had goofy ones…

We had a bunch of spooky teenagers…

And even some creepy kids…

We had “the Ghost with the Most…”
As well as a few gremlins…

And we even did a few extra ones, just for fun!


The Kid blew me away with this drawing of The Bride (not Frankenstein’s Bride–the Bride from Kill Bill). She’s never seen it–it’s WAY too violent–but she knows the story of the Bride as a ninja mama bear, fighting to avenge her daughter. One day while I was drawing Jules from Pulp Fiction, she asked to draw the Bride, and it was too good a category to pass up (and she couldn’t help but add some goofiness to it…hence the chicken and the tiny head-person in the Crazy 88 gang..).

As for Frankenstein brides, we covered those, too…

And we had such a great time doing it! Here’s hope you all have a safe and spooky Halloween!
(If you’re interested, most of my versions from this set are available in my Etsy shop online as small prints–you can go have a look here! )
Spooky Horns
I love when people decorate for holidays, I do. But EVERY DAY, we drive down the only road to the elementary school, and pass by what the kid and I refer to as “the Gore House.” No simple pumpkins or ghosts or skeletons here. This guy goes all out: customized with expanding spray foam painted blood-red, he FILLS his yard full with buckets of fake guts being poured onto a table, where plastic ravens eat them. There’s a full-size BBQ grill full of guts and fake bloody intestines, and something called “The doll house” (thanks to the giant wooden structure over his front door) with “dead babies” hanging from it. Fake bloody. There are disemboweled mock people, positioned into torturous poses, others getting electrocuted with their foam guts hanging out. This assault on my eyeballs, goodness sake! I mean, it’s his house, and he’s got a right to decorate it I guess. Myla always asks me to tell her when the house is coming up so she can turn her head.
Maybe I’m all sensitive now that I’m older, but gore is not Halloween to me. I mean, I guess in a way it is, but…seriously? On the only road to an elementary school? I don’t know. No, it doesn’t have to be all cute and fluffy, but DANG.
SOooo that being said, the kid has slowly come to enjoy the fun spookiness of getting lightly scared at the Spirit store by things that jump and pop up. Funny stuff. I thought it’d be fun last time we went to let her pick out a couple of prosthetics and see what she’d do if I let her just go crazy making me into something else.
She excitedly picked out some horns and an eyeball. Her goal? “To scare daddy right out of his pants!”
So apologies if this post is heavy with selfies, but I was trying to get good pics of what she was doing, because she learned so much. And she learned about spirit gum, and how you can use it to attach things to your skin.
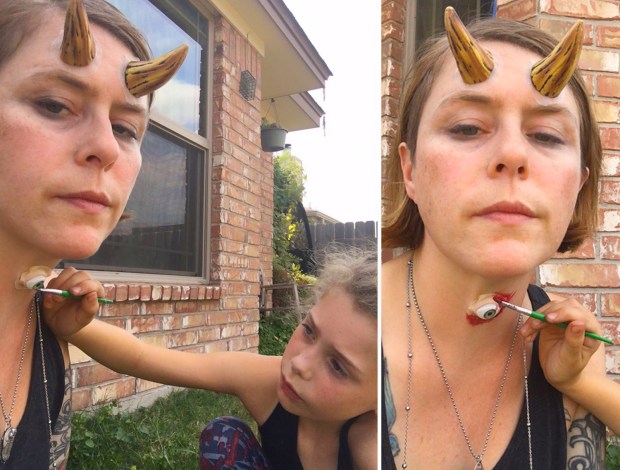
She carefully did her best to make it “realistic,” as if I just sort of grew these horns straight outta my face. (We always use Snazaroo facepaints, because we both have sensitive skin, and I learned early on that it was the only one that didn’t break us both out in a rash.)

 I helped a little around the eyes, and Myla did her best to make it as scary as her lil 8-year old mind could, saying “Daddy is going to be SOOOO scared!!” (…Considering my husband isn’t at ALL a fan of horror, her goal wasn’t exactly unrealistic…)
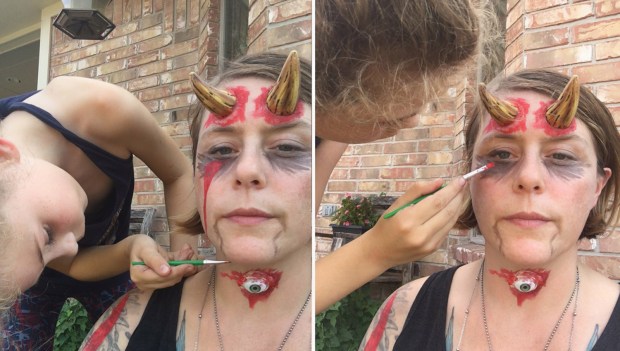
So there it is! Easy and fun, for any kid to do! Now’s a fun time, because those little Spirit Halloween stores have so much to play with. It doesn’t have to be much–I think both of these pieces cost around $7, and the fun we had making a monster was worth it.
Incidentally, I didn’t exactly scare the pants off Daddy (although he did say I looked terrifying), but he did get a good laugh out of it…

Especially when she asked if I could do the same to her, and I let her tell me where to put everything…She did her own makeup on this one, too…

So, yeah, a little paint-on blood? I can see that. I’m not a nun or anything. But this is about as gross as we get.
What are you all doing for Halloween? Does Halloween mean gore and guts to you? Or just spooky fun?
MockInktober!
A couple of years ago, the kid and I did the Inktober challenge on our Instagram page, and called it “Mockinktober.” There are many versions out there, but the basic idea is to post a drawing or art project each day, with a spooky sort of theme.
 (Our Blythe dolls, Mavis and Sweetie dressed up for the occasion…)
I like this challenge, because it always gets me started with other ideas of things I’d like to draw.
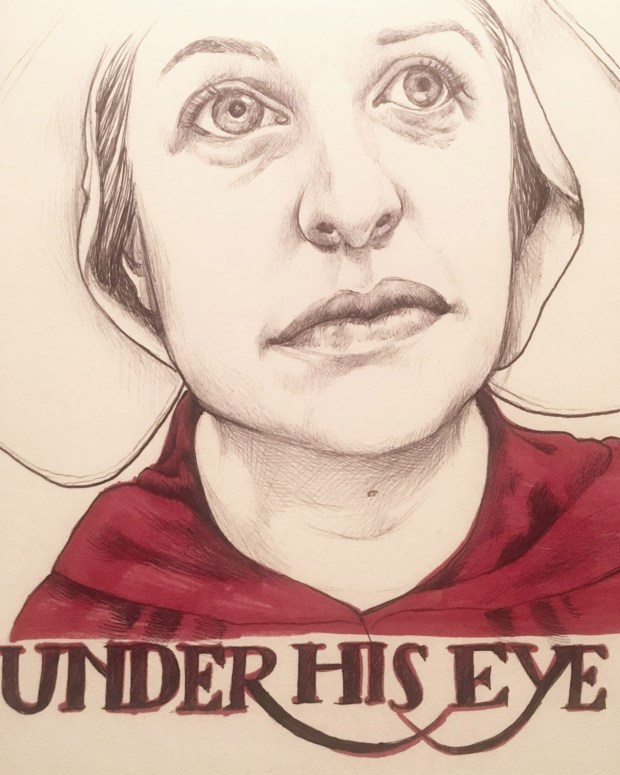
For example, I just finished listening to the audiobook for the Handmaid’s Tale (talk about a horror story!), and wanted to draw this one from the series…
As for WHAT to draw, there are so many options…
The originator of the “Inktober” idea puts out a general list of broad word prompts that are fairly open-ended (meaning each word could mean something different for each person):
Our dear friend Mab Graves put out this list for her event, she calls “Drawlloween…” and always encourages open mediums (not just ink) and friendly fun…

And Myla and I sort of do a little of everything. This year, we just wrote a list of all the spooky ideas we had. Then when Mab’s list came out, we sort of aligned the days that matched with her event so we could play along with hers too. And because Myla sometimes likes to do her own thing, we chose some other random things to fill out our list. And we might repeat some of them, if the category is good. And some days, we might do something else entirely not on this list, and it’s okay, because it’s just for fun, and we do what we want.
 So basically, you just pick something, create it, and post it! If you want other art-people to see it, put the hashtag for each group on there in Instagram, Facebook, or Twitter–it sort of “files” it with other people who have used that hashtag. Click on a hashtag and see what other people are posting! There aren’t any prizes, it’s just a fun practice. And if you can’t do all of them, try to do a few!
It’s only been a few days, so here are ours so far:
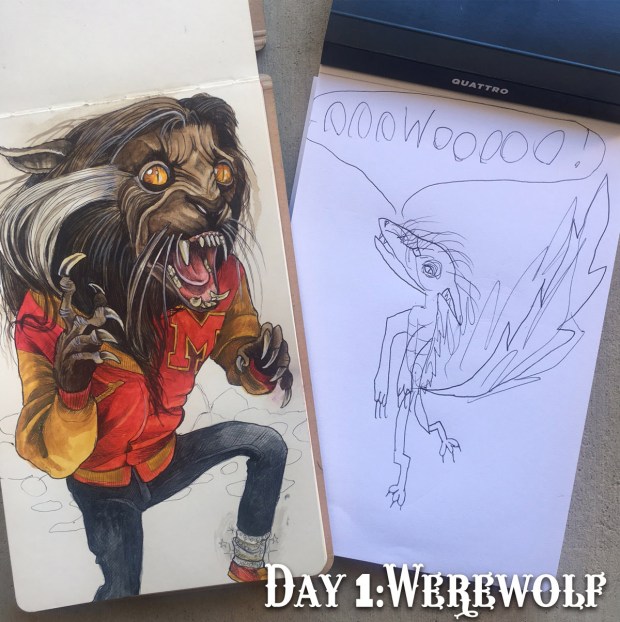
Day 1: Werewolf. I drew MJ from Thriller (because I always loved watching the “making of” of that video), and Myla drew her own version of Professor Lupin (because she always thought he should have a tail)…
Day 2: Goblin. I drew Bob, head of the Department of Small Coins at Gringott’s, and Myla drew a goblin warrior girl.

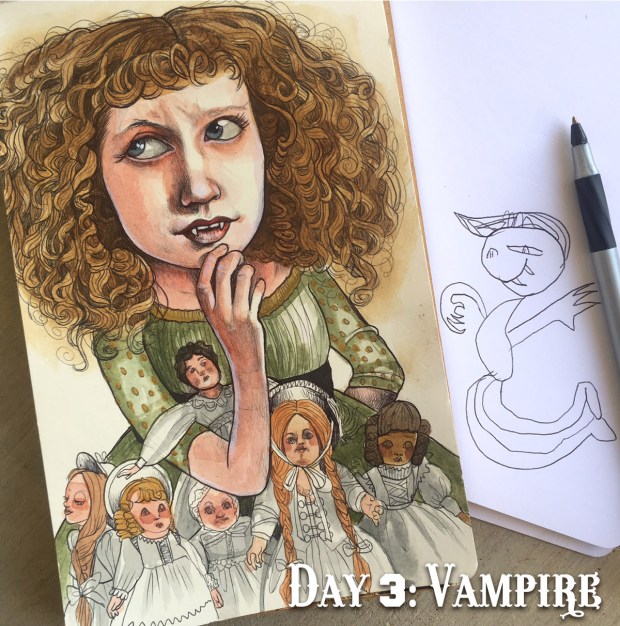
Day 3: Vampire. I drew a sad little Claudia from Interview with a vampire, and Myla drew a quick teenage vampire boy before heading to school…
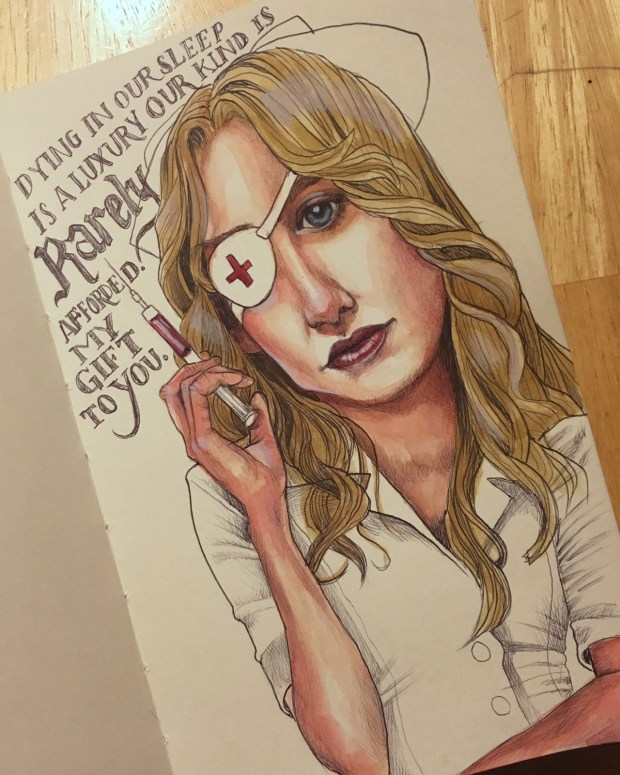
Day 4: Evil queen. I drew Queen of the Damned, and Myla drew a Goblin Queen…

And that’s where we are so far! I love browsing the hashtags to see what other people have done–there’s so much good out there! One thing I like is that as I’m looking for references to draw from, I come across so many others I want to draw, and sometimes I draw them too. So I end up getting extra draw-y during Inktober.
Here’s a cranky Elle Driver from Kill Bill…
And Myla won’t look at this next one, because it has blood. But blood splatters are spooky and also (I’m sorry) fun to paint. I don’t always draw guts or things that are too gory (that’s not my thing), but ink / red splatters always seem to brighten up a spooky doodle. So if you’re squeamish, maybe scroll past. I just use it as background decor, actually. It’s GoGo Yubari, another Kill Bill alum, who really knows how to wreck junk up.

I’ve been really trying to fill out the whole page, and be pretty sparce with my colors sometimes. It’s a fun challenge.
Myla got all excited a few weeks back when we made our list, and did the first few prompts early, just for fun.

We’re only a few days in, but here are a few pointer ideas:
- Have a sketchbook dedicated JUST to your Inktober/Drawlloween/Mockinktober drawings.
- Make a list of your own, maybe on the first page of the book, not only with prompts, but with what you might have in mind for each prompt.
- Gather any references ahead of time. I use a lot of pop culture references, and I can’t tell you how many printouts I have of references, and how many folders of references I have on my phone.
- Don’t be too hard on yourself! It’s not a job application or anything. If you don’t make it, no big deal. It’s just a fun challenge, so you’re the boss.
- POST IT! Share your artwork, show people what you’ve done, and see what other people have done! Communicate, comment on their work–it’s just a fun way to be supportive.
We.., there you go. Happy Mockinktober! And if you join in–happy creating! Aaaaaand if you want to share your creations, feel free to post them on my facebook page!
Plastic Pumpkins
A million years ago, when Myla was four years old, we bought a plastic pumpkin (because the husband was deployed, and I didn’t have the energy to scoop the guts out of a real one). I got out the permanent markers like a good mom (ahem), and let my daughter go to town on it.
I drew a face on it to get her started, thinking she could add things to it. Instead of adding features to the face itself, she drew characters (mostly Batman–her favorite at the time). Which was still pretty cool.
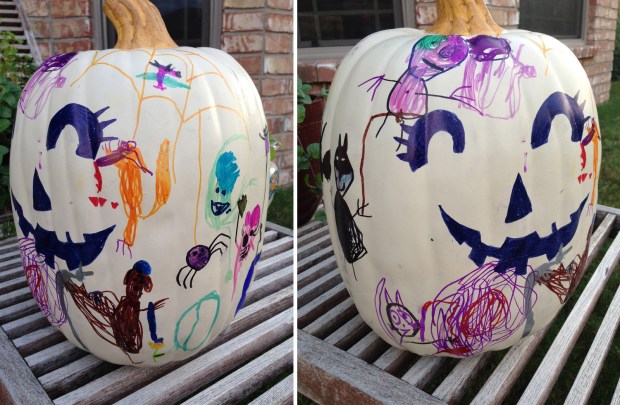
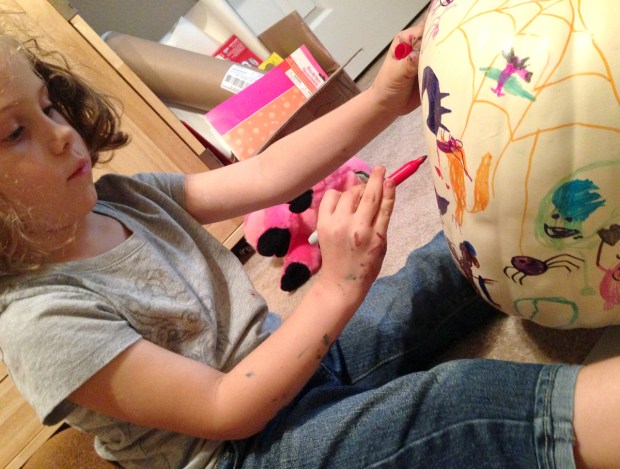
This year (because I just don’t like the mess of a real pumpkin), we were looking at Halloween decorations, and instead of buying a new one, I went back to this old pumpkin, made sure I had a bunch of photos of it, and then painted right over it with acrylic paint.
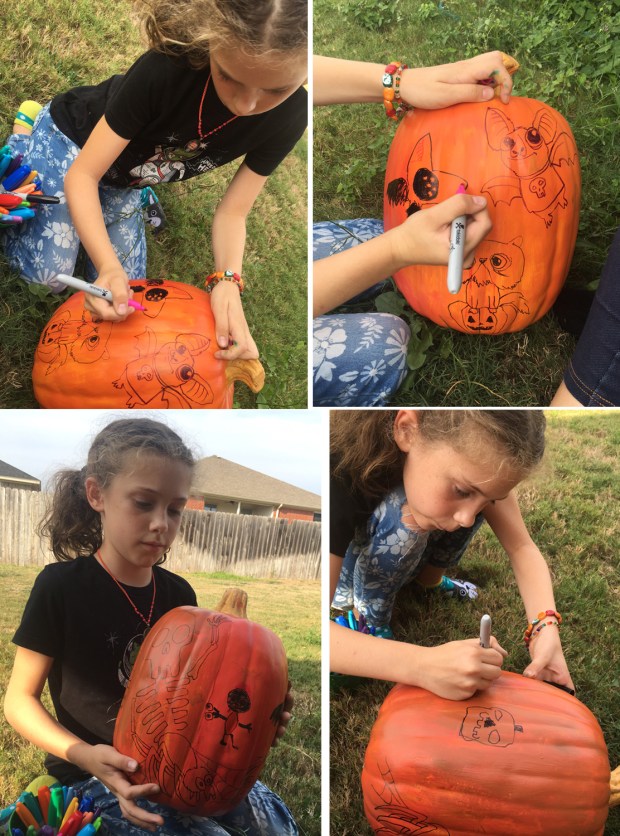
And once again, we sat down outside with our markers in the warm autumn…sunshine (this is Texas, y’all), and filled it with all sorts of Halloween goodness. I thought this time, we’d draw characters that I could paint with more detail later (which Myla thinks is sort of like magic).
Once it was done, I used my acrylic paints to give it some quick paint detail. It’s a pumpkin, so I didn’t go TOO crazy with detail, but I had fun making the little doodles we drew come to life. (MWHAHAHAH! IT’S ALIIIIVE!!!)

It occurred to me that there was a pretty empty area to fill, and instead of drawing something new, I filled it with a quick lighting bolt, which is SUPER easy, and I’ll tell you how to do it, “step to step” (as Myla used to say).
Step 1: Draw a big ol’ wiggly line that takes up the area you want to fill. Step 2: Add another big ol’ wiggly line if the area is a wonky shape. (It doesn’t matter too much what it looks like–it’ll look fine when it’s done.)
 Step 3: Draw wiggly lines coming OFF of your wiggly lines in random places, to fill out the wonky space. End the line in a sort of “branch” Y or V shape (depending on how you see it). Step 4: Keep adding little wiggly lines off of your wiggly lines. It doesn’t look great close up, but from a distance, people will get the idea. and BOOM! You’ve got lightning!
And it filled out the blank spaces in our pumpkin pretty well. Other space-fillers included spirals, rays coming off of the character, and spiderwebs….
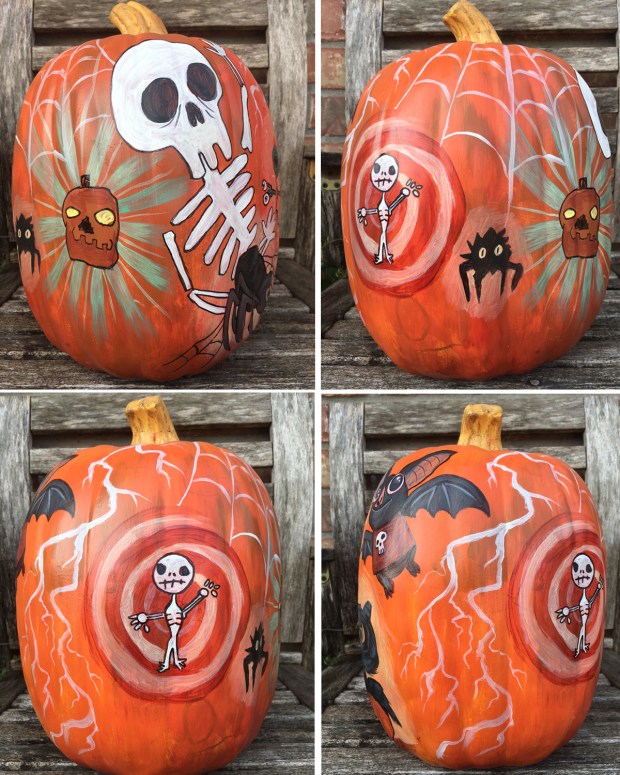
(Myla later asked me why her skeleton was on a target…I was actually going for a sort of Twilight Zone-ish sort of spiral, but I guess a target is sort of spooky too, right? RIGHT?)
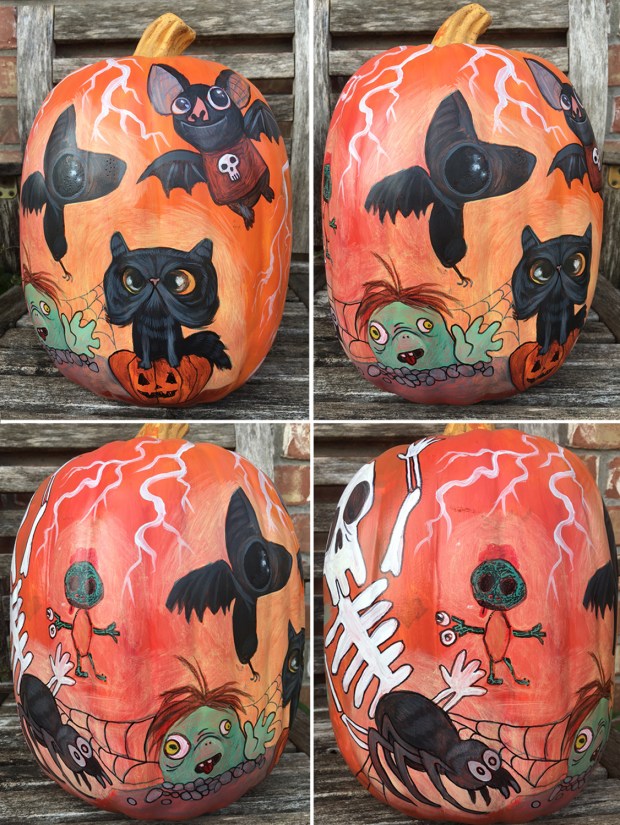
And there it is! You’ll notice my drawings are pretty indistinguishable from my 8-year old’s, despite my being a grownup, not to mention a fairly experienced illustrator. This is because Myla draws fast, and I have to draw fast to keep up with her. Which is why my “zombie” looks sort of like a green potato waving hello. That’s how I roll sometimes.
But the important thing is, we made a memory! We spent time doing something fun together without some grandiose end plan. Sure, we didn’t get pumpkin goo all over our hands, and we didn’t have to watch it decompose and liquify into slime this whole upcoming month, but we had fun drawing on our plastic pumpkin together, and we have a pretty cool keepsake for awhile now. And that’s totally okay, too.

By the way, if you’re into it, the kid and I will be participating in our own version of Inktober: drawing a spooky thing every day for the whole month of October. You can join us, and post your own thing on your own pages, too. No one wins any awards or anything, it’s just for fun to see if we can do it. We tried last year as well, but failed. We only really succeeded a couple years back–and you can see all our 2015 Inktober drawings HERE.
But this year, we’re READY! We can DO it! We’re probably going to do some other activities as well, because we love Halloween. So keep an eye out for our projects on Facebook and Instagram!
Happy upcoming October, everyone!
Don’t Lose Your Magic
The other day, Myla and I had a great idea to give our old Gnome House a reboot. We made it when she was around age four, and it’s gotten pretty old and dusty. We went to the craft store, picked up a few things, and got everything ready.
Overflowing with ideas, Myla excitedly said, “oh, we could put a little blanket in there, and some flowers, and remember how the gnomes came and made little footprints and even left us a little note?”

And then her face froze. “Or….” she said very carefully, with starling clarity. “…Or…did YOU leave the note?”
I was a little startled. I make a point not to EVER lie to my daughter about important things, and while I love magic, I’ve always hated to “lie” about those traditional things like Santa and the Tooth Fairy. But somehow, as a parent, you get sort of peer-pressured into doing all that, right? I’ve always made a point to tell her “it’s real if you BELIEVE it’s real.” But deep down, I always assumed she knew it was all pretend. I used to even ask her “do you want to know the truth, or the story?” …and she ALWAYS very seriously chose the story.
She said, “I wasn’t sure if it was real. But there was a NOTE, so….that was you?” Urg. My heart sank.
If you’re a long-time reader of this blog, you might remember the Gnome House story, and how we talked about how magical things were real if you believed they were real.
I had always told her that Santa was more an IDEA, and that you can make your own Christmas by doing nice things for others. And then, what did we do? We left cookies and milk for Santa.
When she started losing teeth, SHE came to me, excited that the tooth fairy would leave her a coin. So what could I do? I left a coin, and a little receipt that said “thank you! -Tooth Fairy.”
A couple of years ago, her classroom had an Elf on the Shelf, and I was SO grateful, thinking I had escaped THAT dreaded curse. Until we walked into a store, and there they were: HUNDREDS of elves for sale, waiting to sit on shelves. She GASPED saying, “we can adopt our OWN?!?!?” So what could I do? I had to start putting that dang elf into goofier and goofier situations for her to discover every day of December.

So, as we dusted off the old gnome house and decorated it, we talked a lot about magic. I told her that I had offered her the truth SEVERAL times, and she didn’t want it. Of course she preferred the fairy tale, who wouldn’t?
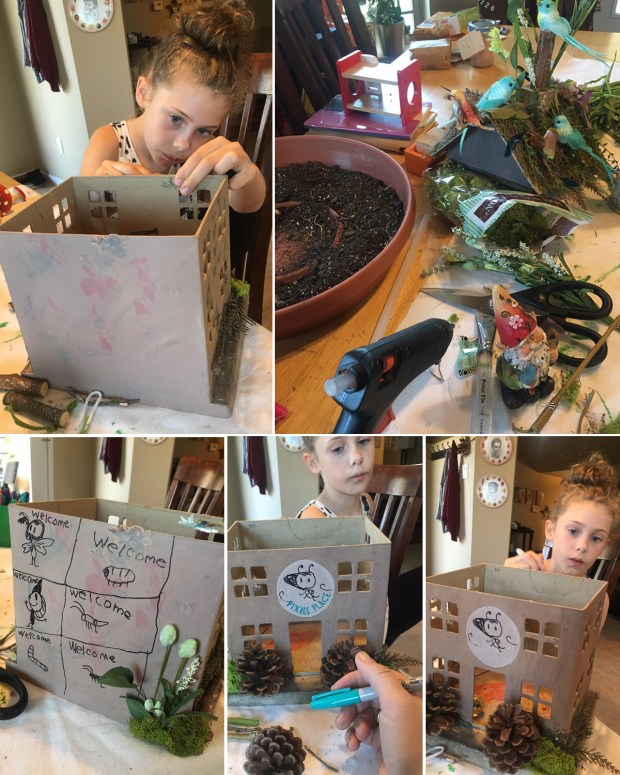
We painted over the old art, and filled it with new, and I talked to her, like a grownup. Like I always do.
First, I asked if she was sad. She said no, not at all–that she was just a little confused. She was just trying to piece it all together.

I said, I really don’t like to not tell you to the truth. And I don’t want you to think I am lying to you. But there are magic secrets as a parent that you sort of go along with it. Because kids are born with special magic, and parents REALLLY don’t want kids to lose that. Because as you get older, and more cranky about things, you start thinking everything’s terrible and nothing is fun. When you become a teenager, you sort of lose that magic for a moment, and don’t believe in it anymore, and everything seems like it sucks.
Magic is hard to see. Bad things are MUCH easier to see. But here’s a secret: If you look around and you can’t find any magic, you can CREATE your own! And that’s why parents do things like that. So kids don’t lose their magic. Life would be boring without any magic…

We talked about other things, too. It wasn’t ALL serious. There were lots of giggles and goofiness. It wasn’t an after-school special TV drama or anything.
I told her that as artists, we’re very lucky, because we have EXTRA magic. We get to paint it, sculpt it, animate it, and show it to other people who might not be able to see it themselves. We get to help keep that magic alive in people.
She seemed to happily accept all of this, but I felt my heart break inside a little. I don’t remember when I first navigated this stuff myself, but my parents handled it well, because I don’t seem to have any lifelong trauma from it all. But I still can’t help but imagine that I heard her heart break a little.
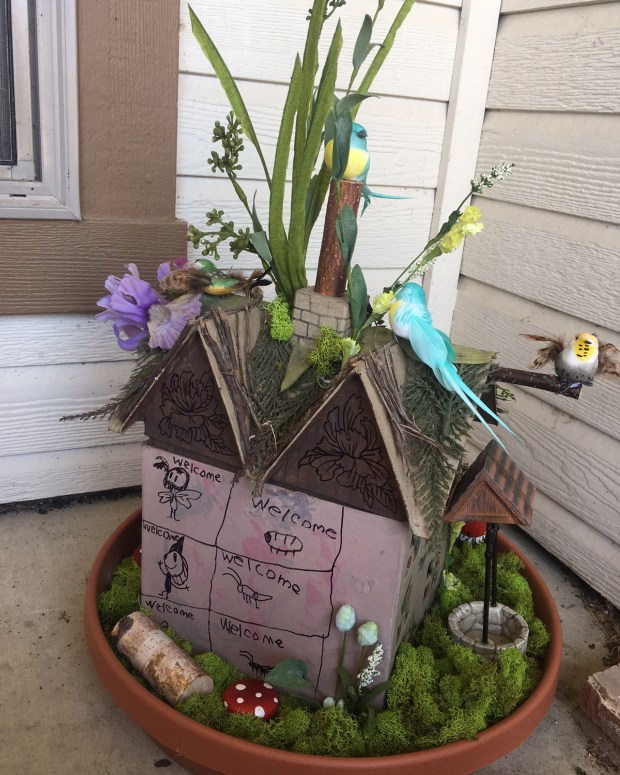
We finished our gnome house, which she called “Pixies Place,” where all things are welcome. She only wrote a few of them on the list, but you get the idea.
The next day (after talking to both my husband and then my mother as to what to do), I took her out for ice cream, and we talked more about it. I said, “here’s the thing: now that you’re old enough, YOU get to be a magic maker for other people. I kept the magic around for you as long as I could when you were younger. Now that you’re older, you keep the magic for other kids.” “And sometimes, even for grownups who have lost their magic!” she said. And that’s exactly right.
My mom had a great idea, of maybe a “symbol” of graduation, or initiation into this sort of “big kid club,” so I gave her a little necklace I used to wear as a teen…a little fairy with a glass bead ball. It looked like magic to me, and seemed to fit the situation perfectly.
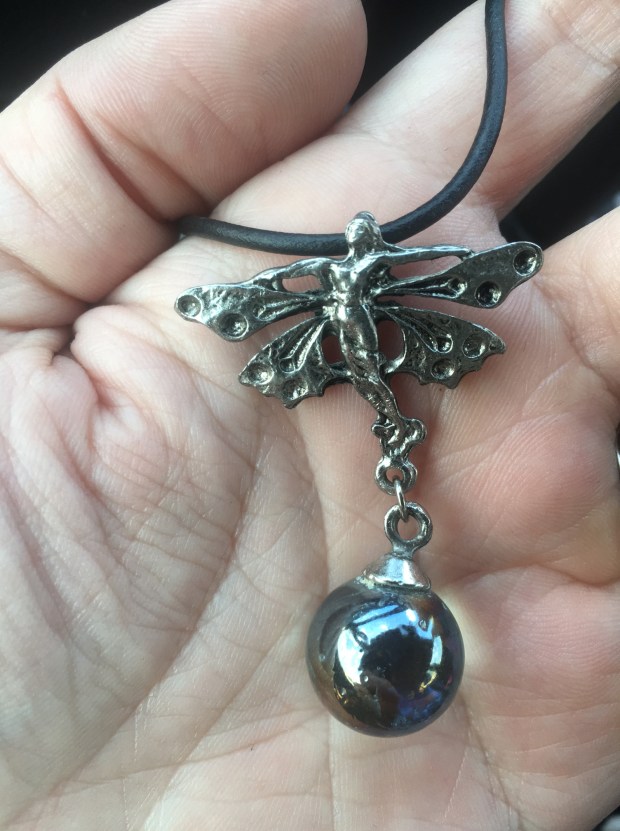
She said if you looked closely, you can imagine all sorts of colors in it–for all of the holidays, and all of the magic. She seemed pretty happy and proud. I was glad.

And I hope that’s enough. I want her to have that special magic, but she does need to know that sometimes YOU are the one that makes the magic, and that’s okay!
You really do have to LOOK for that magic as you grow up, because it gets harder and harder to find the older you get. And if you get to the point where you just can’t find it, you have to MAKE some magic yourself. It’s the best we can do.
Easy Fliers
When we first moved into our Texas house, I asked Myla (who was 3 years old at the time) what she wanted her new room to look like. All she said was “green and pink dinosaurs.” So that’s what we did. And although her room has changed a little over the years (mostly, getting filled to capacity with stuffed animals and art projects), the little hanging pteranadon I made from cardboard still hangs in the corner by her bed.
On weekends, we do a lot of art projects, so recently, Myla and I decided to make our own hanging fliers. I had a sheet of foam core (but cardboard works too), tape, markers, and an xacto blade. And aside from a bit of string, that’s pretty much all you need.
We started by drawing our creatures onto the foam core with pen. The wings took a little help, as I was planning on having them slide through a slot in its upper back. If you’re not up for that, you can just do half a wing, flip it over, and trace the other side, and just tape it to the body. But not a lot of precision is required, really.
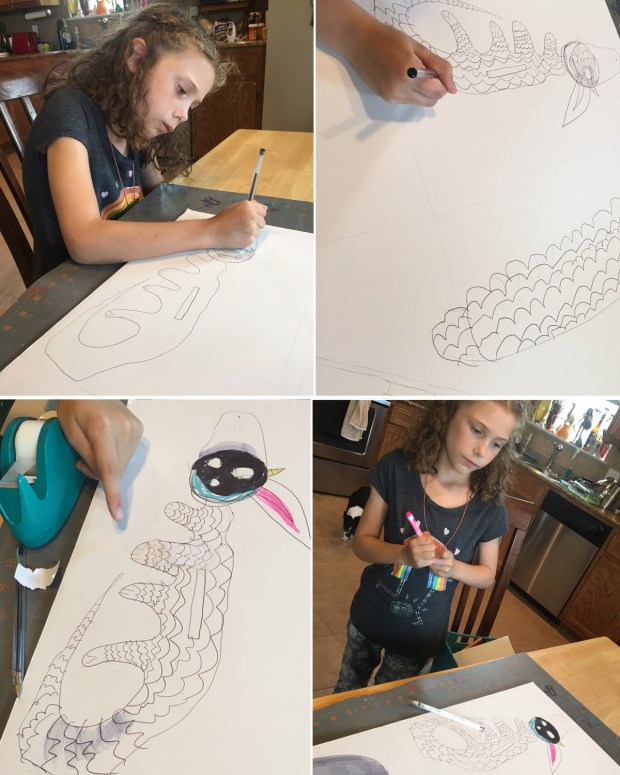 I took on the Xacto cutting myself, as I really didn’t feel like taking Myla to the E.R. for slicing her little kid-fingers off (keeping in mind that I might risk doing the same to my adult-fingers–I am quite clumsy). Once the creature was cut out, I gave it to her to draw on the other side, so her creature would be visible from all angles.

While she decorated the back side of her dragon, I hurriedly cut out the mockingbird I’d drawn, and hastily colored the flip side of mine (because she is a kid and works three times as fast as I do).

Next, we put their wings through the slots, and taped them down. BOOM–our own creature fliers!


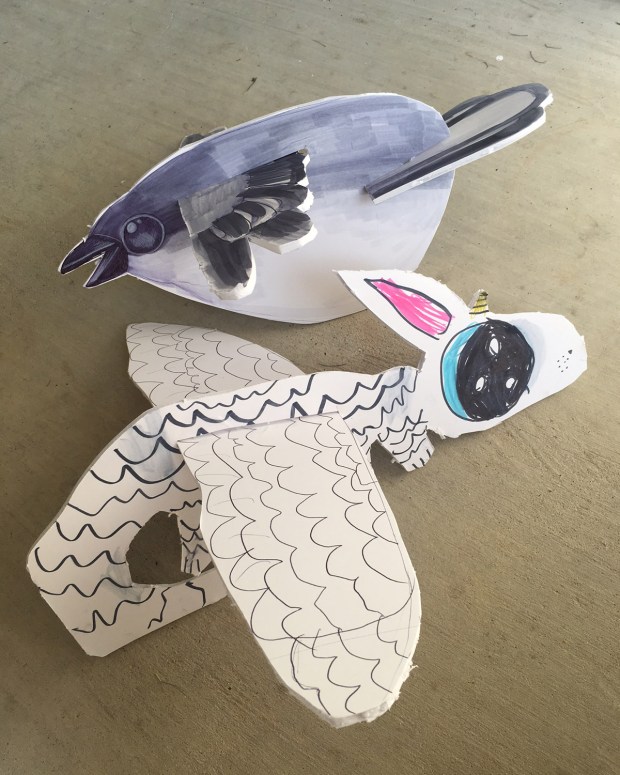
Here’s my finished chubby mockingbird, which I can then tape a piece of string to and hang from wherever I like.

And here it is with Myla’s dragon…
You can also make little fliers on a much smaller scale…While digging through old blog photos, I found this little project from ages ago, where we had made tiny palm-sized fliers one weekend, just using cardstock, scissors, and tape.

So there you go! If you’re looking for a quick & easy project to do with the kid (or to do for your own room), they’re fun and don’t require a big supply list. You could even use old box cardboard from the recycling bin (which is what I did with the pteranadon).

So play around and see what you come up with! And if you do, please show me on our Facebook page!

