Guardians
I grew up on science fiction. My dad was a big sci-fi fan, so when we’d go to the video store (yes, I understand that’s an ancient concept these days), he’d choose anything so long as the cover had space, spaceships, or aliens on it.
I remember seeing Star Wars when I was younger, and collecting figurines and spaceships. Alongside the wooden playhouse my mom designed for us in the backyard of our little house in Oklahoma, my dad built what was meant to be the head of AT-AT.
I remember staying at home with a sitter while my parents saw what they thought was a grownup movie about aliens, only to take my sister and I out the very next night when they realized how good (and kid-appropriate) E.T. was.
I remember one of the very first “grown up” movies I saw was Blade Runner. I was blown away.
So I think it’s fair to say that me & sci-fi go way back. Which is why of COURSE I loved Guardians of the Galaxy. I’m not going to review it, or go into in-depth conversations about how it relates to the comics (which I have not read, and don’t really intend to), but it was a fun little movie, and I enjoyed watching it.
What makes a sci-fi movie “real” for me is the characters. I love them, humor, flaws and all. GotG had some great ones, and nearly ALL of them interesting-looking enough to draw (which is why my IG feed has been flooded with all sorts of amazing character sketches from various artists). For me, GotG has a similar campy feel as Fifth Element did, with a sense of humor, and a lot of colorful characters.
So, of course, I couldn’t help but draw a few of ’em, too….
(Don’t worry, I don’t think I’ve got any spoilers here…)
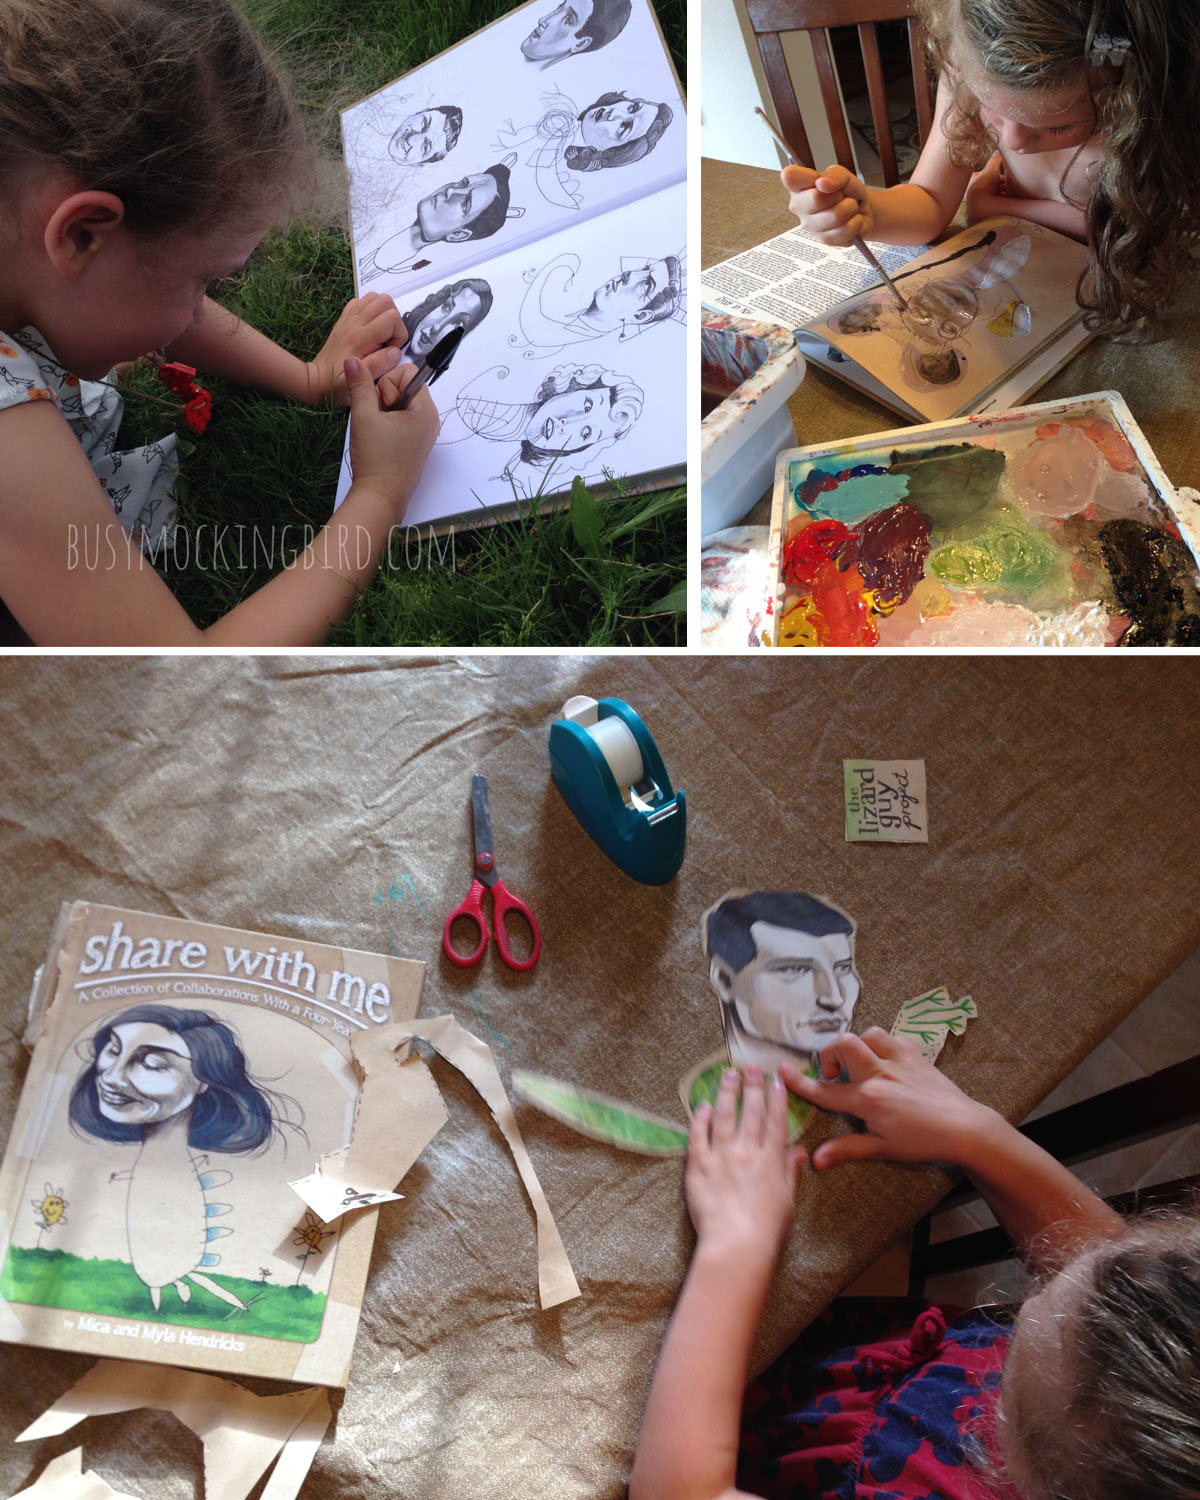
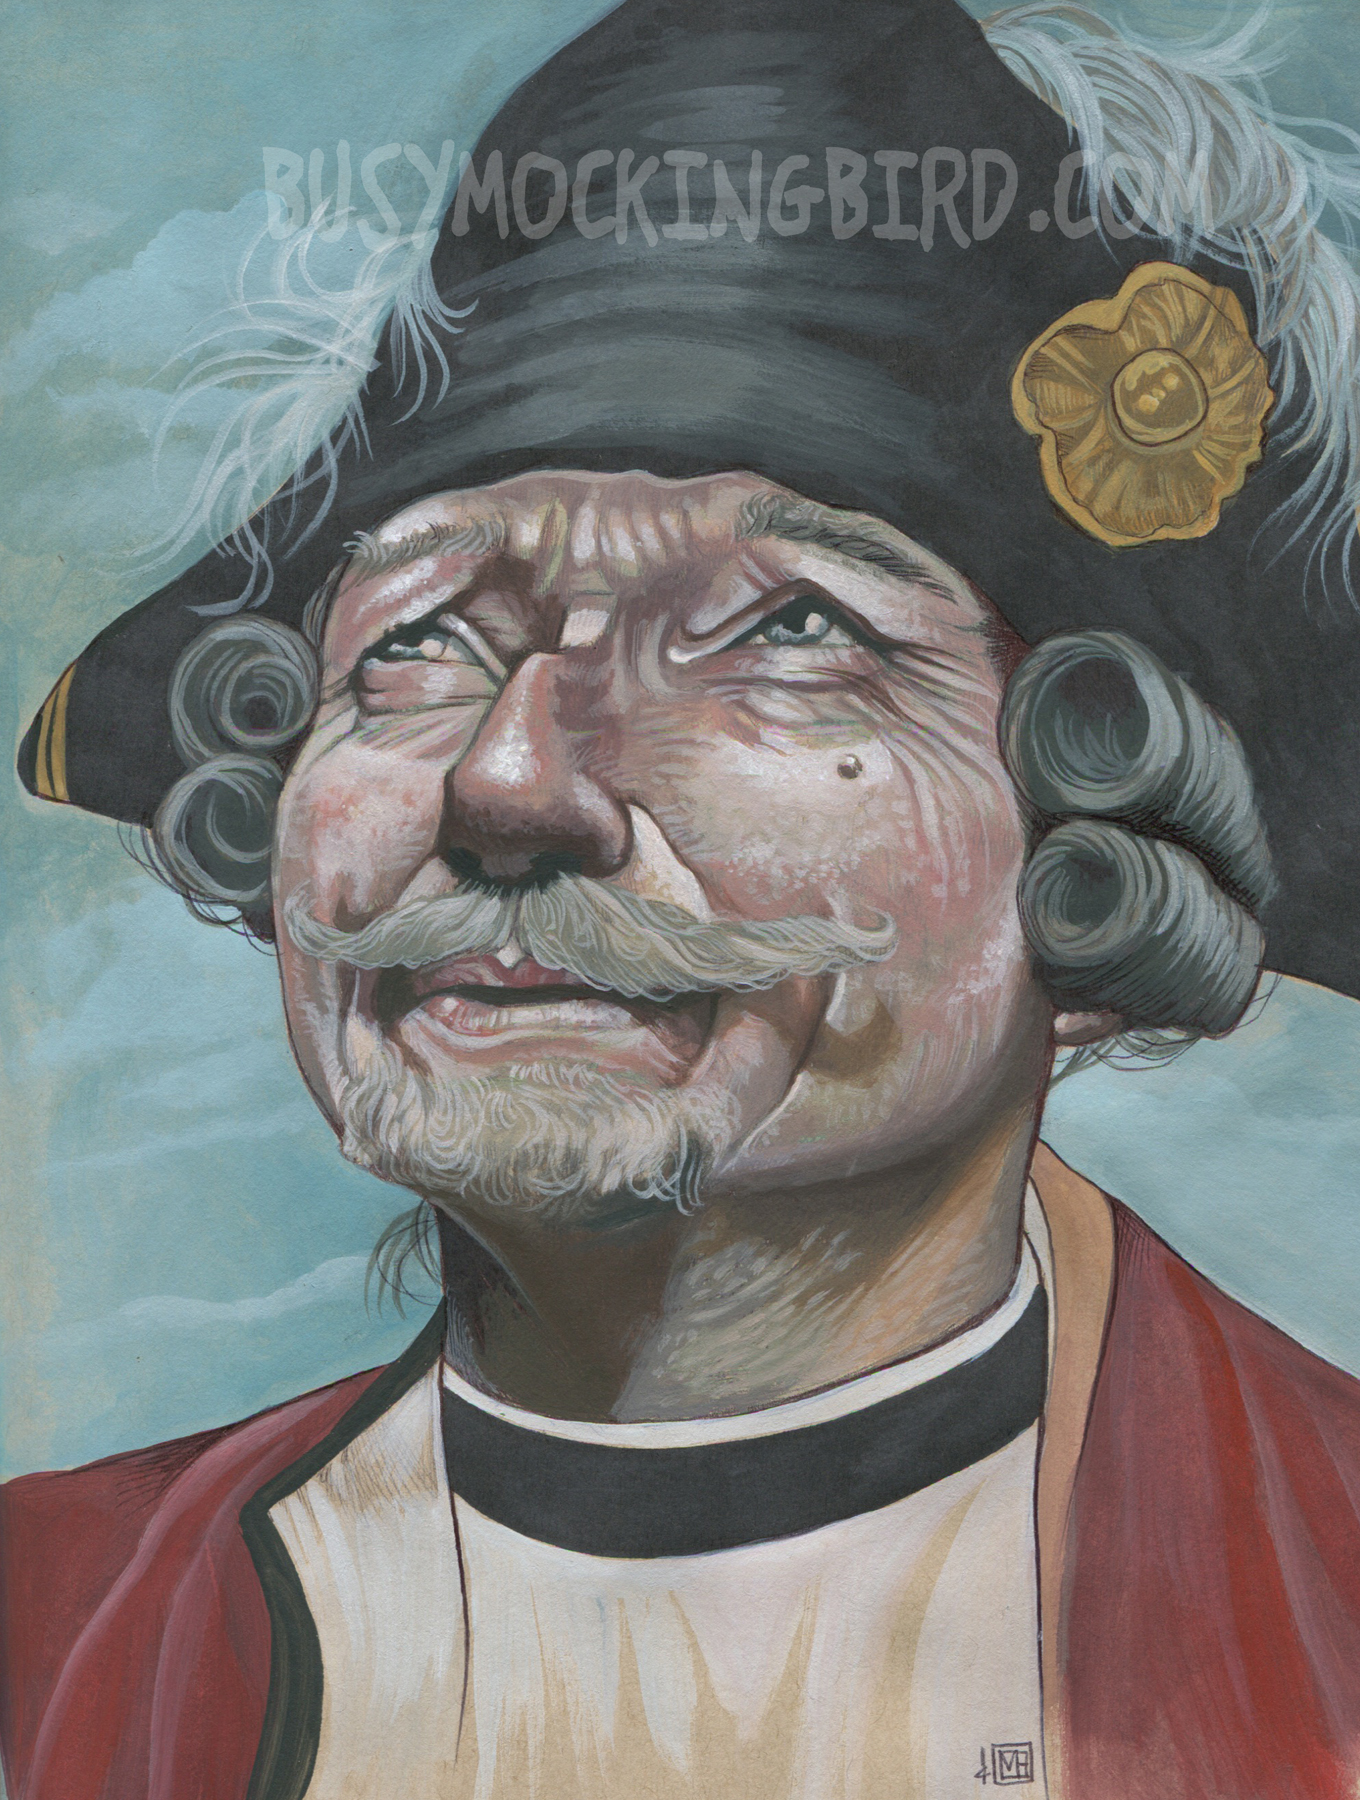
I tend to start off on the beaten path, so one of my favorite characters was Drax the Destroyer, played by WCW’s Dave Bautista (who was so good I forgot he was an athlete-turned-actor). Drax is extremely literal (as am I). I could totally relate to him, as a lifetime of literal misunderstandings have made my own life a bit confusing. He has one of my favorite lines in the movie, saying “Nothing goes over my head. My reflexes are too fast. I would catch it.” I had to get my blue & red ballpoints out and sketch him.

Later, I sketched the character named Yondu (played by Walking Dead’s Michael Rooker) who controls a deadly arrow with his whistles. This one I sketched in ballpoints, and highlighted with acrylics, and I’d just like to say that it was QUITE hard to draw a person whistling. Just sayin’.

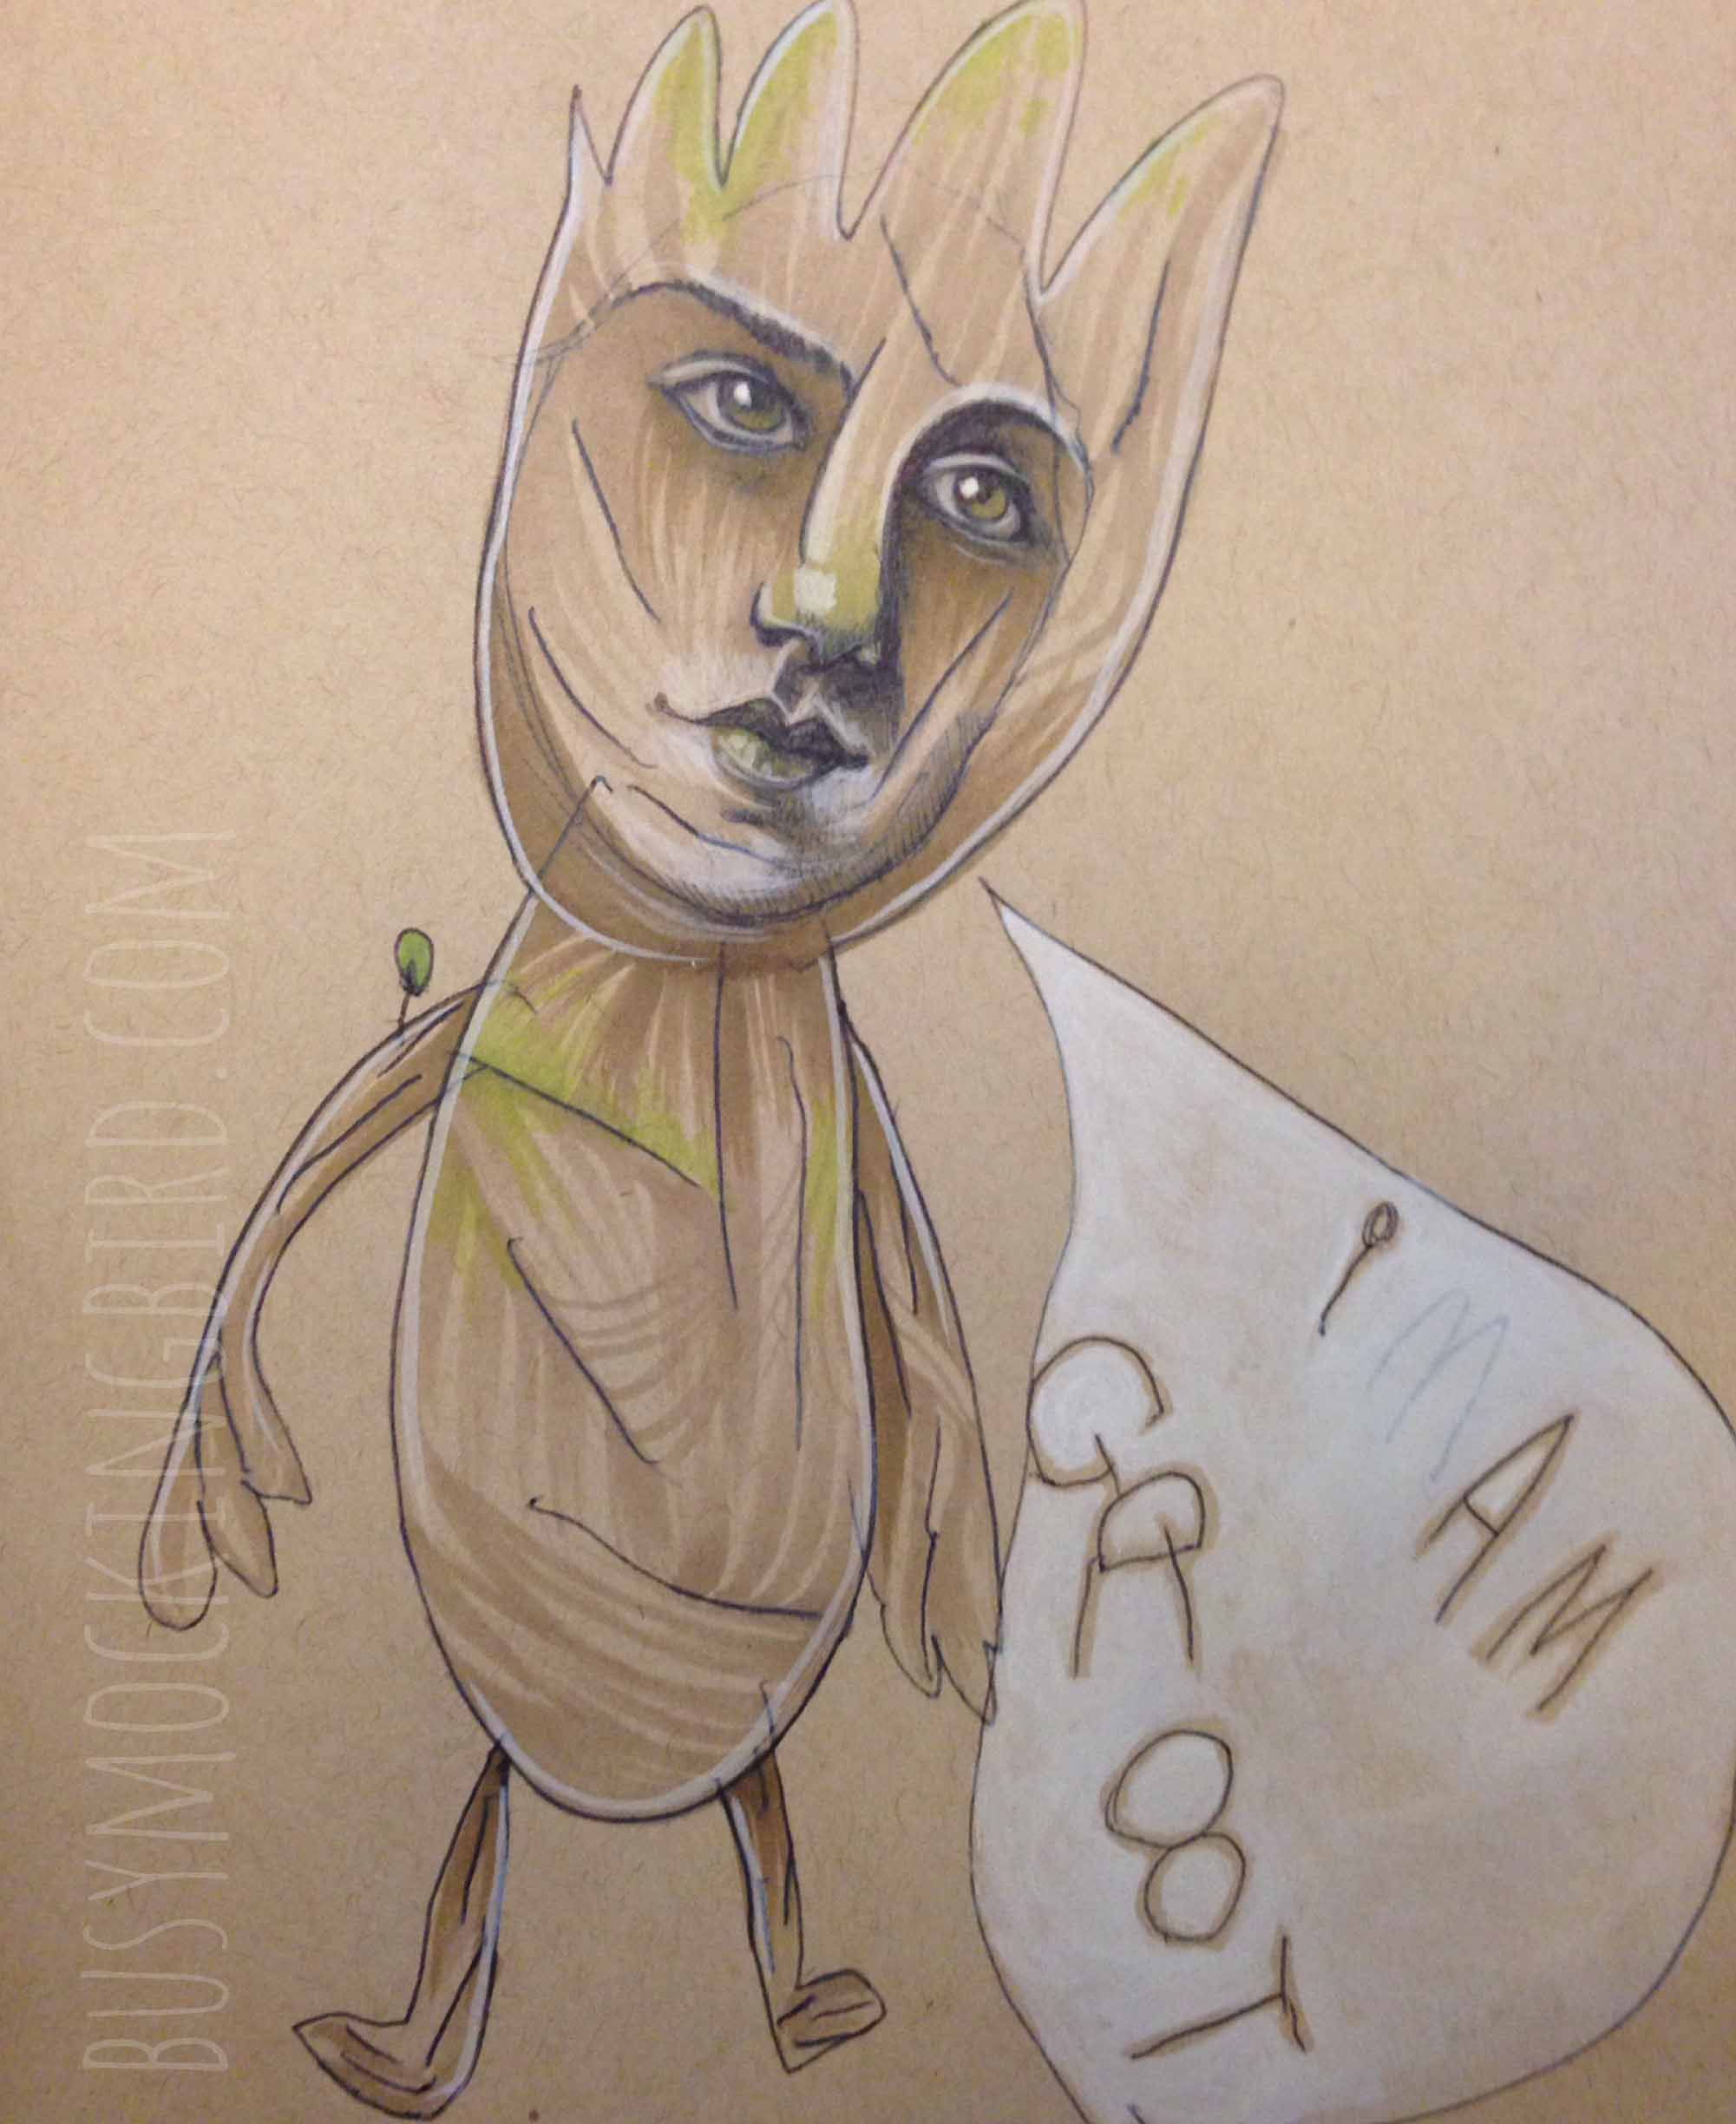
I have a couple of characters I’d still like to draw if I don’t run out of steam…like Gamora (Zoe Saldana) and everyone’s beloved Groot. I’m trying not to get overwhelmed by the plethora of inspirational imagery in that movie, so I think a couple more drawings and I’ll be okay.
Guardians of the Galaxy is rated PG-13, so I know a lot of kids went to see it, but aside from the fact that Myla is only five, heavy action understandably frightens her. Sometimes that can be a little challenging, trying to find kid’s shows that have no “bad guys,” and where no one gets hurt and there’s no conflict whatsoever, but I’m also quite okay with her enjoying the simpler things.
So when there are shows that come out where the marketing and products are EVERYWHERE, or other kids are talking about it, I like to tell her the simplified version. Instead of telling her the entire story of GotG, I tell her about the characters, so she still knows what everyone’s talking about, but doesn’t have to actually see the “scary show” herself. And in my doing so, she has developed a love for characters she’d never otherwise see: like Khaleesi, Daleks, and in this case, Rocket and Groot–as has most of the sci-fi world. I show her little video clips of the characters on YouTube sometimes, she asks me questions, and she loves ’em.
So the next time she asked to draw on some heads (as we do), she immediately turned one into Groot, complete with a little leaf on his shoulder.
And seeing Rocket in stores out & about, she asked lots of questions about this little raccoon character. She thought it’d be funny if he had bubbles coming from his gun instead of bullets…

So there ya go. Nothing like a little sci-fi influence for your day!
Playing with Mermaids
Inspiration comes in strange places. With the excitement of Austin Wizard Con looming, I have been playing with all kinds of ideas for the table display and the idea of little knick-knacks to show. And since I follow a ton of very talented artists on Instagram, I was inspired by them to try something completely new for me: molding and casting.
So I watched a few videos on YouTube, and now I’m an expert.
I won’t do a full DIY step by step, since I don’t really know what I’m doing and this is all new to me anyway (trust me, this is one of those situations where you have to just jump in and try it). But I’ll give a rough rundown of the basic steps, just to show you what was involved…
Step 1: Sculpt something.
I used Super Sculpey, and tried to come up with a little sculpted version of the mermaid girl Myla & I made. (I realize she looks very little like the original, but Myla said she was cute, so I think it’s okay…) Since kids have a natural magnetic attraction towards clay, I sacrificed a handful of Sculpey and let Myla make her own mermaid. (She modeled her after a character on Doc McStuffins, who is not, in fact, topless–but she couldn’t remember what her top looked like, so she just gave her breasts. I’m not sure if I should put a censored black bar over kid-sculpted breasts? I just go with it)…

Step 2: Make a mold.
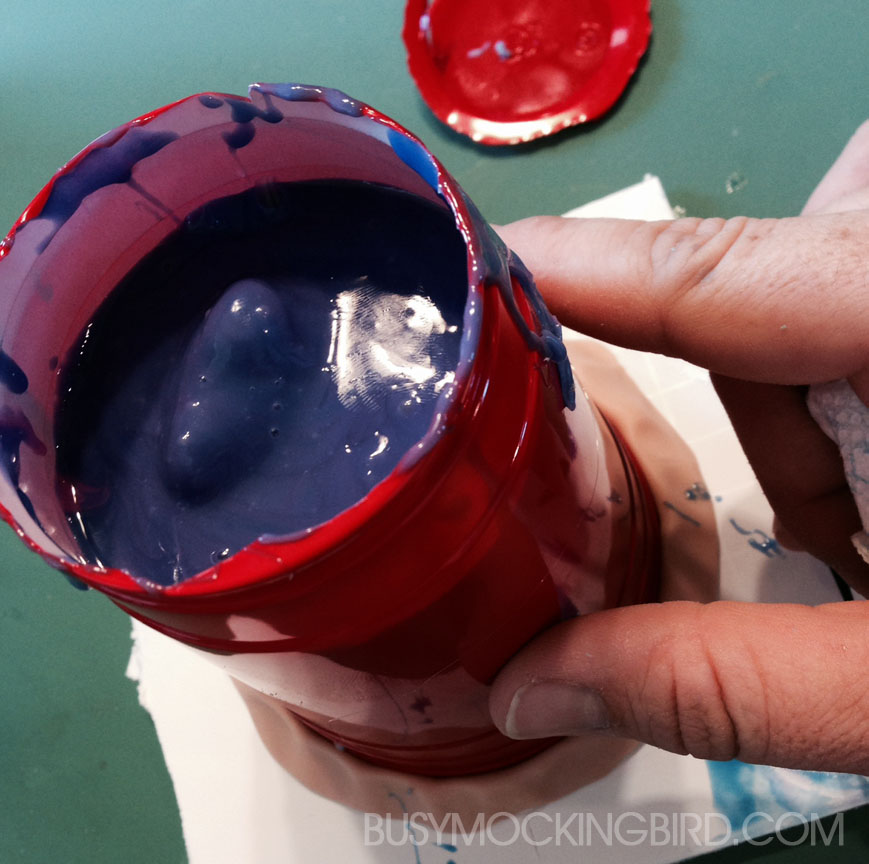
I got my kits from a company called Smooth-On (who have TONS of great videos on their site). I won’t give you every little detail on this, since the directions are really easy (and on the box)…but the basic idea is mix This with That and pour. (Plus, if I told you everything, I’d ruin all the messy fun for you.) The main thing I learned during this step: make sure you mix it REALLY well. If you don’t, it doesn’t set right. I made mine from silicone rubber in a plastic cup. I nearly didn’t mix enough for the tail, but it turned out alright.
Step 3: Cut your sculpture out
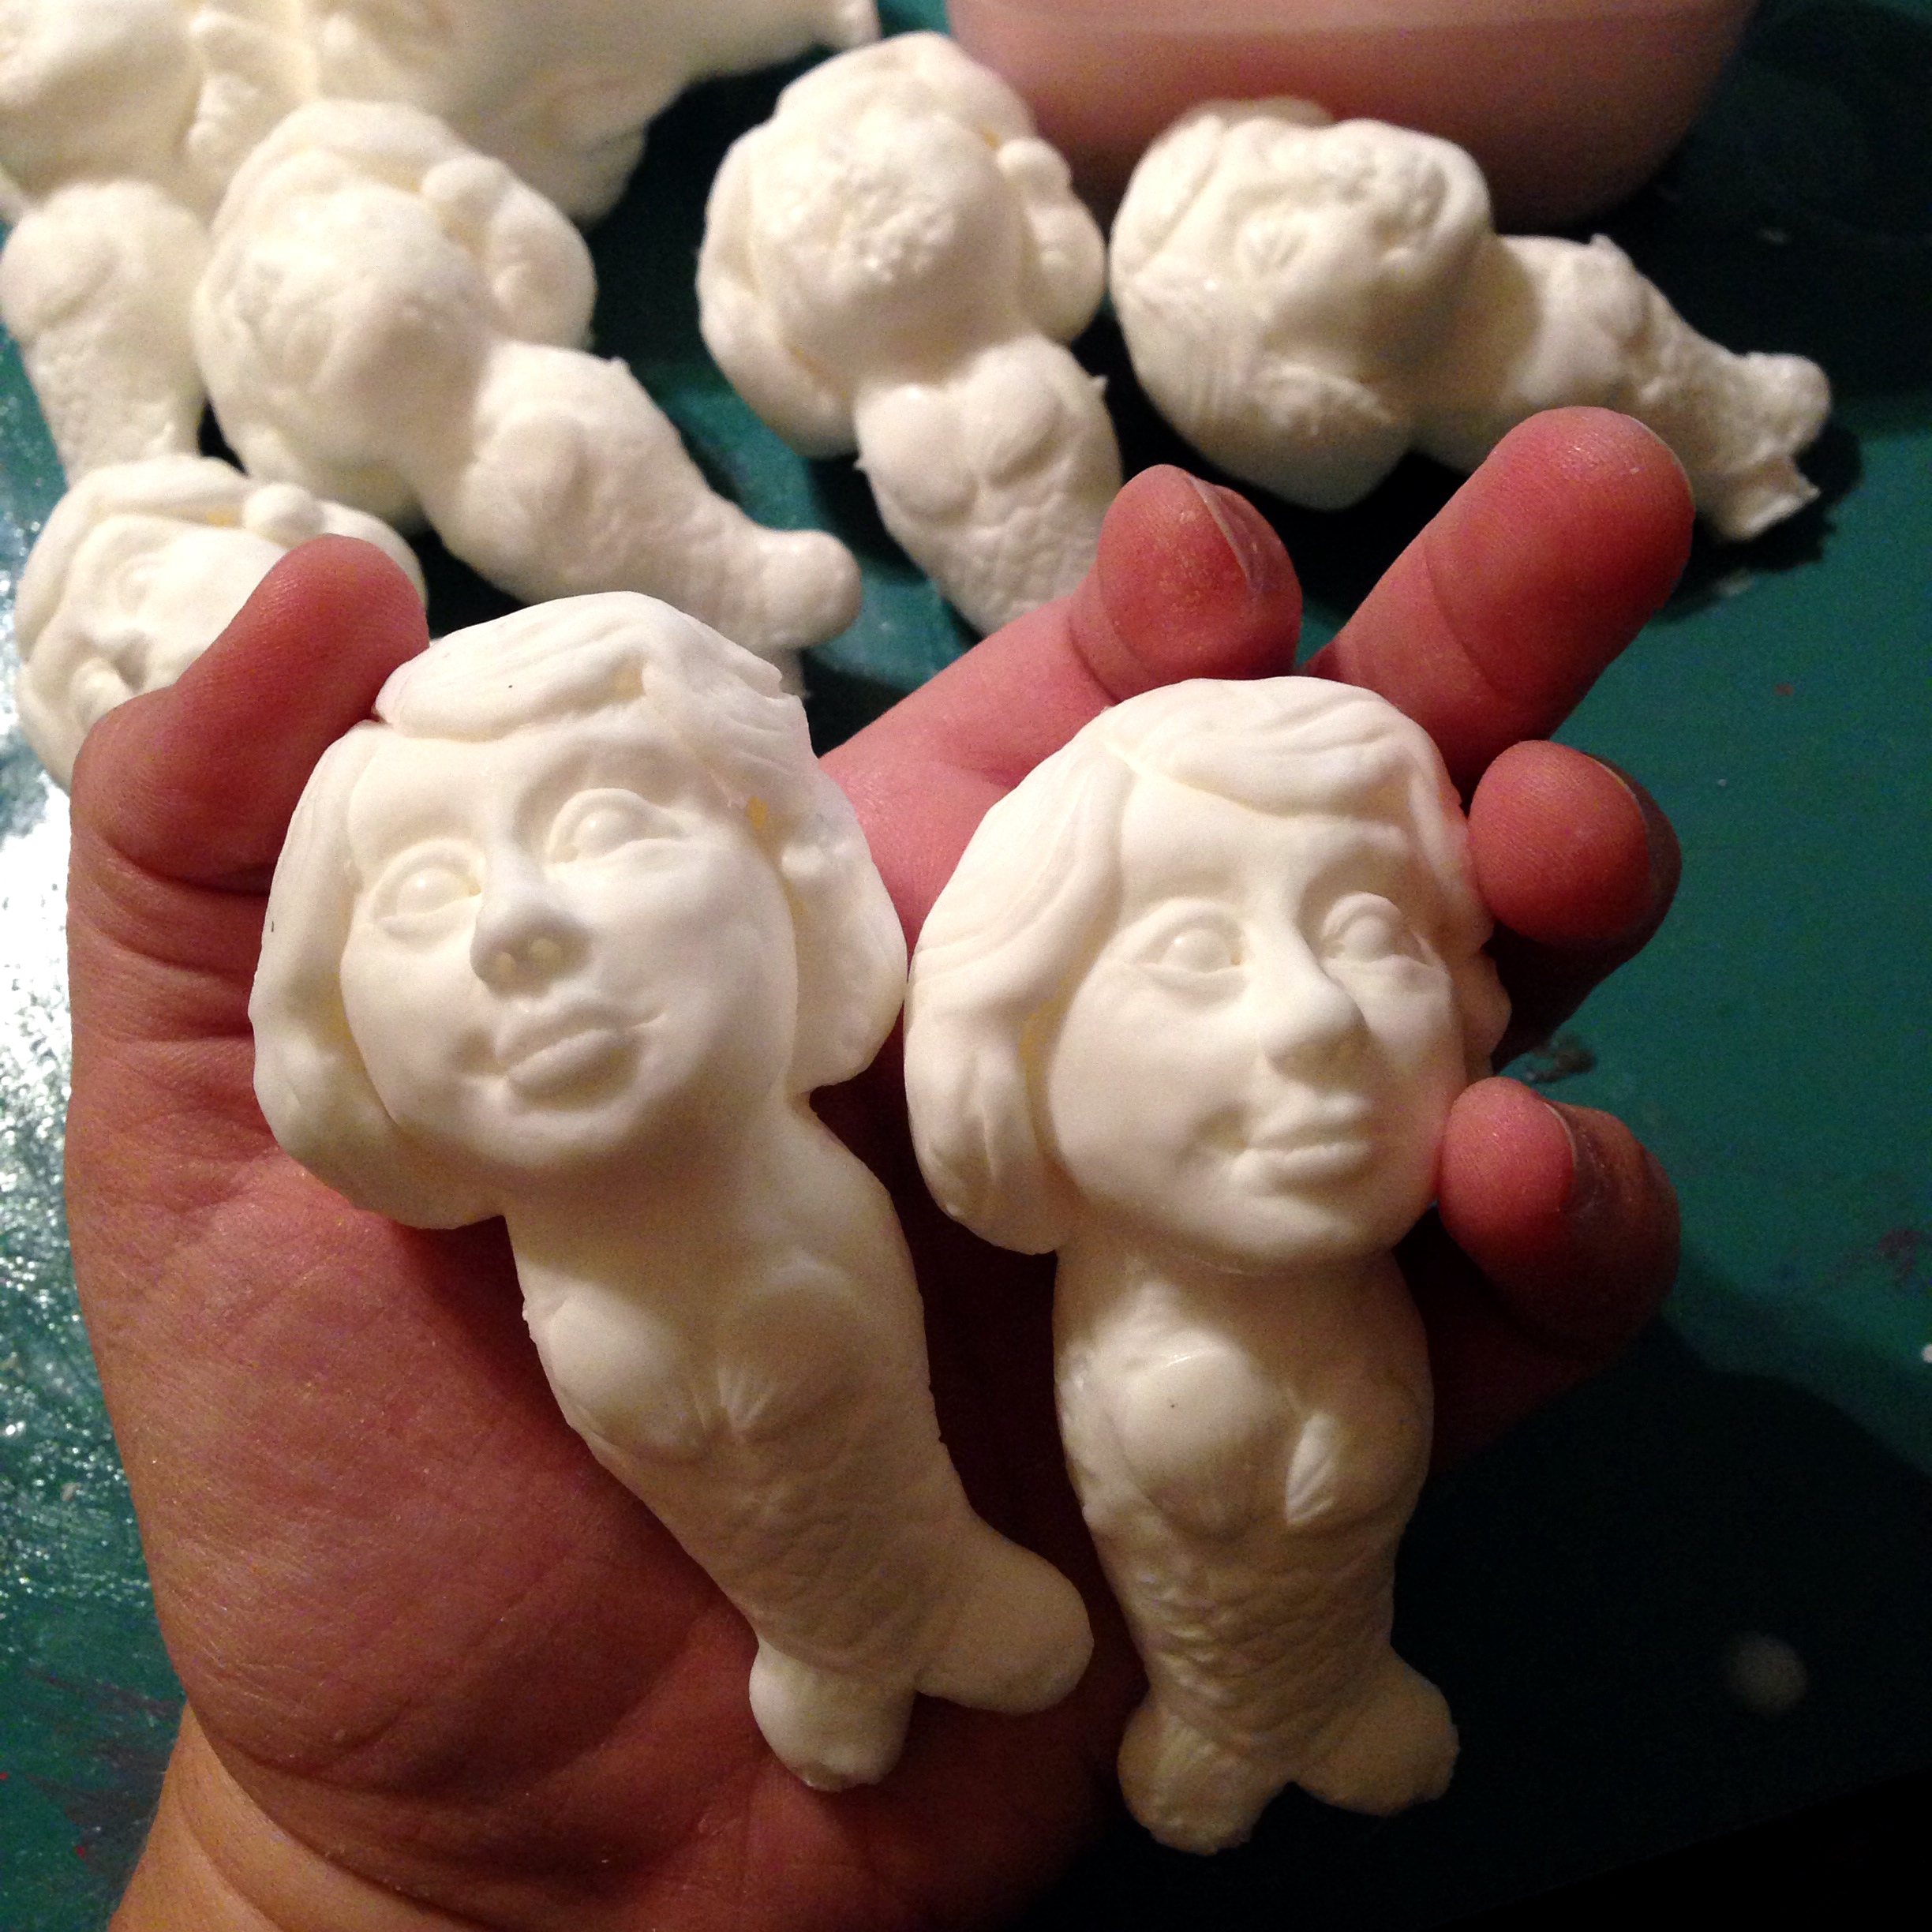
You know that bit of instructions that you think, “Ah, that’s not a big deal, I’ll just sort of wing it”? Well, turns out sometimes they tell you those little tips for a good reason. When I put my sculpture in the cup to mold it, I forgot to mark on the cup where the back side of her was. So when it was time to open her, and I “guessed,” I guessed wrong, and sort of sliced up her face. The stubby arms were apparently a little too weak for the whole process and broke off. And the body crumbled because I hadn’t fully cooked her. But the mold itself turned out fairly good. And Sculpey can be touched up a bit, so I patched her up and fully cooked her, and she was just fine.

Step 4: Pour plastic/resin into the mold.
The first go-round, I tried a liquid plastic kit from Smooth-On. And along with my repeated advice of making sure you mix everything the right way, I’ll add a couple of pointers I learned: First thing is that it’s probably a good idea to wear gloves. Initially, I gave that bit of advice a big ol’ “Pshhhht, whatever.” But plastic nearly ALWAYS gets on your hands, and it feels super creepy, like when you get superglue on your fingers. Blecch. And later, when I tried pouring resin, I had a bit of a leak in the silicone mold (it was a different mold, and I had two “air holes”), and it leaked hot resin ALLLLLLLLLLL over my work table. Trust me, that’s not fun at ALL. So my bit of advice there? make sure you don’t have a spot in the mold that might leak. And lastly, GIVE IT TIME TO CURE. I’m very impatient. But hot plastic hurts.

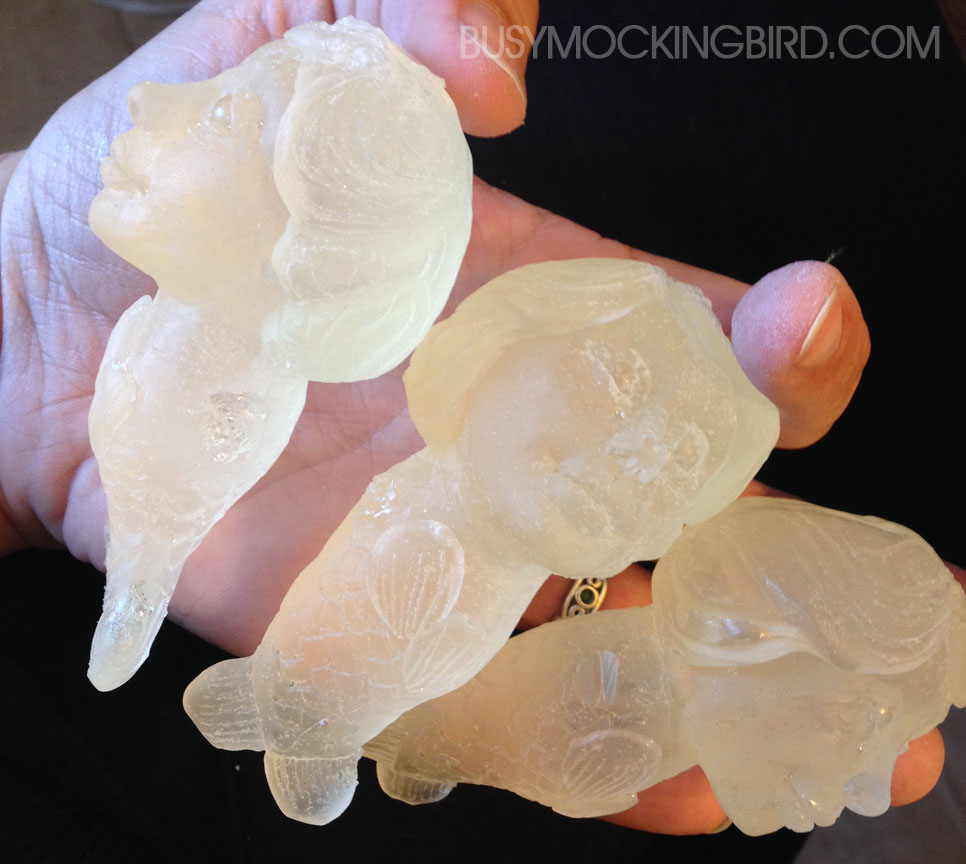
Step 5: Plastic mermaids!
So I messed up quite a few mermaids, but after some trial and error, I was able to get a few decent-looking plastic mermaids! Fun! I couldn’t figure out why their faces were bubbly, though, until I looked closely at the mold, and realized that the mold itself had bubbles set into it. Whoops. Later I made a better mold, and made it smaller and on its back, so I wouldn’t waste so much silicone rubber. That helped clear up any bubble issues, and gave me a much clearer mold. Apparently, having her on her back, and pouring the silicone in the corner and letting it sort of “seep” into the face on its own is the big trick with that. (I HAD done that the first time, but she was positioned upside down, and all the details of the face were on the bottom, leaving lots of chances for air to get trapped in there. Whoops.)
Step 6: Paint that junk
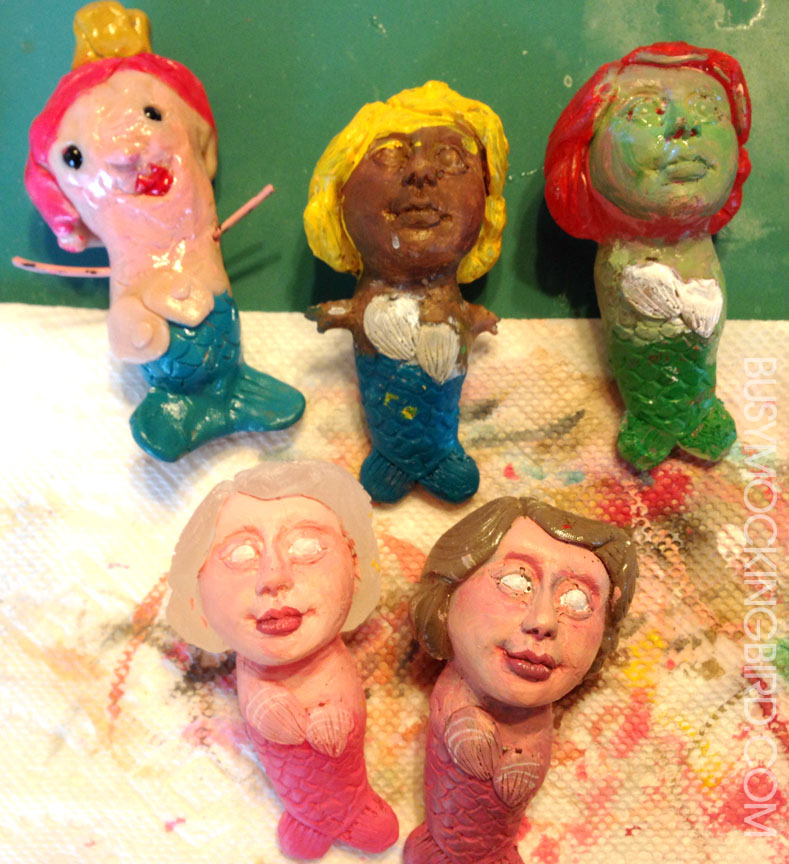
So with a handful of funky mermaids, I decided we should go ahead and paint’em up. Why not? And since they came out wonky, I let Myla have a go at them, too. 
I had a little trouble painting on the actual plastic with acrylic paint. (Myla had no complaints.) I even tried a basecoat of brown primer for plastic, but it just didn’t look so great.
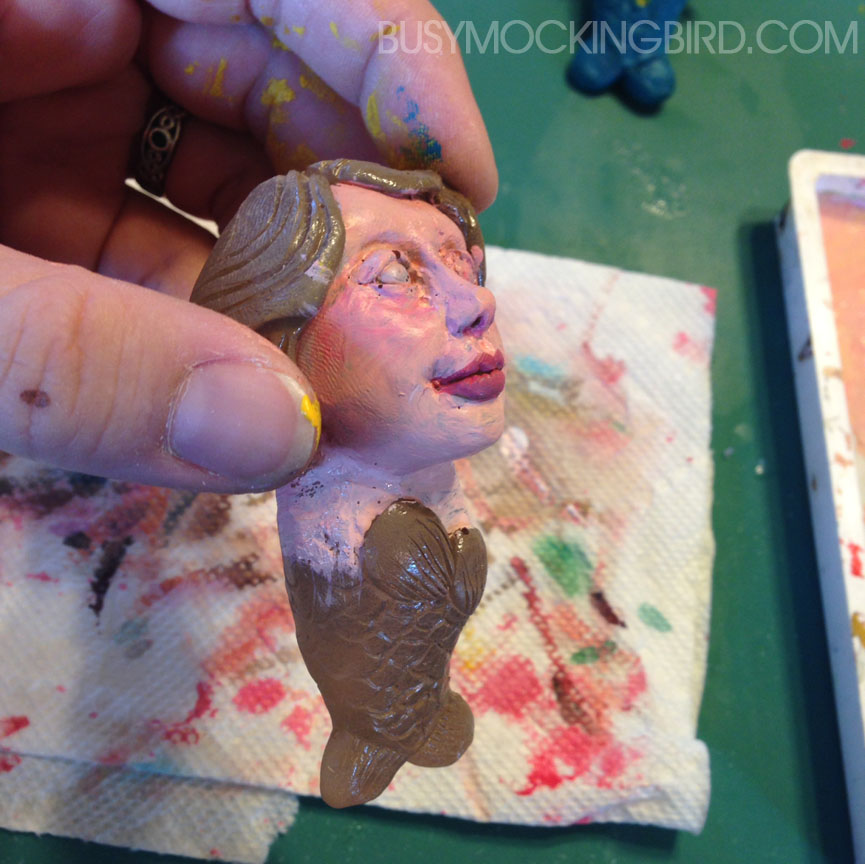 Myla had an awesome time painting them, though. She painted her McStuffins mermaid, along with a yellow-haired one (modeled after a Monster High doll), and a green-skinned Ariel.
 Later, after making the bubble-free mold, I tried casting in resin, instead of the plastic…and despite MANY failed attempts (note the mutant mermaid army in the background) I finally got some good ones!
 Apparently, again–the trick is very careful mixing. In my very limited experience, I’ve learned that if your mixture is off, it can do all sorts of wonky things to your cast. I haven’t tried painting these resin casts yet (I’ll try that later), but I’ll be sure to post the outcome!
With new projects, there’s always a level of intimidation for me. That casting kit sat in my art room for about 5 months before I actually got the courage to try it. But you know–when you do, it feels awesome to have finally figured it out! Even if you end up with an school of mutated fish-women, you can’t really consider it a failure if you’ve learned something.
So jump in and try something new! I promise, it’s worth it. Wonky mermaids and all.
Wizard Con!

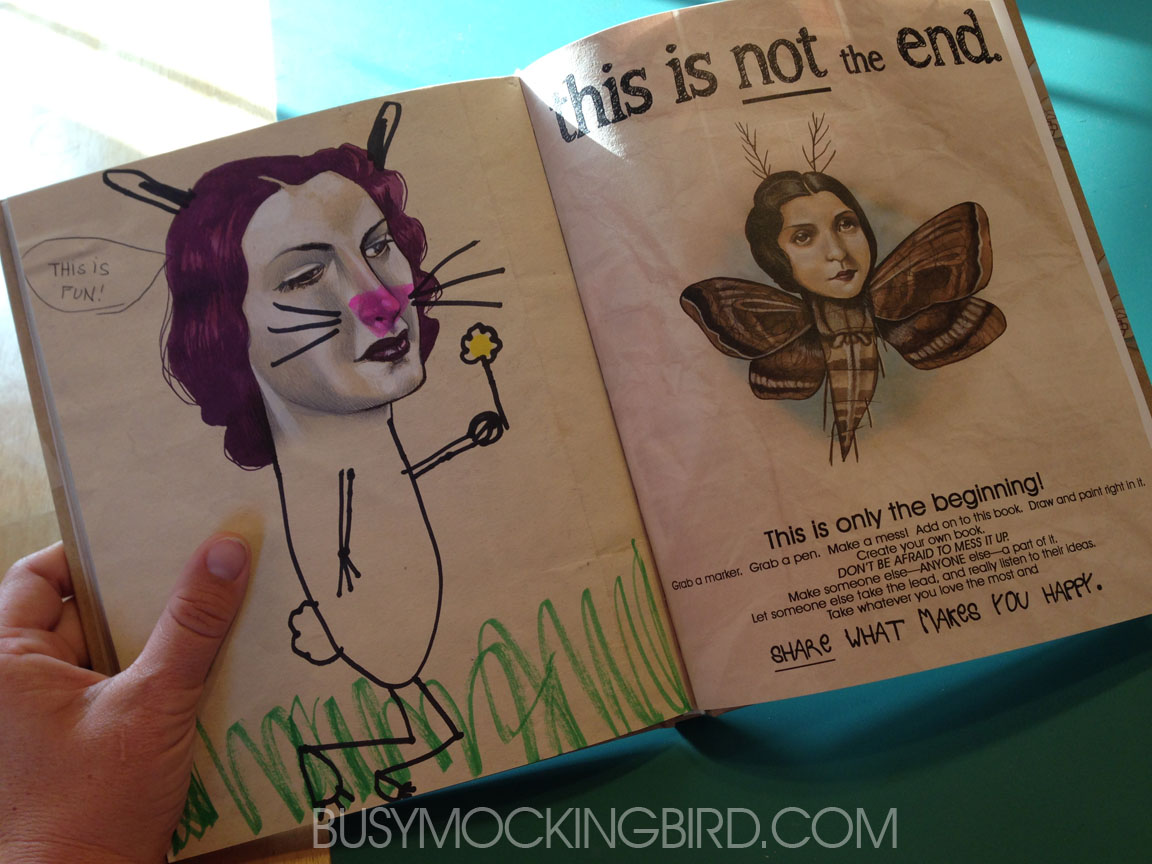
I can’t tell you all how excited I am that we were able to fund the Kickstarter to create our book–a compilation of the collaborative doodles that never could have happened the way I envisioned without the help of so many people. Now that the campaign is over, and I’ve got all these wonderful books to show for it…what the heck do I DO with them all?
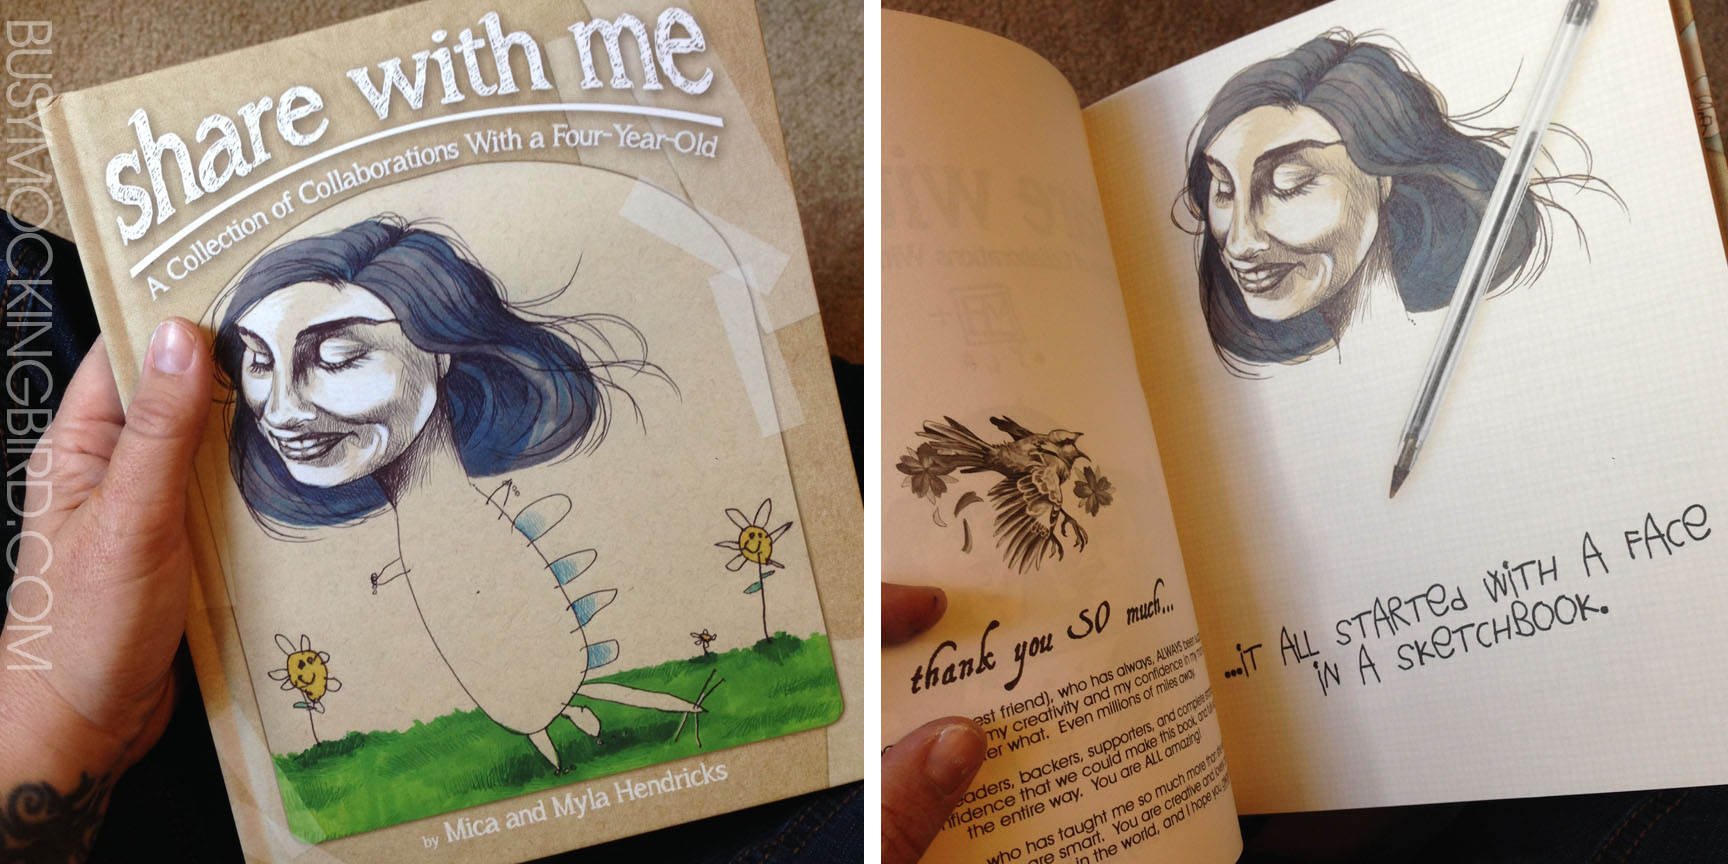
Welllll….you can buy copies of the books online at the “Book” link above…
But my younger sister (who has two teenage daughters, and is a VERY cool mom), suggested a comic convention! Her daughter dabbles in cosplay, and conventions are one of her favorite things to do. But a comic con?? For US?!?
…Well, why the heck NOT?
So I’ve decided to take our doodles to the Artist’s Alley at Wizard Con in Austin from Oct. 2-4!!!
This will be my first convention EVER, and I’m a little nervous. Not so much about breaking even, or making more than we put into it (that would be great, but not at ALL why I’m going), but because (of all things) of the CROWDS. The thought of swarms of people everywhere makes my heart thump and my lungs wither. I don’t like crowds. AT ALL. But I’m hoping that sitting at a booth all day for three days, it won’t be SO bad. It’s not like I’ll be fighting my way, shoulder to shoulder, through people if I’m mostly at my booth, right? At least, that’s what I”m telling myself.
When I was younger, my mom used to do craft shows. Not rinky-dink little garage sale shows, but HUGE art-focused craft conventions all near our various army duty stations throughout Europe. As kids, my sister and I used to help her set up and tear down, take money, bag crafts, and personalize them. We used to trade or barter with the other vendors, and got to see all their booths during setup, before the public came in. I realize a crazy huge comic convention is WAYYY different, but I’m wondering if there are actually any similarities behind the scenes. We’ll see!
My sister suggested something fun, too: “You could even dress up/cosplay as one of your collaborations!” I love watching costume shows like Heroes of Cosplay, and I love the work and care that goes into those costumes. I designed Myla’s C-3PO Halloween costume using cosplay techniques And while I don’t want to sit all day at my booth in a full-blown costume, I MIGHT be able to pull off some little harness wings (like a grownup version of what I made for Myla) and wear them as an elaborate version of my favorite of our collaborations: the moth woman at the end of our book….
Wouldn’t that be fun?
My husband & I agreed, it probably wouldn’t be a good idea to have Myla there all day, so the husband will watch her at home. But they’ll visit me there from time to time. She’s even asking me if I can make her a Nightcrawler costume..
I’m planning on selling copies of our “Share With Me” book (maybe even have a few pre-signed options, if I can get the munchkin to cooperate), copies of our little book of short stories “Tail Tales,” doodle pages, postcard sets, and stickers. I’m also going to sell some prints of some of our more geeky doodles. And who knows what else!
Maybe I’ll put some markers out for people to doodle on a page or two of our own book copies, since the book was really designed to be doodled in, interacted with, and shared. We’ll see!
Maybe I’ll have pie. More people will come if you tell them you have pie.
(Ha! Sorry, old South Park reference).

So if you’re anywhere near Austin, Texas in early October and want to check out what we’ve got, I’d love love LOVE to see you! I’ll be there hiding behind my booth with my moth wings and a smile!
A Creative Epiphany
Oh my gosh, we just discovered a new show. And in kid-world, anything that keeps the same goshdarn show (whichever it might be) from being on repeat over and over again is definitely something to celebrate…

We have Amazon TV, and they just released a series called “Creative Galaxy,” about art and creativity for kids. I’d love to say that they gave us money to blog about them, or at least a stuffed animal or a visit from a character or something, but they didn’t, so this is all our own experience.
So Creative Galaxy is about a little alien named Arty (of course), and his sidekick Epiphany (which, I told Myla, means “a good idea”), and they go around the galaxy “solving problems with art.” Okay, it’s just as perky as any typical kid’s show, but the cool thing about Creative Galaxy is that they introduce the style of certain artists (sort of like I’ve done with Myla with our own projects in the past), and explain what the artist was trying to do with their art. They talk about Pollock and his “action painting.” And they have lots of clips of real kids showing how to do simple fun crafty projects.
The only down side to this show in OUR house is that it gives Myla a million crafty ideas that she wants to try ALL RIGHT NOW! But that’s okay. We pick and choose, and then we get crafty.
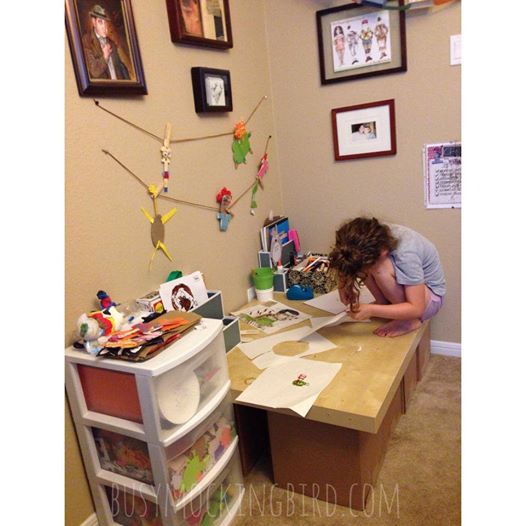
Recently, I expanded Myla’s craft area, since it had started completely taking over both the living room and kitchen tables. We used things we already had around the house, and now it’s easily accessible to her, and right next to my office area (since I work from home on my computer). She loves that there is enough space to sit on top (she REALLY gets into her artwork!) so we don’t even need space for a chair. There are office organizers for her pens and paper, as well as the bins next to it for other craft supplies like paper plates, foam, stickers, and paper bags. Perfect for all sorts of craft time!
There’s nothing more that Myla likes than a stuffed animal. I think she may actually be addicted. I may have to look for some sort of help center for wayward stuffed animal addicts, actually. So inspired by the show, Myla decided one day that she wanted to make her own “Epiphany” doll.
Epiphany is Arty the alien’s little sidekick. We’re not sure what he…or she…really is, exactly, but Myla thinks he’s cute. She started by drawing the shape onto a piece of felt. Since she wanted it to be stuffed, I showed her that she had to have a front and a back piece. Then she cut little arms & legs out. I had her help me sew a simple stitch around it on the sewing machine (I often have her put her hand on it to help guide it), and then came her favorite part: the stuffing!

When we do spontaneous projects like this, the rule is that we have to use things we already have, or we can’t do it at all. I happened to have some little pompoms on a string, which were a bit wonky, but worked well for the little puffball on his head. Thankfully (despite being a perfectionist) she seemed to like it just fine. It bothered me a little, but I always let her have the last word on when it’s “done.”
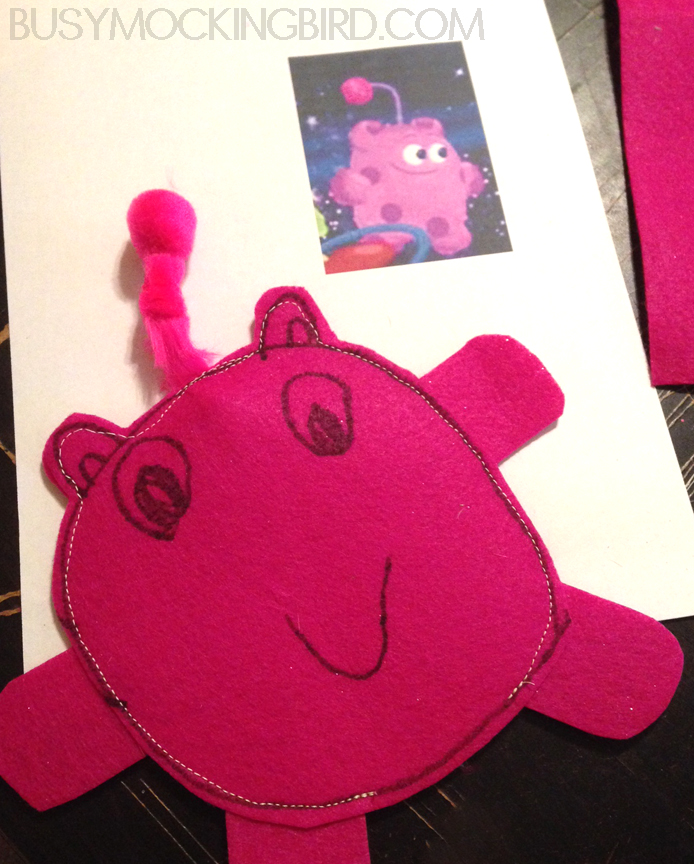
She wanted him to look a little more like the photo, so we got the paints out to color the eyes and spots.
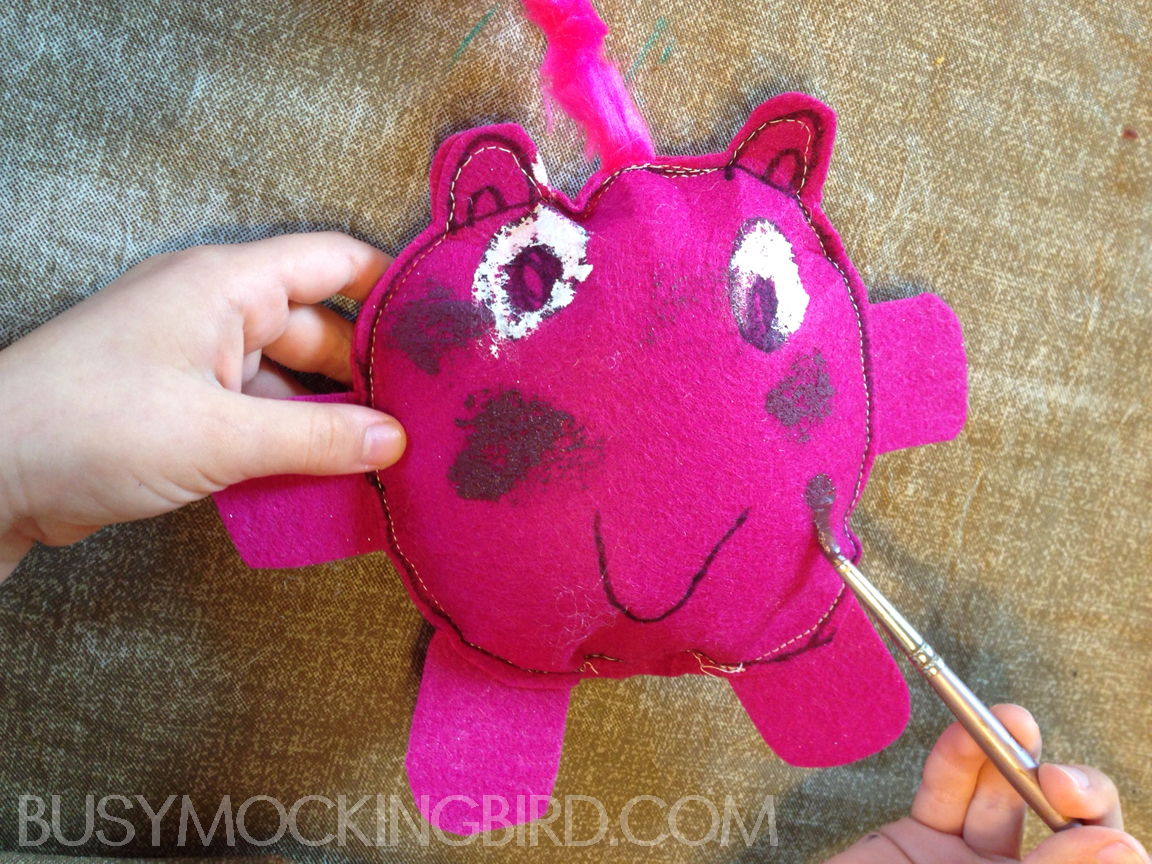
And there he is, the final little Epiphany character! Created (almost) entirely by a 5-year old!

Sure he’s a little wonky and imperfect. But the fact that she made him (almost) all by herself is something she’s VERY proud of. There are some times that the final piece doesn’t look like how she imagined and a wailing pitiful freakout ensues (we’re working on that), but I think it’s good for her to see the outcome of her decisions, whatever they may be. Simple decisions, when she can make them, make her feel more involved, like she had some sort of say in what we’ve created, and makes her more emotionally invested in it. Sure, I could’ve made her a doll, but would she learn how it was made? No. She’d just get the benefit without the effort.
I don’t always indulge her in dollmaking–actually I often steer clear of it, or we’d end up making a dozen dolls a day. But on occasion, and with some boundaries, it’s fun to see where her creativity takes her!
Ballpoint Doodling
Me and ballpoint pens go way back. I love them.
When I was younger, I carried a ballpoint pen and a sketchbook wherever I went. I liked ballpoint because I was too clumsy for pencil–I didn’t like that I could accidentally smear what I’d drawn in pencil with a single careless arm motion, because that’s how clumsy I am. I pressed too hard for pencil, and still didn’t like the coverage it gave. And I didn’t like the scratchy feeling of rough pencil or charcoal or pastel on paper.
So ballpoint it was. In college, it was implied that ballpoint pen was NOT an art medium. That it was a tool for writing, not drawing. So I tried my hardest to master other tools, only to retreat back into the comforts of my room after classes, with my trusty old ballpoint pen and sketchbook at the end of the day.
Over time, I learned to sketch pretty comfortably with pen–to ease up and add pressure where I needed it. I got more comfortable with accepting that pen was my very favorite tool, fine arts be damned. I drew in ballpoint pen so much, that after tons and tons of practice, I could get a fairly good and smooth sketch that people often mistook for pencil. Primarily, I sketched in black ballpoint–plain ol’ Bic or Papermate pen.

After awhile, I started adding color and shading and highlights in either watercolor or acrylics. I used the black ballpoint as a sort of underdrawing. I like the sketchy feel, seeing the structure underneath. Sometimes I paint on top pretty monochromatically…

And other times, I nearly completely covered the initial sketch with acrylic…
But it just doesn’t feel like me whenever I’ve tried leaving out the ballpoint pen.
Did you know there are different types of pens? There are inky smooth rollerballs and spotty ol’ gel pens… but it took me YEARS to realize that the ones I like to sketch with are “officially” called BALLPOINT pens. Easy enough, right?
Ages ago, I hadn’t heard of anyone using ballpoint as a fine art medium. I was a little uncomfortable with the fact that it was my medium of choice (but not enough to give it up). Ballpoint quality was so bad that the paper I used would yellow around my drawing, or the pen would turn purple or blue. These days, I’ve seen TONS of artists creating wonderful, beautiful things with pen. There’s the hyperrealistic work of Samuel Silva, the amazingly smooth work of James Mylne, and ballpoint pen art cheerleader Jerry Stith, who has EXTENSIVE resources on ballpoints and art. (Those are only a few–there are also a ton more, a few of them listed here).
But one of my VERY favorite ballpoint pen artists is Jim Rugg, whose work is both amazingly realistic at times, and also hilariously funny (like this Divine Wonder Woman, and this Playboy Barbie). He has a sense of humor about his work that I can appreciate. He enjoys drawing, and it shows…but he doesn’t seem to take himself so gosh-darn seriously.
I used to think it would be awesome if ballpoints came in tons of other colors…but when my mom sent me a set of Ink Joy colored pens a few years back, I thought they were awesome, but I wasn’t sure how to make them work for me. My work wasn’t as detailed and realistic as those other artists who had mastered the ballpoint pen.
Until a few months ago, inspired again by Jim Rugg’s work, I realized I could still do my own wonky style while using the colored ballpoints…and I gave it a try.
The first one was Napoleon Dynamite (which I realize I’ve posted before)…

I moved on to other fun faces I enjoy….Like the drag artist, Divine:

This scene with Samuel L. Jackson from Pulp Fiction:

And this character from the movie Delicatessen (Myla helped me with the hands):

Since then, I’ve had a lot of fun, really playing with building color.
The process (for me) starts with laying a basic foundation, usually in orange, and building up the reds for color in the cheeks, nose, lips and eyes. (I still think my technique is a little soft–I’m hoping to get a little more bold with the color and text)
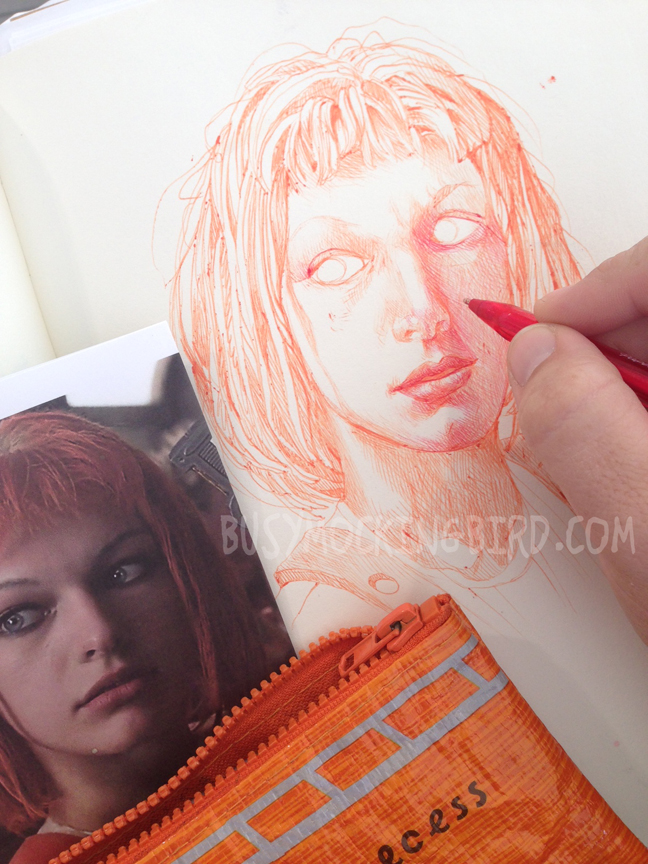
Then I build up with the brown for darker areas.

And it isn’t just a one-shot kinda thing–I keep those three or four pens handy, and switch around between them all, building up colors, adding colors in another area. I like this whole process, because there is PLENTY of wiggle room to get the shapes right. If something’s off, and you’ve started lightly enough, you can adjust it by the time you start really building up the darks.

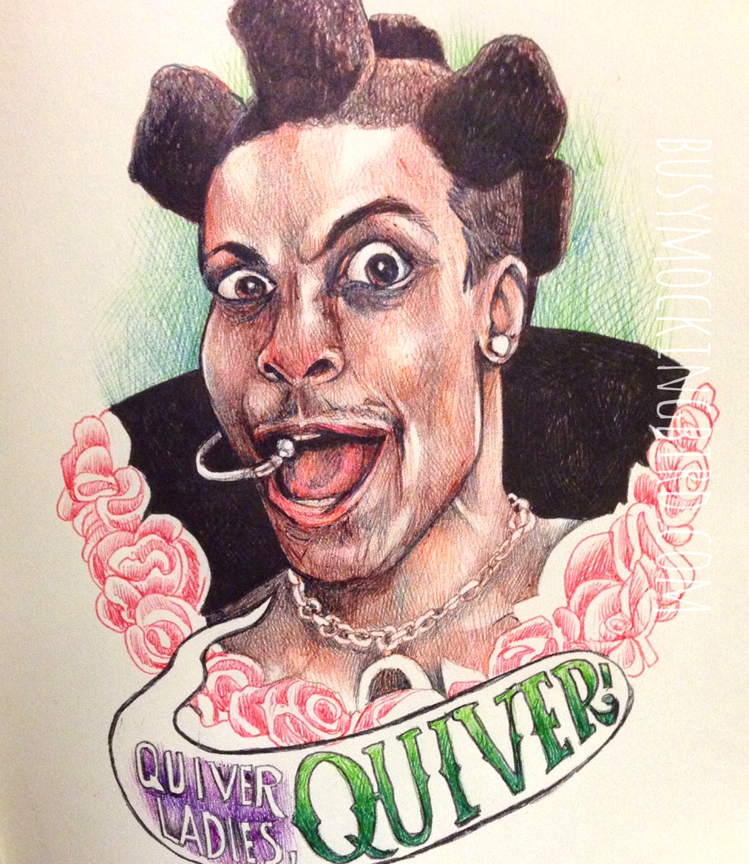
And the final doodle: Leeloo (Milla Jovovitch) from the movie the Fifth Element:
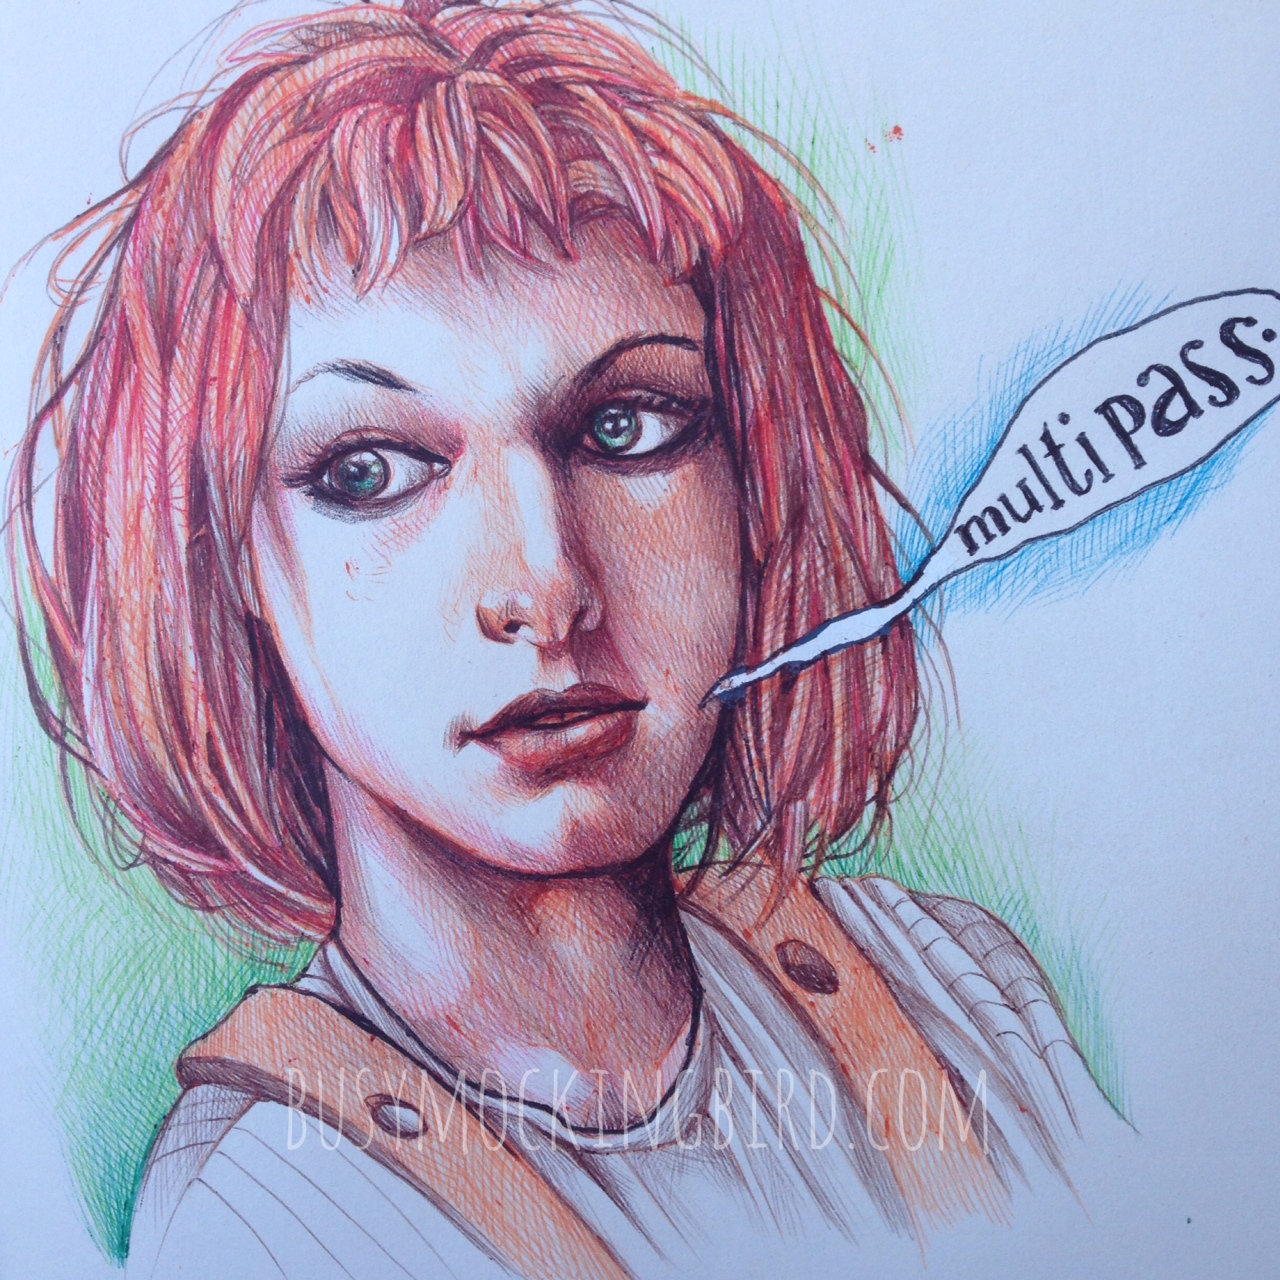
Funny thing about ballpoints, though, is that they glurp. Those blobs of ink on her face and in the background? Those are glurps. I don’t mind them all THAT much, but they’re a little tough to work around sometimes (I don’t even know HOW those other guys keep the glurps away). To avoid the glurp as best I can, I am constantly wiping the ballpoint pen (which I SHOULD do on a napkin, but I don’t, so if you were to look very closely, most of my clothes contain a cluster of small dots, usually on my right shoulder or pants, from twisting the glurp off of the pen before drawing). Still, glurps happen…and that’s okay. They’ve kind of grown on me, even. Gives them a bit of gritty character.
“Goodbye Sweetie” (In-progress, from Dr. Who):
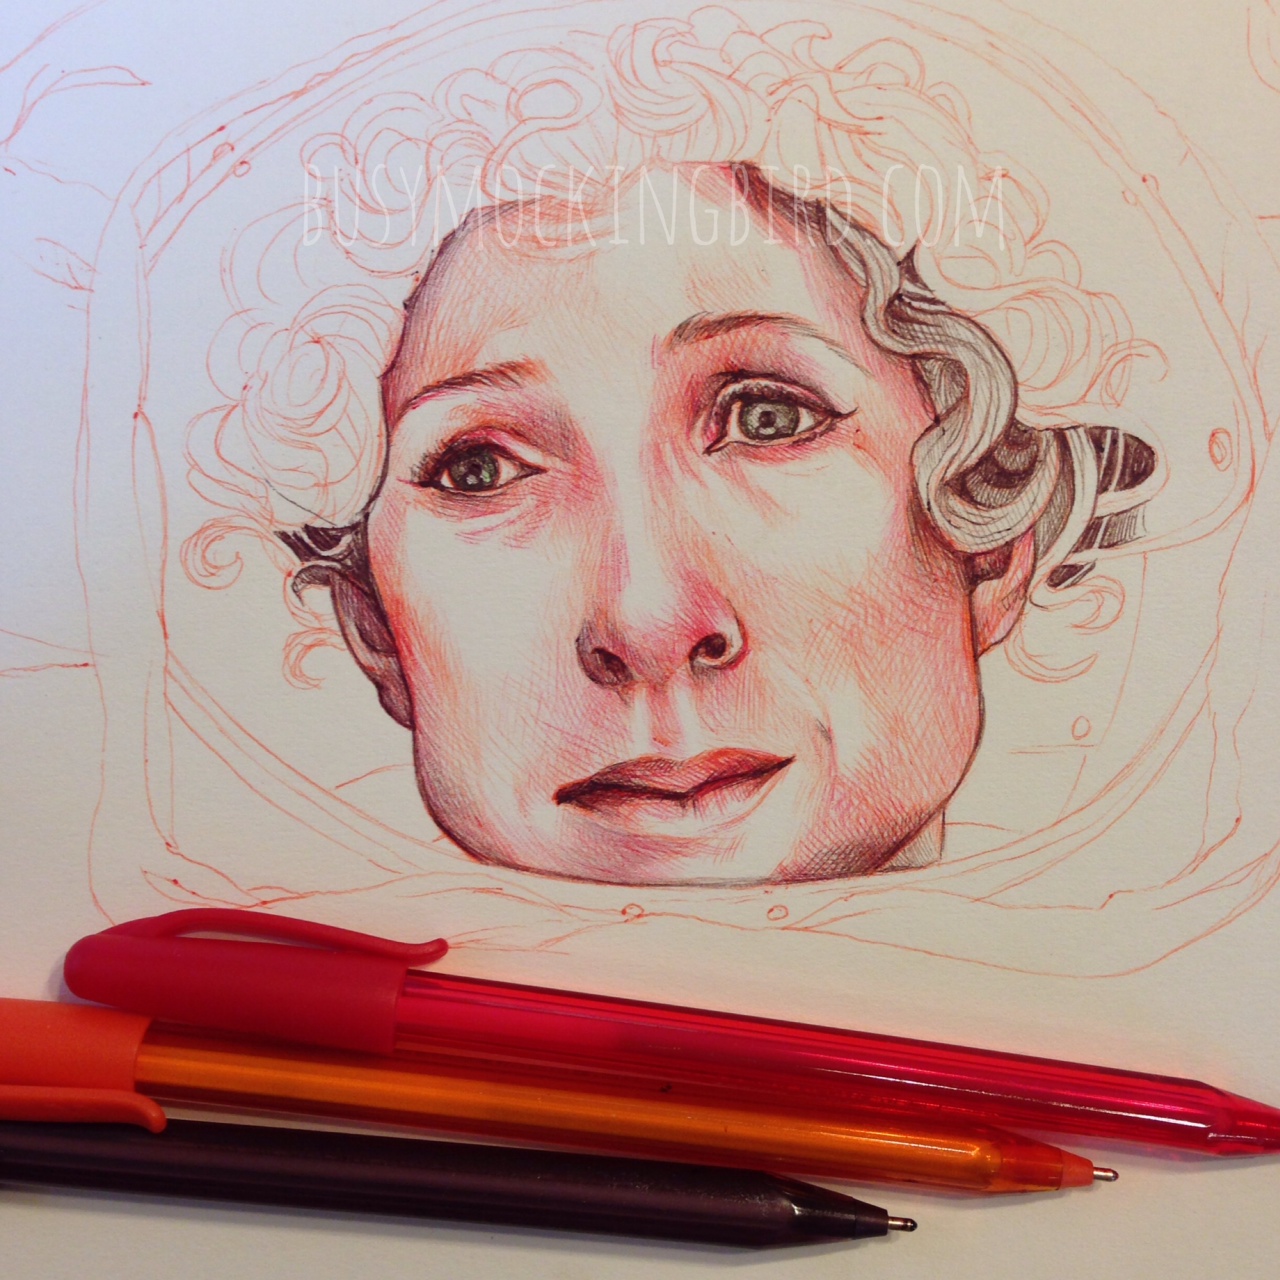
Professor McGonagall, in progress, from Harry Potter:

With darker skin, the process is pretty much the same, except that you can use even more of a variety of colors to really build up the skin tones. (Again, I still think I’m too soft in this area. I’m working on filling out more of the white space)
RubyRhod from Fifth Element:
Recently, because of a long-standing back problem that has been misdiagnosed for SEVERAL years, I have begun a series of injections to help with what they’re now calling “spondyloarthritis.” (Which, from what I understand, just means “chronic localized sacroiliatic pain that we can’t figure out and don’t really know how to treat.”) This means I need to sit at their offices for at least THREE hours, attached to a IV tube full of mutant medications and such.
Ohhh. Fun.
…Except, wait? Three HOURS? In a lounge chair by myself? While Myla’s happily occupied at school or daycare? And I can bring my sketchbook and headphones?? Wait. Wait a minute. This might not be so bad after all…
Jack Black in Nacho Libre:

Nicholas Cage as “H.I.” from Raising Arizona:

Awhile back, PaperMate InkJoy was the only colored ballpoint pen set I knew of. Then I learned that my favorite ballpoints, Bic, came out with the Cristal color pack. Woohoo! But the other day, while looking for some replacements should something tragic potentially happen to my newly beloved pens (as I often fear, once I begin to love a medium), I came across the PaperMate Profile.…and I was SUPER excited to find out that the 12-pack has a sort of GRAYISH MIDNIGHT BLUE…which allowed me to simulate one of my favorite colors of all time: Payne’s Gray!!! (it’s a sort of midnight-bluish gray) Not such a big deal for many people, I’m sure, but very VERY exciting for me!

So I’ve become quite fond of my colored ballpoint pens! And I’m having a WHOLE lot of fun building up shapes. It definitely requires a different sort of thought process than just drawing in straight black ballpoint pen. Still, I think I could cover more of the white area. It just takes getting over the timidity of a new medium. But I love it.
So whatever you enjoy, no matter how timid you may be about it, just rock it. Own it. Make it yours. Because the things that make us different are the EXACT same things that make us special.
I once met a very well-known artist who asked me what medium I worked in, and when I quietly said, “ballpoint pen,” he asked (with honest curiosity), after a long pause, “Um…is that even archival?” I was sort of hesitant to respond, washed over instantly in self-doubt–until I realized with full confidence that I don’t CARE. I enjoy it, I am comfortable with it. And the important thing is this: I AM STILL LEARNING.
The State of Stuff
People ask me sometimes if Myla and I still do our collaborations, and if we will do them forever. I’ve come to learn that kids’ fancies are fleeting, so I do my best to just encourage her and do the best I can to support whatever she’s into at the moment.
Lately, what she’s been into has fallen into two categories…namely, Stuff Stuck to Paper and Paper Creatures. I’ll attempt to describe them, because given a brief moment alone, and she’s furiously scissoring and coloring a creature, with her brow furrowed, and a very faraway look of concentration on her face. In case you labor under the belief that we ethereally flutter around an immaculate house, doing artsy art thing in a perfectly-styled art room designed by artsy art professionals, I will share this photo of what our kitchen table looks like most of the time:

I admit to claiming responsibility for about 20% of the mess that constantly grows in this table (usually concerning school-related paperwork). I have cleaned it and straightened it and battled it in full gear, time and time again, and I have just given up. It has finally won the battle.
But see the look on that kid’s face? That one of absolutely overwhelmingly engrossed concentration? I’m okay with that mess. Plus, I can sit on my end of the table and just draw in my sketchbook. Win-win, if you can handle a messy kitchen table. (We’ll see what happens when the husband gets back from deployment and might like a place to–oh, I dunno–EAT, maybe.)
In any case, here is what she’s been up to:
Stuff Stuck to Paper
The things she’s been creating come from out of nowhere. A scrap of paper, a bottlecap. Left unattended near her, they are at high risk of being glued or taped to a page and made into a “project.” I have had to give her very good reasons why it is not a good idea to GLUE scissors to the page just for a projects’ sake. But for the most part, I don’t mind the random things.
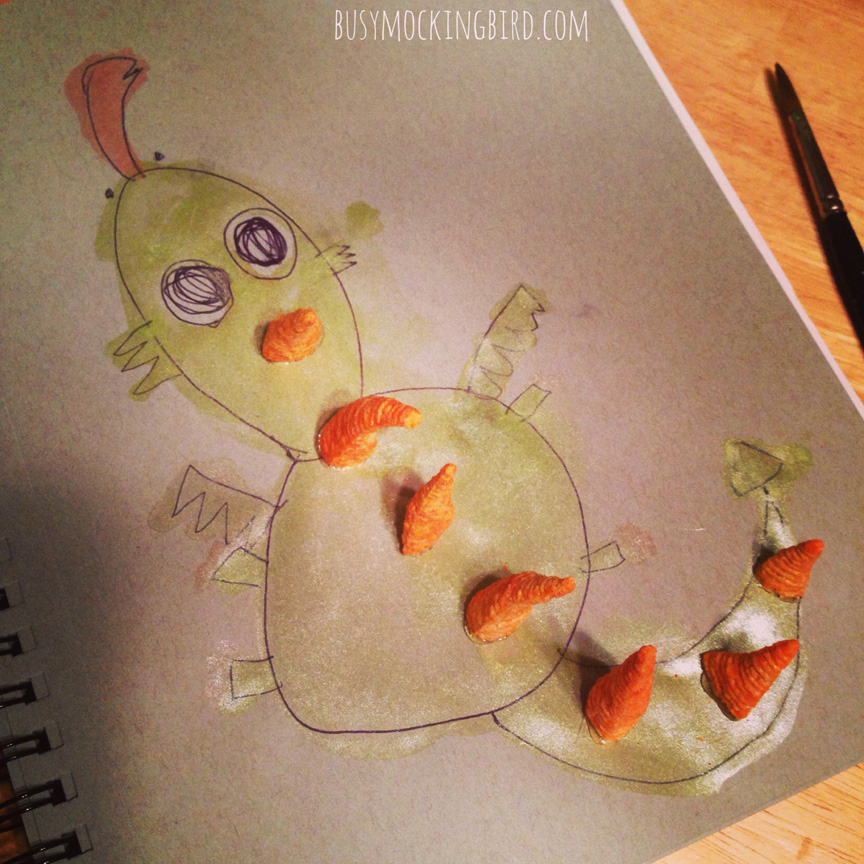
Sometimes, when she’s glued or taped food to the page, I’ve either secretly smuggled it to a temporary holding area (in the garage) before secreting it out to the trashcan (0nly after taking countless photos, of course) to avoid an onslaught of ants, or (as in the case of the Bugle-dragon above) I’ve sprayed it with a multitude of layers of varnish to hopefully keep ants at bay. She’s also glued or taped a birthday candle, bottlecaps, and pieces of plants, creating a little scenery (or what she calls a “project.”)

She’s made birds with Bugles cracker beaks, and carrot parrots…

Once, I gave her a bowl of dry mixed pasta to make “projects” out of, and she made this little crab for me:

I once showed her some doodles by InkyGirl on Instagram, and the next morning she drew this:
Paper Creatures
The other thing she’s been doing is making “creatures.” These are things she builds out of paper to be “toys.” (Because, you know, she doesn’t have like a million ACTUAL toys. Heheh)
Here, she frantically cuts up tiny pieces of paper and usually tapes (because she’s got no time to wait for glue) or glues them together to make some sort of creature.
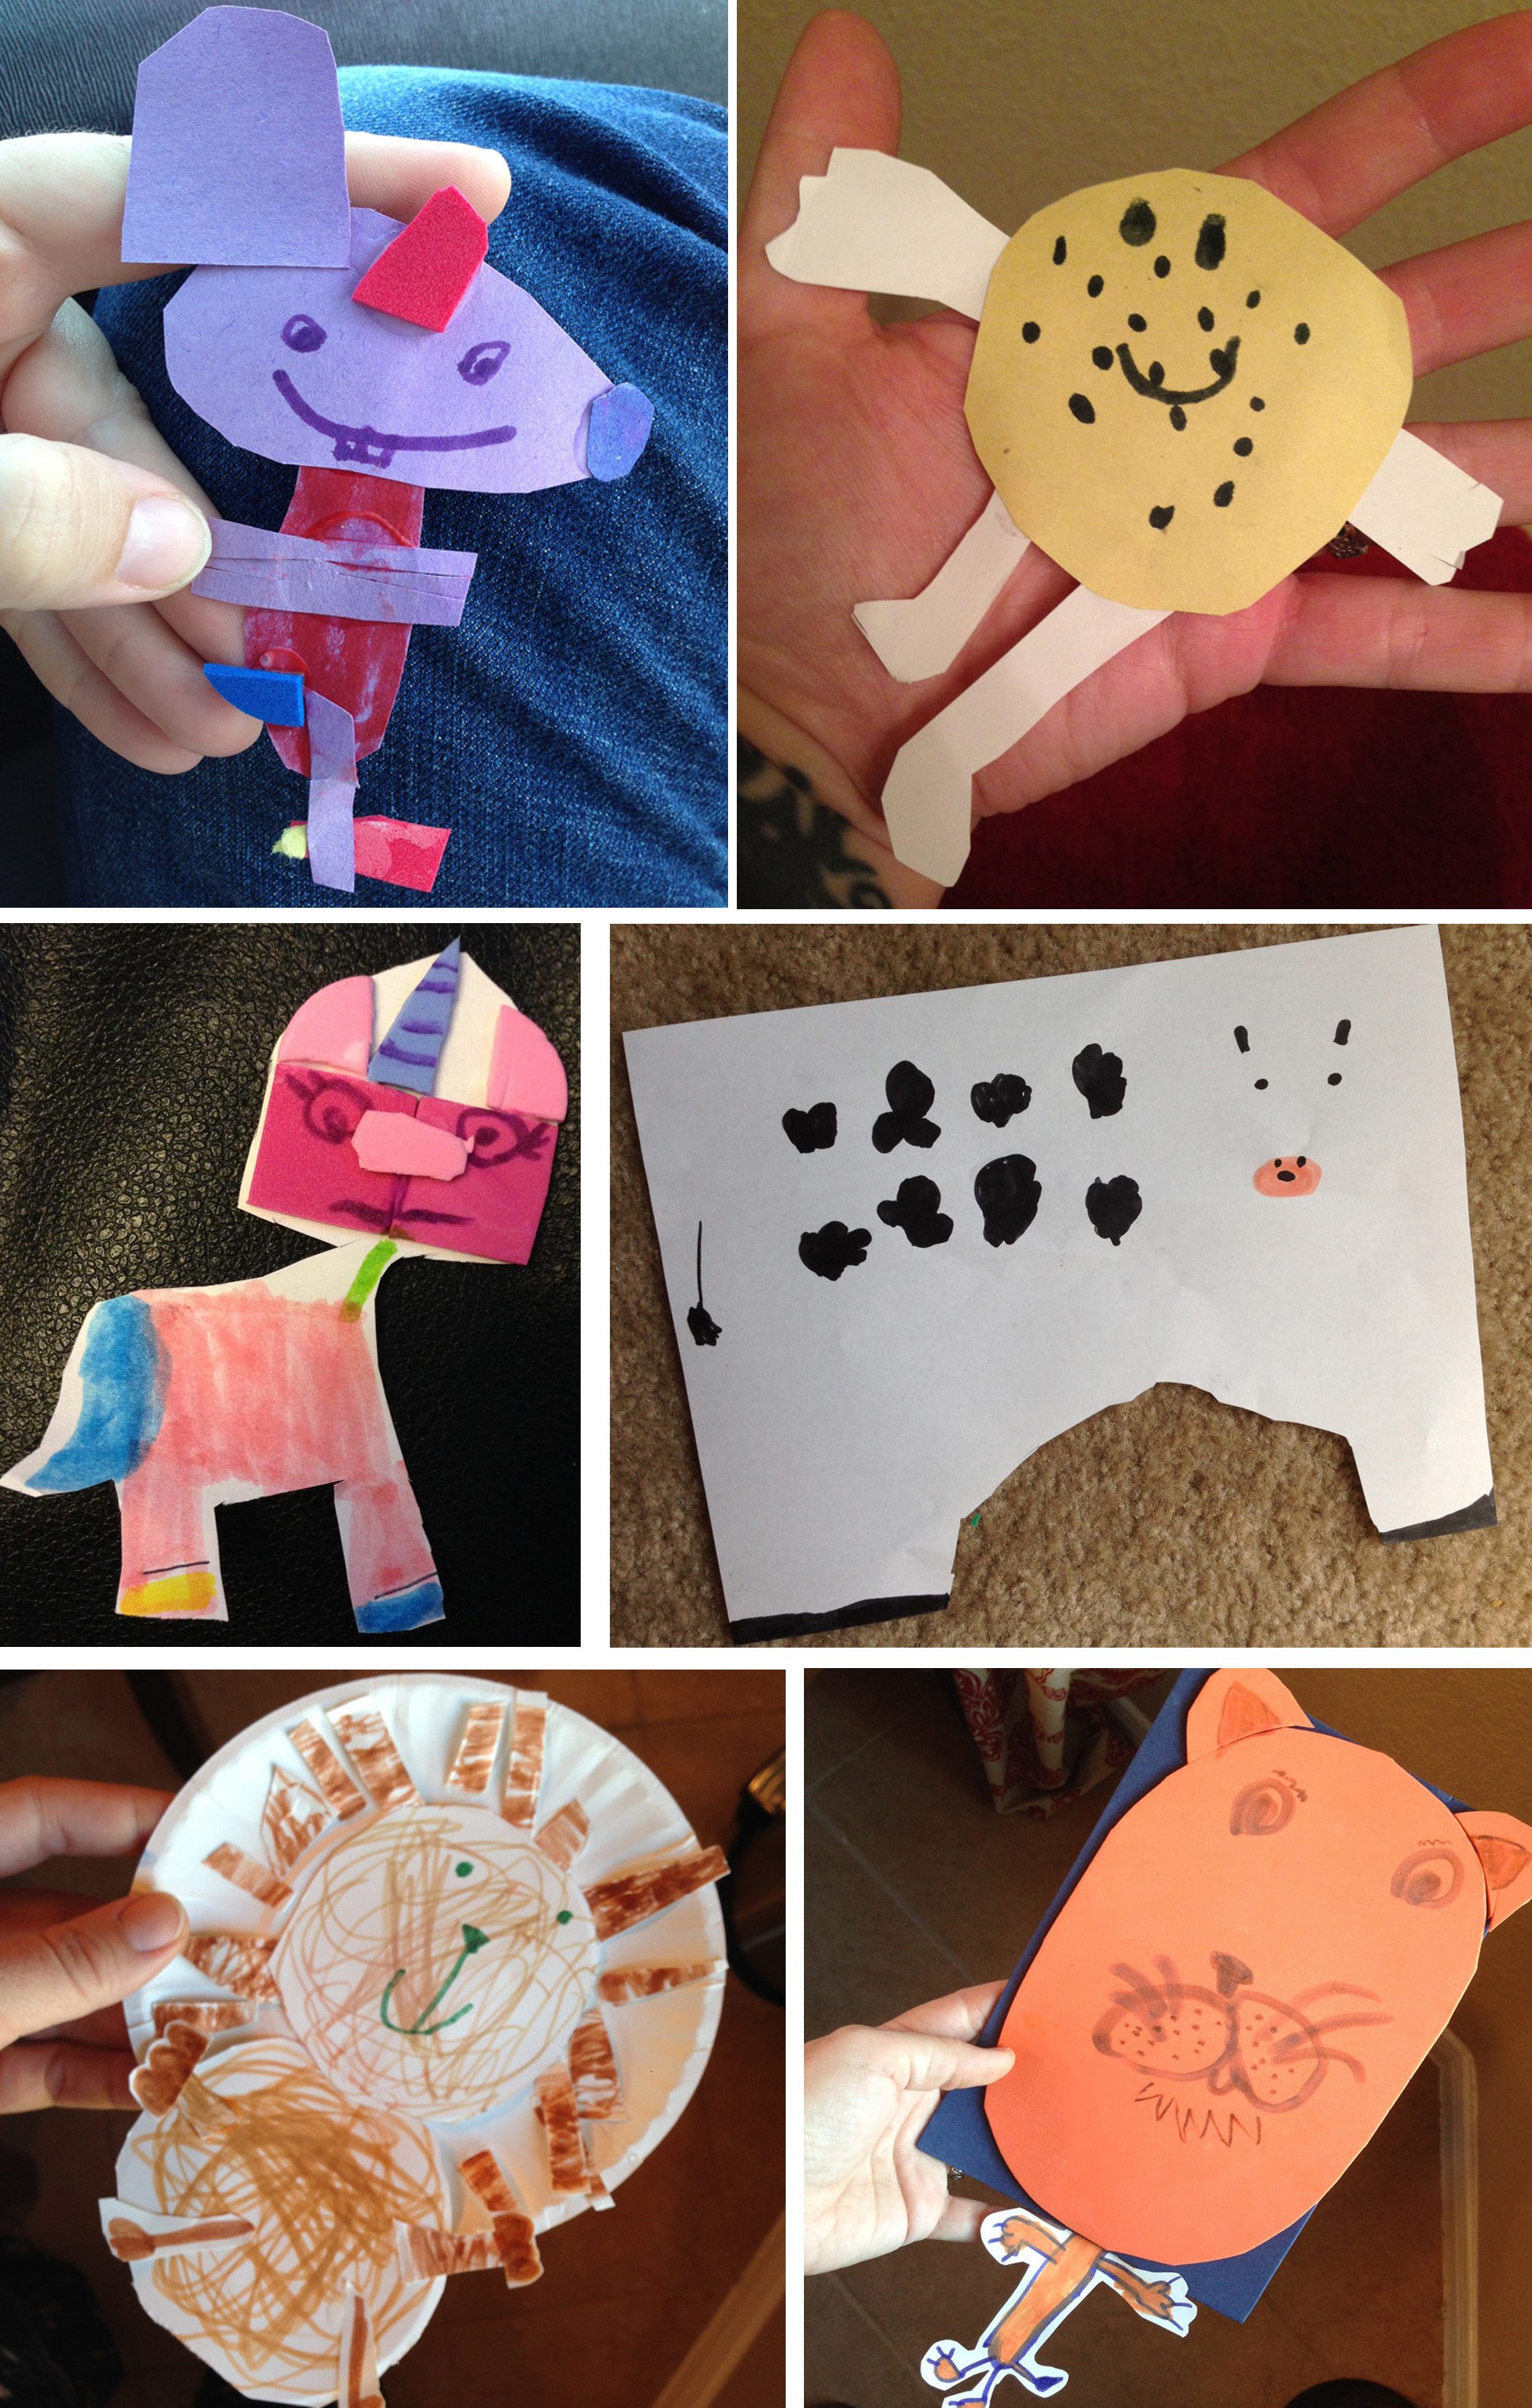
(From left to right: Mouse from Cinderella, a talking tortilla, Unikitty, a cow, a porcupine, and a lion.)
Sometimes she cuts out & colors all the pieces, and other times she markers them…
(Catbus from Totoro, and her green catbus friend)
They’re fully realized characters, since they almost always have backsides, too.

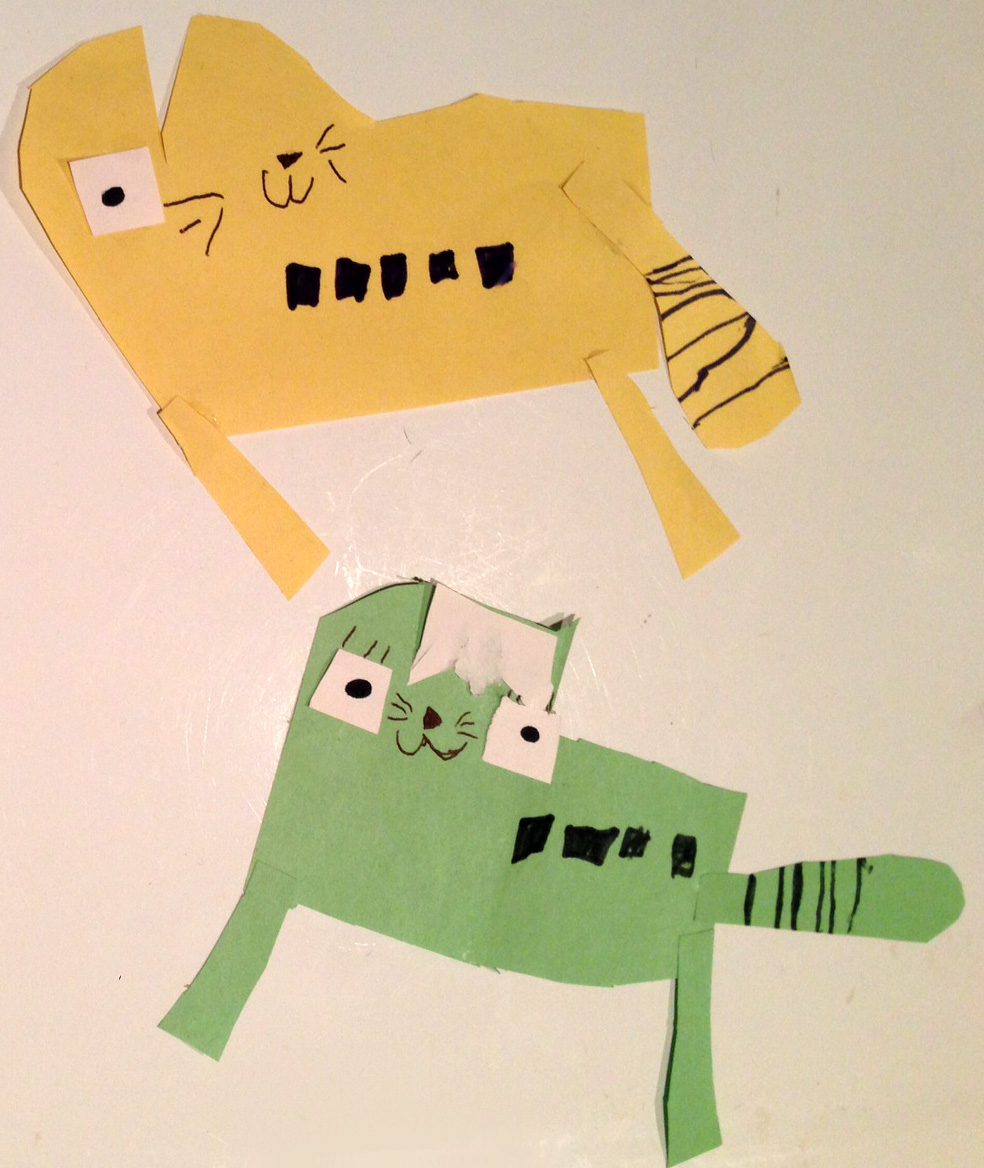
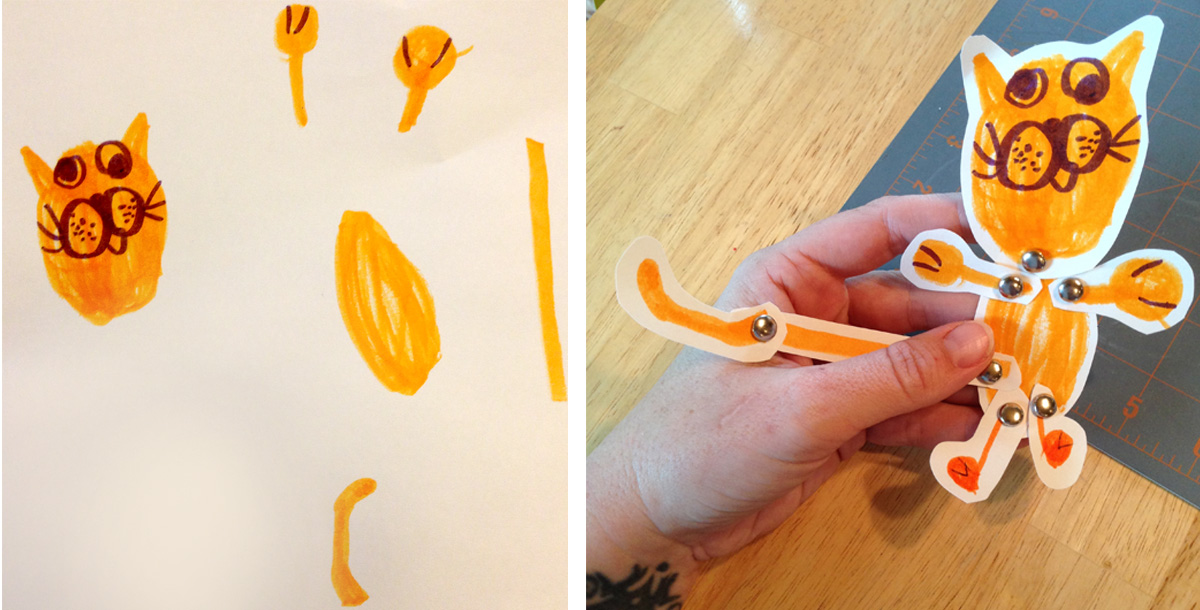
I showed her how to use metal brads once, and she created all the pieces, cut them out, and had me help her put it together…
Other times, they are full sheets of paper (with backsides, too) that are like “dolls…”

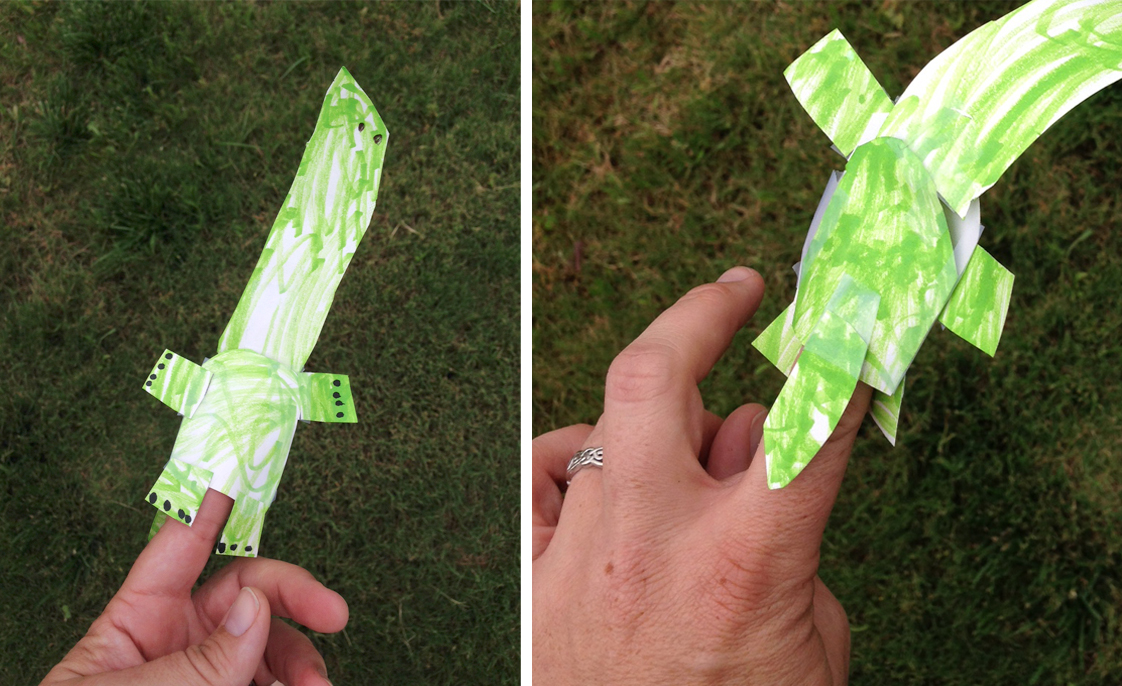
She voraciously made this dinosaur finger puppet for me, which is pretty gosh-darned cool. It even has a tail!
So those are exciting. And she’s been obsessed with these paper things. I’ve had to stock up on construction paper and tape, something I didn’t need to do when she was voraciously drawing. But that’s what she’s into. And that’s cool.
But the other day, I wasn’t feeling well, and I lay on my stomach on the couch with my sketchbook, and she dragged her marker box, scissors and tape into the room and started making paper bats like a madwoman. And then she suddenly looked up, climbed onto the pillows over my head, and stared at my sketchbook, watching me draw. I was playing with colored ballpoint pens, drawing Napoleon Dynamite.
“Are you using shading?” she asked.
“Yes I am,” I replied, and I showed her how layers and layers of colors can look like they’re mixing to make other colors, and that darker things look like they’re behind. Sort of like when we played with pointillism.
“I’m going to try that, too.” she said. “And I’m going to make it look SO REAL.” So I watched her look at the photo for references (or what she calls “estructions”), and drew her own version:
I was blown away! Shading, “realistic” features. So exciting, and pretty darned awesome, for a 4-year old! She really took her time with it, focusing very hard on looking at the picture and trying to draw it the same way (making me instantly recall the Napoleon Dynamite quote: “It took me like three hours to finish the shading on your upper lip. It’s probably the best drawing I’ve ever done.” Hehehe.)
Yesterday, I had a doodle of Wonder Woman in my sketchbook, and she tried her hand at it again, and again–I’m blown away.

It’s so cool to be able to see your kid change and grown and learn new things. Sure, it’s a little sad to see a beloved phase go by, but my mom always said, “enjoy whatever phase she’s in, because the next phase might be a rough one.”
So while we still doodle the occasional heads from time to time (and I’ll be sure to keep giving her the option to), it’s so great to see her trying new things! Believe, me, the collaborations have changed our lives so much for the good that I’m going to keep trying them with her, and it’ll be fun to see how they look once she’s a little older. Maybe she’s ready to let me draw the bodies to HER heads now…
Whatever the case, I’m just glad for it. All of it. Messes and ants and all.
Get Messy!
Summer’s coming! And for a stay at home, work-at-home mom, the prospect of keeping the munchkin busy all day every day for several months while simultaneously working from my computer is a daunting one indeed. But while I work on the prospect of signing up for a little bit of summer day camps and a few hours of daycare each day, I have to remember to make some really good memories. And sometimes, the quickest way to make a good memory…is to make a good MESS.
A long long time ago on the blog, I wrote about making beautiful messes. When I was a kid, I loved to make a mess, and I wasn’t afraid of things like dirt, muddy clothes, or bug guts. But somehow, in the process of growing up, instead of being carefree and fun, a roll in the grass now makes me fret about grass stains, spiders, and where the dogs may have peed. But how is our daughter supposed to know what it’s like to squish mud between her toes and all that stuff…if I never let her do it?

And honestly, can’t all that stuff be washed away, for the most part? I mean, what’s the worst that can happen, really? When I was in the army, we would get disgustingly gross, sweaty and muddy and horrible-smelling and sore, and I think the fact that you are so disgustingly messy beforehand made you feel SOOOO GOOD when you got all cleaned up.
As a mom, when I find myself being resistant to something the kid wants to do, I try to ask myself if I’m saying no for a good reason, or just because it makes me uncomfortable. If it’s just that it makes me uncomfortable, it might be something I actually SHOULD do.
So a recent trip to our local library has unearthed my sister’s favorite book series and our newest book obsession: The Magic Schoolbus. Along with being EXTREMELY educational and fun for me to read to Myla in a way that can grow with her (there is the main story about going on crazy adventures and exploring things like the human body, insects, sea life, etc, and then additional more detailed information along the sides in cute “side notes”), the crazy teacher’s motto has reiterated an idea that has been a key thing I’ve learned from becoming a parent: to “Take chances, make mistakes, GET MESSY!!!”
If you’re someone who gets the oogies about messes, there are easy stress-free ways to get messy, and the key is to GET PREPARED! Use washable paints, wear sloppy clothes or an apron. Put down a table cloth and have towels on hand for when you’re done. Have the washer on standby and have a set of clean clothes waiting by a readied bathtub.
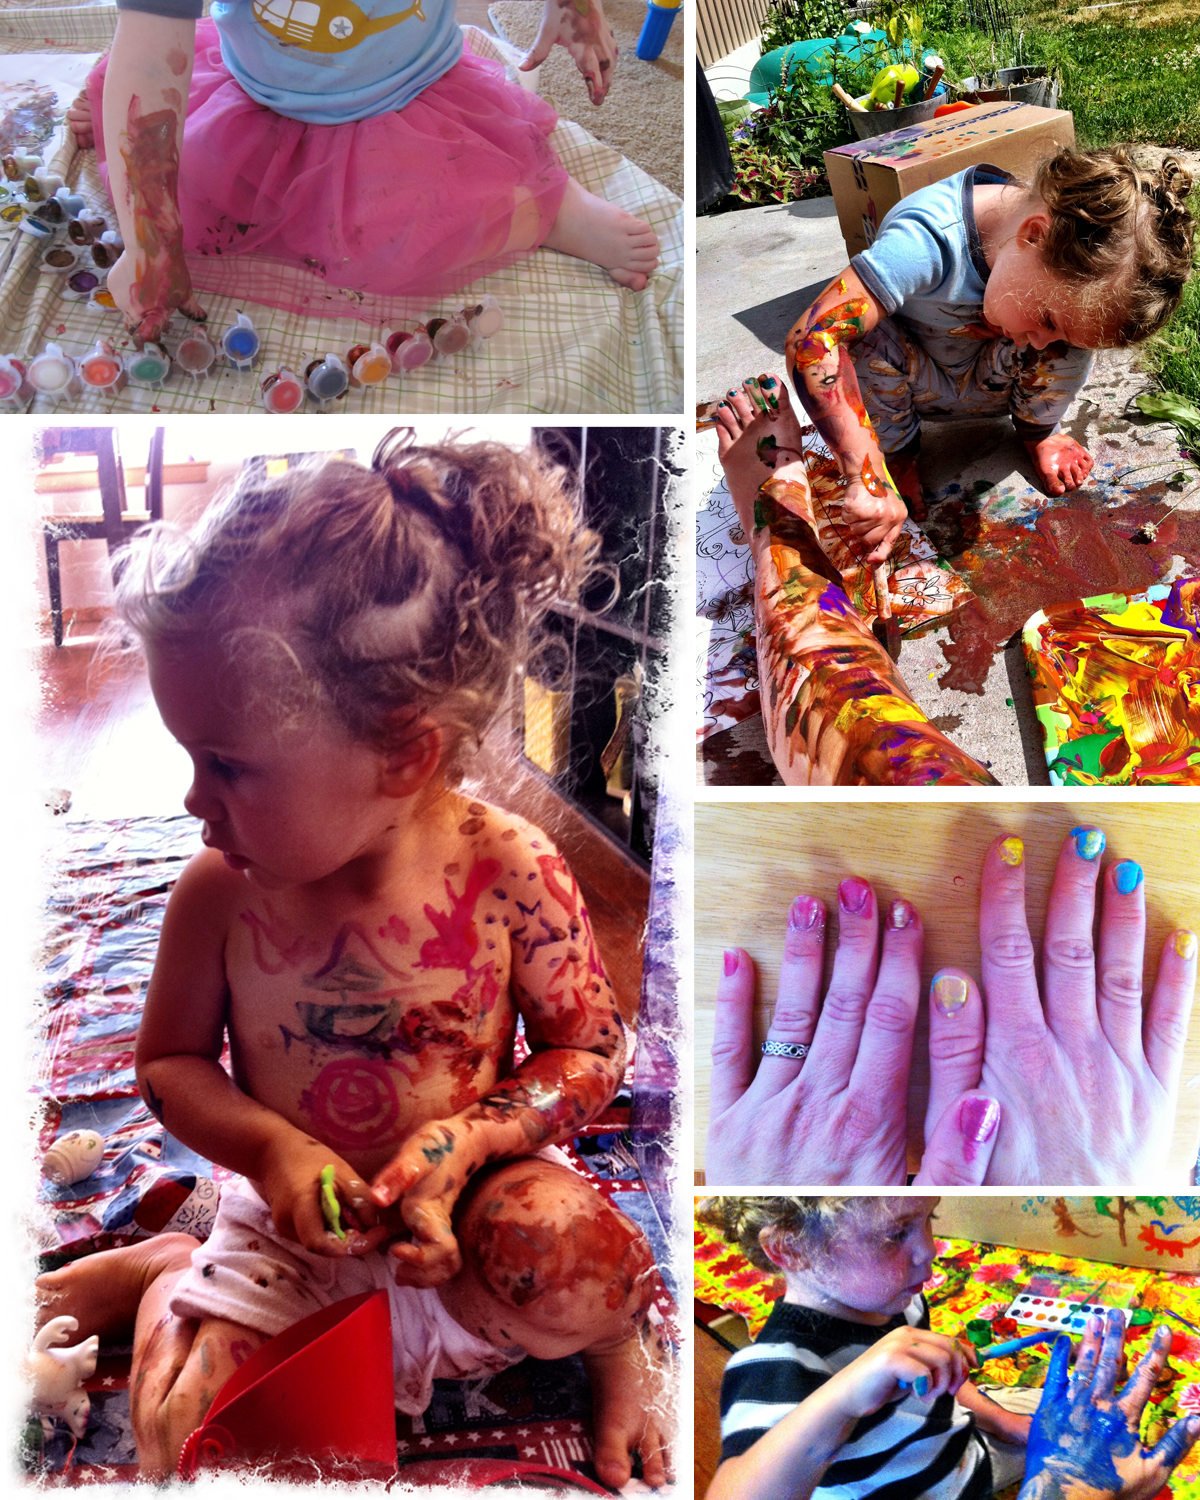
And don’t forget to JOIN IN! Don’t just be a spectator. It’ll be good for you to get out of your comfort zone–believe me!

Most important of all, though: don’t take anything too seriously! Get out there and challenge yourself to make all kinds of messes with your kids, with your family, with your friends. You can do it! And when you DO, don’t forget to take some pictures, and share them with me on Facebook. I’d love to see ’em!
I love BUGS.
Yes, I love bugs. Insects. Beetles. Whatever.
Well, mainly, I really love the IDEA of bugs, and I love LOOKING at bugs. (It’s a whole other story when they’re actually touching me.) I don’t like squished bugs, but sometimes if they’re all dried up and pretty, I love looking at dead bugs. I have a few I’ve collected here and there, that I’ve hung up on the walls of our house for the past ten or so years. By “collected,” I don’t mean I’ve gone out & hunted them down myself–I mean that I either found them, bought them, or was given them by friends.
One day, while helping our daughter get ready for bedtime, my eyes tripped over a rhino beetle we had hanging in our bathroom. It had been there for YEARS (in different houses, but in roughly the same spot), so long that it just sort of blended into the scenery of everyday life, overlooked. But this time, a strange and very intense thought occurred to me, and it did so with a very loud voice: “I wonder if I could paint on its wings?”
Then I wondered, if beetles could customize their wings with painted “tattoos,” what would they get? Beetles often fight, so maybe they would be aggressive battle scenes with intimidating imagery. But not the typically intimidating human skulls, since beetles lack an internal skeleton and therefore it wouldn’t mean the same to them. Perhaps instead of a skull and crossbones, they’d have two sticks and some decayed leaves around them? Maybe a Japanese fighting beetle would have ornate scenes of fighting beetles emblazoned on their backs, or a fear-inspiring giant sole of a boot, since their main natural predator might be our own feet trampling down on them. Maybe there would be peaceful, hippie-tattooed beetles. Or images of their larvae with birth dates. Or a portrait of “mom.” And what on earth would a DUNG beetle get?
Yes, these are the kind of thoughts that sometimes go through my head while staring at the shell of a beetle and getting our daughter ready for bed.
So, like most ideas I have, once they’re in my head, they won’t go away until I do it. So I did. At my husband’s suggestion, I drew a preliminary sketch. I don’t always like to do this–I often like to just wing it (haha, see what I did there?). But this time (like most times) he was right.
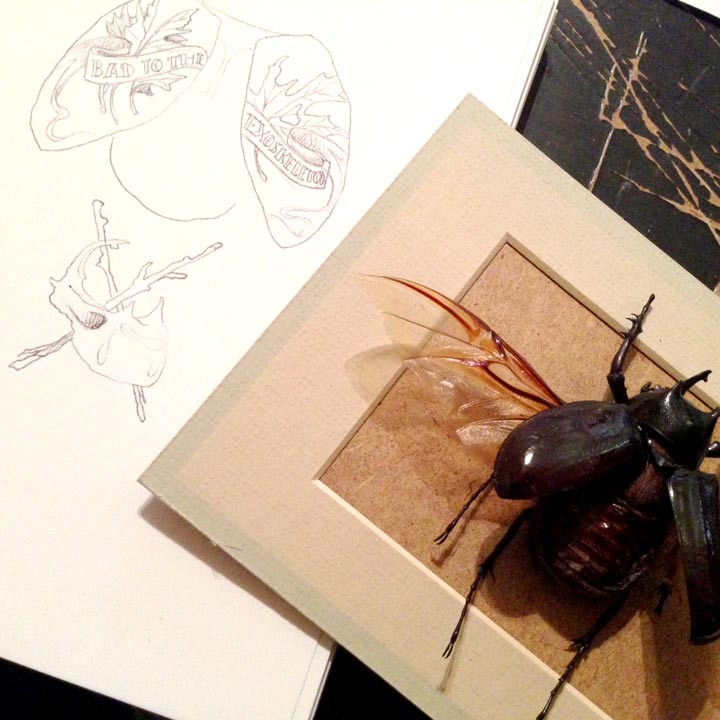
Apparently, this beetle had been sprayed with a kind of varnish (because I bought it at a store and of COURSE they sprayed it to preserve it), so it was a little like painting on plastic. I used acrylic paints, and took my time going over and over and over it, layer after layer, since the paint had a habit of beading up.
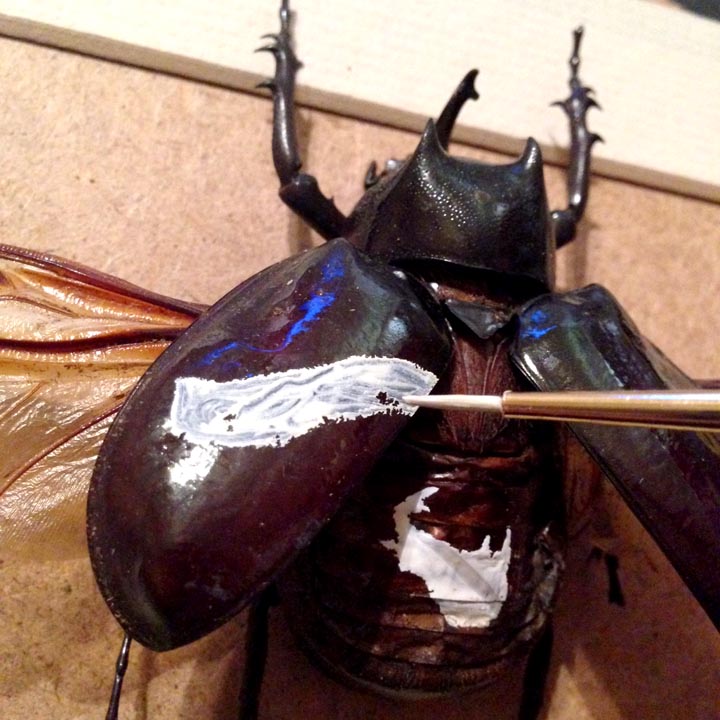
But with each new layer, the image started coming together, and the basic layout was falling into place.

Thankfully, the wing shells were pretty sturdy, and although they had the slightest give, they didn’t really move much. Since I am impatient, I tried using thicker blobs of paint to cut back on the amount of layers I’d need to repaint, but I still needed to go over and over it again and again to bet the basic underpainting. Once that was dry, I could go back and add the little details and shading and fine-tune the whole thing.

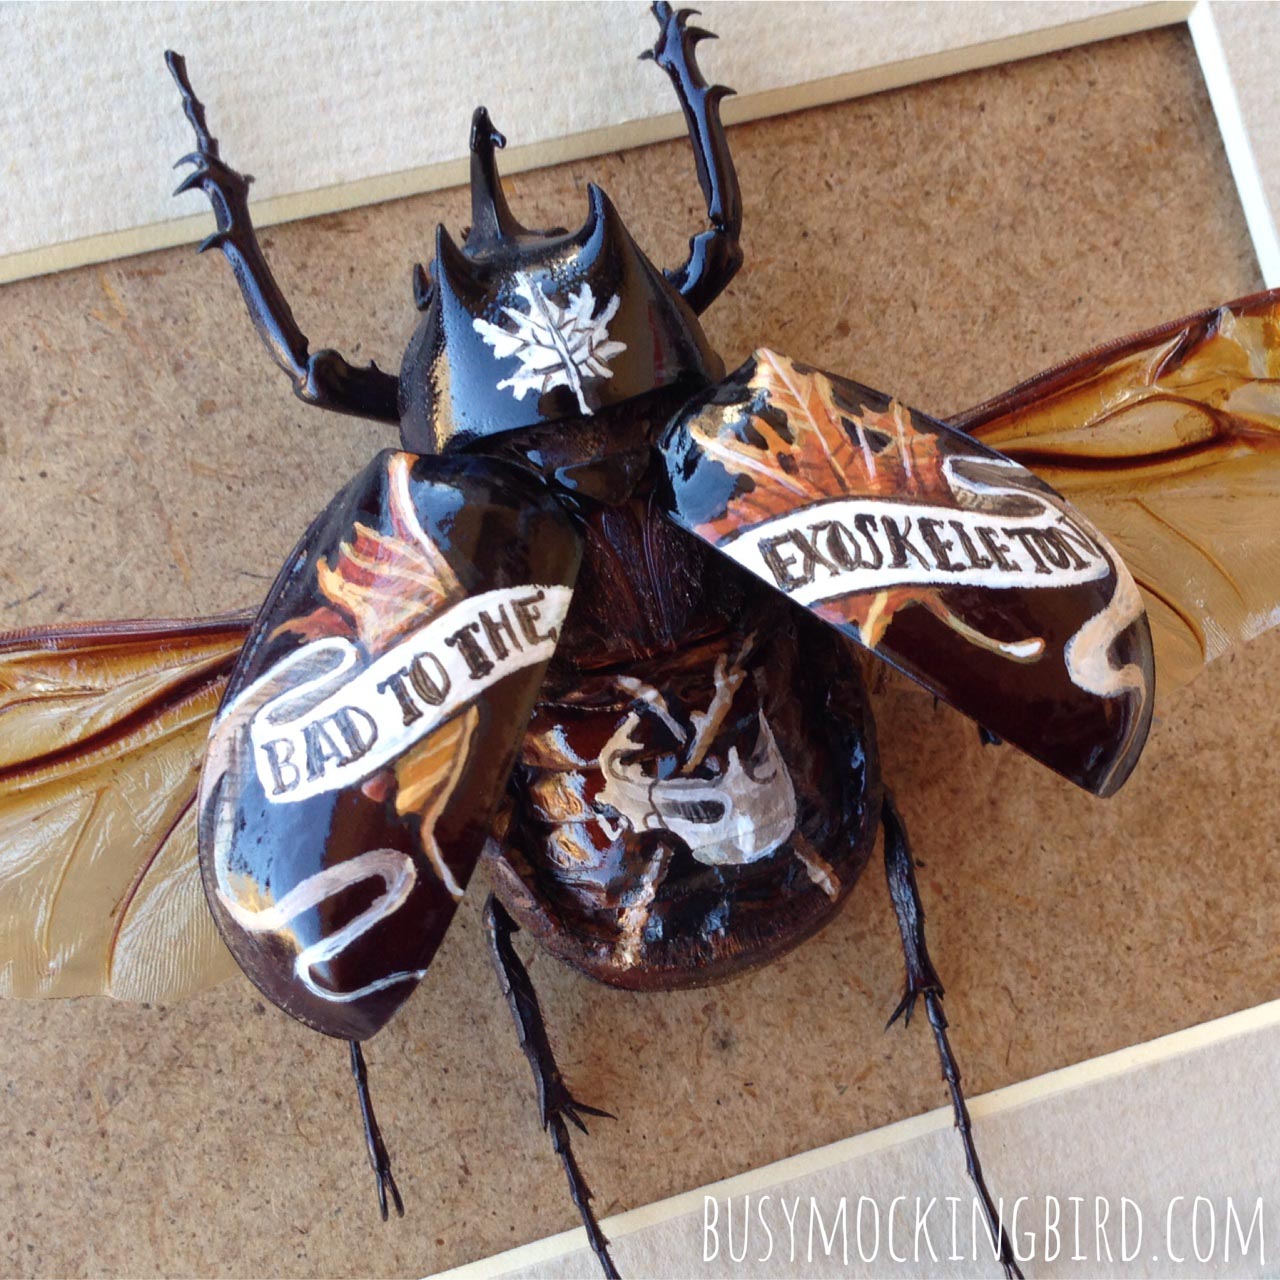
And here it is: the final beetle! I really REALLY wanted to put a skull on his head, but that didn’t make sense, so I put a tiny leaf that ended up looking a bit like a snowflake from a distance. Still, I like the little “skeleton beetle skull with crossed sticks” (instead of a skull & crossbones) on the inside of his back. And instead of “bad to the bone…” Well, you know. Because beetles don’t have bones, right?
So I had SO much fun with that, that I immediately looked around the house for more insects I could vandalize. Some of my nicer ones are contained completely inside wooden frames and sealed plexiglass, which makes breaking into them nearly impossible (probably for the best), but I was able to accost one of my dragonflies.
So what would a dragonfly get? There are so many different styles of tattoos! This one is a tribal-style dragon on dragonfly wings…
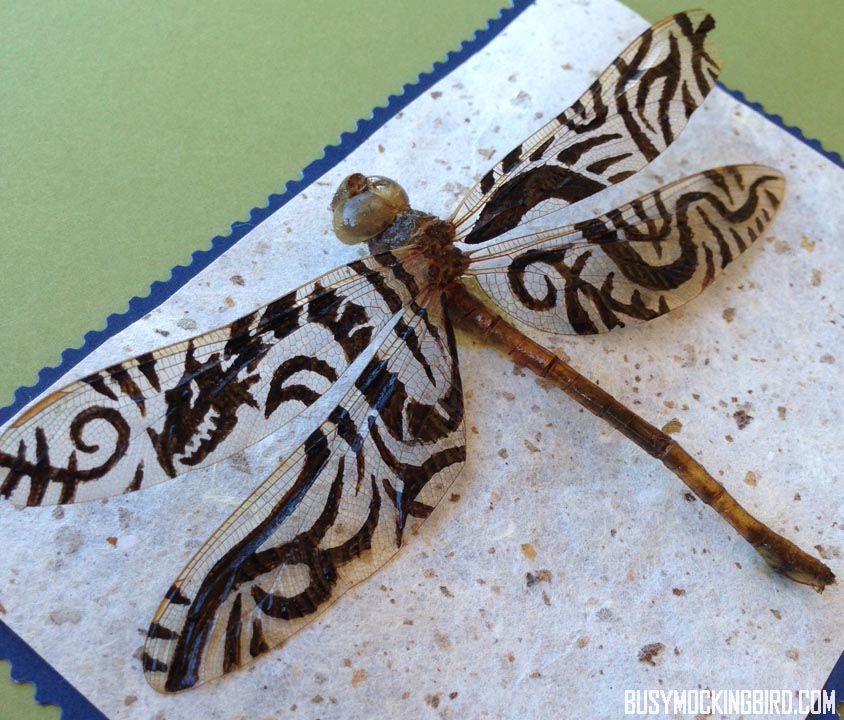
Those wings were hard to paint, by the way. I was hoping for more detail, but this guy died about 14 years ago, and is really fragile. Plus, dragonfly wings, with all those little cells, are almost like tiny little tissue-thin accordions. Keeping a straight line was pretty difficult.
And the last one was this brittle old moth. (The light one, not the dark one who just happens to be glued next to him.) I gave this guy old-school flames, because of the ol’ “like a moth to the flame” standard, and because moths love light, right? So he’d probably tattoo some daring flames on his wings to show off his bravery at dancing close to danger. Or something. Anyway, they didn’t turn out as detailed as I had envisioned either, because moth wings are fuzzy, and it’s like painting on a tiny little carpet.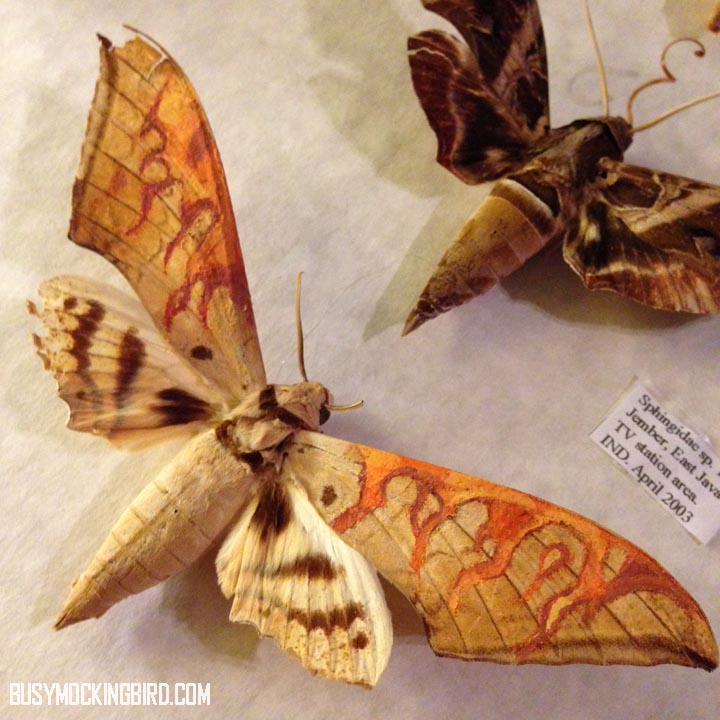
So there are my painted insects. I immediately went on Amazon and ordered a few more beetles to paint on, but apparently I didn’t notice they’re shipping from THAILAND and will be here in like three years. Or two months. Either way: a long, long time.
In the meantime, I’d love to hear your ideas: with all the different styles and influences, what do you think different types of insects would get if they could customize their wings?
Here There Be Monsters
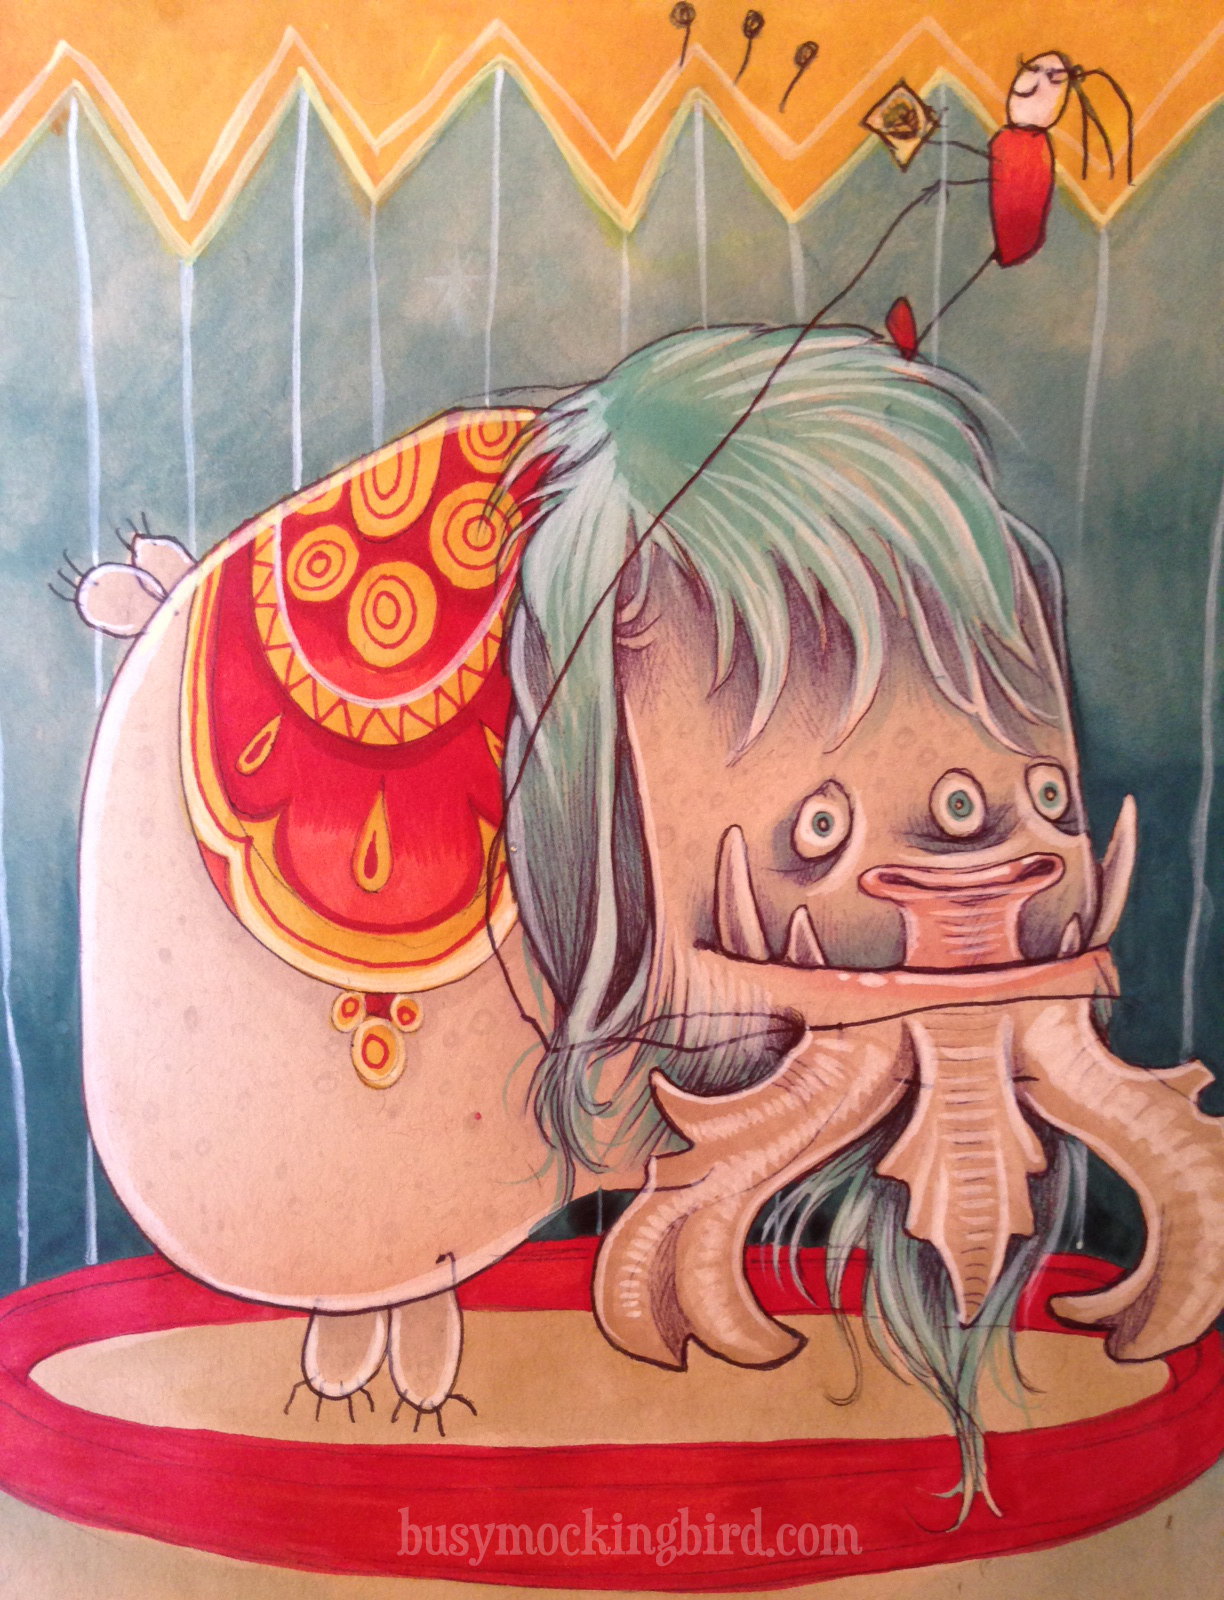
From time to time, people ask if our 4-year old or I get tired of collaborating together when we draw, and so far, the answer has been a resounding “heck NO!” But to change it up a little so that we DON’T, we’ve done a few animals….and every once in awhile, we’ve started throwing some monsters in there.
Now, I’ve written about the monster doodles before, but since then, we’ve sort of expanded the process a bit. First, they start out with me drawing a monster head, and our daughter (just like with the “people” collaborations) would draw the body & any additional scenery on them.

Several of them end up in the water, for some reason.

Following her art direction, many of them end up patterned and pink.
 Sometimes, she gets a little elaborate with them, like this one who fell down while rollerskating…

This one, who needed a helmet before he could hop on his bike…
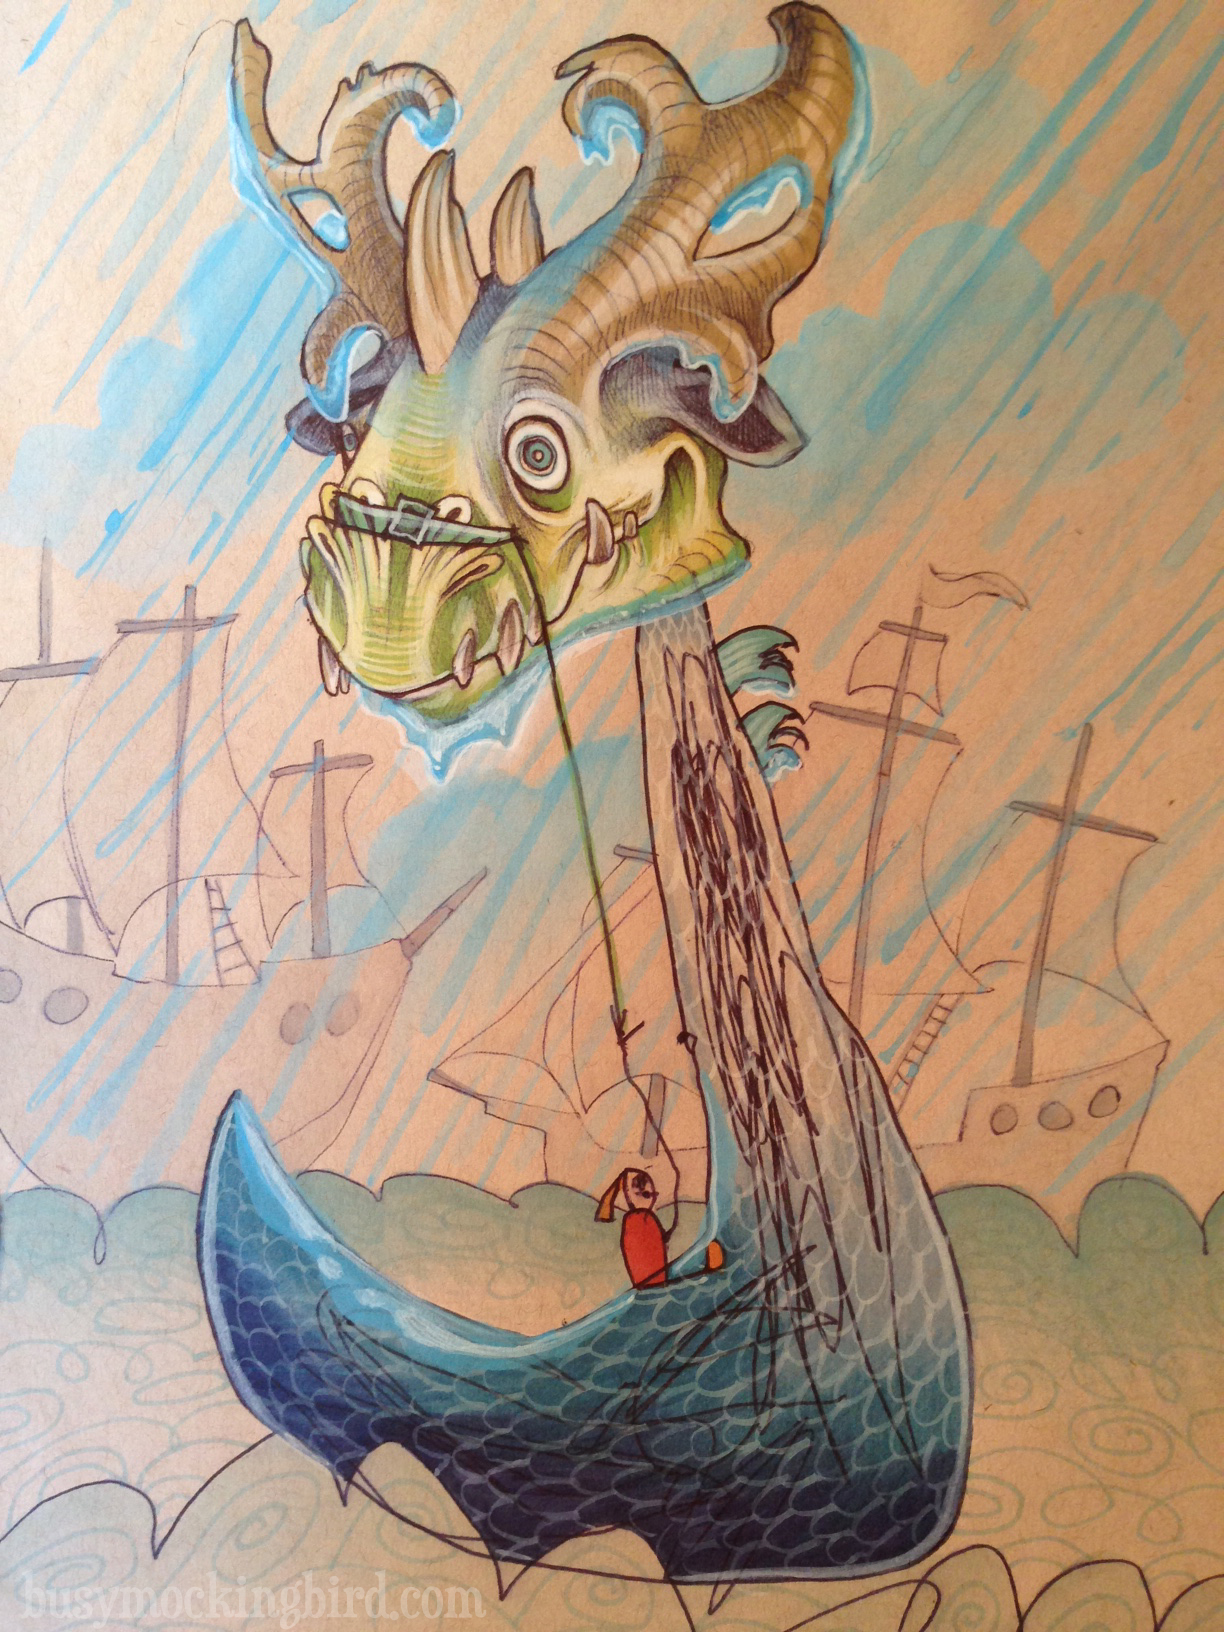
Or this one, who she insisted be in a rainstorm.
They’re often influenced by her little world, like this creature which came about not long after her first visit to a circus…
This one, which was of a cat-monster tossing candy to her at Halloween (that’s me in the yellow-striped shirt, picking her up)…

Or this one, which happened around the same time we made a gingerbread house for the holidays.

But the process itself REALLY started getting fun when (instead of drawing on the head I had pre-drawn) she and I started taking DIRECTION from eachother. “Let’s make a monster!” she’d say, and I’d get out a pen. “First step: it should have lots of eyes,” she said. So I drew lots of eyes. “Wings for ears. A bird beak.” Each time, I’d draw from her prompts in my own style. Then when it was her turn, and she’d follow my lead. “It should have antennae,” I said. “Pteranadon wings. And a dragon tail.”

Or she’d tell me, “It should have hair like Great Grandma’s (we were visiting her at the time). LOTS of noses. Glasses. Lots of down-pointing teeth, and horse ears.” Then I would tell her, “A snail body with stripes and lots of legs.” And she would add the extra details (like a decorative mouse flashlight and a bed) on her own.

It’s another fun little exercise in collaborating with the kid. And secretly, I know she enjoys practicing the rare moment of getting to “boss” me by telling me what to draw! She is still a bit rigid sometimes, and insists that I “didn’t do it right,” and I insist that when you work WITH someone, there IS no “right.” That you have to work WITH people, share their ideas, and just have fun. It takes some getting used to, because I can see those same perfectionist tendencies in our daughter that I have–wanting things to be “just so.” But it’s GOOD to step out of your comfort zone, and it’s GOOD to share.
So give it a try! Sit down for a bit, take your kid’s direction, and let ‘m tell YOU what to do for a moment–just to see what happens….It doesn’t have to be with drawing; try letting them tell you what shapes to glue down, what clothes to put on, or how to decorate cupcakes. And show me how it worked for you!
PicassOH!
Once upon a time, our daughter commented that an artist’s work we saw in a shop wasn’t so great because “it looks like scribbles.” In an effort to try to expand her creativity, it occurred to me that other than the rare kid’s book, there isn’t much out there to explain different kinds of art to kids in a way that makes sense in their little world. I guess kids try so hard to learn how to draw things literally, that it’s difficult for them to understand why anyone would INTENTIONALLY draw something unrecognizable!
We had learned a little about Frida, and how she “painted her dreams.” Then I taught her to “dance” with the paint, like Pollock. Like their work or don’t, but each one of them was important to the history of art for a reason, and I think helping someone else make sense of that reason is a fun challenge.
So I saw another opportunity in Picasso. Picasso was a fine artist, and actually drew quite realistically, but what really set him apart was when he expanded on the idea of breaking up the face into its most basic SHAPES. He also played with the idea of seeing if he could show different perspectives in the same piece. Could she be turned to the side, but also show both of her eyes? What would that look like?
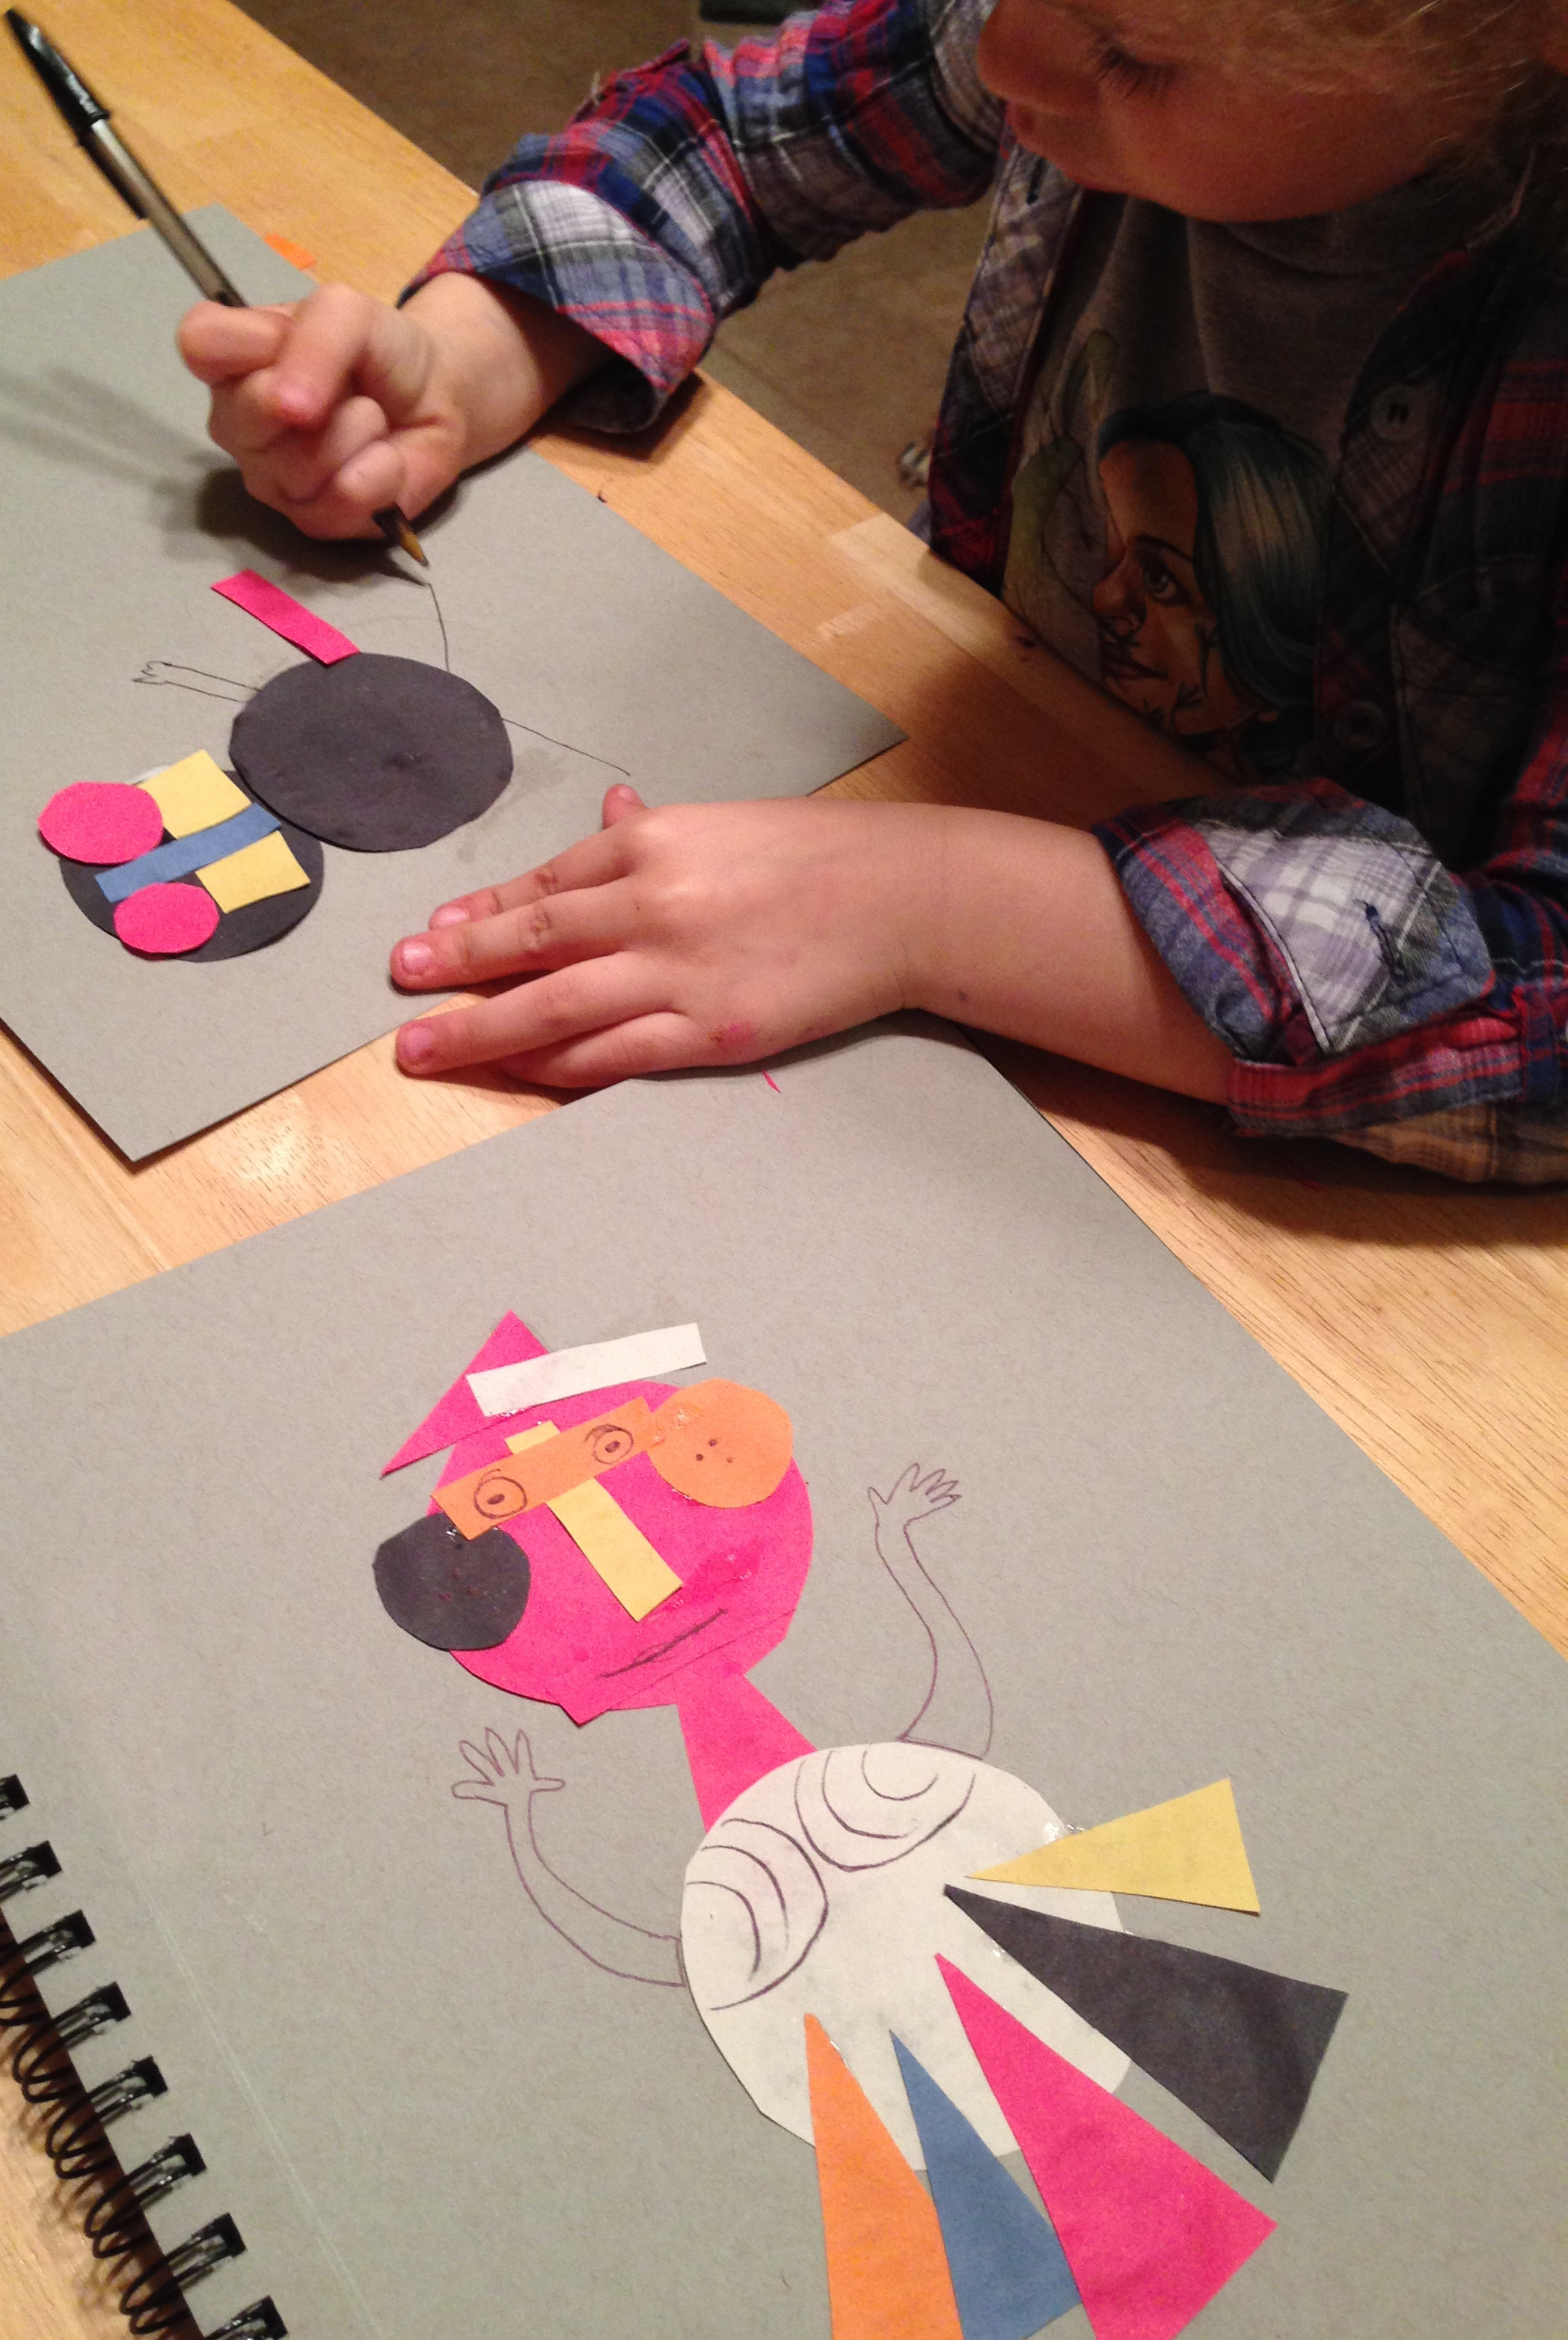
This was fun, because it didn’t take a lot of prep work. When our daughter came home from school, I had a plate full of shapes that I had cut out of construction paper waiting for her, along with some glue.

“Picasso made shapes into faces,” I told her. “Let’s see if we can make a face using only shapes.” So we happily cut and pasted. At first she balked a little. “Your dress looks strange,” she questioned me. “And why are her cheeks two different colors?” Because, my dear, we’re trying to mix things up a bit. Picasso-style.

I told her it didn’t have to be perfect, and it didn’t have to look EXACTLY like the thing you were trying to draw. It was just supposed to be a fun experiment. What would it look like if you used shapes for the eyes instead of drawing them?
She couldn’t help herself, and finished some additional spots in pen. And although she struggled with the need for symmetry, she was able to step out of her comfort zone a bit and enjoyed trying something new.

We left the shape plate on the table, and she created a rabbit the next day. (I KNOW those mismatched ears were killin’ her…)
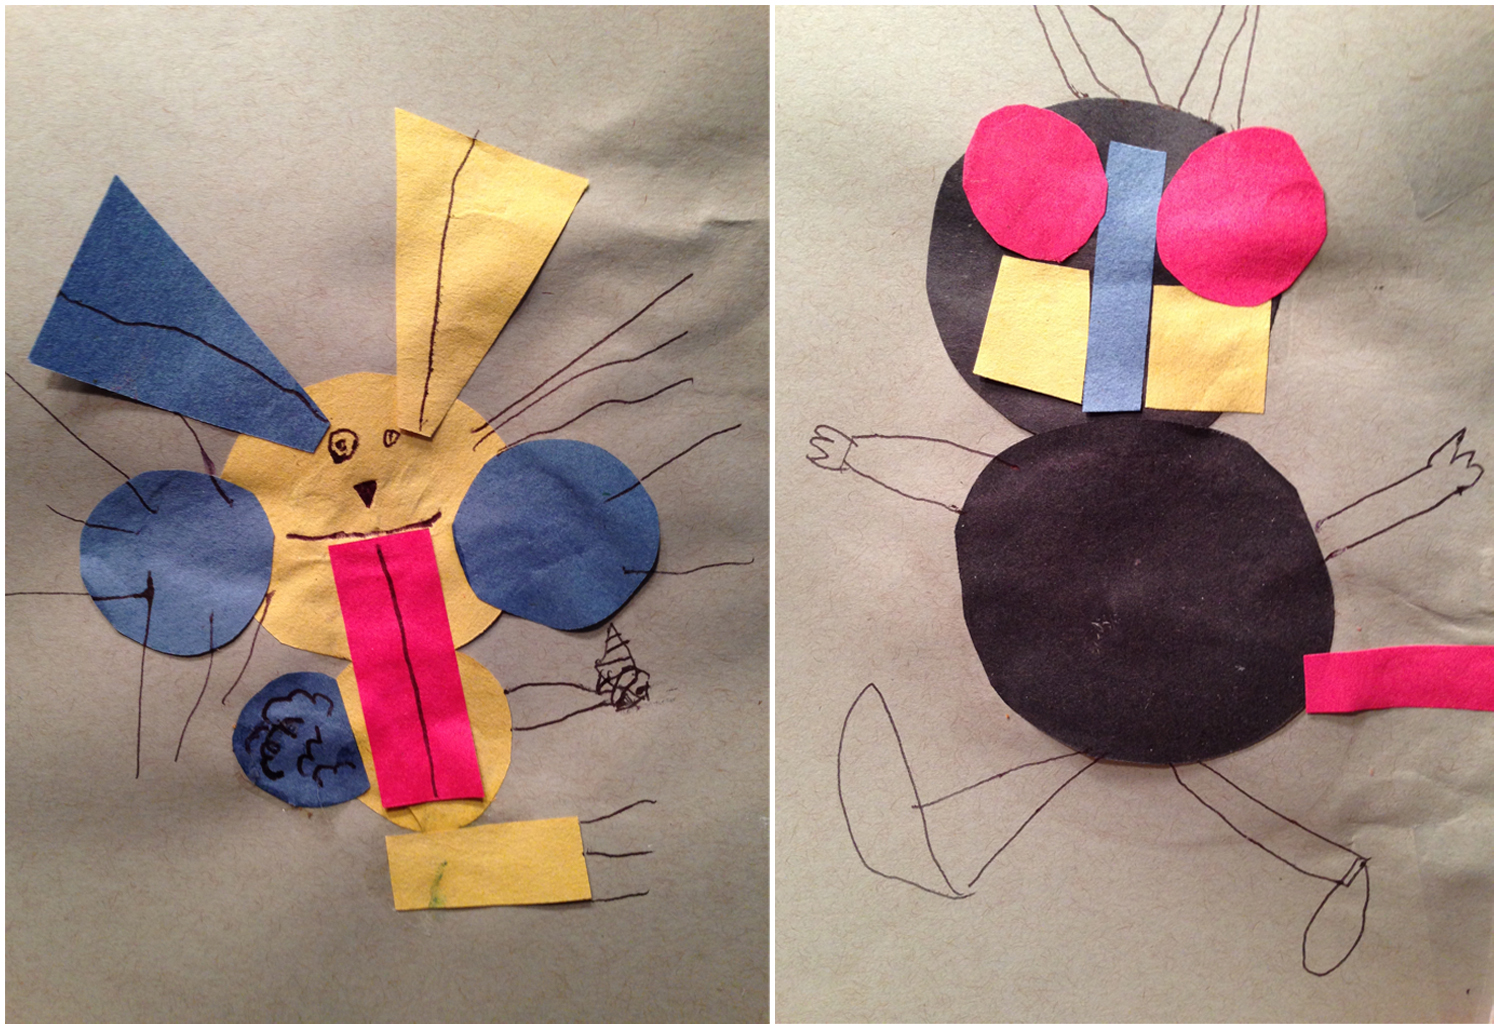
So, like we did with Pollock and Frida, I showed her a drawing of Picasso I had done, and she drew a body for him. She put him in stripes, gluing little shapes down onto paper, just like we did. And while that may not have been Picasso’s medium, the basic idea is there, I think.
Besides, I think Picasso might have actually had fun with construction paper and glue.

So if you’re looking for a fun kid project that also teaches them about art, give it a try! And I’d love to see what you come up with over on the Facebook page!
(OH! And if you’d like to see more artsy artwork from both me AND the kiddo, I’m on Instagram now!–@busymockingbird. But more about that later…)

