How to Draw for Real
Most of the time, our 6-year old is very happy with her art style. She draws as well as builds 3D sculpture creature things out of paper and tape. But the other day, she said, “I want to draw for REAL. Can you teach me?” I assumed she meant drawing realistically, since that’s what I was doing at the time she asked. “Can you show me step by step?” she asked. And so I did.
We started with the basics: simple football eyes, two comma shapes for the nostrils, and the bow of the top lip, the line of the mouth, and the curve of the bottom lip.
She added her own flairs, as she always does (like vampire teeth and a “knight’s helmet”), and then she stood back and took a look.

“It still doesn’t look real, like yours.”
I explained to her that it was a VERY good start, and better than a lot of people can do as an adult, but the details would come with time and with practice. The good news is, if you enjoy it, it doesn’t seem like hard work at all.
Anyone who draws will tell you that people often want to know the type of tool they use, the type of paper, the name brand of everything, they want to see a timelapse, they want detailed instructions on HOW you did it. Aside from general interest as an artist, I can tell you that stuff is NOT NEARLY as important as practice.

It sounds easy, doesn’t it? It takes time. Lots and lots of time. But if it’s something you enjoy doing, you’ll do it for the love of it, and the more you do it, the better you’ll get.
When you’re just starting as a kid, I think it’s perfectly okay to learn by copying a piece by another artist. Or copying a face from a magazine. Or by using the style of one of your favorite artists to make something of your own. As long as you don’t tell everyone it was YOUR original idea, it can be a good way to learn from people whose work you admire. From there, you can create your own work, your own drawings, and your own style.
And once you REALLY learn the basics, and really understand them well, you can unlearn them and create your own style! People ask me why the people I draw are so wonky-looking (I assume they mean that respectfully–haha!). They assume the variation in proportion is a choice I intentionally make while I draw. Like, “okay, now I’m going to make this eye bigger…” Actually, when I was in college, I took countless classes on proportion, and facial structure. We studied live models, and had to measure out the proportions of the face and body correctly. For me, there is something pleasant in perfected proportion, but once I learned it, I found I had much more fun when I just drew things as I saw them.
I often start with an eye, and then sort of guess-measure where everything goes from there, based on a reference photo I’m looking at. And because I’m not a computer, my proportions wind up a bit…askew. And I’ve learned that I enjoy that! It’s not an intentional distortion, it’s just me, and what happens when I don’t walk directly down the center of the road. And I enjoy it!
I’m often impressed at the technical perfection of people who can draw hyperrealism (where it looks EXACTLY like a photograph), but that style doesn’t sing to me nearly as much as wonky imperfection does.

And no matter WHAT tool you use, the only way you’ll get better at it is practicing, practicing, practicing, practicing, practicing, practicing, and PRACTICING. As I told our daughter, I’m STILL learning. There’s a ton out there for me to STILL learn. And I’ve got TONS of practice left to go. So as frustrating as it may be for our girl to not be able to draw “for real” after one lesson, I’ve reminded her that you can have all the lessons in the world and have the finest (or least expensive) art supplies, but it just takes practice. And the great thing is that if it’s something you’re into, practice is FUN.
Fun Little Nature Project
It’s been a busy week, trying to keep up with the world…sometimes it’s nice to just step away and do an easy, fun little thing with the kid.
My mother’s day weekend was spent with a large group of giggling Girl Scouts, on a Mother-Daughter Campout in the woods. (Please please, calm your envy…)
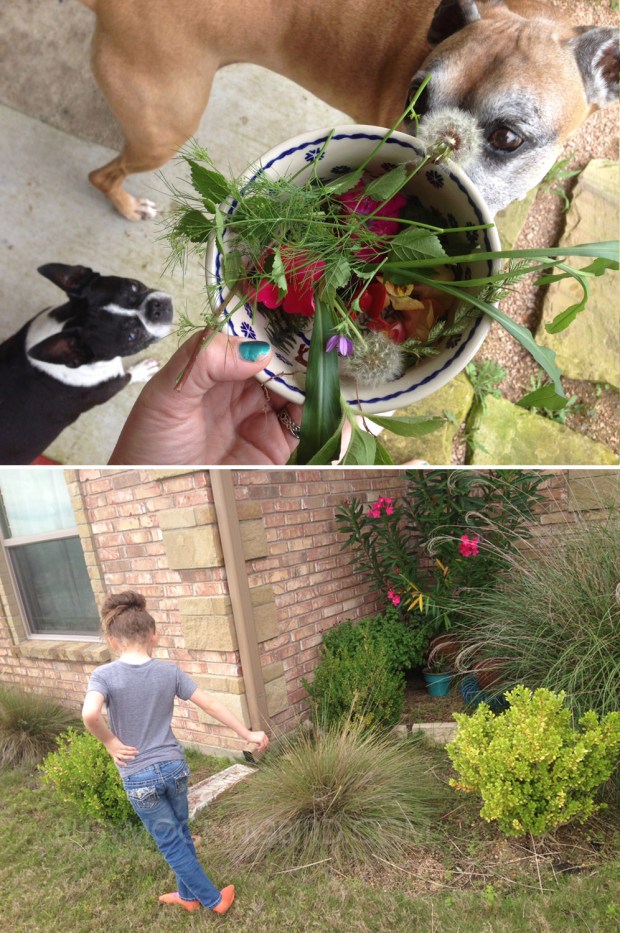
Even with the archery, horseback riding, and nature walks we did, if you asked Myla what her favorite part was, she’d tell you it was the nature project. She’s been asking me to do it again, and since our Texas days have cooled down for a couple of days, we were able to just go into our yard and have some fun. So I thought I’d share what we worked on, in case you’d like to give it a go yourself!

First step is to Pick some plants. You want to find things that have a variety of shapes and sizes and colors, but you want to make sure they’re fairly flat. You don’t need to go far; if you’ve got houseplants nearby, or have access to grass (unlike some Ohioans I’ve heard, who are currently covered in snow) and plants in your own yard, all you have to do is gather them up.
Next, you’ll need contact paper. I’m sure it’s cheaper sold in rolls, but I only happened to have self-laminating sheets on hand, which are admittedly a bit pricier. But they got more action with this project than they’ve seen in a while, so I didn’t mind.
With your gathered plants nearby, unpeel half of the sheet with the sticky side up, so you can start placing your plants where you want them, into whatever design you choose.

Since Myla’s more into building animals and creatures and things with faces, she went straight for making something adorably weird, even adding little bits of paper for the eyes, while I made a simple little mouse. Fun little tip: clover petals look like hearts. 🙂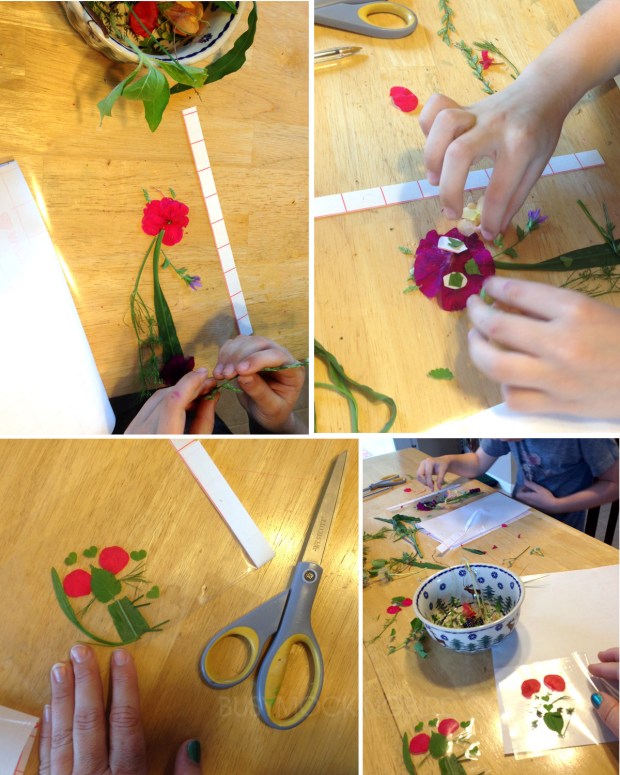
Or you can go decorative, like my wonky little tree-shape below.

Myla moved on to making a rabbit from various plants, being very careful in properly laying them out how she wanted. With have the page exposed, when you feel finished, just unfold the other half and fold it over your piece to seal it up.

Once you’ve folded it over and sealed it up, cut around your piece, being sure to leave quite a lot of space around. Sometimes, it even helps to seal it twice, making sure all the edges or sealed, or air will get in, and your little creations will discolor and “turn rotten,” as Myla says.
And there you have it! Just a fun and easy little idea to make into bookmarks or punch holes to make a mobile to hang in a window. And a calm little happy project that nearly anyone of any age can do. So get out and spend some time in the sunshine (if you have it) and make some lovely little things with someone you love!

Awesome Art Day!
We’re at a countdown in school to the last day–and at our school, they’re doing an alphabet a day all the way until Z for Zip up and go home! The countdown started this past Wednesday with Awesome Art Day…and I was so happy to be asked by the teacher to help with a project!
At first, I considered a sort of collaborative project (which is what we have so much fun doing together), but the teacher asked if we could have it relate to ecosystems or nature in some way. So I thought it’d be fun for the kids to have a take-home, and with the help of ideas from artist friends, I drew out these little paper dolls, with the idea that they could create a predator and a prey.

I let Myla give it a try at home first–I had the pieces cut out for her, so all she had to was punch holes where she wanted them, and put in the little brads. Then, she could decorate and color them whichever way she liked.
 So I cut out 20 pages of the creatures and pieces in the template above (WHEW!), and put them in individual baggies for each kid. I had decided to pre-punch holes in the bodies where legs & arms would be to save a little time, and brought my hole puncher in case they wanted more punches.
And it was so much fun! Their teacher had talked to them earlier in the day about predators and prey, so it was fun for them to create a creature and then a creature that gets eaten by it. I had them each open their baggies and start putting their creatures together, and I walked around, offering more punches and extra brads, asking them which creature was which.
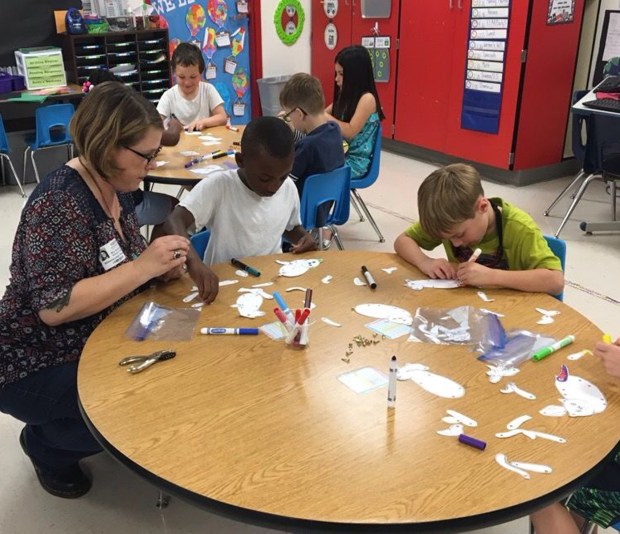
The teacher brought out markers for them to color with, and a couple of them used construction paper to make extras to add on.

They had fun coming up with unusual creatures!


So if you’re looking for a fun little project to do, grab some brads at your local store’s office supply section, use a hole-punch, and feel free to download and cut out the critters from my template above. I’d love to see what you come up with!
Art and Audiobooks
This past week, the daughter and I visited family for Spring Break, part of which included an 8-hour drive. Myla’s a great traveler, though, and can entertain herself for hours with a sketchbook, animation apps, or just staring out the window, daydreaming. I had never tried her with audiobooks, but since the trip was long and she was tired of her normal car activities, I decided to play for her The Wonderful Wizard of Oz, read by Anne Hathaway.

Anne has a knack for creating interesting voices for all the characters, which Myla enjoyed, and to my surprise, she was riveted, and was hooked right away.
We happily learned that there were a great many differences between the book and the famous movie (of which she’s not really a fan), and was full of so many strange creatures and events that we had never heard of before.
“We should try to DRAW all the characters the way we saw them in our heads!” she excitedly suggested once we got back and settled in at home. It was an incredibly awesome idea (she is 6 years old, and never ceases to have awesome ideas). And it just so happened that my husband (who is deployed) had sent us a little sketchbook that was just waiting to be drawn in…

So we started talking to each other about the characters, and we talked about drawing what was in our minds as we heard the story. We talked about how the author can sort of tell you what they see, but everyone who hears it might have their own picture in their heads. (We also never referenced the movie or the original illustrations from the 1900s, we just drew what we saw in our heads, so that can’t be wrong, no matter how you slice it). So in case you’re worried about spoilers from a book that’s been out since the 1900s, I’m going to tell you a bit now about all the characters we drew:
One of her favorites was near the end, when the adventurers come upon some people they called the Hammer-Heads, who had no arms, but very wrinkly necks, which could shoot out and punch you with their flat heads. And we started to sketch.

We drew them side by side, to compare. I pictured them more as rock people, and she saw them more like little cranky men. In any case, they both definitely had a wicked case of cranky-face.
Next up, we drew the Scarecrow–Myla’s favorite of the travelers. I drew a little doodle on her lunch napkin that day, and when she got home, she sketched her version of the scarecrow being flung by the guard trees in one of the forests. I drew the Scarecrow in a quite disturbing description of how Oz gave him brains–by filling his head up with a lumpy mixture containing pins, which then stuck out of the fabric once his head was back on. They said it made his mind “sharp” (and not at all terrifyingly creepy in the slightest, right?).

We both loved the Tin Woodsman (my favorite), whose story was MUCH more grim than in the movie. In the book, he was a regular man, in love with a Munchkin girl who lived with a mean witch, who enchanted his axe, which made him accidentally keep cutting off his own goshdarn limbs. Luckily, his good buddy the Tinsmith would replace his limbs with tin ones each time, until finally the Tin Woodsman cut off his own head and body with the enchanted axe, and the Tinsmith fashioned him a new one…but it didn’t have a heart, and he no longer was able to feel love, even for the little Munchkin girl….until Oz cut a little square in his chest and put a tiny fabric heart inside, and he finally felt love again. I drew him on her lunch napkin, and then later, holding his axe (with which he chops a GREAT many messy things in the story) and Myla drew him feeling sad, crying over accidentally stepping on an insect.

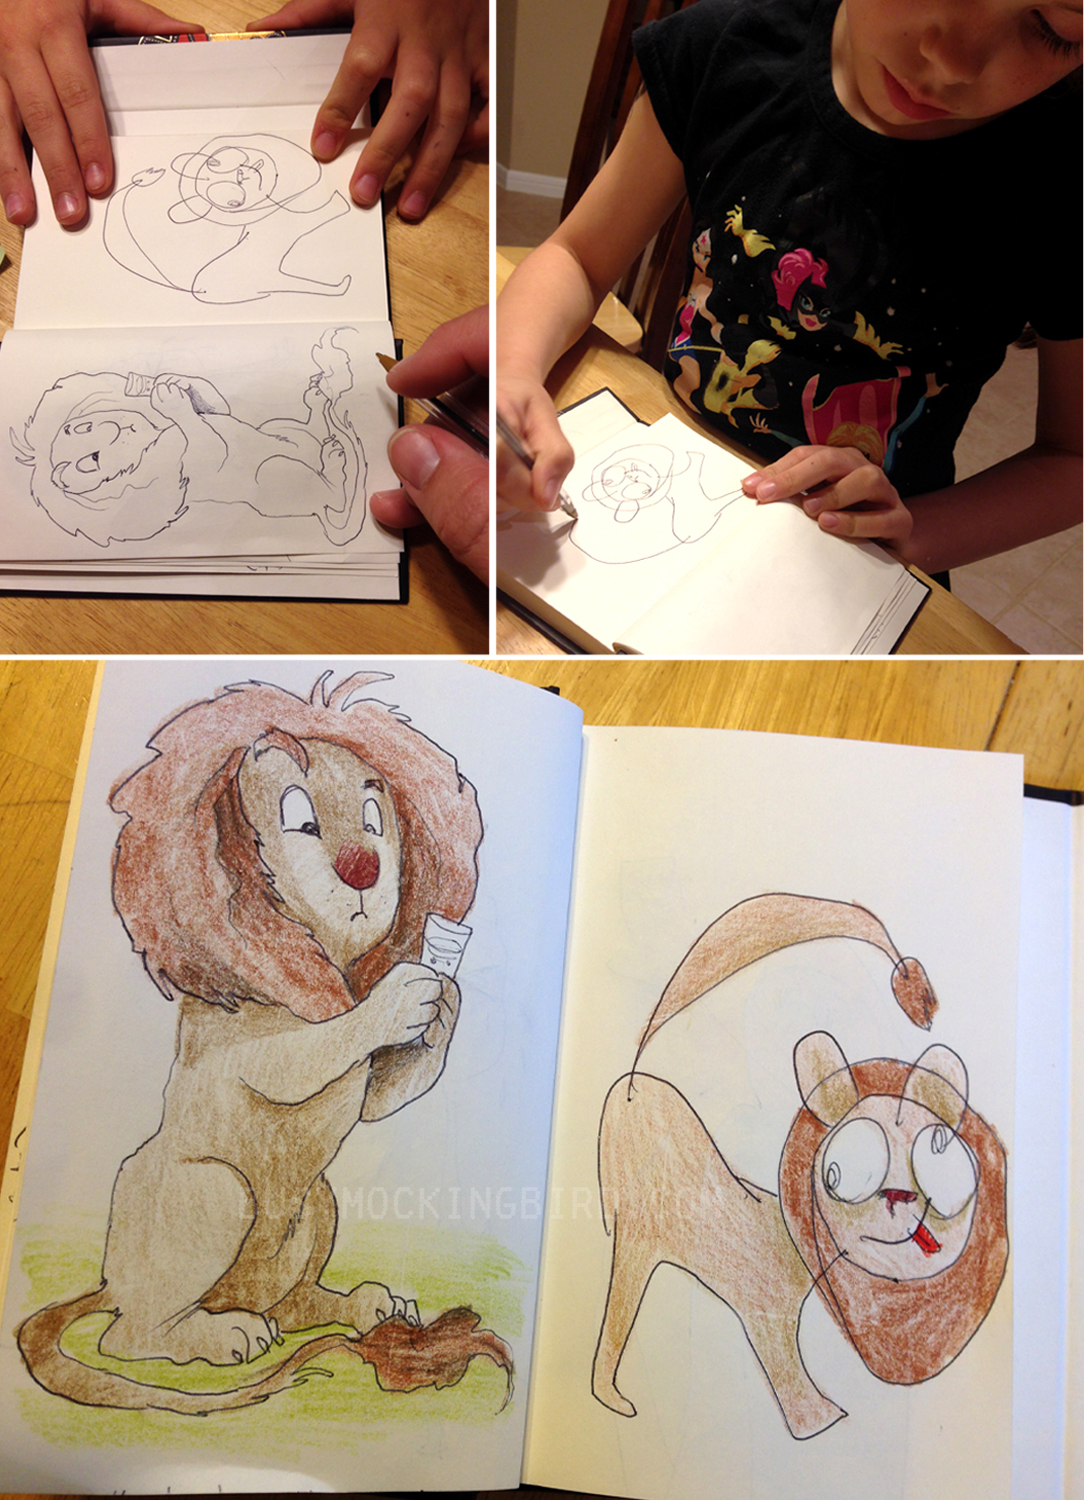
The Lion seemed to us just like a regular lion, and we talked about how in the movie they kind of made him like a person, standing on two legs. Hers was a little more goofy -faced than mine (since he was quite silly), and mine is drinking the liquid courage (which I assume was probably a shot of whiskey or whatever?) that Oz gave him.
Dorothy was also quite different. Myla saw her as a little blonde-haired girl in a blue dress, and we were both surprised to know that in the book, those famous ruby slippers were not in fact “ruby,” but were SILVER, a-thankyouverymuch, and never ever contained a bit of red. When the house lands and she’s about to take off on her adventure to find the Wizard who might help her get home (which she heard about from a woman who was NOT Glinda, but an older small, hunched wrinkly woman, who was indeed a Good Witch), she puts on a blue gingham dress, the silver shoes, and a yellow bonnet, which I supposed she wears for the entire trip… Since that blew my mind, I scrapped my childhood image of the iconic Dorothy, and drew her with shorter, curlier brown hair. Myla and I both saw Toto pretty much the same, which makes sense, since they described him pretty well.

The Wicked Witch of the West was a fun one, as she was described in the book as having one eye that was magic and could see everything in the land she ruled over. “What did she have in the place where her other eye was?” Myla asked me. “Well, they never really said if she lost one of her eyes, or if it was one eye like a cylclops.” So we decided to both draw her as a grumpy ol’ cyclops. And they never actually said her skin was green, so I just drew her with a greenish tint. (Still, I think it might’ve been fun to draw her like a sort of cyborg, or like Mad-Eye Moody from Harry Potter.) 🙂

We haven’t yet drawn my favorite characters, the Flying Monkeys…but I was surprised that their story was MUCH different in the movie, where the Witch just bossed them around all the time, whenever she wanted. In the book, there is a golden jeweled cap that the Witch puts on, says a goofy little chant, and the monkeys come do whatever she commands. The catch is that the wearer of the cap can only call the monkeys three times (she’s already called them twice), and then the hat must be passed on to someone else. So when the Wicked Witch sees the travelers in her country, she sends…the WOLVES to go hunt them down. When that doesn’t work, she calls the CROWS. Then the BEES. Then the WINKIES. (wait, what? “Where are the goshdarned monkeys??” I was thinking at the time). Finally, when all of those are defeated, she decides to use her last and final monkey-call to attack them.
The monkeys have a whole other back story, but it’s a bit long…
…So there it is! What started as a simple way to pass the time on a long road trip turned out to be a pretty fun project for us both. I’m pretty happy about how much she got into it!
I had nearly forgotten that when I was in high school, I had an AP English assignment to do a paper on imagery from the book One Flew Over the Cuckoo’s Nest, and I drew each character as I had seen them in the descriptions I read. It had always been one of my favorite assignments, and I had nearly forgotten about it until Myla came up with this one.
We’ve read a few actual chapter books at bedtime, like the Spiderwick Chronicles (of course), Charlie and the Chocolate Factory, Fantastic Mr. Fox, James and the Giant Peach, How to Train Your Dragon, and The Phantom Tollbooth, to name a few–ALL of which would probably be amazing for this project. I think the key is finding out if your kid’s into it first.
But if not, hey–what’s to stop you from giving it a try yourself? 🙂
Thimbletack!
Last week, Myla’s school celebrated reading week. Myla never misses an opportunity to wear any kind of costume to school, and when the day came to “dress as your favorite book character,” she immediately said, “THIMBLETACK!”
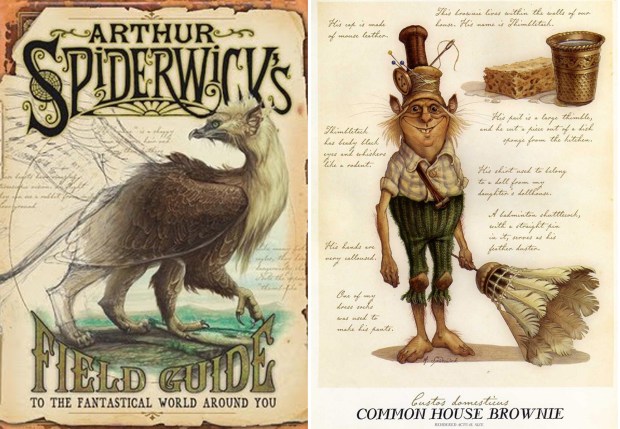
If you’re not familiar, Thimbletack is a house brownie in the Spiderwick Chronicles books by Holly Black and Tony DiTerlizzi (containing Mr. DiTerlizzi’s beautiful illustrations), and we have consumed the entire book series like cake in our bedtime reading time.
I always love a good creative challenge. But how the heck was I going to pull off a Thimbletack? With our busy life, I had waited til the last minute on this one, and found myself scrambling for an idea the night before. Thankfully, this was one of those times when the planets aligned and the stars shone down on my craft room, and I was able to magically whip something together within a half hour.
House Brownies, according to the book, make their clothes up from things they find around the house, and their little hats are made from thimbles or scraps of fabric, with buttons and things tucked in. I didn’t know HOW the heck I was going to make a hat with that sort of look….until I remembered a hat called a pakol that my husband had brought back from his last deployment to Afghanistan. I unrolled it, and it had nearly the same silhouette. Magical sparkling birds sang songs of happiness as they flew around my shoulders.

Unsure whether or not my husband would mind me destroying this deployment souvenir, I maintained the integrity of the hat by wrapping it with a burlap ribbon and pinning it to the hat. On the burlap ribbon, I hot-glued a pair of quickly-sewn ears. I dug through one of my many craft drawers and found (to my surprise) several giant buttons that I do not ever remember intentionally purchasing. I hot-glued those to the burlap ribbon, along with some cheap paintbrushes (because when you send something with your kid to school, you have to prepare for the fact that you might never see it again), and BOOM: I think we got what we were going for…

So cute! And not too shabby for the night before. She has a pair of ratty jeans that reeeeally need to be retired, but they came in perfectly for a dress-up day like this. I copied the book jacket, filled it with printer paper, and stapled the sides, to make Arthur Spiderwick’s Field Guide (which Thimbletack protects). She had a great time with that on its own, just drawing fairies and other imaginary creatures at breakfast.
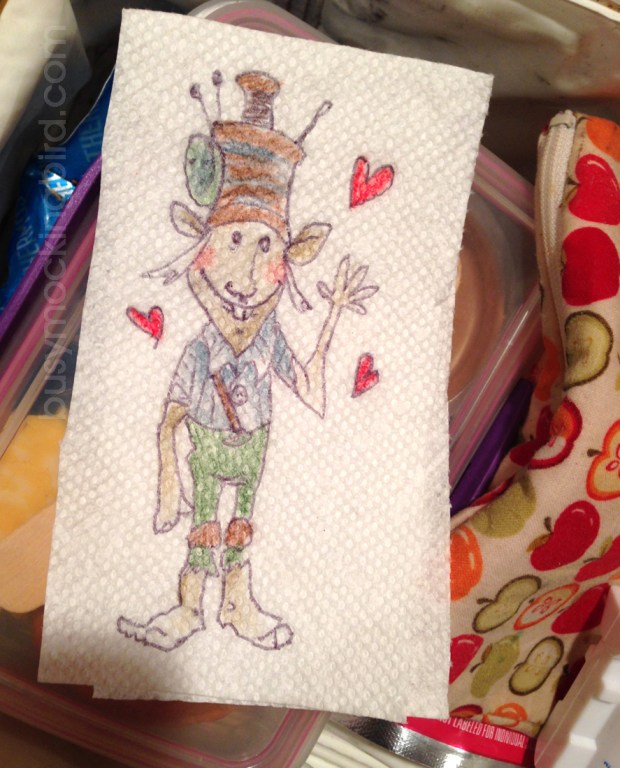
I draw on her lunch napkin every day (been doing it since she started school), so that day, a little Thimbletack greeted her…
So it turned out pretty well, and essentially just involved her wearing a decked-out hat!
As a fun little side, Myla’s affection for Thimbletack was already there, but she found him even more lovely when we did an art trade with Mr. DiTerlizzi a few months back. We had shared comments often on Instagram, and traded a few things, but the best was a portrait Myla and I did of his daughter, who was a big fan of the Labyrinth…
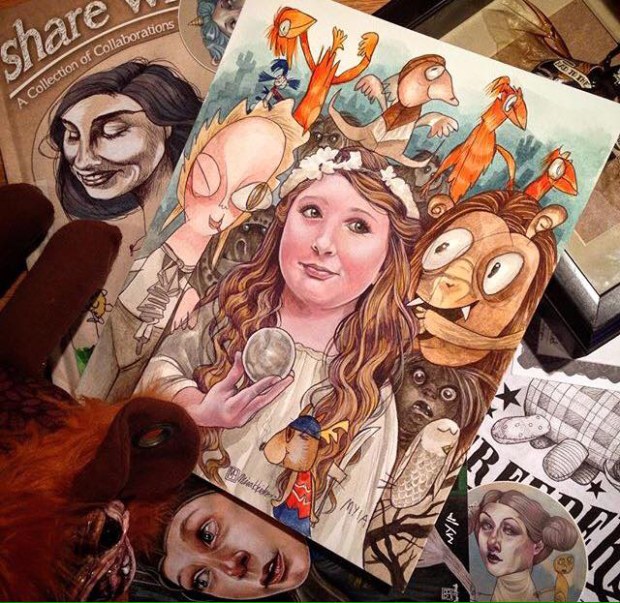
We drew her as Jareth / Sarah, and Myla drew the main characters behind her–it was so much fun!
In return, he sent us a WONDERFUL package full of magical things, but most especially this:
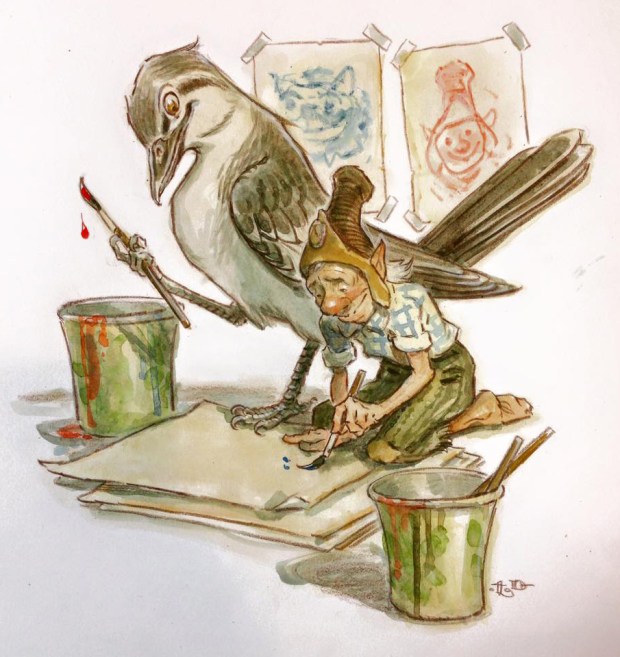
It’s his Spiderwick character, Thimbletack, collaborating with a mockingbird. Get it?!? Because of our collaborations? Because I’m the mockingbird?!?! I was so very touched, and it’s one of my very favorite pieces of artwork–it sits next to my bed, above the tiny original painting of Big Bird by Carroll Spinney.
And that’s our little story of Thimbletack and the 30-minute costume for reading week. Have you ever had to last-minute throw something together that turned out pretty cool? Well, if you ever do, I hope magic craft-fairies shine down from the sky and light your way. 🙂
Bird Nests and Trust
When our daughter was a baby, she had a lovely little mess of curls on top of her head that I lovingly referred to as her bird’s nest. I drew pictures of it. I made photo collages of it (complete with little mockingbird!).

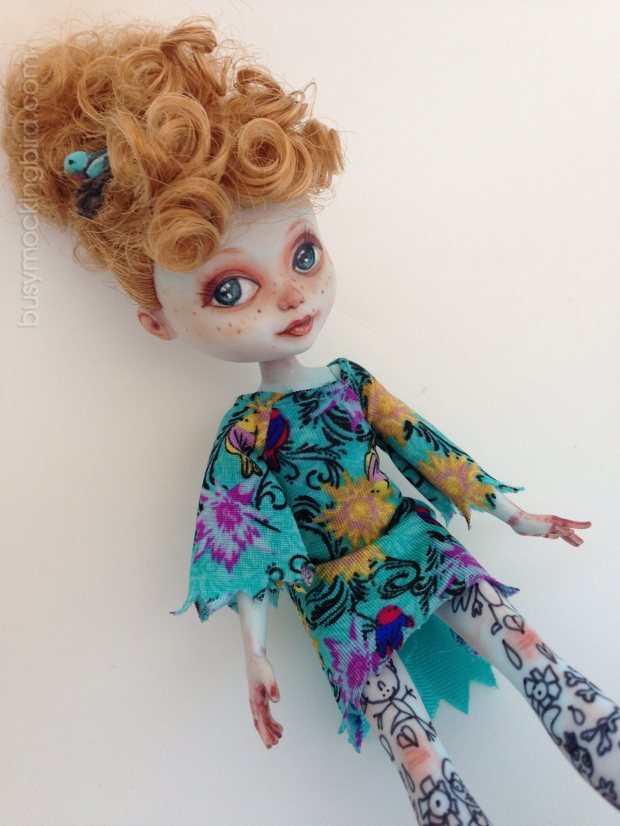
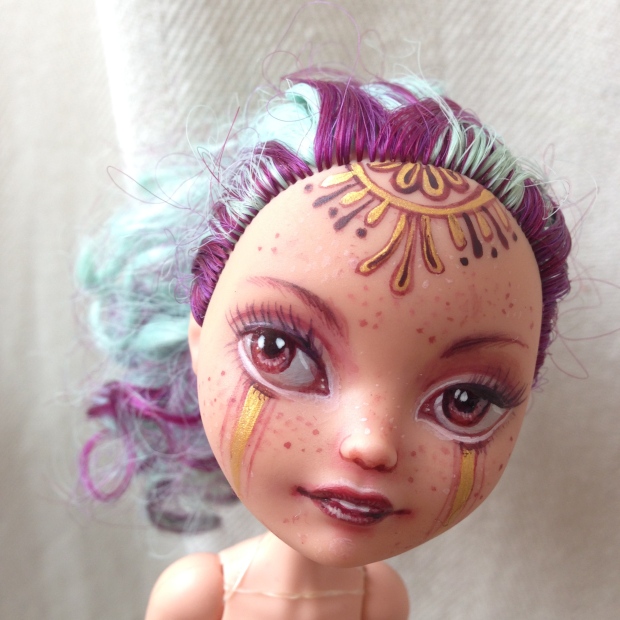
So last week I was browsing the Monster/EverAfter High section of a store (like adults do), and I came across the most wonderful thing that made me instantly smile: An Ever After High doll named “Featherly,” complete with curly hair and a little BIRD NEST.

As I mentioned, I’ve been randomly addicted to customizing dolls lately, and set about repainting her immediately. I wanted her to look a little more like a little girl. A little more like Myla. Not in a weird voodoo-doll “I want you to be my pretty little doll and never grow up” way, but just in a simply innocently weird, “I want to make a doll that looks like my kid” way. (Hey, it’s not THAT weird. Girls get those American Girl dolls and dress like them, right??)
So here she is all repainted and pretty… I’ve still got a little learning to do with customizing dolls, but I’m having fun, and the rest will come with practice.

My technique’s a little more scratchy and sketchy than people who do this professionally, but it feels good to see a new little look shining through.
I even redrew some of her drawings onto the doll’s legs, like little doodle-tattoos.
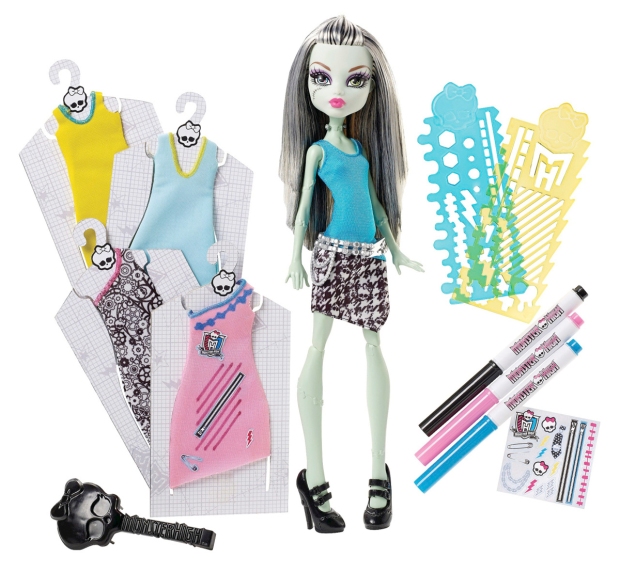
 Myla’s seen me do some customizations lately, and asked if she could give it a try. So once , when she had a chance to choose a toy, she chose a Monster High Boo-tique kit. She’s not at all interested in clothing, but the kit inspired her, and she asked if she could draw on the actual doll instead.
Now, Myla is a kid who hears “no” a lot. We give her discipline. She has rules. But sometimes, when you can allow it, a simple yes can make a kid shine.
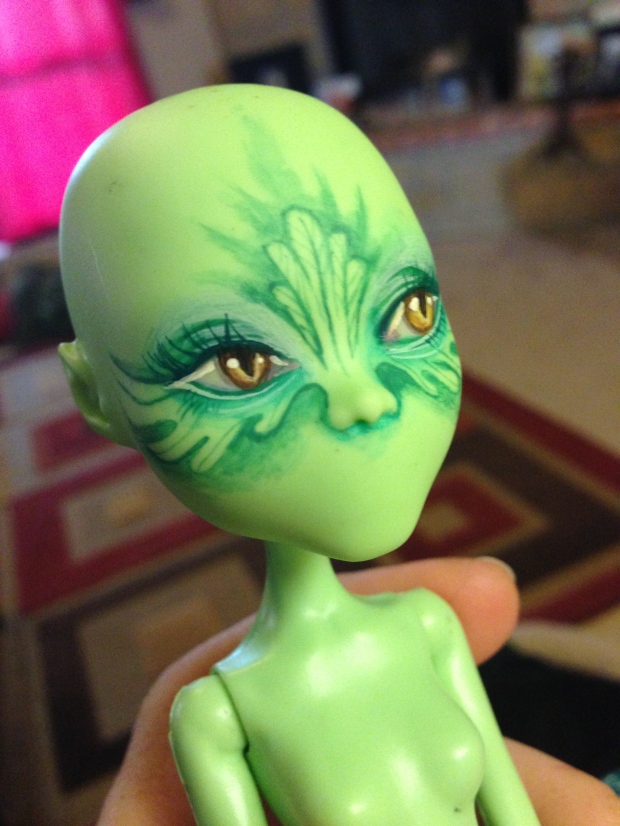
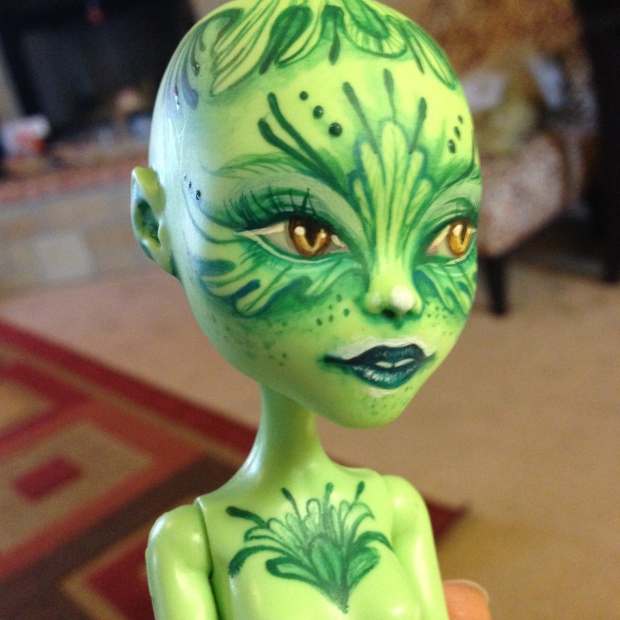
Awhile later, she showed me her masterpiece…

Okay, I know what you’re thinking–quite terrifying, right? The thing is, she made it her own, and it made her so happy. And it didn’t take a lot on my part. In this case, saying “yes” told her “I believe that you can do it.” And no matter what it looks like, she OWNED it. As wonky as it was, she was pretty proud of her. “I messed up on the eyes,” she said, “and I was frustrated, until I just cut some new ones out of paper.” She markered her hair. She drew a snake tongue on her mouth. Her name is Alia, and she’s an alien (of course).
What did it cost me? A doll. Fifteen dollars for a chunk of confidence? I’ll take it.
One of the things I learned from collaborating with her when she was four was that if you loosen the chains of thinking things should be “just so,” that magical things can happen. As I said in that post so long ago, “Those things you hold so dear cannot change and grow and expand unless you loosen your grip on them a little.” And the best part is that the confidence she’ll get from me trusting her is worth way more than the sanctity of any doll.

Crazy Doll Lady
It’s been awhile since I posted about playing with dolls…
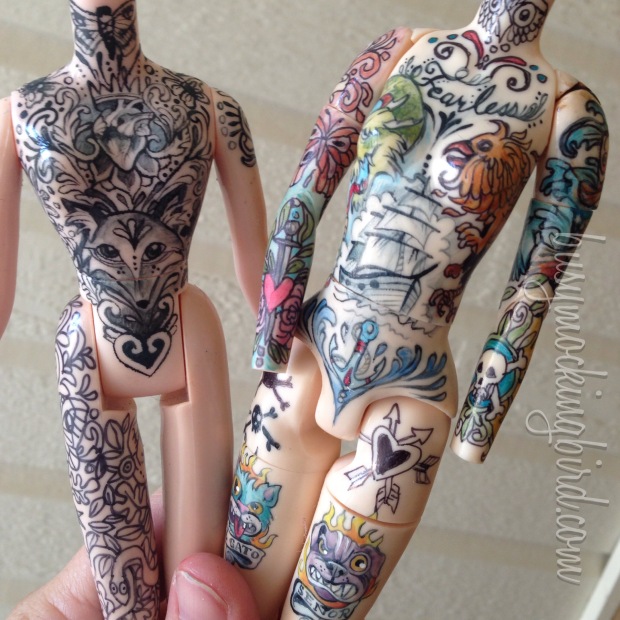
Back then, I was customizing a Blythe and some Monster High dolls, along with “tattooing” some blank bodies that my friend Aletta (from theFoxyToyBox) let me play with.
(So I’m not sure if I’ve ever shared all the doll customs I played around with. I feel like I’ve shared them before, but a rudimentary search shows only my initial post. Considering I’ve been doing this blog a few years now, I don’t THINK I’m repeating…I try REEALLY hard not to repeat. (But if I do, in fact, repeat, please just consider it an old friend coming to say hello again…)…)
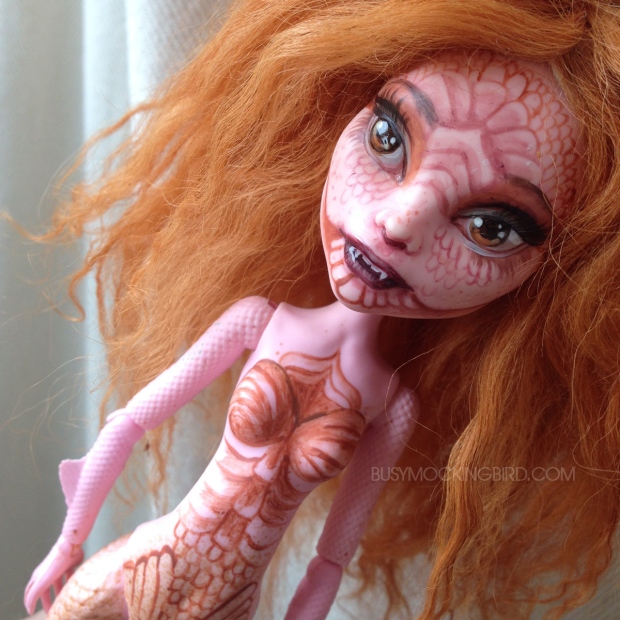
Awhile back, my friend Aletta sent these old used dolls for me to play with, and I took the opportunity to repaint them using all the skillful skills I learned from the magical world of Pinterest.
 If you want to paint on Monster High dolls, trust me–I’m not the best one to learn from, because there are people who are WAY better pro at it than me. But I wiped off their paint with nail polish remover (I describe my wonky process here), painted in acrylics, and sealed with with Testors spray varnish to protect the plastic without leaving it sticky. And OMGosh they were so much fun.
I got little wigs in Etsy shops, because I am weird like that. And because they’re GORGEOUS. You pretty much just cut off their store-hair and glue on the lovely wigs, and BOOM–magic.
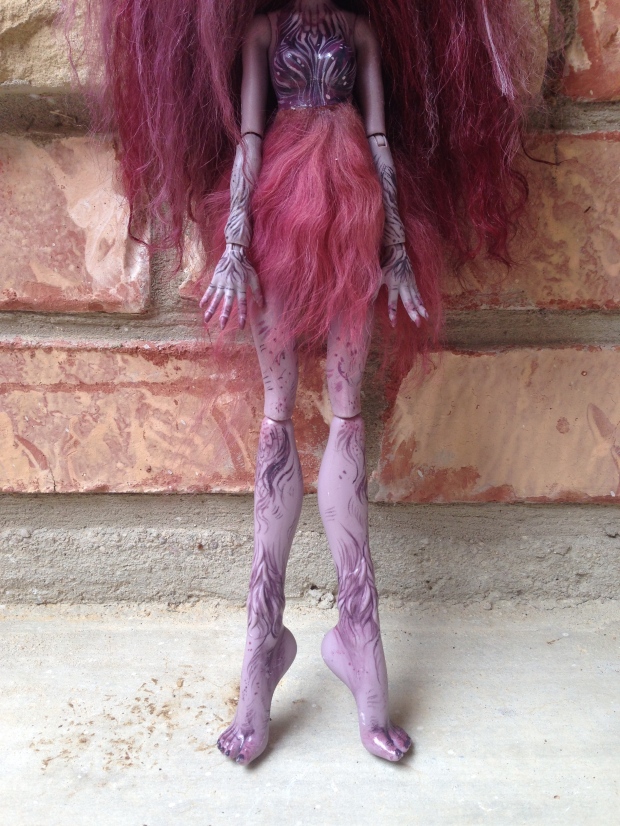
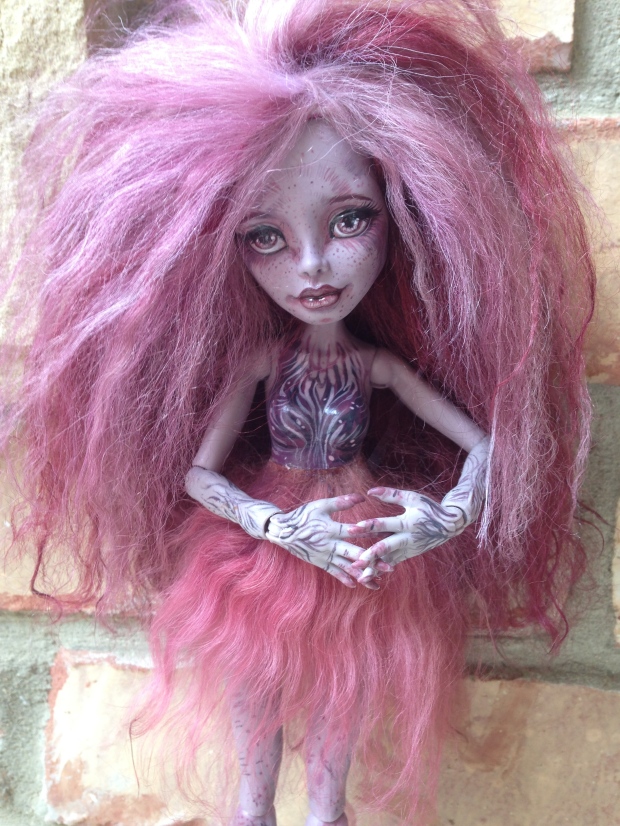
Ages ago, I bought a Bigfoot Monster High doll to repaint (because I couldn’t pass up those HUGE feet and hairy legs). I repainted her, paying lots of detail to that hair, and found a wig that matched her perfectly. I even contacted the wigmaker on etsy, asking if she could send a little extra scrap fur to put around her, which she kindly did. So here she is, with her little mini skirt of hair:
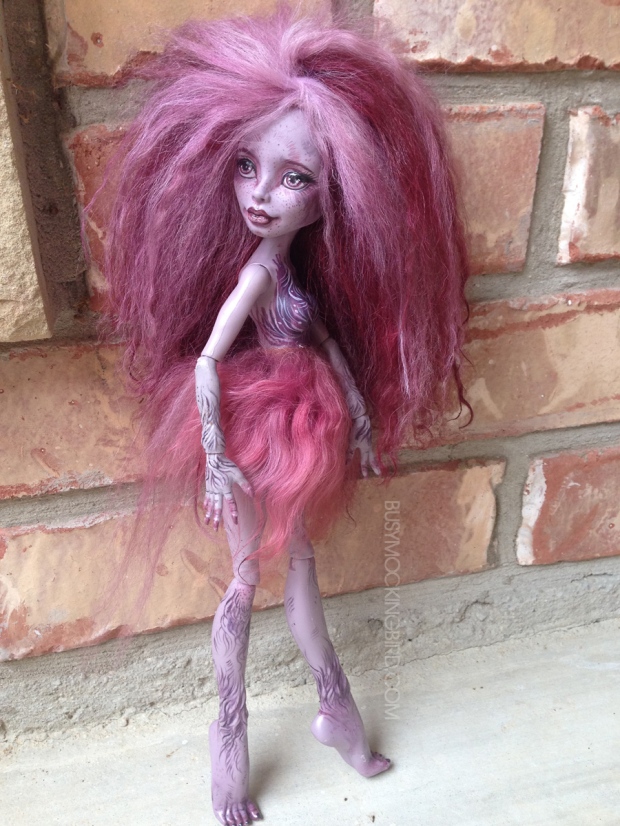
I tried to put her in that bigfoot hunched pose from “real” Bigfoot photos, but Monster High dolls are a little too poised to hunch. But lookit that fantastic leg stubble! Hahah
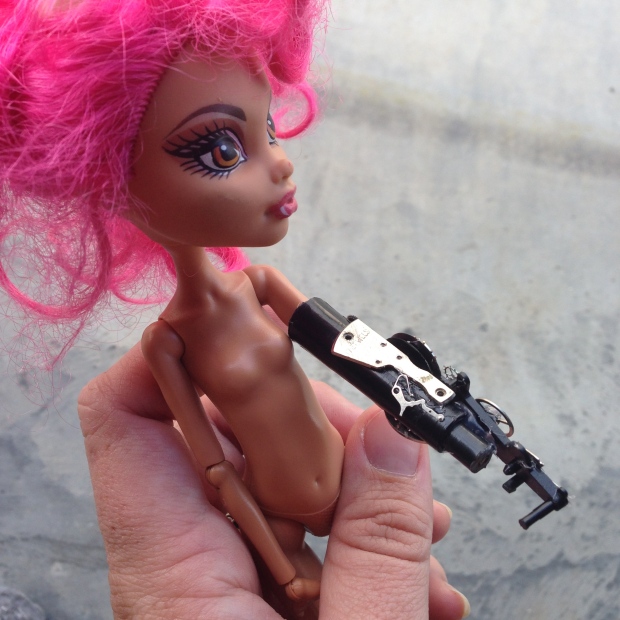
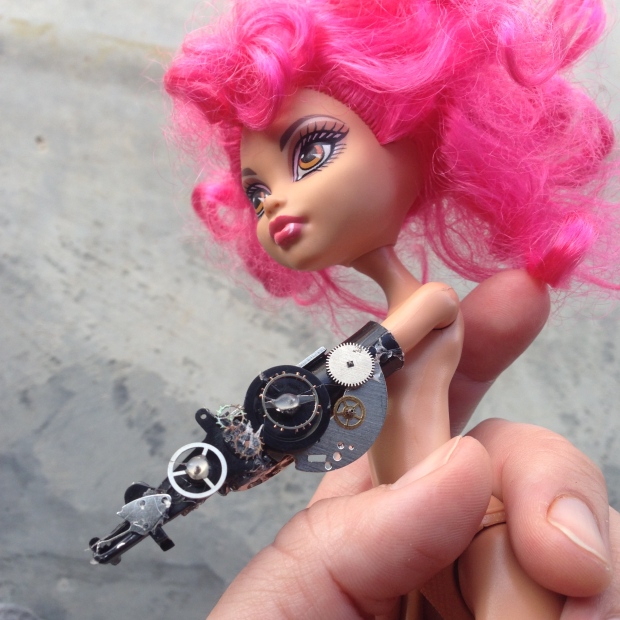
Even one doll (which Myla asked me to keep unpainted) was missing an arm, and she asked if I could build her one (because I can apparently do anything). I asked if it could be a robot arm, and she said, “of COURSE!” So a few electronic bits later, and I was able to hot-glue a fairly decent “robotic” appendage, which Myla was VERY happy with.
What’s funny, is that my occasional interest in repainting dolls has inspired our 6-year old to attempt to get me to buy her new Monster High dolls. “MOM! Can we please get it if I promise to PAINT it???” Usually our rule is that if I let her get something, she can pick a PROJECT, not just a toy. Which is why she tries, at times, to get me to buy new dolls. It’s tempting, really, considering our thrift stores here don’t HAVE any used ones, and holy cow, one time I saw a LUNA MOTH Monster High doll that even I wanted to repaint!! But I have to use restraint–they’re expensive after awhile, and we can’t just go buy toys for no reason (at least not once you become a parent) so I don’t really allow it.
But they ARE fun….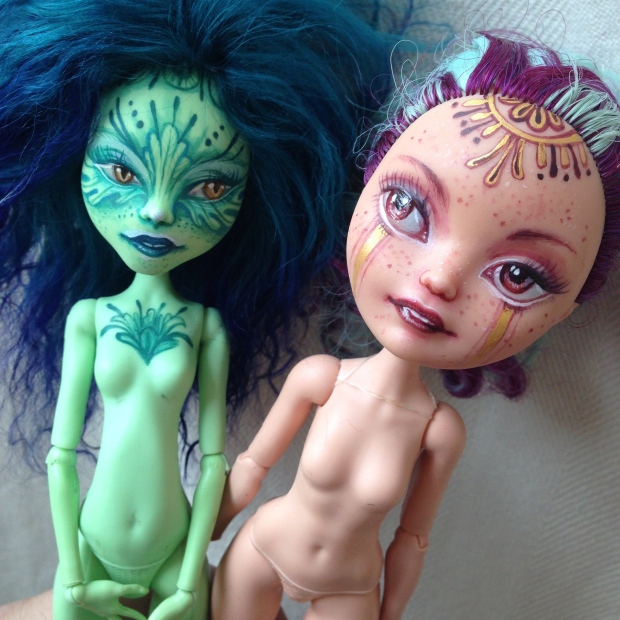
Anyway, I’ll share more of how our custom collaborations are going next week–Myla is having lots of fun with them! For now, have a great rest of the week! 🙂
Dad’s Garden Train Hogwarts
My sister and I grew up in a pretty artistic family. My mom and dad both paint and have always been very creative. So today, I thought I’d share a little project of my dad’s….
I learned to paint and draw when my mom started showing me how to draw shapes and make people when I was still learning to walk. I get so much of my encouragement and imagination from her. And I get a lot of my furious, frenetic, constant MAKING from my dad, who was always knee-deep in a project or two, always creating, always building, always doing SOMEthing. (Sounds very familiar!)
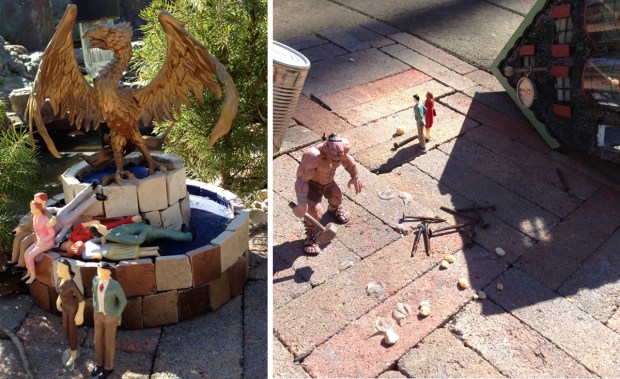
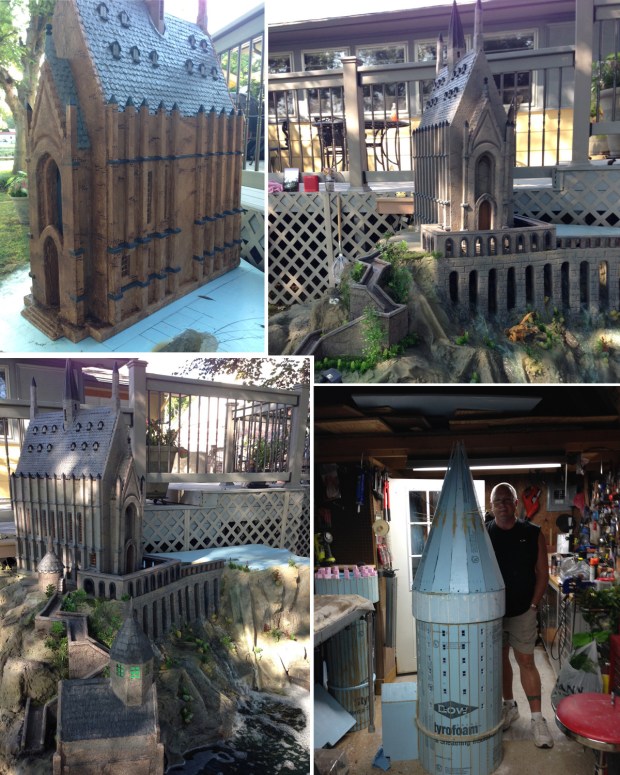
A few years ago, my dad got into building garden trains. He had fun setting up the track, but also building the structures for the cities and towns in his train village. At one point, before they moved, he had worked on a Harry Potter’s Hogwarts castle to add at the back.  The old town below included Diagon Alley, Hagrid’s, and the Weasley’s. He even included a few fun things with the people…
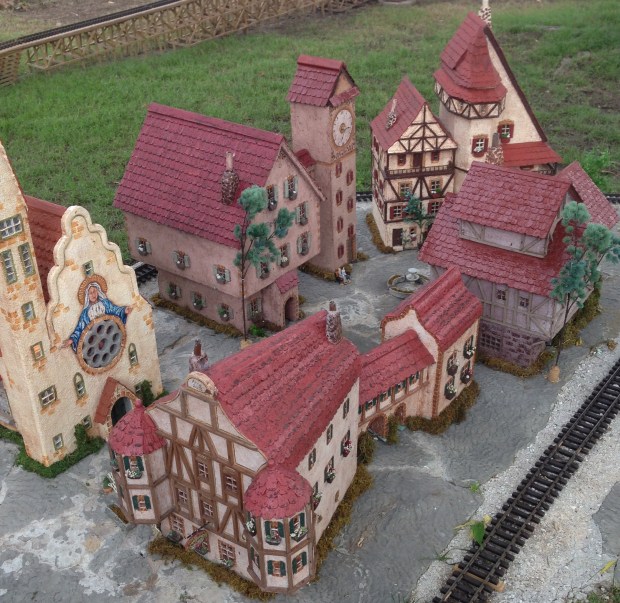
 Awhile back, my parents moved to a new home, and my dad started up a new train village. He built each structure by hand, from sheets of styrofoam and thin pieces of wood, coating them in liquid cement, and then painting and decorating them (often with the help of my mom’s awesome decorative painting skills).

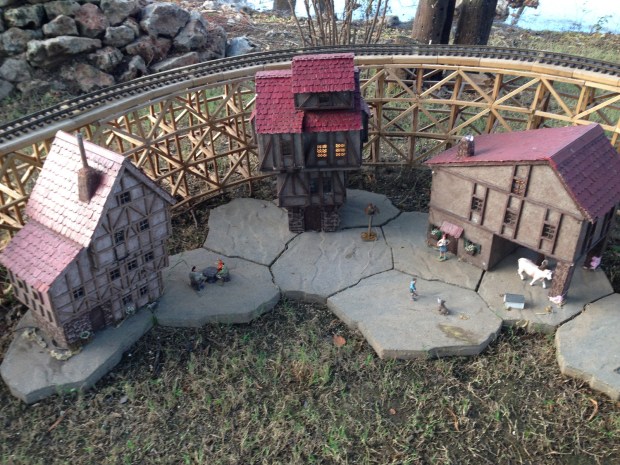
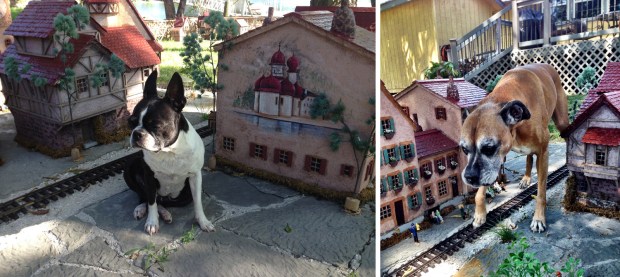
 They’re pretty good-sized structures, too–here are our two dogs–a fully grown Boston Terrier and Boxer, who love to sniff around town. (Thankfully, they haven’t destroyed anything…yet.)
 The liquid concrete and coats of varnish keep the structures fairly well-protected from the weather.
 As fantastic as dad’s sculptures are, Mom’s painting details are just as amazing! She creates tiny handpainted murals on some:
 After finishing a good chunk of the town, Dad recently decided to try his old Hogwart’s castle again. But this time, he studied schematics of Hogwarts, looked at reference photos and movie models, and laid out a foundation. He started by building a styrofoam mountain in the back, up against their patio, adding a water feature as well.
 Then he worked on the first building tower, sculpting into the styrofoam and shaping it with wooden pieces.
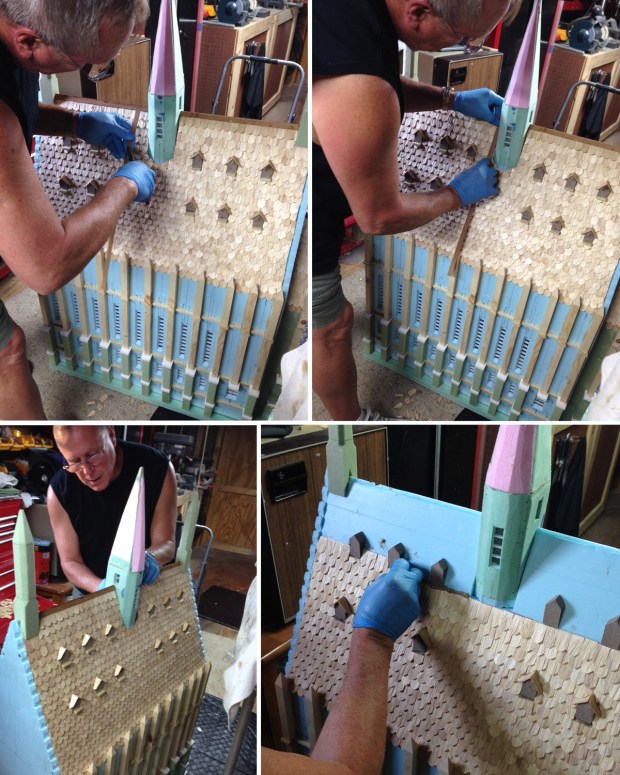
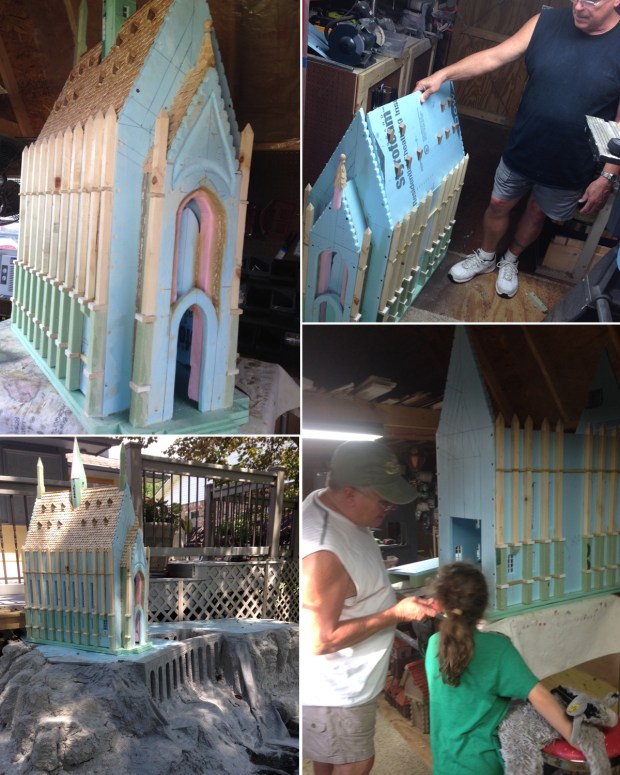 He laid the tiny wooden shingles on the roof one by one, by hand.
 Here it is, temporarily mounted on the “mountain”just as a test-run.
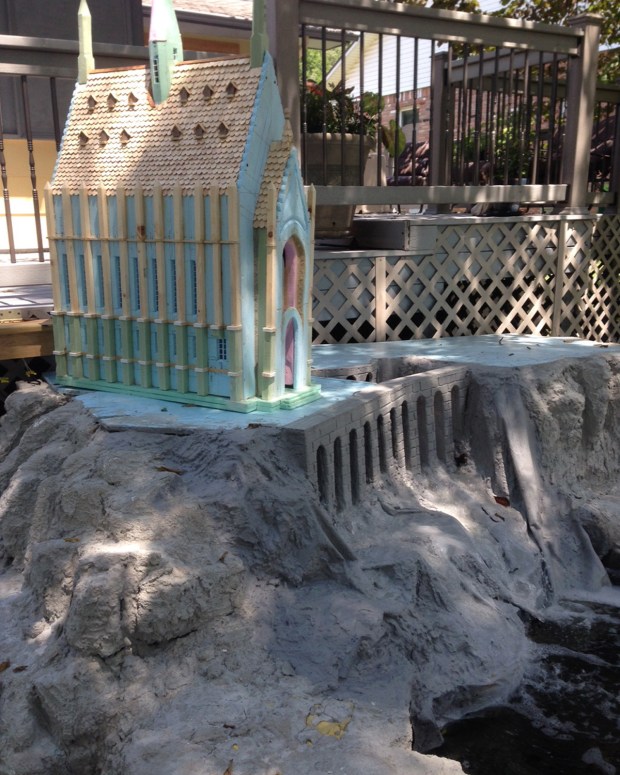 Initially, he matched his paint job to a reference he found, which was a lot more rusty orangey brown (the first photo, below). He sent a photo of it, and asked, and we talked about how although he matched the reference, the FEEL of it in the movie (although the shots of it are often at night) is that it’s mostly grayish. So he repainted, and it made a WORLD of difference!
 Here are some more progress shots of the mounted castle tower, and of coating and painting it.
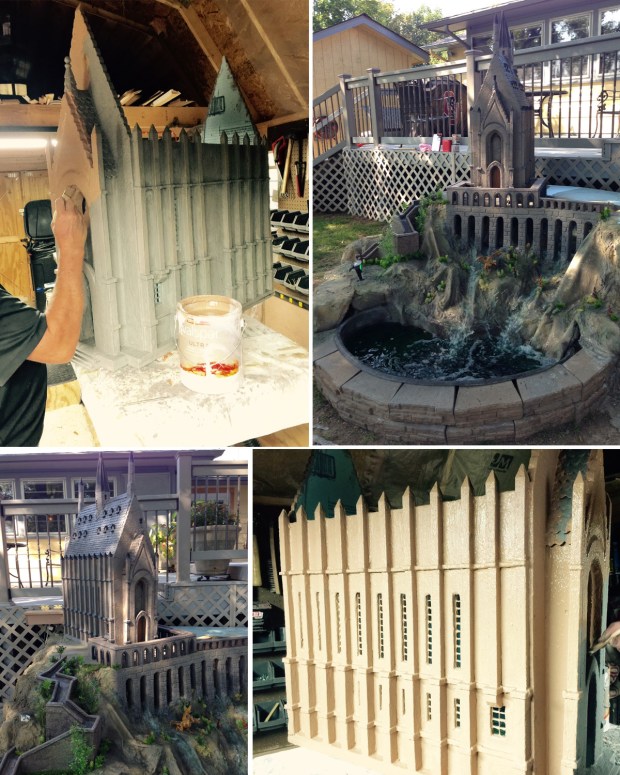 So, fast-forward to several steps later, and HERE is the final Hogwart’s castle!
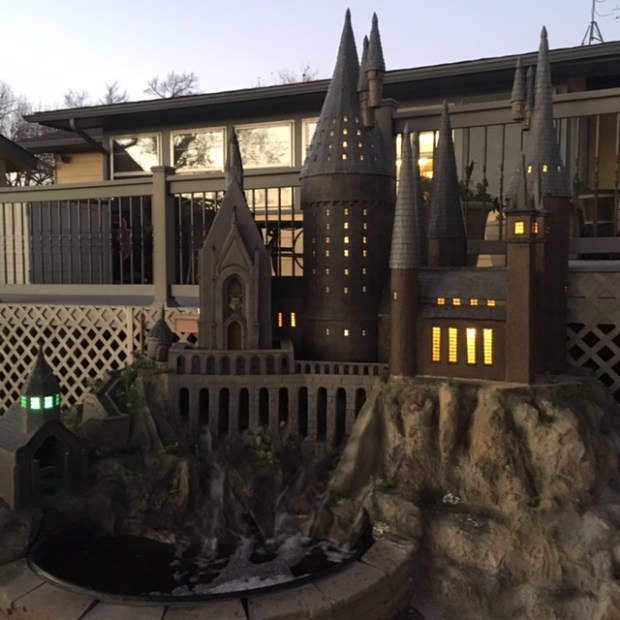 He put lights in them, so the towers glow beautifully at night.
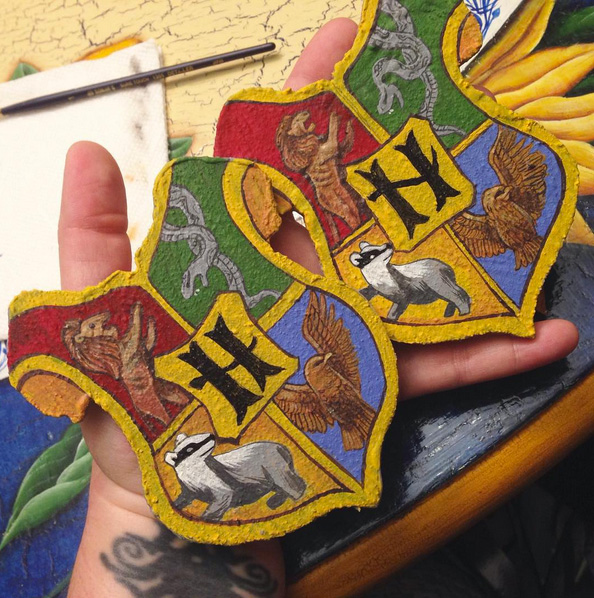
 It’s so beautiful and amazing! If you look closely, you can see these tiny Hogwarts shields I painted for him, with each house emblem on them:
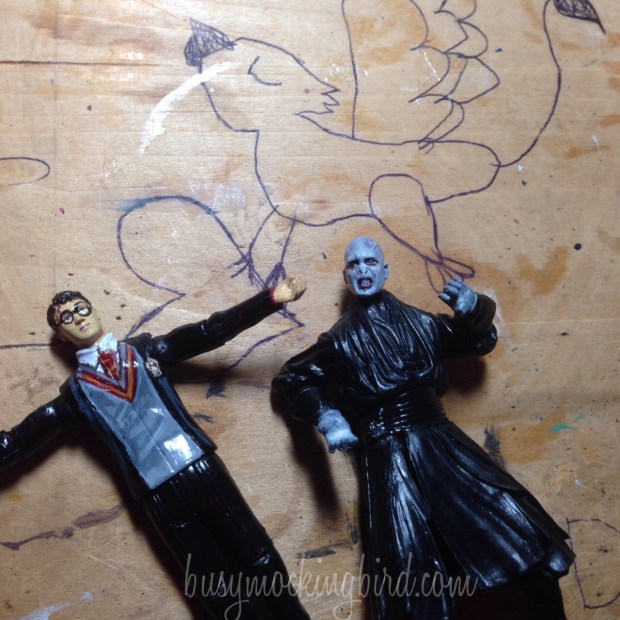
 I also customized a few figures for his castle, although they turned out a little wonky. I turned one into Harry, and chopped off Darth Maul’s horns and nose to turn him into Voldemort.
 Here they both are, complete (lying next to an adorable heart-holding griffin Myla drew on my work board).
 Anyway, there it is! Dad’s Garden Train Hogwarts castle.
 Growing up, I knew enough to realize that not everyone’s parents were as creative as mine…but knowing that we didn’t come from a ton of money, I realized that everyone had the capability of being creative. Seeing something start from small beginnings to something huge and amazing doesn’t always require specific tools or the finest art supplies or the best brushes. Dad was building stuff when we were younger out of dental floss and twigs! Really, when it comes down to it, the most important thing you really need is a desire to create!
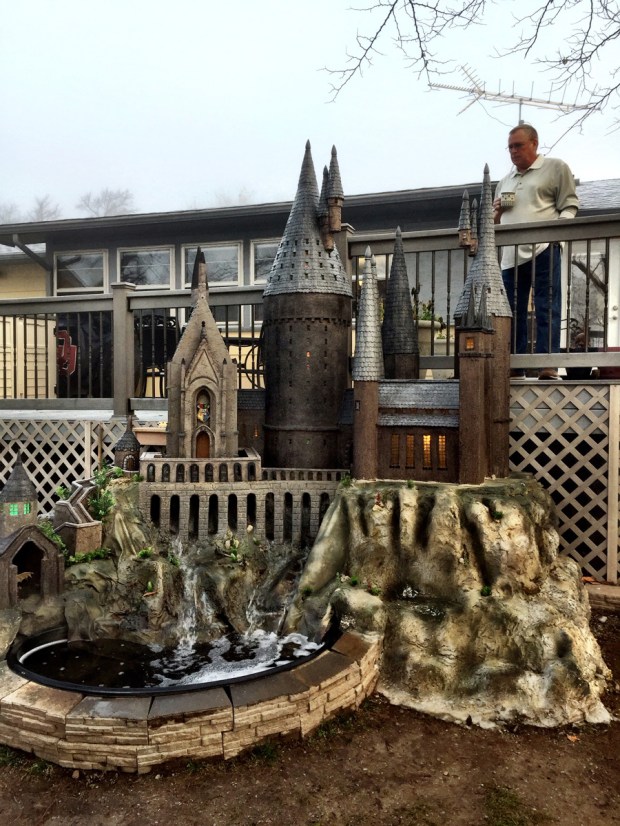 Congrats on your castle, Dad!
This Is Halloween
It’s nearly Halloween!
If you’re like me, and you’re horrible at decorating for anything but Christmas (I mean if you put a bunch of stuff UP, you have to take it DOWN, right??), I thought I’d share with you a couple of my easier Halloween projects that don’t take a lot of work, or effort, or even skill for that matter, but projects that still make Halloween fun, and make you ALMOST feel pretty Martha-Stewarty. …Almost.
First up: PUMPKIN PAINTING
I don’t know if I’ve told you before, but Texas is HOT. I don’t know how people can carve up a pumpkin without it turning all moldy & mushy before Halloween night (that’d certainly keep any trick or treaters away, if that’s what you’re going for, I guess), but painting is just as fun and creative with just about HALF the mess!
 Since my sister’s young adult-kid is visiting, we all picked pumpkins and painted them. Now, I’ve seen the amazing things people can do with pumpkin carving and pumpkin painting, and in my mind, I can do a super cool thing too, but when it just came down to it, I went with the “ain’t nobody got time f’that” approach, and just made a big goofy face. Myla did the two on the left (I believe it is a golduck and a psyduck from Pokemon–of course). Maylin did a skull, and mine’s the giant big goof-face. BOOM. Happy Halloween.
Next up: DECORATING COOKIES
If there’s one sort of cooking I CAN do, it’s baking….especially when most of it comes from a box, and all you have to do is add butter and milk. The fun part was just getting out all the sprinkles and eye candies and decorative icing-tools and just letting everyone go wild. BAM! You just Halloween’ed.
 Also: CHALKING THE SIDEWALK
Alright, admittedly, this isn’t very spooky, but hey–it was fun (especially since Texas’ version of autumn is for the wind to blow a little so you might have to put on long sleeves). Granted, you could chalk something spookier than we did. I drew a cute decorative little moth, and then realized that wasn’t really very Halloweeny, so I tried to spook it up by adding (and labeling, in case you couldn’t identify it) a “GHOST BAT.” Myla did Slappy the flying squirrel (because: Animaniacs), and Maylin drew aliens and stuff. But yeah, spooky stuff would work, too.

And oh yeah: DECORATIONS.
This one I’m not so great at. I put a store-bought plastic sheet on the door that says “Happy Halloween,” and we got a giant spiderweb with a cute big black spider. That’s about it. Myla loved it. But that’s about all we did outside because did I mention you have to take DOWN the stuff at some point??
So my friend asked me what Myla’s going to be for Halloween, and it made me nostalgic for some of her older costumes. Like the time she was madly in love with C3PO, and the store costumes were lame, so I made her one, cosplay-style (I blogged about it here) which I think turned out SO COOL….and I threw together a quick sugar-skull Vader (because why have a Vader, when you can have a sugar-skull Vader?).
 (Sorry for the watermark, but she’s my kid, and stuff has a way of going weird places online. Which reminds me, I think I’ll do a post on the whys and hows of watermarking soon…)
Last year, she was Nightcrawler (not that Jake Gyllenhaal movie about a serial killer), the teenage version from the cartoon X-men: Evolution, which she discovered at superhero summer camp. I made her little blue ears with hairclips in them (although she decided later that the wig was “too itchy.” I made 3-fingered gloves (she insisted on that, and thought it was so awesome). I made a tail to pin onto her black leotard, and a simple belt. The shoes were the hardest, as they were supposed to look like they had two toes (like one has, if one is a mutant).

Anyway, here’s what he looks like in the cartoon:
 She liked him because he was funny and goofy and silly. And HE COULD TELEPORT. Too cool.
So THIS YEAR, she has decided to be James, from Pokemon’s Team Rocket. He cracks her up. She even knows the whole motto (say it with me: “To protect the world from devastation…to unite all peoples within our nation” –what, no takers? Just me? Hello?)
Here they are, from the cartoon (James is the one on the left):

See that little cat? That’s Meowth, the other part of their team. And to help better identify her as James, I whipped up a quick little Meowth doll for her to carry with her:
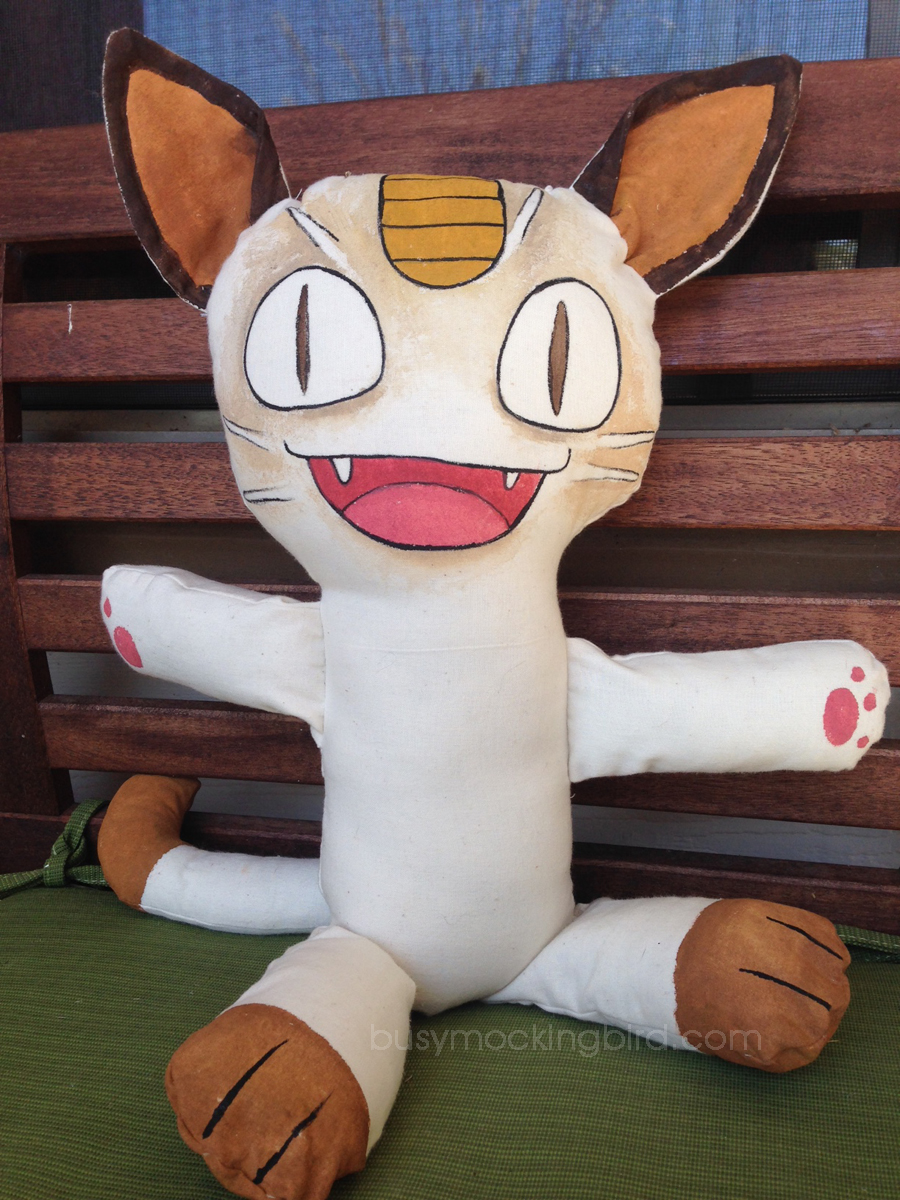
He was super simple, easy to whip up. Basically just a front-and-back pillow with appendages. I painted on everything. So if she carries him around, it might make a little more sense who she is….although I’m very aware of the fact that Pokemon was in its prime like 20 years ago. Still, you’d be surprised at how many of her school friends know EXACTLY what she’s talking about when she talks about Poke-stuff (which is quite often).
The funny thing is, she asked me if I’d be Jessie. Yes, Jessie from Team Rocket. Have you seen her? I’ll give you a minute while you scroll back up to look at that picture again. She’s the one on the right. Go ahead, I’ll wait….
…Okay, RIGHT?? Sorry, kid, I’m not exposing my midriff, I have NEVER worn a mini skirt, and my legs just don’t do…THAT. And the hair?? I have looked at what the cosplayers do, and again: ain’t nobody got time f’that.
BUT WAIT! I came up with a solution: I got a white t-shirt, painted a big R on it. I have black leggings, black boots, black gloves. As for the hair, I got a red Bettie Page-style ‘do, which will have to do. I’ll be “retro Jessie!”
In any case, it doesn’t matter. She doesn’t care about authenticity. She cares about fun. She doesn’t care if I make homemade cookies from scratch, or if I just add water. What she cares about is having fun together. She won’t remember that we never actually CARVED a pumpkin…she’ll remember that we had fun painting them. Kids don’t always know what they DON’T have unless you make them aware of your shortcomings. Just go with it! Have fun, and make some awesome memories. Even little efforts can make the long-lasting, forever-kind of memories.
And hey–if all else fails, and you haven’t got a costume, grab some eyeliner, and turn yourself into a sugar skull.
BOOM! You just Halloween’ed AGAIN! Easy peasy.
 So get out there and have a good one! We’re doing a lot of our Halloween fun stuff this weekend, as I’ll be in Austin for Wizard World on the 30th and 31st. Myla will be there on Saturday. If you’re there, come see me–I’m giving out free stickers to kids on Saturday, so come & say hello!!
Inkin’ it Up Together
Kid time is the BEST time for messes…
 And putting pink in your hair if you want to (like Myla asked to do when she was 3 or 4).
 And drawing on yourself! Sadly, Myla’s school doesn’t allow for crazy hair color and excessive temporary tattoos (weird, huh?). So summertime was a GREAT time to do all that. And even best is when everyone else gets involved, too. At our house, family visits usually mean the markers come out at some point, and Myla offers everyone some “ink.”
I’ve always loved how well our whole family (on Matt’s side and on mine) have always been so cooperative about getting all markered up. This last visit, she got her cousin involved, and they even made a “menu” (unlike the old days, when she used to just draw whatever she wanted on you).
 Hardly anyone escapes the ink sessions…

It always reminds me of how ages ago, Myla & I had tried printing some of our own designs on tattoo paper….
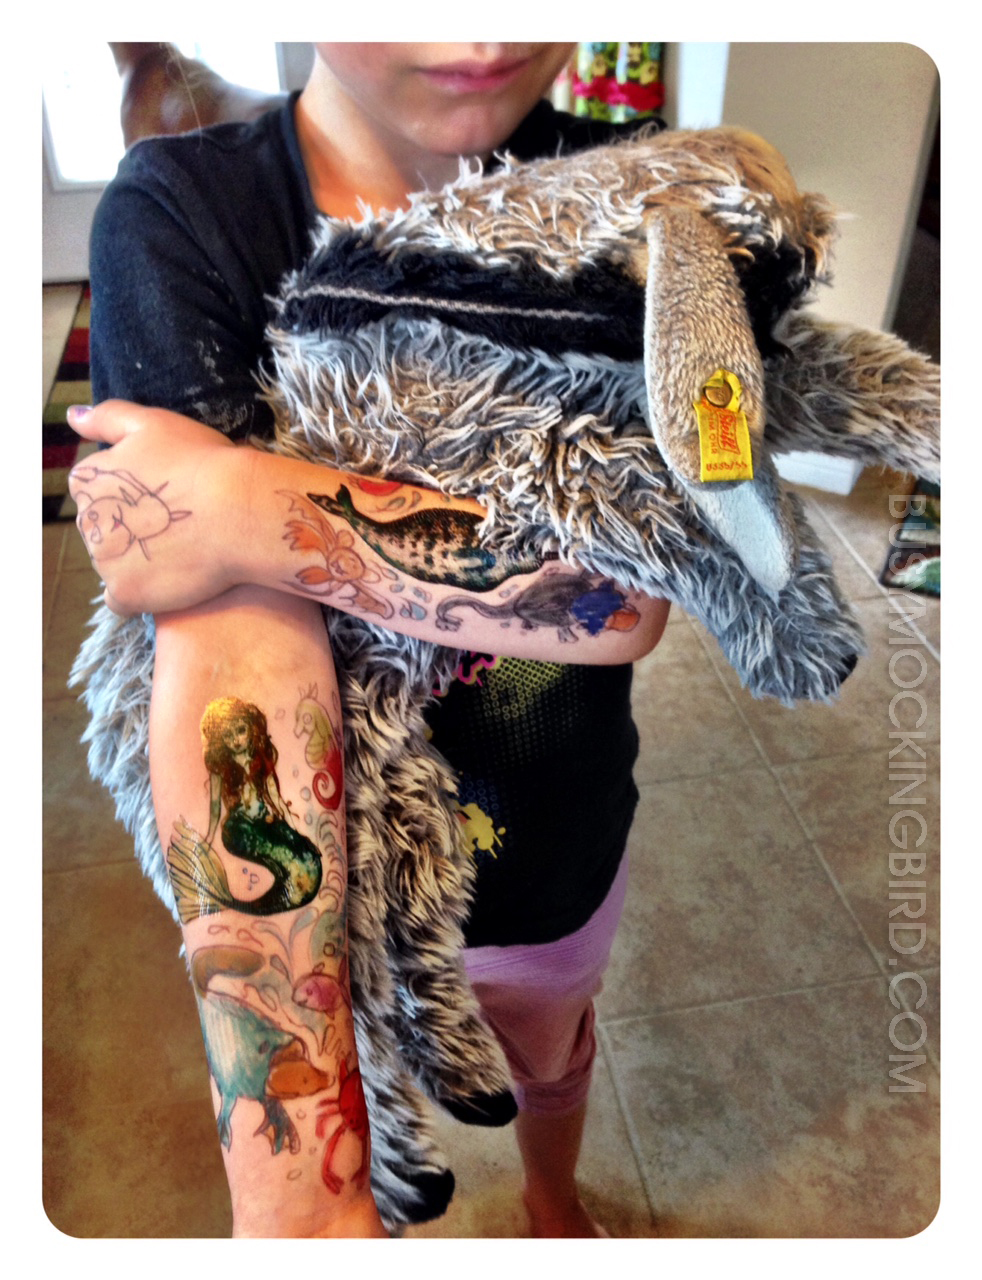
 So recently, when a sister-run company called Inky & Bear asked me if I’d like to try out some of their beautifully hand-illustrated temporary tattoos, I said “HECK YEAH!” When our Inky & Bear tattoos came, we had a blast figuring out where to put them on. Myla chose a lovely little mermaid, and a sweet lil’ narwhal for her arms.
 And, like with most things, Myla always has a great way to kick it up a notch. This time, by asking me to draw all sorts of sea creatures on her to go along with the nautical theme. I doodled them out in ballpoint and she even added a little creature on her own hand.
 So after a little ballpoint pen and a bit of pipsqueak Crayola markers, I had a pretty decorative, temporary-tattooed, inked-up kid!
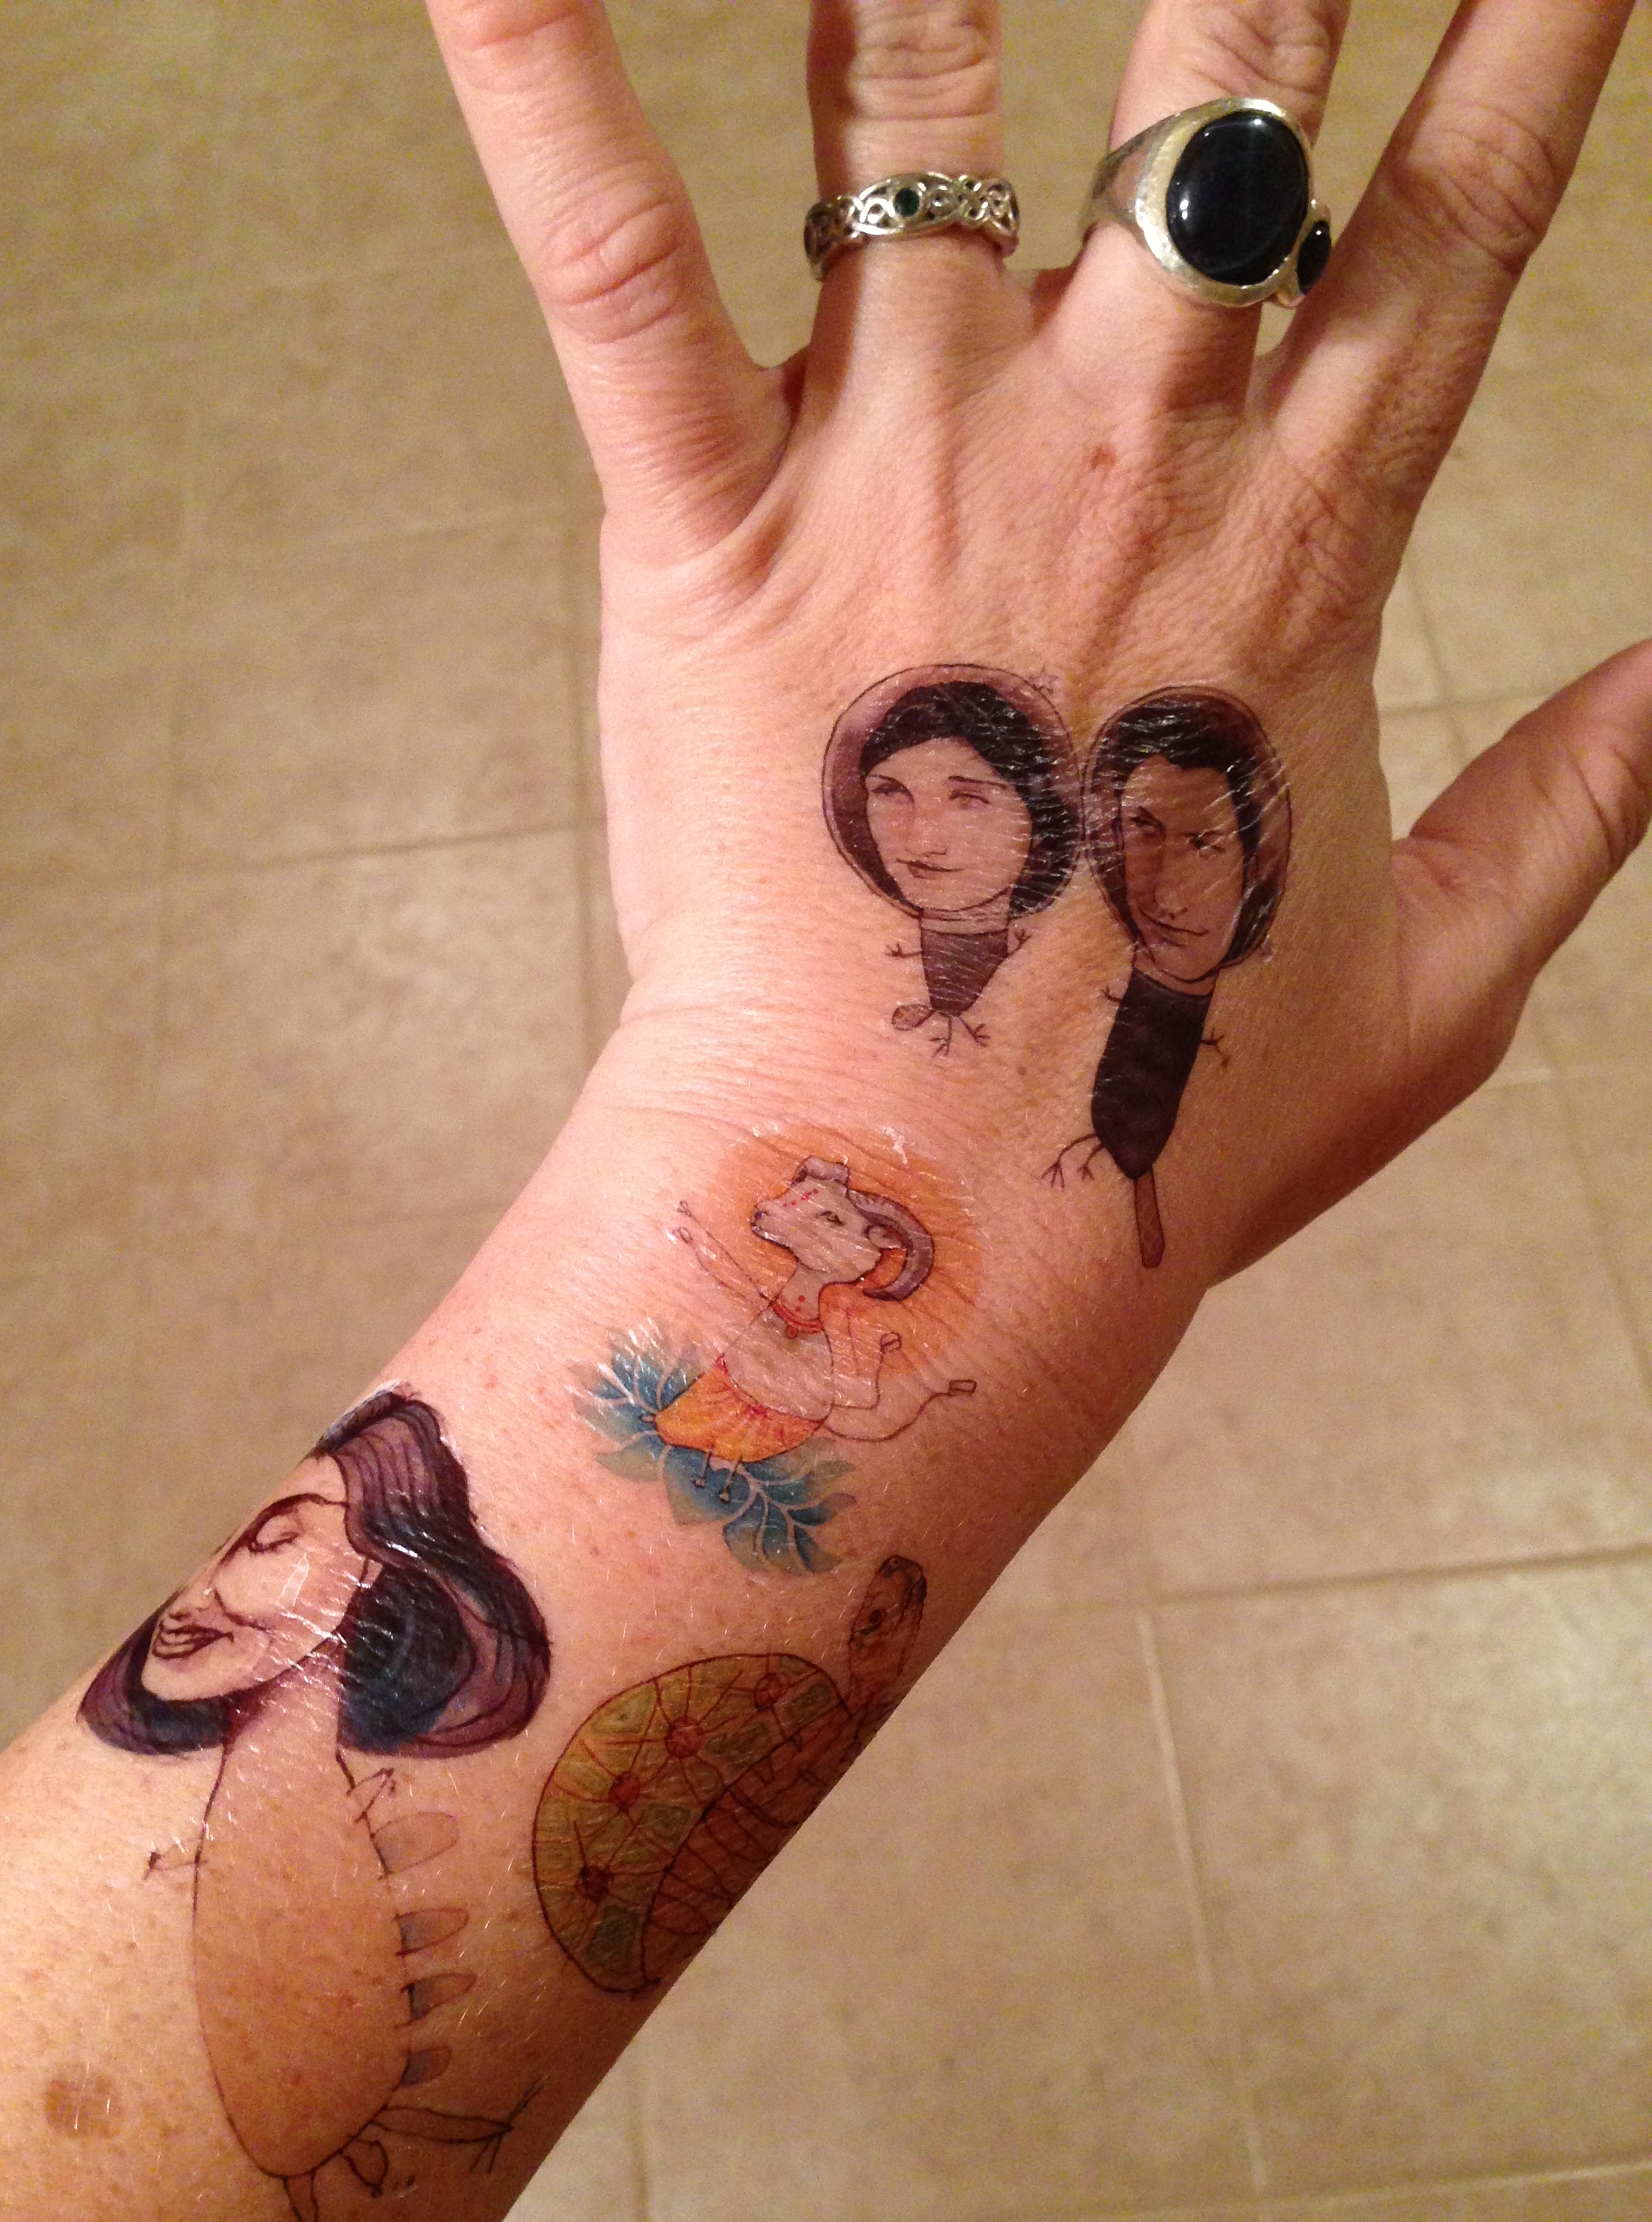
 She added onto my already-existing real tattoos (and an Inky & Bear mermaid), with a little dancing Donkey doodle. (Do you know the story of Donkey?)
 So there it is!
 Messes are temporary. So are marker doodles and temporary tattoos. But they make for great memories when you actually let yourself join in!
If you want to print your own tattoos, try this tattoo printer paper, or go check out all the wonderfully painted temporary tattoos at Inky & Bear!
Angsty Disclaimer: Everytime I do a post about drawing on yourself, I get comments asking if I’m worried about the toxicity and danger of inks soaking into skin. My response to that is that if you’re worried about it, don’t do it. As for me, I’m not going to leave them on me or my daughter’s skin for very long, so it’s fine. Artist Jodi Steel draws amazing drawings on herself and her friends with Sharpie Markers, and washes it off with coconut oil (and then gets a lot of nasty comments by people telling her she’s poisoning her OWN skin). It’s temporary. It washes off. And ultimately, it’s not your skin, right?. In my opinion, there is just as much danger of chemicals eating non-organic fruit or junk food–all fine in moderation. But if it doesn’t sound right for you, don’t do it. Go get some nontoxic facepaints and try doing the same thing, except with paints! So take a deep breath, take it easy, get creative, and have a little messy fun!

